As much as we love our smart vacuum cleaners for their ability to keep our homes clean with minimal effort, the filters can become clogged over time, reducing their effectiveness. So, how can you ensure that your vacuum’s filters are always in tip-top condition? Fear not, as this step-by-step guide will provide you with everything you need to know to replace your filters with ease. From gathering the necessary materials to testing the vacuum after replacement, we’ve got you covered. So, let’s dive into the world of filter replacement and learn how to keep your smart vacuum cleaner running at its best.
Table of Contents
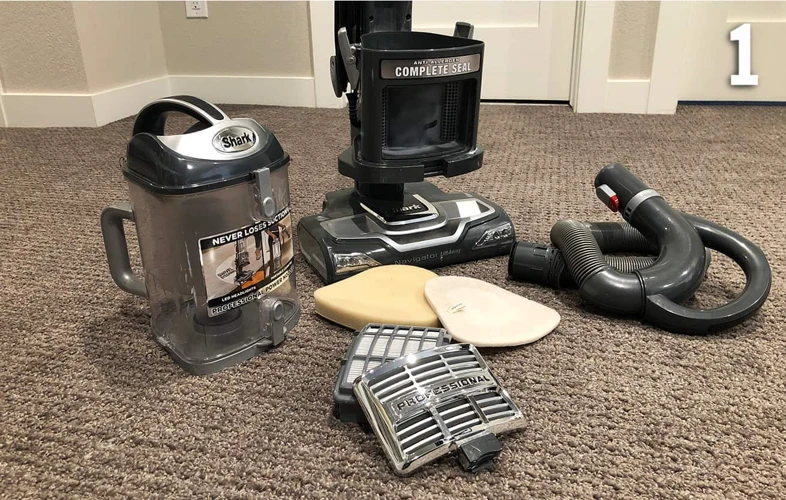
Step 1: Gather Your Materials
Assembling the necessary materials is an important first step in replacing the filters of your smart vacuum cleaner. Ensuring you have all the required supplies beforehand will make the process smoother and quicker. Before moving on to the subsequent steps, gather the needed materials for the filter replacement process. Some of the required materials include a new set of filters specific to your vacuum model, a screwdriver, a cleaning brush, and a damp cloth. If you’re unsure which filters to purchase, consult your vacuum manual or check online for compatible filter replacements. Additionally, while you have the necessary materials in hand, it’s a good idea to read up on how often to replace your vacuum filter to ensure the longevity of your device.
Materials Needed:
For successfully replacing the filters in your smart vacuum cleaner, you will need to gather the necessary materials in advance. Here is a table outlining the materials you will need for this cleaning process:
Materials Needed:
Clean rag or paper towel
New filter(s)
Scissors or cutting tool (for trimming filters, if necessary)
User manual (for reference)
Make sure you have all these materials on hand before you begin, to make the process as efficient and convenient as possible. If you need more information about maintaining your smart vacuum’s filters, check out our article on Smart Vacuum Filter Maintenance, which provides useful tips on how to keep your vacuum’s filtration system functioning at its best.
Step 2: Check Your Manual
When it comes to replacing the filters in your smart vacuum cleaner, it is always a good idea to check your manual beforehand. Your manual will provide you with important information and instructions specific to your vacuum model. By checking the manual, you can ensure that you have the right tools and understanding to properly replace the filters.
Without referring to the manual, you might miss crucial instructions that could result in damaging your vacuum while replacing the filters. The manual will also help you to identify the type of filter that your vacuum cleaner uses. With this knowledge, you can purchase the right filter replacements if needed.
Your manual will give you an insight into how frequently you should replace the filters of your vacuum cleaner. Keep in mind that the frequency will depend on the model, level of usage, and type of filter. It is non-negotiable to check your manual to avoid making assumptions about the filter replacement frequency.
It is important to note that filters in smart vacuum cleaners may get clogged, causing your vacuum’s suction power to diminish. During filter replacement, it would also be good to check the filters’ condition as per the manual instructions. If clogged, cleaning the filter is the best way of restoring suction power to your smart vacuum.
Your manual will also enlighten you on whether your vacuum’s filters are washable or disposable, and this information will guide you on the appropriate measures to take. It’s fundamental to understand this distinction as it will help you choose the right filters for your system or decide whether to clean or replace your current filter.
Mistakes in replacing filters can happen if you don’t follow the right instructions. Some of the common mistakes to avoid, as per the manual, include using incorrect filters, inserting the filter in reverse, and failing to notice small filter replacements that may be hidden in the vacuum.
Lastly, the tips section of your manual will give you smart vacuum filter-upgrade options to consider, such as HEPA filters. Also, it will help you understand how to better maintain your vacuum’s filters to prolong their lifespan.
Take your manual as your filter replacement guide, and always refer to it when replacing your vacuum filters.
Step 3: Locate the Filters
As you move onto Step 3 of the filter replacement process, the next crucial step is locating the filters in your smart vacuum cleaner. Depending on the manufacturer and model of your smart vacuum, filters may be located in different areas of the machine. It is important to familiarize yourself with the location of the filters to ensure a successful replacement. Not sure how frequently you should replace your filters? Check out our guide on smart vacuum filter replacement frequency for more information.
Where to Find Filters:
When it comes to replacing the filters in your smart vacuum cleaner, the first step is to locate where the filters are. You may need to consult your vacuum cleaner’s manual or do a quick online search to find out where the filters are located. Typically, filters can be found in one or more of the following places:
The dustbin: Some smart vacuums have filters that are located directly within the dustbin. To access these filters, you will need to remove the dustbin from the vacuum and look for any filters that may be attached.
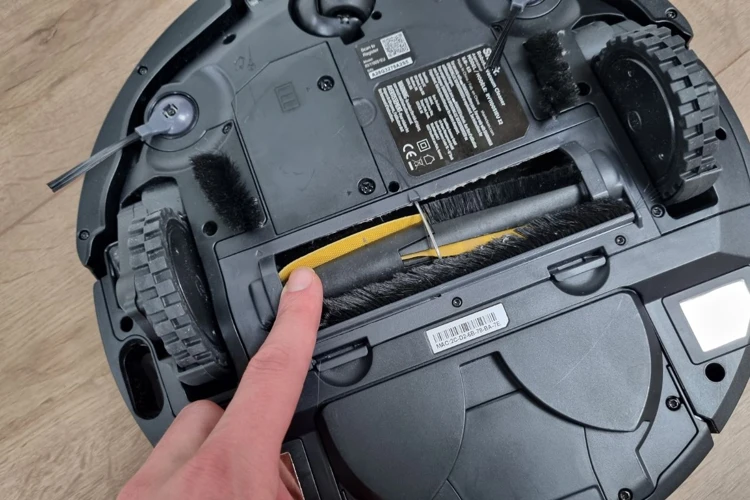
The brush roll: Other smart vacuums may have filters located near or on the brush roll. You may need to flip the vacuum over or remove the brush roll to access these filters.
The side or back of the vacuum: In some cases, the filters may be located on the side or back of the vacuum. Look for any panels or doors that can be opened to access these filters.
Once you have located the filters, you may find that they are clogged with dust and debris. If this is the case, it’s essential to clean or replace them to ensure your smart vacuum can operate efficiently. Remember that failing to replace the filters can lead to decreased suction and overall performance from your vacuum.
If you’re unsure whether the filters need to be replaced, you can perform a quick visual inspection. If the filters are visibly dirty or damaged, it’s time to replace them. Alternatively, you may want to consider upgrading to a more efficient filter type to improve the performance and lifespan of your smart vacuum. Be sure to check out our guide on smart vacuum filter tips.
Understanding where the filters are located in your smart vacuum is crucial for successful filter replacement. Take the time to locate the filters, and you’ll be on your way to clean floors in no time. Remember to avoid common mistakes when replacing your vacuum’s filters and pay attention to smart vacuum filter tips to ensure your vacuum stays in top condition.
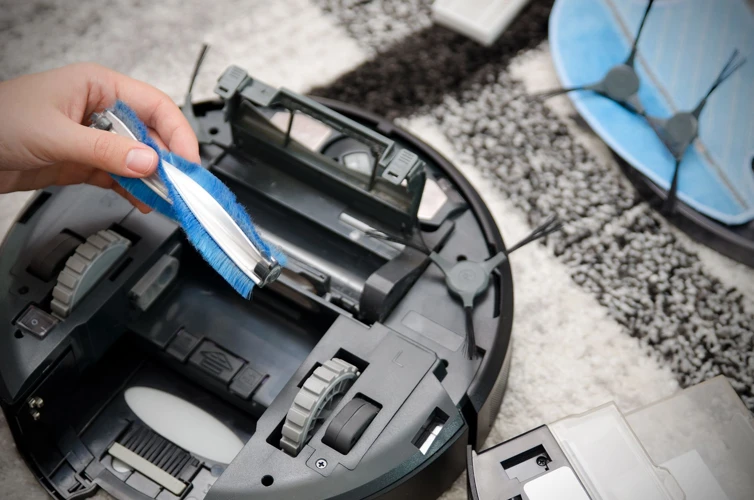
Step 4: Remove the Filters
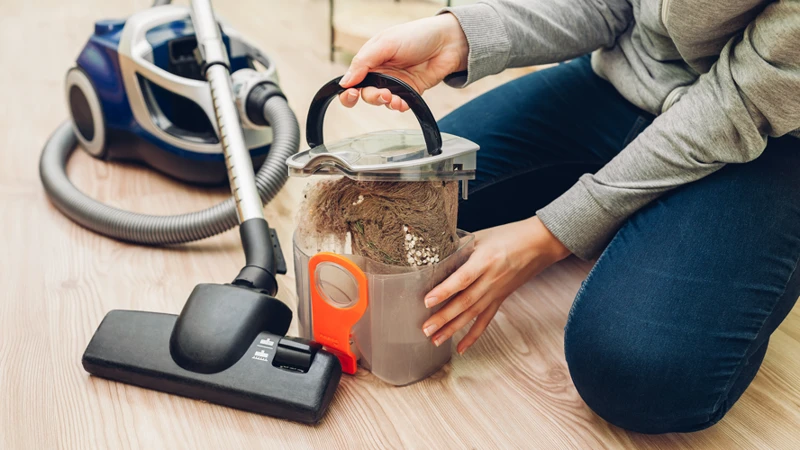
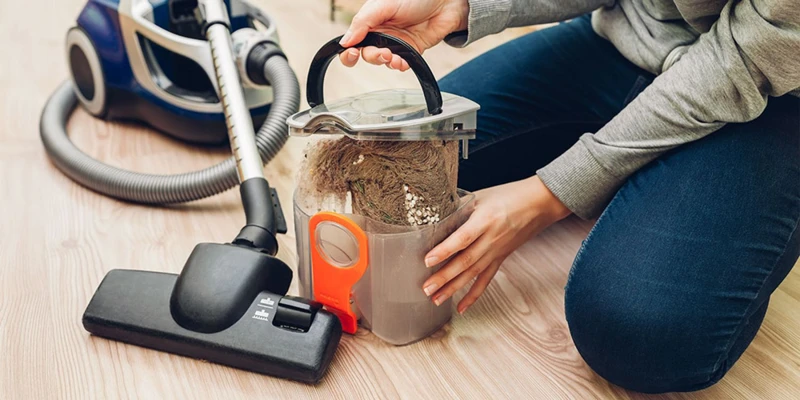
Now that you’ve located the filters, it’s time to remove them. Removing the filters requires some level of care, so be sure to follow the instructions closely. If the filters are not removed correctly, it could damage the vacuum or affect its performance. Take your time and follow the steps carefully to safely remove the filters. Remember, if the filters are visibly dirty or clogged, they need to be cleaned or replaced. You can read more about clogged filters here, or about the difference between washable and disposable filters here.
How to Remove Filters:
Removing filters from your smart vacuum cleaner may vary depending on the brand and model you have. However, these are basic steps you can follow to remove the filters from your vacuum cleaner.
Switch off the smart vacuum cleaner: You don’t want to risk injuring yourself while your device is still powered on, do you? So this should always be your first step. Switch off the vacuum and unplug it from the socket before you start working on it.
Locate the filters: Now, look for the filters in your smart vacuum cleaner. You might find them inside the dustbin or on the side of your vacuum depending on your machine’s design.
Remove the filters: Once you find the filters, gently remove them from your vacuum cleaner. Some filters may be secured by clips or screws. Remove them carefully to avoid damaging the filters or the vacuum cleaner.
Check for dirt: After removing the filters, it’s essential to check if they need cleaning or replacing. You can do this by inspecting them for dirt, debris, or any visible damages.
By following these simple steps, you can remove the filters from your smart vacuum cleaner safely and efficiently. Remember always to handle your vacuum with care to avoid any damage.
Step 5: Clean or Replace Filters
Now that you have located the filters and removed them from your smart vacuum cleaner, it’s time to clean or replace them. This step is essential to ensure that your cleaner is functioning properly and maintaining the cleanliness of your home. Dirty filters can reduce the suction power of the vacuum and lead to poor performance. However, you may be wondering whether you need to clean or replace the filters. Don’t worry, we’ll guide you through both processes to help determine what’s best for your smart vacuum cleaner. So, let’s move on to the next step with anticipation!
Cleaning the Filters:
After you have successfully retrieved the filters from your smart vacuum cleaner, it’s time to clean them. Follow these simple steps to get the job done:
Step 1: Use a soft brush to remove any visible dirt or debris from the filter. This will help to loosen any stubborn dirt that might be stuck to the surface.
Step 2: Rinse the filter under running water. Make sure to use cool or lukewarm water, as hot water can damage some filters. Gently rinse both sides until you see the water running clear.
Step 3: Now, mix a small amount of mild detergent with warm water in a bowl. Make sure to use only mild detergent, as harsh chemicals can damage the filter.
Step 4: Carefully place the filter in the bowl and let it soak for about 10-15 minutes. Be sure to agitate the water periodically to release any dirt that’s still stuck to the filter surface.
Step 5: Remove the filter from the bowl and carefully rinse it under running water again. Repeat this process until the water runs clean and all the soap has been removed from the filter.
Step 6: Now, gently pat the filter with a clean, dry cloth to remove any excess water. Then, let the filter air dry completely before reinstalling it in your vacuum cleaner.
Tip: Avoid using a hair dryer or any other artificial heat sources to dry the filter, as this might damage it.
By following these simple steps for cleaning the filters, you’ll extend the lifespan of your vacuum cleaner and keep it functioning at peak performance. Remember to clean the filters regularly, depending on the manufacturer’s recommendations, to avoid clogging and ensure the best filtration.
Replacing the Filters:
When it comes to replacing the filters in your smart vacuum cleaner, it’s important to know the correct steps to ensure you’re doing it properly. Here’s a step-by-step guide on how to replace the filters with ease.
Before beginning the process, make sure you have the necessary replacement filters. The specific filters needed will depend on the model of your vacuum cleaner. Check your manual for information on what type of filters to get.
Step 1: Turn off your smart vacuum cleaner and unplug it from the power source. This will ensure your safety and prevent any damage to the vacuum cleaner as you replace the filters.
Step 2: Locate the filters of your smart vacuum cleaner. The location of the filters will depend on the model of your vacuum cleaner. Consult the manual to locate them.
Step 3: Remove the old filters from the vacuum cleaner. This may require some disassembly depending on the model. Make sure to properly dispose of the used filters.
Step 4: Install the new filters. Make sure to follow the manufacturer’s instructions for inserting the new filters properly.
Step 5: Reassemble any parts that were removed during the process of replacing the filters. Make sure everything is securely in place.
Step 6: Turn the vacuum cleaner back on and test it out to ensure that it’s working properly.
Once the filters have been replaced, it’s important to maintain them regularly. This can be done by cleaning them on a regular basis, depending on your usage.
To make the cleaning process easier, we recommend using a schedule or reminder. Mark the days when the filters were last cleaned, so you can easily keep track of it.
Here’s a table to help you keep track of when to clean or replace the vacuum cleaner’s filters:
Frequency
Action Required
Every Few Months
Clean Filter
Every 6 Months
Replace Filter
By following these steps and keeping track of the frequency of cleaning and replacing the filters, you can ensure that your smart vacuum cleaner operates at its best performance level, providing you with clean and fresh air while cleaning your home.
Step 6: Reinstall the Filters
Now that you’ve cleaned or replaced your filters, it’s time to put them back in place. This step might seem simple, but it’s crucial to do it correctly to ensure your smart vacuum cleaner functions effectively. So, let’s get started with the reinstallation process!
How to Reinstall:
When it comes to reinstalling the filters, the process is simple and straightforward. However, there are a few key points to keep in mind to ensure that you do it correctly.
First, take note of the orientation of the filters before you removed them. This will help you put them back in the right position.
Next, clean the filter housing to remove any dirt or debris that may have accumulated. Use a clean, dry cloth or a soft-bristled brush to wipe down the area.
Once the housing is clean, it’s time to reinstall the filter. Refer to your manual for specific instructions, but here are the general steps to follow:
Step
Instructions
Step 1
Take the filter and carefully place it back into the housing, making sure it’s properly aligned.
Step 2
With one hand, hold the filter in place while using the other hand to secure any clips or fasteners that are used to hold the filter in place.
Step 3
Gently press down on the filter to ensure that it’s securely in place.
It’s important to check that the filters are firmly in place before turning on the vacuum. Loose filters can not only impact the vacuum’s suction power but can also cause damage to the motor.
Reinstalling the filters is a quick and easy process as long as you take the time to do it correctly. By following the simple steps outlined above, you can ensure that your smart vacuum cleaner functions at its best and keeps your home free of dirt and debris.
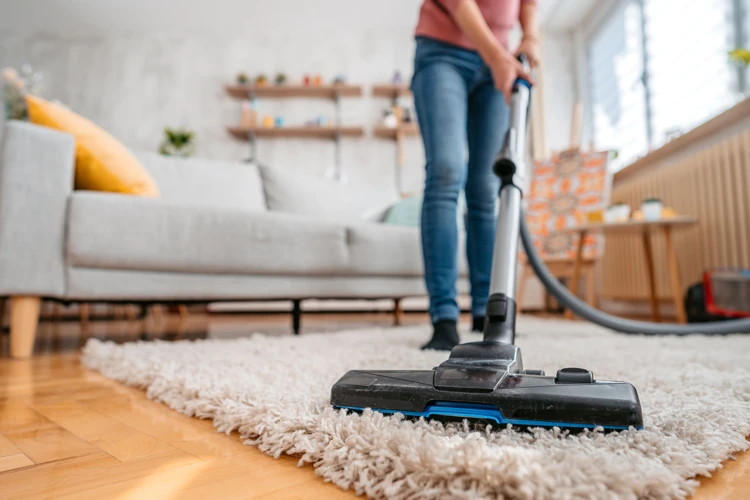
Step 7: Test the Vacuum
As you near the end of the filter replacement process, it’s important to ensure that your smart vacuum cleaner is working properly. This means conducting a quick yet thorough test to make sure that the new filters have been installed correctly and that the machine is ready to go. To help you through this final step, we’ve put together a few simple instructions that will guide you every step of the way. So, let’s dive in and learn how to test your vacuum like a pro.
How to Test:
Once you have installed the new filters or cleaned the old ones, it’s important to test your smart vacuum cleaner to make sure there are no issues. Here’s how to test your vacuum:
Step 1: Turn on the power button of the vacuum and let it run for a few minutes to ensure that the suction power is working.
Step 2: Check if there’s any unusual noise, vibration or other signs of distress. This could indicate that something went wrong when you were replacing or cleaning the filters.
Step 3: Test the vacuum’s ability to pick up debris. Scoop up some dust, crumbs or small objects and place them on the carpet or floor. Turn on the vacuum and see if it can pick up the debris efficiently. If it does, then it means the filter replacement was successful.
Step 4: Check the exhaust air for any unusual smells or particles. If you notice any dust or bad odors, it means that the filter is damaged or not installed properly. In this case, you need to reinstall the filter or replace with a new one as necessary.
Testing your smart vacuum cleaner after replacing or cleaning the filters is an important step to ensure that it’s functioning properly. If you notice anything unusual during the testing process, it’s best to consult the manual or contact the manufacturer for further assistance.
Tips for Filter Maintenance
Maintaining the filters in your smart vacuum cleaner is crucial to ensure its long-term efficiency and effectiveness. Here are some tips to help you maintain the filters.
1. Regular Cleaning: It’s essential to clean the filters after every use or at least once a week. Regular cleaning prevents dirt and dust from accumulating on the filters, which can overwork your vacuum.
2. Deep Cleaning: Even with regular cleaning, the filters can get clogged over time. Deep-clean the filters every month. You can soak them in hot, soapy water and let the filters dry completely before reinstalling.
3. Don’t Overwork: The filters in your smart vacuum cleaner do a lot of work, but you shouldn’t overwork them. If the filters are old and overused, it’s best to replace them instead of cleaning, as they won’t be as effective.
4. Regular Replacement: Even with careful maintenance, filters eventually wear down and lose their effectiveness. Check your vacuum cleaner’s manual for the recommended replacement schedule of the filters, and don’t forget to replace as needed.
5. Quality Filters: Investing in high-quality filters can significantly extend the lifespan of your vacuum cleaner. Cheap and low-quality filters may cost less upfront but can end up costing you more in the long run with frequent replacements and repairs.
By following these tips, you can maintain your smart vacuum cleaner’s filters in top condition, enhancing the vacuum’s longevity and ensuring that it continues to provide top-notch service. Taking care of your vacuum cleaner ensures that it can keep up its functionality, and you can enjoy a clean environment without worries.
Conclusion
In conclusion, replacing the filters in your smart vacuum cleaner is an essential part of its maintenance. It ensures that your vacuum cleaner works efficiently and effectively, removing dirt, dust, and other particles from your floors and carpets. We hope the step-by-step guide we’ve provided has been helpful in guiding you through the process.
Remember, always refer to your vacuum cleaner’s manual for specific instructions on how to replace the filters. Be sure to gather all the necessary materials beforehand, and follow the steps carefully. Cleaning or replacing your filters regularly will not only maintain your vacuum’s suction power, but it will also prolong its lifespan, saving you money in the long run.
Aside from replacing the filters, it’s also essential to maintain them properly. Cleaning your filters regularly and replacing them when necessary will prevent any build-up of dust and dirt that could potentially damage your vacuum’s motor. Additionally, clean filters improve the air quality in your home, making it a cleaner and more comfortable place to live.
By following this guide, you can ensure that your smart vacuum cleaner works at its best, without any unnecessary breakdowns or issues. Remember to always take proper care of your appliance, and it’ll take proper care of your home.
Frequently Asked Questions
1. How often should vacuum filters be replaced?
The frequency of replacing vacuum filters depends on the recommended maintenance schedule in the manual. However, it is generally advised to replace them every 3-6 months.
2. Can filters be cleaned rather than replaced?
Yes, filters can be cleaned instead of replaced if they are not damaged. Regular cleaning of filters can extend their longevity and save money in the long run.
3. Is it necessary to replace multiple filters at once?
It is not necessary to replace all filters at once unless they are all due for replacement. However, it is recommended to replace primary filters first and then replace the remaining filters based on their recommended maintenance schedule.
4. Are there different types of filters for different vacuum cleaners?
Yes, there are various types of filters depending on the make and model of the vacuum cleaner. The most common types include HEPA filters, foam filters, and pre filters.
5. Can vacuum filters be recycled?
Yes, many vacuum filters are made of recyclable materials such as paper, foam, or plastic. Contact your local recycling facility to inquire about their recycling capabilities and guidelines.
6. What happens if I don’t replace the vacuum filters?
If the filters are not regularly replaced, the vacuum cleaner’s suction power may decrease, and the airflow may be restricted, resulting in poor performance. Allergens and dust particles may not be adequately trapped, resulting in poor indoor air quality.
7. How long should I wait before reinstalling the cleaned filters?
After cleaning the filters, ensure that they are completely dry before reinstalling them. Air-drying the filters overnight is recommended to ensure they are completely dry.
8. Can I use my vacuum cleaner without filters?
It is not recommended to use your vacuum cleaner without filters. The filters protect the motor from dust and debris, and using the vacuum cleaner without filters can result in motor damage and costly repairs.
9. How can I tell if the filters need to be replaced?
If the vacuum cleaner’s suction power decreases or the airflow becomes restricted, it may be time to replace the filters. If the filters are visibly dirty, they may need to be replaced.
10. Can I replace the filters myself, or do I need to bring my vacuum cleaner to a professional?
In most cases, filters can be replaced by the owner with no need to take the vacuum cleaner to a professional. However, if you are unsure or unfamiliar with the process, it is advised to refer to the manual or seek professional assistance.