Warning: A non-numeric value encountered in /var/www/html/wp-content/themes/generatepress/inc/structure/post-meta.php on line 165
by Dwight Gibson
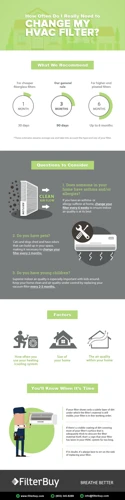
Have you ever noticed that your smart vacuum cleaner is not picking up dirt and debris as well as it used to? Or maybe you’ve started experiencing allergies or asthma symptoms since you started using it. If so, it may be time to replace the filters in your vacuum cleaner. In this article, we will discuss the importance of filter replacement, when to replace air filters, how to check filters for replacement, and how to replace the filters. By the end, you’ll have a better understanding of how often you should replace the filters in your smart vacuum cleaner to keep it working effectively and prolong its life. So, let’s dive in!
Table of Contents
Why filter replacement is important
When it comes to maintaining your smart vacuum cleaner, the importance of filter replacement cannot be overstated. Regularly changing the filters in your vacuum not only ensures higher suction power and better cleaning performance, but it also helps to avoid allergies and asthma as well as prolong the life of your machine. In this section, we’ll take a deeper look at why filter replacement for your smart vacuum cleaner is so crucial and the benefits that come from doing it. Whether you’re looking to upgrade your current filter or just learn more about how to maintain your machine, we’ve got you covered. So, let’s dive in and explore the importance of smart vacuum cleaner filter replacement!
Higher suction
Regularly replacing the air filters in your smart vacuum cleaner can help improve the suction power of your device, ensuring efficient cleaning of your floors. When the filters are clogged, your vacuum might not perform optimally. A clogged filter means that air can’t flow freely, causing your vacuum’s suction power to weaken. This can result in your vacuum taking longer to clean a room or leaving behind some dirt particles. By regularly replacing the filters, you can guarantee better suction and cleaning results.
It’s important to note that the frequency of filter replacement may vary depending on several factors such as the frequency of vacuum use and the type of filter used in the vacuum cleaner. In most cases, HEPA filters, pre-motor filters, and post-motor filters require different replacement schedules.
Let’s take a closer look at how often each type of filter should be replaced to achieve the best suction possible.
Type of Filter
Replacement frequency
HEPA filter
Every six months to one year
Pre-motor filter
Every three to six months
Post-motor filter
Every six to twelve months
Remember, these are just guideline replacement frequencies, and you may need to replace your smart vacuum filters more frequently if you use your vacuum cleaner more frequently than usual or if you have pets or a larger home.
To avoid clogged filters and ensure maximum suction power, it’s important to also clean and maintain the filters between replacements.
Want to learn more about the proper care and maintenance of your smart vacuum filters? Check out our Smart Vacuum Filter Replacement Guide for more tips and tricks.
Avoid allergies & asthma
Avoid allergies & asthma
One of the key benefits of replacing filters in your smart vacuum cleaner is avoiding allergies and asthma. A clogged or dirty filter can lead to an increase in airborne particles, such as dust and pet dander, which can trigger allergies and asthma symptoms. This is especially important for those with allergies or asthma, as irritation from airborne particles can cause breathing difficulties, itchy eyes and throat, and even skin rashes.
To reduce the risk of allergies and asthma, it’s important to regularly replace the filters in your smart vacuum cleaner. This will help to ensure that your machine is effectively filtering out harmful airborne particles, and that you and your family can breathe easier.
By regularly replacing your filters, you may also find that you experience fewer colds and flu-like symptoms, as your immune system will be better equipped to fight off airborne viruses and bacteria.
To learn more about the importance of filter replacement in your smart vacuum cleaner, check out our article on smart vacuum filter replacement.
Prolong machine life
Regular replacement of filters in your smart vacuum cleaner not only ensures that it performs at its best but also contributes to prolonging the machine’s lifespan. Imagine running a marathon without proper breathing techniques, and you will get an idea of how your smart vacuum cleaner struggles to perform with clogged filters. Dirty air filters cause the machine’s motor to work harder, leading to faster wear and tear, overheating and eventually motor failure. Replacing filters regularly is essential to keep your smart vacuum cleaner in good working condition and prevent costly repairs.
Here are some benefits of replacing smart vacuum cleaner filters:
Maintains optimum airflow
Prevents motor overheating and damage
Ensures efficient operation of the machine
Reduces the risk of breakdowns and repairs
Increases the machine’s lifespan
With regular replacement of filters, you can keep your smart vacuum cleaner’s motor running smoothly, preventing it from overworking and overheating. Overheating of the motor can cause several malfunctions in the machine, leading to expensive repairs. Replacing filters at regular intervals is a simple step to take to extend the life of your smart vacuum cleaner.
Keeping the filters clean ensures a consistent supply of fresh and clean air to the vacuum, hence avoiding the machine’s wear and tear due to increased workload. Clean air filters reduce the burden on the machine’s motor, prolonging its lifespan and ensuring its smooth operation.
Replacing filters can also prevent the spread of dust and allergens throughout your home. A dirty filter can cause dust and allergens to circulate back into the air as it loses the ability to capture small particles effectively. Hence regular filter replacement can help prevent allergies and asthma.
Replacing filters regularly is not only vital for the performance and efficiency of your smart vacuum cleaner but also critical to the lifespan of the machine. Don’t forget to check the manufacturer’s recommendations on how often to replace filters, and use high-quality filters for optimum performance.
When to replace air filters
As important as it is to use air filters in your smart vacuum cleaner, it’s equally important to know when it’s time to replace them. Over time, filters become less effective at trapping dust, dirt and debris, which is why they should be checked regularly. Neglecting filter replacement can result in poor suction, reduced machine lifespan, and even allergies. In this section, we’ll discuss how often you should replace the different types of filters in your smart vacuum cleaner, including HEPA, pre-motor, and post-motor filters to ensure your machine is working at maximum efficiency. Learn more about maintaining and replacing filters in smart vacuums by following this link.
High-efficiency Particulate Air (HEPA) filter
High-efficiency Particulate Air (HEPA) filters are one of the most crucial filters in a smart vacuum cleaner. These filters are used to trap small particles such as pollen, dust, and pet dander. What sets HEPA filters apart from other filters is their ability to capture 99.97% of particles as small as 0.3 microns.
It is recommended that you replace the HEPA filter in your smart vacuum cleaner every six months to ensure proper filtration. However, this may vary depending on the manufacturer’s recommendations and environmental factors. If the filter appears to be visibly dirty or clogged, it should be replaced immediately.
It is important to note that some smart vacuum cleaner models come with washable HEPA filters that can be cleaned and reused. When cleaning a washable filter, it is important to follow manufacturer instructions to ensure proper cleaning and avoid damaging the filter.
Replacing the HEPA filter regularly can help to improve the air quality in your home by removing harmful allergens and pollutants. Additionally, a clogged or dirty HEPA filter can reduce the suction power of your smart vacuum cleaner, leading to a less effective clean.
By understanding the importance of the HEPA filter in your smart vacuum cleaner and following the recommended replacement schedule, you can ensure that your smart vacuum cleaner performs at its best and keeps your home healthy and clean. For more information on smart vacuum cleaner filters, you can visit /smart-vacuum-cleaner-filters/.
Pre-motor filter
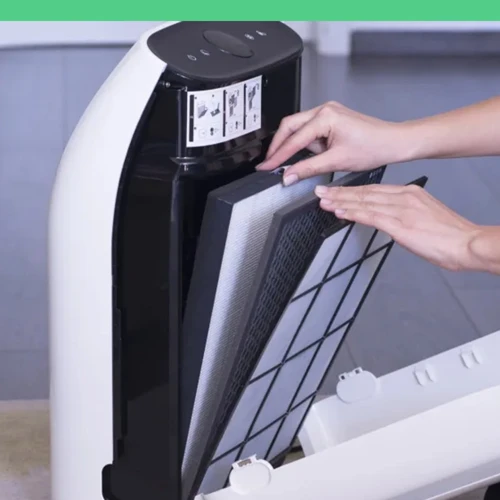
Cleaning your smart vacuum’s pre-motor filter is essential to maintain optimum suction power and ensure that your vacuum cleaner picks up dirt and debris from your floors effectively. Failing to clean or replace the pre-motor filter can result in a clogged filter, reducing the suction power of your vacuum cleaner.
The pre-motor filter is designed to capture dust and other particles that can get into the motor and damage it. It is typically made of washable foam or felt and should be cleaned regularly to ensure continuous suction power. You can follow the instruction manual to locate the pre-motor filter on your smart vacuum cleaner.
To clean the pre-motor filter, follow these steps:
Step 1: Turn off your smart vacuum and unplug it from the power source.
Step 2: Remove the dustbin or dirt container from your smart vacuum.
Step 3: Locate the pre-motor filter and remove it from the machine.
Step 4: Tap the filter gently to remove any loose dirt or debris.
Step 5: Wash the filter using mild detergent and warm water.
Step 6: Rinse the filter thoroughly and squeeze out the excess water.
Step 7: Leave the filter to dry naturally before placing it back into your vacuum cleaner.
To keep your smart vacuum operating at its best, you should clean the pre-motor filter every month or more frequently if you use your machine frequently.
There are several symptoms that indicate the need for replacement of the pre-motor filter. If you notice a reduction in suction power, poor performance or increased noise level, it may be time to replace the filter. Another sign of a clogged filter is when the vacuum cleaner expels dirty air, indicating that the filter is no longer effective.
It’s recommended to replace pre-motor filters every six months or as guided by the manufacturer. If you’re unsure about the replacement timeframe or how to remove and clean the filter, refer to your vacuum cleaner’s user manual for guidance.
Clogged filters can lead to poor vacuum cleaning results, which can lead to the release of harmful dust and allergens into the air. Cleaning or replacing the pre-motor filter regularly is essential to maintain effective cleaning performance and to avoid allergies and asthma caused by pollutants in the air.
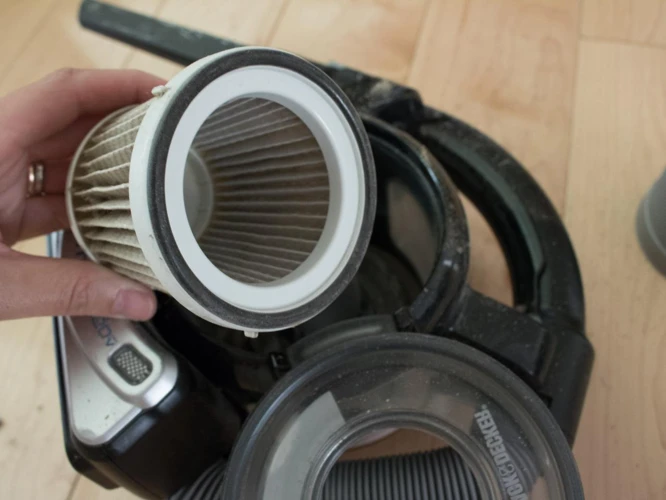
When it comes to the post-motor filter in your smart vacuum cleaner, the main function is to filter out tiny particles that could damage the motor or get released back into the air. These filters are typically made of foam or felt material, which captures the fine dust and dirt that passes through the vacuum’s motor.
When to replace the post-motor filter: Over time, the post-motor filter may become clogged with dirt and debris, causing a reduction in suction power and increasing the risk of damage to the motor. It’s important to replace the post-motor filter at least every 6 months, or whenever it appears dirty.
To help you better understand when it’s time to replace your post-motor filter, take a look at the following table:
Signs that indicate it’s time to replace your post-motor filter:
The filter is torn, damaged or doesn’t fit properly
The filter appears dirty or clogged
You notice a reduction in suction power
You start to notice a musty smell coming from the vacuum
How to replace the post-motor filter: Now that you know when to replace your post-motor filter, it’s important to follow the correct steps to replace it. The good news is that replacing the filter is usually quite straightforward for most smart vacuums. Here are the steps you can follow:
Consult your vacuum owner’s manual to find out where the filter is located and what type of filter is required.
Open the vacuum’s filter compartment and remove the old filter by pulling it out of its slot (use gloves to avoid any dust contamination).
Clean the vacuum’s filter compartment (if necessary).
Insert the new post-motor filter into the slot, ensuring a secure fit.
Close the filter compartment, and you’re done!
Recommended replacement brands: Some popular brands for post-motor filters include HEPA, Shark, and Miele. However, it’s important to always select a filter that is compatible with your specific smart vacuum cleaner model. If you’re unsure which brand to choose or having trouble finding a suitable replacement, you can always reach out to the manufacturer or a professional vacuum cleaner repair specialist for assistance.
Remember, maintaining a clean post-motor filter in your smart vacuum cleaner is key to prolonging its lifespan, maintaining its suction power, and ensuring that the air you breathe in your home is as clean as possible.
How to check filters for replacement
You may be wondering how to determine when it’s time to replace the filters in your smart vacuum cleaner. Checking the filters regularly is essential for maintaining the machine’s optimal performance and prolonging its lifespan. A clogged filter can decrease suction power and even cause damage to the motor. In this section, we will explore different methods for checking filter replacement and provide tips on what to look for. By regularly inspecting your filters, you can avoid misconceptions around replacing your machine at the wrong time.
Visual inspection
One of the ways to determine if it’s time to replace filters in your smart vacuum cleaner is through visual inspection. This method works best for people who use their smart vacuum cleaner frequently, and it involves carefully examining the state of each filter.
To conduct a thorough visual inspection, you should first consult your smart vacuum cleaner’s user manual to identify where each filter is located. Once you have located each filter, you should remove it from the vacuum cleaner and examine it closely.
Here’s a table to summarize how to visually inspect each filter:
Filter Type
What to Look For
When to Replace
HEPA Filter
Check for discoloration, dirt buildup, or tears in the filter fibers.
Replace every 6-12 months or when the filter becomes clogged.
Pre-motor Filter
Check for discoloration, dirt buildup, or damage to the filter mesh.
Replace every 3-6 months or when the filter becomes clogged.
Post-motor Filter
Check for discoloration, dirt buildup, or damage to the filter mesh.
Replace every 3-6 months or when the filter becomes clogged.
Keep in mind that filters may need to be replaced more frequently if you have pets, live in a dusty area, or have allergies. If you notice any signs of wear and tear during your visual inspection, it’s usually best to err on the side of caution and replace the filter sooner rather than later to prevent reduced suction power and potential damage to the vacuum cleaner’s motor.
Performing regular visual inspections and replacing filters as needed can help prolong the life of your smart vacuum cleaner and keep it running at optimal efficiency. However, inspecting the filter visually is not always the most precise method, and sometimes filters can appear clean when they are actually due for replacement. In those cases, you may want to consider other methods of checking for clogs and dirt buildup, or upgrading to higher-quality filters that offer washable and durable options. It’s also essential to understand the differences between washable and disposable filters to make the best purchasing decision for your needs.
Time-based replacement
Time-based replacement is one of the methods to determine when to replace the filters in your smart vacuum cleaner. This method is based on a predetermined schedule of when the filters should be replaced regardless of their actual condition. It is recommended that you refer to the manufacturer’s instructions for a specific replacement schedule, which can vary depending on the make and model.
The table below shows a general guide for time-based filter replacement for three types of filters often found in smart vacuum cleaners:
Type of Filter
Replacement Frequency
High-efficiency Particulate Air (HEPA) filter
6-12 months
Pre-motor filter
3-6 months
Post-motor filter
6 months
It is important to note that the manufacturer’s recommendations may vary from the general guide above. It is important to refer to your specific model’s user manual for the correct filter replacement schedule.
While time-based filter replacement is a convenient method, it is not always accurate, and relying solely on this method may be a mistake. For example, if the vacuum cleaner is used more frequently than usual, the filters may need to be replaced more frequently than the manufacturer’s recommendation. It is essential to also perform visual inspections and performance-based replacements to ensure clean and high-quality air filtration.
When it comes to performance-based replacement of smart vacuum cleaner filters, there are a few tell-tale signs that you need to watch out for. These signs indicate that your current filter is no longer performing at its optimum level, and it’s time for a replacement.
Deterioration of suction power: One of the most significant indicators of filter replacement is a deteriorating suction power. If you notice that your vacuum cleaner doesn’t pick up dirt and debris as effectively as before, it indicates that the filter is clogged and needs to be replaced.
Allergy and asthma symptoms: If you or any of your family members experience allergy or asthma symptoms like sneezing, coughing, or difficulty breathing when the vacuum cleaner is in use, it’s a clear sign that the filter needs to be replaced. A dirty filter can release allergens and other harmful pollutants back into the air and aggravate your respiratory system.
Strange noises: When a vacuum cleaner starts making strange noises, it usually indicates that something is wrong with the machine. In the case of a dirty filter, the motor has to work harder to produce suction power, leading to unusual noises. If you hear any strange sounds, be sure to check your filter and see if it needs to be replaced.
Unpleasant odors: A dirty filter can produce unpleasant odors that can make your home smell musty or dusty. If you notice any strange smells while using the vacuum cleaner, check the filter and replace it if it’s dirty.
To summarize, performance-based replacement of vacuum cleaner filters is all about keeping an eye out for the general performance of your machine. Check for signs of clogging, reduced suction power, and strange noises, and replace the filter accordingly. It’s always better to replace the filter before it causes significant damage to your machine. Use the following table as a quick reference for your timeline of filter replacement based on performance:
Performance Issue
Recommended Filter Replacement
Deterioration of suction power
Check filter and replace if necessary
Allergy and asthma symptoms
Check filter and replace if necessary
Strange noises
Check filter and replace if necessary
Unpleasant odors
Check filter and replace if necessary
Remember, taking care of your vacuum cleaner’s filter is crucial to maintain its performance and prolong its life. So, don’t wait for signs of performance issues to appear before checking and replacing your filter. With a little bit of effort, you can ensure that your smart vacuum cleaner works efficiently and keeps your home air cleaner and healthier.
How to replace filters
Once you have identified the filters in your smart vacuum cleaner that need replacing, it’s important to know how to go about replacing them. While some models may have different methods for filter replacement, the general process is relatively straightforward. By following a few simple steps, you can ensure that your vacuum is operating at peak performance and prolonging its lifespan. In this section, we will highlight the steps involved in replacing your smart vacuum’s air filters, and recommend some top-rated brands to consider for your replacement filters.
Steps for filter replacement
When it is finally time to replace the filters, it’s important to follow the proper steps to ensure your smart vacuum cleaner is functioning at its best. Here are the simple steps for replacing filters:
Step 1: Turn off your smart vacuum cleaner and unplug the power cord to prevent any electrical accidents or damage.
Step 2: Locate the filter compartment on your smart vacuum cleaner, which is typically located on the bottom or side of the unit.
Step 3: Open the filter compartment and carefully remove the old filter(s) from the designated areas. Be sure to dispose of the old filter(s) in a trash bin or recycling center.
Step 4: Take your new filter(s) out of the package and carefully insert them into the designated areas, with arrows or labels that clearly indicate the proper orientation.
Step 5: Ensure that the new filter(s) is securely in place and that the filter compartment is closed tightly.
Step 6: Turn on your smart vacuum cleaner and check to make sure it’s functioning properly.
Remember to always refer to your smart vacuum cleaner’s user manual for specific instructions on how to replace the filters. Now that you know the steps involved, replacing your filters should be a breeze. Taking the time to replace the filters will ensure that your smart vacuum cleaner performs at its full potential and picks up dirt and debris effectively.
Recommended replacement brands
It is important to choose the right replacement brands for your smart vacuum cleaner filters. Opting for low-quality or cheap filters might compromise the performance of your machine and can even cause damage, reducing its lifespan. Here are some recommended replacement brands to consider:
Honeywell – a well-known brand in air filtration, with high-quality HEPA filters that can trap up to 99.97% of microscopic particles.
Filtrete – a popular choice among smart vacuum cleaner owners, with efficient HEPA filters that can remove dust, pollen, pet dander, and other allergens.
Shark – a brand that offers pre-motor and post-motor filters for most smart vacuum cleaner models, ensuring optimal performance and prolonging the lifespan of your machine.
Eureka – a reliable brand that offers high-quality filters for different types of smart vacuum cleaners, including HEPA filters that can capture dust and pollutants as small as 0.3 microns.
Bissell – a brand that offers various types of filters for different needs and preferences, from foam filters that can trap larger debris to HEPA filters that can purify the air inside your home.
Remember to always follow the manufacturer’s instructions when replacing your smart vacuum cleaner filters and to buy filters that are compatible with your machine. Investing in high-quality replacement filters will not only improve the performance and lifespan of your smart vacuum cleaner, but also ensure a cleaner and healthier environment for you and your family.
Conclusion
In conclusion, replacing the filters in your smart vacuum cleaner is crucial for maintaining its performance and ensuring a healthy living environment. Neglecting filter maintenance can lead to decreased suction power, accumulation of allergens, and premature failure of the vacuum cleaner.
Remember that the frequency of filter replacement varies depending on the type of filter and usage habits. For instance, HEPA filters that capture tiny particles need to be replaced more frequently than other filters.
Don’t compromise on the quality of filters that you choose for replacement. Choosing cheaper filters may seem like an economical decision at first, but these filters might not match the quality and standards of the original filters.
Be vigilant about checking the filters for replacement. Don’t wait for the filter to get extremely dirty before replacing it. Timely replacement empowers your vacuum cleaner to perform efficiently and helps in maintaining good indoor air quality.
In conclusion, replacing the filters of your smart vacuum cleaner should not be taken lightly. It not only maintains the performance of your machine but also protects your health and prolongs the lifespan of your vacuum. Follow the manufacturer’s instructions and recommended replacement intervals to ensure optimal performance and a healthy home.
Frequently Asked Questions
1. Can I use third-party filters in my smart vacuum cleaner?
Yes, you can use third-party filters as long as they are compatible with your specific smart vacuum cleaner model.
2. How often should I replace my HEPA filter?
HEPA filters should be replaced every 6 to 12 months, depending on usage and the manufacturer’s recommendations.
3. Why does my smart vacuum cleaner lose suction power over time?
A clogged or dirty filter can cause the smart vacuum cleaner to lose suction power over time. This is why it is important to replace filters regularly.
4. Can I clean and reuse the filters in my smart vacuum cleaner?
It depends on the filter type. HEPA filters cannot be cleaned and must be replaced. Pre-motor and post-motor filters may be reusable and can be cleaned according to the manufacturer’s instructions.
5. Will using a dirty filter damage my smart vacuum cleaner?
Using a dirty filter in your smart vacuum cleaner can cause the motor to overwork, which can lead to damage over time.
6. How often should I replace pre-motor and post-motor filters?
Pre-motor and post-motor filters should be replaced every 2 to 3 months, depending on usage and the manufacturer’s recommendations.
7. Can I wash my pre-motor and post-motor filters?
Pre-motor and post-motor filters may be washed according to the manufacturer’s instructions. However, some filters may not be washable and must be replaced instead.
8. What should I do if I accidentally damage a filter during replacement?
If you accidentally damage a filter during replacement, you should replace it immediately to avoid causing damage to the smart vacuum cleaner.
9. How do I know if my smart vacuum cleaner has a HEPA filter?
You can check your smart vacuum cleaner’s user manual or contact the manufacturer to confirm whether it has a HEPA filter or not.
10. Can I replace the filters in my smart vacuum cleaner myself?
Yes, you can replace the filters in your smart vacuum cleaner yourself as long as you follow the manufacturer’s instructions carefully.