How to Upgrade Your Smart Vacuum Cleaner Filters for Optimal Performance
Warning: A non-numeric value encountered in /var/www/html/wp-content/themes/generatepress/inc/structure/post-meta.php on line 165
by Dwight Gibson
Filtered vacuum cleaners have become increasingly popular due to their efficiency and effectiveness in cleaning various types of surfaces, whether it’s carpets, hardwood floors, or tiles. However, with regular usage, the filters in these devices can become clogged and lose their suction power, leading to a decrease in their overall performance. Upgrading your smart vacuum cleaner filters is key to maintain optimal performance and efficiency in your cleaning routine.
In this article, we’ll explore the different types of filters and the benefits of upgrading them to maximize the lifespan and usage of your smart vacuum cleaner. Additionally, we’ll discuss the different options for choosing and installing upgraded filters, as well as tips for maintaining their efficiency. So, let’s dive in!
Table of Contents
The Importance of Filters
Filters are one of the most important components of a smart vacuum cleaner, but they are often overlooked. These essential parts keep your home free of dust, allergens, and other harmful particles that can affect your health. When filters are not functioning properly, they can cause problems with the efficiency and performance of your smart vacuum cleaner. Understanding the importance of filters is essential to maintain optimal performance of your machine, and ensure a clean and healthy home.
Filters play a crucial role in filtering dirt, dust, pet hair, and other debris that your smart vacuum cleaner picks up while cleaning the floors of your home. If filters are not well-maintained, the air quality of your home can be adversely affected, and soon you will start experiencing allergic reactions, respiratory issues, and other health problems. This is why it is imperative to make sure they are functioning at their best.
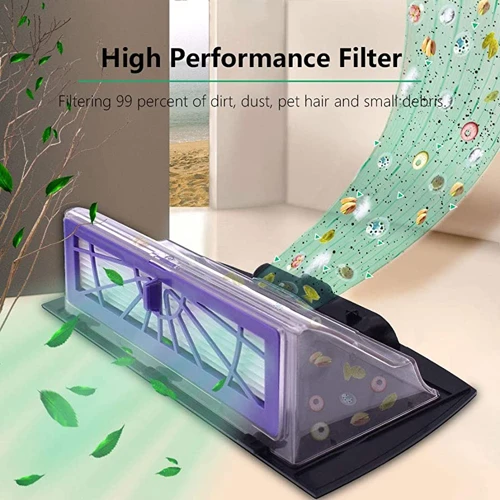
Smart vacuum cleaners come with different types of filters, such as pre-motor, post-motor, and HEPA filters. Pre-motor filters protect the motor from damage by preventing dust and other debris from entering it. On the other hand, post-motor filters are used to capture the tiny particles that are not caught by pre-motor filters. HEPA filters, which stand for “High-Efficiency Particulate Air” filters, captures 99.97% of particles that are 0.3 microns or larger. This means that the air being released into your home is much cleaner, and free of harmful airborne particles.
To ensure that your smart vacuum cleaner is working efficiently, you need to clean or replace the filters regularly. Not cleaning the filters frequently can cause them to become clogged, which hinders air flow, reduces suction power, and reduces the overall performance of your machine. It is recommended to clean or replace the filter every one to three months, or as recommended by the manufacturer for the make and model of your smart vacuum cleaner.
Smart vacuum cleaner filters play a vital role in keeping your home clean and healthy. Understanding their importance helps you to realize how essential it is to clean and replace them regularly. Regular maintenance of your machine’s filters extends its life, boosts its efficiency, its performance and reduces the risk of respiratory issues, allergies and other health problems. Check the common mistakes that people make while replacing smart vacuum cleaner filters to avoid potential issues that may arise while maintaining your smart vacuum cleaner filters.
The Benefits of Upgrading
Upgrading your smart vacuum cleaner filters has a multitude of benefits for both you and your home. One of the primary benefits is improved efficiency and performance. When your filters are clogged or dirty, the suction power of your smart vacuum may decrease, resulting in a less thorough clean. Upgrading your filters can ensure your vacuum is working at full capacity, meaning your floors will be cleaner and the air in your home will be purer.
Another benefit to upgrading your smart vacuum filters is improved air quality. Dust, dirt, pet hair, and other debris can quickly accumulate in your home, leading to poor air quality and potential health issues. By installing upgraded filters, you can effectively capture and remove these harmful particles from your indoor air, creating a cleaner and healthier living environment for you and your family.
Not only will upgraded filters improve the efficiency and air quality of your smart vacuum, but they can also save you money in the long run. High-quality filters can last longer and require less frequent replacement than standard filters, meaning you can save money on replacement filters and potentially avoid more costly repairs or replacements down the line.
Finally, upgrading your smart vacuum filters can also help extend the life of your vacuum. Clean, effective filters keep your vacuum running smoothly and prevent damage to the motor and other parts of the appliance. This means less maintenance and less money spent on repairs or replacements.
The benefits of upgrading your smart vacuum cleaner filters are numerous and significant. Improved efficiency and performance, improved air quality, cost savings, and extended life of your vacuum make upgrading your filters a worthwhile investment for any homeowner. To learn more about the benefits of smart vacuum filter replacement, check out our Smart Vacuum Filter Replacement Guide.
Types of Filters
Filters are a crucial part of any smart vacuum cleaner. They trap the particles and debris that your vacuum collects, ensuring that your home stays clean and safe.
There are several types of filters that you may find in a smart vacuum cleaner. These include pre-motor filters, post-motor filters, and HEPA filters.
Pre-Motor Filters: These filters prevent larger debris like hair and dirt from entering the vacuum’s motor. They are typically located near the vacuum’s intake port and should be cleaned or replaced regularly to avoid clogging.
Post-Motor Filters: These filters capture smaller particles that make it past the pre-motor filter. They are located near the vacuum’s exhaust port and often filter out microscopic allergens and pollutants.
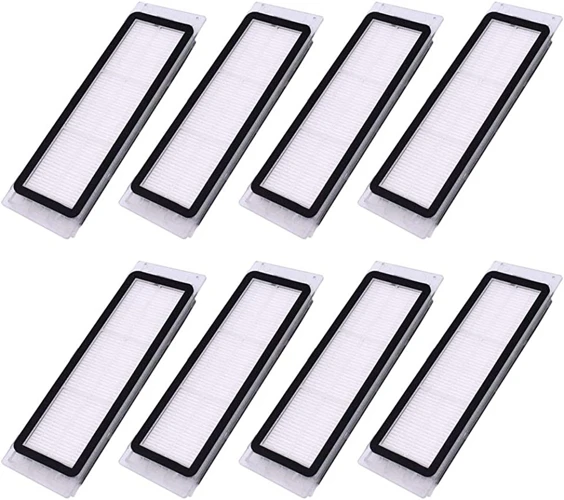
HEPA Filters: HEPA (High-Efficiency Particulate Air) filters are designed to capture at least 99.97% of particles down to 0.3 microns in size. They are the most effective filters for trapping pet dander, pollen, and dust mites. HEPA filters are used in vacuums that cater to people with allergies or asthma and need to be replaced regularly.
Choosing the Right Filter for Your Smart Vacuum Cleaner is Crucial!
When selecting new filters, you have two options: brand-specific filters or third-party filters. If you opt for brand-specific filters, you will be sure that they’re compatible with your vacuum cleaner. Third-party filters, on the other hand, may be less expensive than brand-specific ones.
Brand-Specific Filters: Filters manufactured by the vacuum’s brand are designed to work seamlessly with that vacuum cleaner. These filters may be more expensive but may have additional features.
Third-Party Filters: Third-party filters are manufactured by companies that specialize in making filters that fit popular vacuum brands, and they can be cheaper than brand-specific filters. However, it is crucial to make sure you’re buying the right filter size and type, and quality standards vary among manufacturers.
Filter Specifications to Look For
When purchasing a filter, consider the type of filter, size compatibility, and the filter’s capacity to remove pollutants. If you purchase a HEPA filter, ensure the filter meets the industry standard of capturing at least 99.97% of particles 0.3 microns or larger to match HEPA filtration standards. It is essential to check the product specifications before purchasing a filter to ensure it’s compatible with your vacuum cleaner and indoor air quality.
Remember, choosing the right filter for your vacuum cleaner will improve its overall efficiency and extend its life span.
When you have the right filter, installation is critical. Check the next section, ‘Installing Upgraded Filters‘ for the step-by-step guide.
Pre-Motor Filters
Pre-Motor Filters are the first line of defense for your smart vacuum cleaner. They remove large particles such as pet hair, dust, and dirt before they reach the motor. In doing so, pre-motor filters help extend the life of your vacuum cleaner by preventing damage to the motor caused by large debris.
There are different types of pre-motor filters, including washable and disposable ones. Washable filters are made of fabric material and can be reused after they have been washed and thoroughly dried. Disposable filters, on the other hand, are made of paper or synthetic fibers and need to be replaced regularly.
To maximize the efficiency and performance of your smart vacuum cleaner, it is important to check your pre-motor filters regularly and replace them as needed. Over time, pre-motor filters can become clogged with dirt and debris, causing the vacuum cleaner to lose suction power.
If you are unsure of how often to replace your pre-motor filters, refer to the manufacturer’s recommendations or consult our smart vacuum filter replacement frequency guide for more information.
One common mistake people make when replacing pre-motor filters is not properly securing them in place. When the filter is not properly installed, it can allow unfiltered air to go through the motor and damage it. Be sure to check your owner’s manual for instructions on how to properly install your pre-motor filters.
To learn more about how to clean and maintain your smart vacuum filters, refer to our smart vacuum filter cleaning and maintenance guide. You will also find information about the different types of filters commonly used in smart vacuum cleaners and the benefits of upgrading to a higher quality filter.
Post-Motor Filters
When it comes to smart vacuum cleaners, post-motor filters are essential for maintaining optimal indoor air quality. These filters work by capturing fine particles and allergens that pass through the vacuum’s motor. As their name suggests, they are located behind the vacuum’s motor, which requires them to be durable and effective enough to withstand both suction power and heat.
Post-motor filters come in various forms, including washable and disposable options. Washable filters typically consist of a layer of foam that can be rinsed clean, while disposable filters are made of paper or synthetic fibers that can be discarded after they reach their maximum filtration capacity. Both options have their benefits, so it’s crucial to understand the differences between them before deciding which one to use.
If you opt for a washable filter, it’s crucial to note that frequent washing is necessary to keep the filters operating effectively. Failing to keep up with cleaning could result in clogged filters that impair suction power and overall performance. Meanwhile, disposable post-motor filters tend to be less effective than washable ones while they’re functioning. However, they’re typically less difficult to replace and spare you the hassle of needing to clean them.
When you’re upgrading your smart vacuum cleaner’s post-motor filter, it’s important to choose an option that’s compatible with your model. You should always refer to the manufacturer’s manual for filter compatibility information. Alternatively, you could check our guide on smart vacuum filter replacements that will provide you with detailed information about specific post-motor filters that are ideal for your vacuum model.
If you notice a change in your vacuum’s performance, clogged post-motor filters could be the culprit. One major mistake that people make is not checking the status of their filters regularly. Clogged filters could lead to loss of suction and even burn out in the motor. If you think the suction performance has decreased, first clean or change the filters before calling for maintenance services.
Post-motor filters are essential components of smart vacuum cleaners that capture fine dust and allergens. Before making the switch, make sure to check your manufacturer’s manual or our smart vacuum cleaner filters guide for compatibility information. Finally, adopting a regular cleaning schedule to avoid the clogging of filters is crucial to maximize efficiency and performance.
HEPA Filters
High-Efficiency Particulate Air (HEPA) filters are some of the most effective and popular filters used in smart vacuum cleaners. They are designed to capture and trap small particles that other filters may miss. HEPA filters can capture up to 99.97% of particles as small as 0.3 microns, making them ideal for people with allergies or respiratory conditions. When shopping for an upgraded filter, it is essential to determine if the filter is a true HEPA filter or if it simply meets HEPA-like standards.
One thing to keep in mind when using a HEPA filter is that they do not last forever. Over time, they can become clogged with dust, dirt, and other particles, which can reduce their effectiveness. It is essential to clean or replace the HEPA filter regularly to maintain its high level of performance. Some smart vacuums come with washable HEPA filters, which can be cleaned and reused. However, most HEPA filters are disposable, and it is advisable to replace them every six months or so.
It’s important to note that not all smart vacuum cleaners are compatible with HEPA filters. Before purchasing an upgraded filter, it is necessary to check whether your smart vacuum manufacturer offers a HEPA filter option or not. Some smart vacuums come with their HEPA filters; however, for others, you may need to purchase a third-party filter.
One common mistake people make when replacing HEPA filters is not using the right filter for their smart vacuum cleaner. Some people may try to use filters designed for other brands or models, which could lead to inefficiency or even damage to the vacuum. When purchasing an upgraded HEPA filter, make sure that it is compatible with your vacuum cleaner model and brand.
Upgrading your smart vacuum cleaner filters to HEPA filters can improve the air quality in your home by trapping small particles that other filters would miss. It is essential to determine whether your smart vacuum cleaner is compatible with HEPA filters and choose a filter that is specifically designed for your brand and model. Additionally, cleaning or replacing your HEPA filter regularly is necessary to maintain its effectiveness. For more information, check out our article on understanding washable vs. disposable filters or common mistakes when replacing filters on a smart vacuum.
Choosing Upgraded Filters
When it comes to upgrading your smart vacuum cleaner filters, it’s important to choose the right ones that will help to maximize efficiency and performance. There are two main types of filters that you can choose from, brand-specific filters or third-party filters.
Brand-Specific Filters: These are the filters that are specifically designed for your vacuum cleaner brand, and they are made to fit perfectly with your vacuum cleaner’s system. They are usually more expensive compared to third-party filters, but they often come with a warranty, which means you can trust the quality of the product. Also, If you have a warranty on your vacuum, changing the filter with a brand-specific one will ensure that you don’t void the warranty.
Third-Party Filters: Third-party filters are compatible with multiple brands of vacuums, and they tend to be a more affordable option compared to brand-specific filters. Before buying them, it’s important to check the specifications and compatibility to make sure they will fit with your specific vacuum cleaner model. An advantage of third-party filters is that they are often made with the same material as brand-specific filters but at a lower cost.
Filter Specifications to Look For: When choosing upgraded vacuum cleaner filters, it’s important to look for specific specifications that can affect their performance. These specifications include the filtration efficiency rates, filter media, and airflow rate. Higher filtration efficiency rates imply that the filter can capture more particles and allergens, while filter media determines how well it can trap them. A high airflow rate means that the vacuum can get more air into the system, which increases its suction power.
Bottom Line: Choosing the right upgraded filter for your smart vacuum cleaner can significantly improve the performance and longevity of your device. Remember to consider the type of filter, brand-specific or third-party, and specifications such as filtration efficiency, filter media, and airflow rate. As a precaution, remember to avoid common mistakes when replacing filters, which you can read more about in our article about common mistakes when replacing filters in smart vacuums.
Brand-Specific Filters
When it comes to upgrading your smart vacuum cleaner filters, one option to consider is purchasing brand-specific filters. These filters are designed and manufactured specifically for your vacuum model, ensuring that they’ll fit perfectly and function at their best. This can lead to improved suction power, better performance, and a longer lifespan for your vacuum.
One advantage of brand-specific filters is that they’re often widely available from the manufacturer or from authorized dealers. This means that you’re more likely to find them in stock and ready to ship, and you can rest assured that you’re getting a high-quality product that’s been tested and approved by the manufacturer.
Another advantage of brand-specific filters is that they often come with warranties and guarantees from the manufacturer. This can give you peace of mind in knowing that if there are any issues or defects with the filter, you’ll be able to get a replacement or refund without any hassle.
Of course, there are some potential drawbacks to consider when opting for brand-specific filters. One drawback is that they can be more expensive than third-party filters. This is because the manufacturer has invested significant resources into designing and producing the filter, and they need to recoup those costs through higher prices.
Another potential drawback is that you may be limited in terms of the variety of filters available. For example, if you have an older vacuum model that’s no longer in production, it may be difficult or impossible to find replacement filters from the manufacturer. In these cases, you may need to consider third-party filters as an alternative.
Ultimately, the decision to opt for brand-specific filters will depend on your budget, your vacuum model, and your personal preferences. If you’re willing to spend a bit more for a high-quality, manufacturer-tested filter that’s guaranteed to work with your vacuum, then brand-specific filters may be the way to go. On the other hand, if you’re looking to save money or if you have an older or less common vacuum model, then third-party filters may be a better option.
Third-Party Filters
When it comes to choosing upgraded filters for your smart vacuum cleaner, there are options beyond brand-specific filters. Third-party filters can offer comparable quality at more affordable prices. However, before selecting a third-party filter, it’s important to do your research and ensure that the filter is compatible with your vacuum cleaner.
Benefits of Third-Party Filters
One of the primary advantages of third-party filters is that they can cost significantly less than brand-specific filters. This is especially true if you opt for filters from lesser-known manufacturers. They often offer high-quality filter materials that function similarly or even better than the pricier brands.
In addition to cost savings, third-party filters can also offer greater variety. If you’re looking for specialized or hard-to-find filter types, third-party filters may be your best bet. For instance, certain third-party manufacturers specialize in HEPA filters, which can be difficult to find from brand-specific manufacturers.
Considerations Before Buying Third-Party Filters
While third-party filters can offer significant cost savings, there are certain considerations to keep in mind before making a purchase. First and foremost, ensure that the filter you’re considering is compatible with your vacuum cleaner model. Check the user manual or manufacturer’s website to confirm that the third-party filter will work with your vacuum.
It’s also important to note that not all third-party filters are created equal. Research the manufacturer and read reviews from other customers to ensure that the product is reliable and effective. Be wary of filters that claim to have certain features or abilities without proper certifications, as this could indicate that they don’t meet quality standards.
Conclusion
Third-party filters can be a cost-effective and practical solution for anyone looking to upgrade their smart vacuum cleaner’s filters. However, it’s important to do your research before making a purchase to ensure compatibility and quality. With the right third-party filter, your vacuum cleaner can continue to operate at maximum efficiency and performance while saving you money in the long run.
Filter Specifications to Look For
When it comes to upgrading your smart vacuum cleaner filters, it’s important to pay attention to the specifications of the filters you’re considering. Not all filters are made equal, and choosing the wrong type or model can actually do more harm than good. Here are some key specifications to keep in mind as you shop for upgraded filters.
Efficiency Rating – This is one of the most important factors to consider when choosing upgraded filters. The efficiency rating tells you how well the filter can capture and trap small particles, such as dust, pollen, and pet dander. Look for filters that have a high efficiency rating, measured on a scale of 1 to 20 (with 20 being the highest possible rating).
Micron Size – Another important specification to look for is the micron size. This tells you how small the particles are that the filter can capture. The smaller the micron size, the more effective the filter will be at trapping fine dust and other pollutants. Look for filters with a micron size of 0.3 or smaller for maximum efficiency.
Filter Type – There are several different types of filters to choose from, each with their own advantages and disadvantages. For pre-motor filters, consider a foam or felt filter, while post-motor filters are typically made from paper or fabric. HEPA filters are the most effective at capturing small particles, but they are also the most expensive.
Filter Longevity – Consider how often you’ll need to replace the filters. Some filters need to be changed every few months, while others can last up to two years. Keep in mind that cheaper filters may need to be replaced more frequently, so it’s important to factor in the cost of replacement filters when considering your options.
Compatibility – Finally, make sure that the upgraded filters you choose are compatible with your specific make and model of vacuum cleaner. While many filters are designed to fit multiple models, it’s always best to double-check before making a purchase to avoid any compatibility issues down the road.
By keeping these filter specifications in mind, you can ensure that you choose the best upgraded filters for your smart vacuum cleaner. Not only will this result in better cleaning performance, but it can also help to reduce allergies and other respiratory issues caused by poor air quality.
Installing Upgraded Filters
Installing Upgraded Filters for Your Smart Vacuum Cleaner
Now that you’ve chosen the upgraded filters that work best for your smart vacuum cleaner, it’s time to install them. The good news is that the process is fairly easy and straightforward – you don’t have to be a technical expert to do it. Follow these step-by-step instructions to get your upgraded filters up and running smoothly.
Step 1: Turn Off Your Vacuum Cleaner
Before you start, make sure that your smart vacuum cleaner is turned off and unplugged. This is very important for your safety and to avoid any damage to your vacuum cleaner.
Step 2: Locate the Pre-Motor Filter
The pre-motor filter is located near your vacuum cleaner’s motor. For most smart vacuum cleaners, this is located at the bottom of the dustbin or on the top of the motor. You may need to refer to your vacuum cleaner’s manual to locate the pre-motor filter.
Step 3: Remove the Old Pre-Motor Filter
Once you’ve located the pre-motor filter, remove it by gently pulling it out. Be careful not to damage the filter or any of the vacuum cleaner’s parts while doing this.
Step 4: Install the Upgraded Pre-Motor Filter
Take your upgraded pre-motor filter and insert it into the same slot where the old filter was removed. Make sure it fits firmly into place and is aligned properly.
Step 5: Locate the Post-Motor Filter
The post-motor filter is usually located next to the vacuum cleaner’s motor. Refer to your vacuum cleaner’s manual to locate the post-motor filter if you’re not sure where it is.
Step 6: Remove the Old Post-Motor Filter
Remove the old filter by gently pulling it out of the slot. Again, be careful not to damage the filter or any of the vacuum cleaner’s parts.
Step 7: Install the Upgraded Post-Motor Filter
Take your new post-motor filter and insert it into the same slot where the old filter was located. Ensure that it is firmly in place and aligned correctly.
Step 8: Close the Vacuum Cleaner
Once you have replaced the upgraded pre-motor and post-motor filters, close the vacuum cleaner’s dustbin, panels or doors, depending on the model of your vacuum cleaner.
Troubleshooting Tips
If you encounter any issues while installing your upgraded filters, don’t hesitate to refer to your vacuum cleaner’s manual or contact customer support. Some possible problems you may face include difficulty inserting the filter, the filter not fitting properly or the vacuum cleaner not turning on after the new filters are installed.
Final Thoughts
Upgrading your smart vacuum cleaner filters is an important and easy step towards maximum efficiency and performance. By following these simple steps and installing the right filters, you’ll have a smarter and more user-friendly home cleaning system.
Step-by-Step Instructions
Upgrading your smart vacuum cleaner filters can be a straightforward process if you know what to do. Follow these step-by-step instructions for a successful filter replacement:
Step 1: First, locate the filter compartment on your smart vacuum cleaner. Depending on the brand and model, this can be located at the top, side, or bottom of the device.
Step 2: Open the filter compartment using the designated latch or button. Some brands may require you to detach a separate cover before accessing the filters.
Step 3: Remove the old filters from the compartment. Take note of their orientation and position for easier replacement.
Step 4: If you are using brand-specific filters, take them out of their packaging and compare them with the old filters. Look for any noticeable differences, such as shape, size, and texture.
Step 5: Before installing the new filters, inspect the filter compartment for any accumulated dust and debris. Wipe it clean using a dry cloth or vacuum with a brush attachment.
Step 6: Install the new filters following their designated orientation and position. Push them in tightly to ensure a secure fit. Some filters may have arrows or labels indicating their proper installation.
Step 7: Close the filter compartment and secure it with the designated latch or button. If necessary, reinstall any covers that were detached.
Step 8: Turn on your smart vacuum cleaner and ensure that it is functioning correctly with the new filters. Run it for a few minutes to verify that the new filters are working as intended.
By following these simple steps, you can ensure that your smart vacuum cleaner’s performance and efficiency are maximized with upgraded filters. However, if you encounter any issues during the installation process, don’t hesitate to consult the manufacturer’s manual or contact customer support for assistance.
Troubleshooting Tips
When upgrading your smart vacuum cleaner filters, it’s important to ensure that they are installed properly to ensure maximum efficiency and performance. However, even with the proper installation, it’s possible to run into some issues. Here are some troubleshooting tips to help you get the most out of your upgraded vacuum filters:
1. Poor suction: If you notice that the suction power on your smart vacuum has decreased after installing upgraded filters, it could be due to a clog. Check the filters to see if they are full of dust and debris. If the filters are clean and the suction is still poor, it may be due to a clog in the vacuum hose. Clear any clogs and your suction should improve.
2. Air leaks: If you notice air escaping from the vacuum, it could be due to a poorly installed filter. Make sure that the filter is properly installed and that there are no gaps or leaks between the filter and the vacuum. Check the vacuum hose and attachments to ensure that they are properly connected and not leaking.
3. Unusual noises: If you hear unusual noises coming from your vacuum after installing new filters, it could be due to a clog or poor filter installation. Check the filters and vacuum hose for any clogs and ensure that the filters are properly installed with no gaps or leaks.
4. Reduced battery life: If you notice that the battery life on your smart vacuum has decreased, it could be due to the upgraded filters. The vacuum may be working harder to push air through the new filters, causing it to use more battery power. To conserve battery life, try reducing the suction power on your vacuum.
5. Filters need to be replaced frequently: If you find that you need to replace your upgraded filters frequently, it could be due to poor air quality in your home. Try reducing the amount of dust and debris in your home by vacuuming and dusting more often, or consider upgrading to a higher-quality filter that can handle more particles.
By following these troubleshooting tips, you can identify and solve any issues that may arise after upgrading your smart vacuum cleaner filters. Remember, proper installation and maintenance of your filters is key to ensuring maximum efficiency and performance from your vacuum.
Maintaining Your Upgraded Filters
After installing upgraded filters in your smart vacuum cleaner, it’s important to maintain them properly to ensure maximum efficiency and performance. Proper maintenance of filters also prolongs their lifespan, thereby reducing replacement costs. Here are some steps you can take to maintain your upgraded filters.
Cleaning and Replacing Filters
Regular cleaning and replacement of filters are essential to maintain their efficiency. However, the cleaning and replacement frequency depends on the type of filter and usage frequency of your vacuum cleaner. Pre-motor filters and post-motor filters require different cleaning approaches. Pre-motor filters collect larger dust and debris particles, while post-motor filters trap smaller dust and allergen particles. Pre-motor filters can often be cleaned with water or vacuumed regularly, while post-motor filters require careful cleaning with a soft brush to avoid damage. Some upgraded filters may come with a cleaning brush or instructions for appropriate cleaning methods. In general, it’s recommended to replace your filters every 3-6 months depending on usage frequency.
Schedule for Maintenance
Having a regular maintenance schedule not only prolongs your filter lifespan, but also contributes to improved air quality in your environment. Remember to check your filters regularly and clean them if necessary. If your filters get damaged or you notice a reduction in vacuum power, it’s a sign that it’s time for a replacement. Having a maintenance schedule ensures that you maintain your vacuum filters regularly and avoid procrastination, which leads to problems over time.
Maintaining upgraded filters in your smart vacuum cleaner is crucial for maximum efficiency and performance. Cleaning and replacing your filters frequently help to keep them in top working condition and also contributes to improved air quality in your environment. Having a maintenance schedule is an excellent strategy to ensure that you maintain your filters regularly, prolong their lifespan, and save the cost of replacement.
Cleaning and Replacing Filters
When it comes to maintaining your smart vacuum cleaner’s efficiency and performance, cleaning and replacing the filters on a regular basis is essential. Neglecting to do so can lead to clogs, reduced suction power, and ultimately, a shorter lifespan for your device. To ensure that your upgraded filters continue to perform optimally, it’s important to follow proper cleaning and replacement procedures.
Cleaning Filters: Many smart vacuum cleaner filters require cleaning rather than replacement, which can save you money in the long run. However, it’s important to follow the manufacturer’s guidelines for optimal results. In general, pre-motor and post-motor filters can often be washed in warm water, but be sure to check the label for specific instructions. Avoid using harsh chemicals or scrubbing the filters too vigorously, as this can damage the material and compromise their effectiveness. After washing, allow the filters to air dry completely before reinstalling them.
Replacing Filters: Depending on the type of filter and how frequently you use your smart vacuum cleaner, replacement may be necessary. HEPA filters, for example, typically need to be replaced every six months to maintain optimal performance. Before purchasing replacement filters, be sure to check your device’s manual or website for specific recommendations. Once you have the appropriate filters, follow the instructions included for installation. In general, it’s important to replace filters as soon as you notice reduced suction power or other signs of damage, such as tears or holes.
Schedule for Maintenance: By following a regular schedule for cleaning and replacing filters, you can extend the lifespan of your smart vacuum cleaner and maintain its efficiency and suction power. Depending on your usage patterns and the number of people or pets in your household, you may need to clean or replace filters more frequently. To avoid forgetting, consider setting a reminder on your phone or calendar for regular maintenance.
By incorporating these simple steps into your smart vacuum cleaner maintenance routine, you can ensure that your upgraded filters continue to perform optimally, improving the efficiency and lifespan of your device. Remember to always refer to the manufacturer’s guidelines for best results and consult with a professional if you encounter any issues.
Schedule for Maintenance
Maintaining your upgraded filters is extremely important to ensure maximum efficiency and performance of your smart vacuum cleaner. Regular cleaning and replacement of filters according to a schedule is crucial to prevent clogging and maintain the suction power of your device.
Firstly, it is important to read the manufacturer’s instructions to determine the recommended schedule for maintenance. The schedule may vary depending on the type of filters and how often you use your vacuum cleaner.
Secondly, creating a maintenance schedule and sticking to it will help ensure that your filters are always in good condition. A good rule of thumb is to replace the filters every three to six months, depending on usage frequency and the type of filter.
Thirdly, checking the filters regularly for signs of wear and tear can help identify problems before they become major issues. If you notice any damage to the filter, such as holes or tears, it is essential to replace it immediately.
Fourthly, cleaning the filters regularly can extend their lifespan and maintain their efficiency. Many filters can be washed with water and left to dry thoroughly before reinstallation. However, some filters may require replacement rather than cleaning.
Finally, keeping track of the date of last maintenance and replacements can help you stay organized and ensure that the filters are always in proper condition. You can easily set reminders on your smartphone or computer to notify you when it’s time to clean or replace the filters.
Maintaining a regular schedule for cleaning and replacing your upgraded filters will help ensure that your smart vacuum cleaner continues to perform at its best. By following the steps outlined in this article, you can extend the lifespan of your filters, prevent clogging, and maintain the suction power of your device for maximum efficiency.
Conclusion
In conclusion, upgrading your smart vacuum cleaner filters can greatly improve its efficiency and overall performance. By choosing the right type of filter and brand-specific or third-party options with the proper specifications, you can ensure that your vacuum is effectively capturing and eliminating dirt, dust, allergens, and other particles from your home.
Regularly maintaining your upgraded filters by cleaning and replacing them on a schedule can help extend the lifespan of both the filters and the vacuum. It’s important to follow the manufacturer’s instructions and troubleshoot any issues that arise during installation or use.
Remember that a clean home is a healthy home, and by upgrading your smart vacuum cleaner filters, you can significantly improve the air quality in your living space. Experience the benefits of enhanced cleaning power and superior filtration by investing in upgraded filters today.
With a little bit of research and attention to detail, you can upgrade your smart vacuum cleaner filters for maximum efficiency and performance, and enjoy a cleaner, healthier home.
Frequently Asked Questions
What is the role of smart vacuum cleaner filters?
The filters in a smart vacuum cleaner trap dust, dirt, and other debris to prevent them from circulating back into the air while vacuuming.
What are the benefits of upgrading my vacuum cleaner filters?
Upgrading your smart vacuum cleaner filters can increase its efficiency, prolong the lifespan of your machine, and improve indoor air quality by removing smaller particles from the air.
What types of filters are available for smart vacuum cleaners?
The three main types of filters for smart vacuum cleaners are pre-motor, post-motor, and HEPA filters.
What is a pre-motor filter?
A pre-motor filter is located before the motor of a vacuum cleaner, and its role is to prevent large debris from reaching the motor.
What is a post-motor filter?
A post-motor filter captures small particles that escape the dustbin and prevent them from recirculating into the air.
What is a HEPA filter, and how does it work?
A HEPA filter, or High-Efficiency Particulate Air filter, captures small particles and pollutants that other filters may miss. They’re made up of densely packed, small fibers that trap particles as small as 0.3 microns.
Can I use third-party filters for my smart vacuum cleaner?
Yes, as long as they meet the manufacturer’s specifications and compatibility, third-party filters are a cost-effective alternative to branded replacement filters.
How often should I replace upgraded filters?
It’s recommended to replace your vacuum cleaner filter(s) every three to six months, depending on usage, to maintain optimal performance and air quality.
How do I clean my upgraded filters?
Most filters are washable. Follow the manufacturer’s instructions for cleaning to avoid damage, and let the filters dry thoroughly before reinstalling them.
Can I reuse my filters?
Pre-motor and post-motor filters, in general, can be reused as long as they remain intact and clean. HEPA filters are not washable, and once contaminated, they must be replaced.