Maintaining Your Upright Vacuum: Tips for Optimal Performance
Warning: A non-numeric value encountered in /var/www/html/wp-content/themes/generatepress/inc/structure/post-meta.php on line 165
by Dwight Gibson
Have you ever wondered why your upright vacuum doesn’t seem to be working as efficiently as it used to? It could be due to a lack of proper maintenance. Like any machine, your vacuum requires regular upkeep to keep it running at its best. In this article, we will provide you with top tips for upright vacuum maintenance to keep them running efficiently. From cleaning the filters to inspecting the belts, we’ve got you covered. So, let’s dive in and discover how to maintain your vacuum like a pro!
Table of Contents
Clean the Filters Regularly
Keeping your upright vacuum in tip-top shape is essential to ensure that it runs efficiently and has a long lifespan. One key step in maintaining your vacuum is to regularly clean the filters. Not cleaning your filters can lead to decreased suction power and a lower quality clean, so it’s important to make sure they’re in good condition. In this section, we’ll go over why cleaning your filters is important and how to do it properly to keep your vacuum running smoothly. For more tips on maintaining your upright vacuum, check out our article on the most effective upright vacuum tips.
Why Clean the Filters?
Regularly cleaning the filters in your upright vacuum is essential for keeping it running efficiently. Dirty filters restrict airflow, causing your vacuum’s suction power to diminish over time. When this happens, your vacuum will struggle to pick up dirt and debris, and you’ll likely have to make more passes over the same area to get it clean. This can be frustrating and time-consuming.
By cleaning your vacuum’s filters, you’ll not only maintain strong suction power, but you’ll also extend the life of your vacuum. Dirty filters can cause the motor to overheat, putting extra strain on the machine and potentially causing damage. Regular filter cleaning can prevent this from happening and save you from having to buy a new vacuum prematurely.
Another advantage of keeping your vacuum’s filters clean is that it can improve the air quality in your home. When you vacuum, allergens and dust particles become airborne, and the filters are responsible for capturing them. If the filters are clogged with dirt and debris, those particles are released back into the air, causing potential health problems for you and your family. By regularly cleaning or replacing the filters, you can ensure that the air in your home is as clean and healthy as possible.
To prevent these issues, it’s important to clean the filters in your upright vacuum regularly. How often you need to clean them will depend on how frequently you use your vacuum and the level of debris you typically pick up. As a general rule, you should clean or replace your vacuum’s filters at least once every three months. However, if you have pets or live in a particularly dusty home, you may need to do it more frequently.
Regularly cleaning the filters of your upright vacuum is essential for keeping it running efficiently. Here are the simple steps to clean the filters of your upright vacuum:
Step
Instructions
Step 1
Turn off and unplug your vacuum.
Step 2
Locate the filter(s) in your vacuum. Most upright vacuums have at least one filter, but some may have multiple filters.
Step 3
Remove the filter(s) from your vacuum. Refer to your vacuum’s manual to determine the proper method for removing the filter. Some filters may simply pull out, while others may need to be unscrewed or unclipped.
Step 4
If the filter is reusable, shake off any loose debris and use a soft-bristled brush to gently brush away any accumulated dirt or dust. Then, rinse the filter under running water until the water runs clear. Allow the filter to air-dry completely before placing it back in the vacuum. If the filter is not reusable, dispose of it and replace it with a new one.
Step 5
Once the filter(s) is clean and dry, place it back in the vacuum and secure it according to the manufacturer’s instructions.
Remember to clean your vacuum filters regularly, as this can greatly affect the performance and lifespan of your vacuum. Additionally, using a vacuum with clean filters can help improve air quality in your home. If you’re not sure how often to clean your vacuum’s filters, refer to your vacuum’s manual.
Cleaning the filters is just one aspect of maintaining the efficiency and effectiveness of your upright vacuum. Be sure to also regularly empty the dustbin, check for hose blockages, and inspect the belt for any signs of wear or damage. For more information on the advantages of upright vacuums, check out our article on the advantages of upright vacuum cleaners.
Replace Vacuum Bags as Needed
Keeping your upright vacuum running at peak efficiency requires regular maintenance, and one of the most critical aspects of that maintenance is replacing the vacuum bag. Over time, vacuum bags fill up with dirt, dust, and debris, which can limit suction and reduce the overall performance of your machine. That’s why it’s important to replace your vacuum bag as needed. In this section, we’ll explore why changing your vacuum bag is so essential and how to do it the right way. But before we dive in, if you’re in the market for a new vacuum cleaner, be sure to check out our article on the top features to look for in an upright vacuum, or if you need help deciding between an upright and a canister vacuum, read our handy guide on upright vs. canister vacuums.
Importance of Changing the Bags
One of the most important aspects of upright vacuum maintenance is changing the bags regularly. It may seem like a small detail, but it can significantly impact the performance of your vacuum. Clogged or full bags can reduce suction power, leading to less effective cleaning. Over time, a vacuum with a dirty bag can work harder to do the same job, resulting in motor strain and potential damage to your machine.
To keep your vacuum running efficiently, it’s crucial to replace bags as soon as they become full or clogged. Most vacuum bags have a line that indicates when they’re full, but it’s a good idea to check them before each use to ensure that they’re not overflowing.
Using the right vacuum bags also plays a role in keeping your machine running efficiently. Low-quality bags can tear easily and leak dust and dirt back into the air and onto surfaces. Opting for high-quality bags can help prevent this issue and even improve air quality in your home.
Here is a table summarizing the importance of changing vacuum bags:
Importance of Changing Vacuum Bags
Reduces strain on motor
Improves suction power
Prevents dust and debris from leaking back into the air and onto surfaces
Increases the lifespan of your vacuum
Improves air quality in your home
Changing the vacuum bag is a simple but essential part of upright vacuum maintenance. Regularly replacing used bags with high-quality replacements can help keep your machine running smoothly and even improve air quality in your home.
How to Replace Vacuum Bags
Replacing the vacuum bags is an essential part of maintaining your upright vacuum. Here are the step-by-step instructions on how to do it:
Step 1:
Make sure the vacuum is unplugged from the power source.
Step 2:
Locate the bag compartment or dustbin on your vacuum.
Step 3:
Open the bag compartment or dustbin according to the manufacturer’s instructions. Some dustbins may have a release button or latch, while others may require twisting or sliding to open.
Step 4:
Remove the old vacuum bag or empty the dustbin into a trash can.
Step 5:
Inspect the vacuum bag compartment or dustbin for any debris or buildup, and clean it out if necessary. A dirty compartment can affect the vacuum’s suction power.
Step 6:
Take a new vacuum bag and make sure it is the correct size for your vacuum. Refer to the manufacturer’s instructions or the old bag for size information.
Step 7:
Align the new vacuum bag with the vacuum’s bag compartment or dustbin. Some bags may require attaching with clips or flaps, while others may require inserting into grooves. Make sure the bag is properly secured before closing the compartment or dustbin.
Step 8:
Close the vacuum bag compartment or dustbin according to the manufacturer’s instructions. Make sure it is securely fastened to avoid any dust or debris escaping.
Step 9:
Dispose of the old vacuum bag in a trash can. Some bags may be recyclable, so check the manufacturer’s instructions or the bag itself for recycling instructions.
Step 10:
Plug the vacuum back in and test it to make sure it is running efficiently with the new bag.
Remember: replacing the vacuum bag can improve the suction power and overall performance of your upright vacuum. It’s important to follow the manufacturer’s instructions for your specific vacuum model to ensure proper replacement.
Clean the Brush Roll
One of the most crucial components of an upright vacuum cleaner is the brush roll. This spinning brush is responsible for agitating and loosening dirt and debris from soft surfaces like carpets and rugs. Over time, the brush roll can become clogged with hair, fibers, and other debris, which can cause it to lose suction and become less effective. Regularly cleaning the brush roll is a simple and effective way to maintain your vacuum cleaner’s optimal performance. But what’s the best way to get started? Let’s dive in!
Why Clean the Brush Roll?
The brush roll is an essential component of an upright vacuum cleaner, responsible for agitating the carpet fibres and dislodging dirt and debris. Keeping the brush roll clean is crucial for maintaining the efficiency of your vacuum cleaner.
Dirt build-up – Dirt particles, hair, and other debris can accumulate on the brush roll, inhibiting its ability to agitate the carpet fibres. This can result in poor suction and reduced cleaning performance.
Wear and tear – Over time, the bristles on the brush roll can become worn and flattened, reducing their effectiveness. A worn-out brush roll can also cause damage to your carpets.
Tangled hair – Hair can wrap around the brush roll and become tangled, causing the brush roll to stop spinning altogether. This can damage the vacuum motor and reduce its lifespan.
Dust and allergens – A dirty brush roll can accumulate dust and allergens, making it a potential source of indoor air pollution. If you or anyone in your household suffers from allergies or respiratory issues, cleaning the brush roll regularly is crucial.
Regular cleaning of the brush roll can help to prevent these problems and keep your vacuum running smoothly. In the next section, we’ll discuss how to clean the brush roll effectively.
Reasons to Clean the Brush Roll
Effects of Not Cleaning the Brush Roll
Prevents dirt build-up
Poor suction, reduced cleaning performance
Reduces wear and tear
Ineffective cleaning and potential damage to carpets
Prevents hair tangles
Motor damage, reduced lifespan of the vacuum
Reduces dust and allergens
Poor indoor air quality, potential health problems
How to Clean the Brush Roll
The brush roll in your upright vacuum is one of the most important components when it comes to effectively cleaning your floors. Over time, dirt, hair, and other debris can become tangled in the brush roll, which reduces its effectiveness and can even damage the vacuum over time. Here are the steps you can follow to clean your brush roll and keep your vacuum running efficiently:
Step 1: Unplug the Vacuum
Before you begin cleaning the brush roll, make sure your vacuum is unplugged from the power source.
Step 2: Remove the Brush Roll Cover
Next, locate the cover for the brush roll on the underside of the vacuum. Use a screwdriver to remove any screws or clips holding the cover in place.
Step 3: Remove the Brush Roll
Once the cover is removed, carefully lift out the brush roll. Be sure to note the orientation of the brush so you can return it to the vacuum in the correct position.
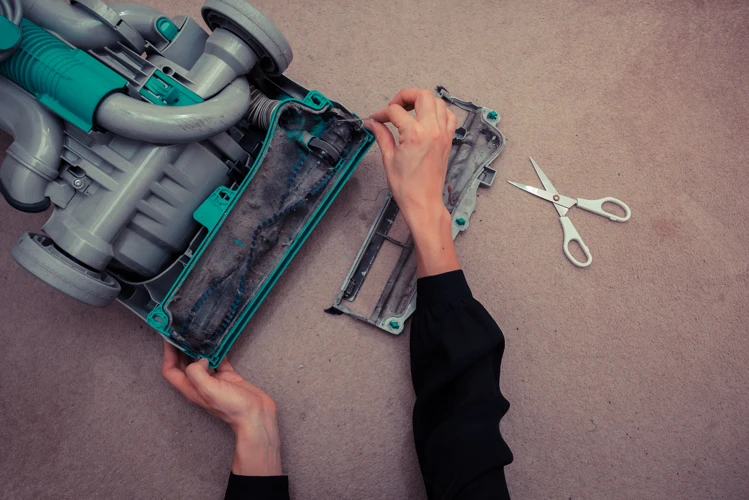
Step 4: Remove Debris from the Brush Roll
Using a pair of scissors or a seam ripper, carefully cut and remove any tangled hair or debris from the brush roll. Take care not to damage the bristles or any other components.
Step 5: Clean the Brush Roll
After removing the debris, use a mixture of warm water and mild soap to clean the brush roll. You can also use a toothbrush to scrub away any remaining dirt or grime. Rinse the brush roll thoroughly with water and then allow it to air dry completely.
Step 6: Reassemble the Vacuum
Once the brush roll is dry, reinsert it back into the vacuum, making sure it is properly oriented. Replace the cover and any screws or clips that were removed.
By cleaning the brush roll on a regular basis, you can ensure that your vacuum continues to operate efficiently and effectively, and you can save yourself the headache of dealing with damaged parts or clogs.
Inspect the Belt
One of the most critical components of your vacuum is the belt, which drives the brush roll and helps to lift dirt and debris from your floors. Over time, belts can become worn, stretched, or damaged, leading to a decrease in cleaning efficiency. That’s why it’s important to regularly inspect the belt and make sure it’s in good condition. By doing so, you can keep your vacuum running smoothly and ensure your floors stay spotless. But how exactly do you inspect the belt? Let’s dive in and explore.
Why Inspect the Belt?
The belt of your upright vacuum is an important component that drives the brush roll to pick up dirt and debris from your floors. It’s critical to regularly inspect the belt to ensure it’s not worn or damaged. Otherwise, it may not be able to do its job properly, and the vacuum’s cleaning ability will decrease.
Here are some potential problems that can arise from a worn or damaged belt:
Potential Problems
Consequences
The brush roll stops rotating
The vacuum can’t pick up debris effectively and may leave dirt behind
The belt breaks
The vacuum won’t work at all until a new belt is installed
The belt slips
The brush roll won’t rotate at the right speed, reducing the vacuum’s cleaning ability
To prevent these issues, it’s important to inspect the belt for signs of wear or damage. You should also replace the belt on a regular basis as recommended by the manufacturer. Generally, this is every 6-12 months, but it may vary depending on your usage.
Additionally, it’s important to use the correct belt replacement that’s compatible with your vacuum model. Using the wrong type of belt can further damage your vacuum and lead to even more costly repairs.
How to Inspect the Belt
Inspecting the belt on your upright vacuum is a simple task that can help prolong the life of your machine. Follow these steps to inspect the belt:
Unplug the vacuum from the electrical outlet for safety.
Locate the belt cover on the base of the vacuum. This is typically a plastic cover that can be removed with a screwdriver.
Remove the belt cover to reveal the belt and brush roll.
Visually inspect the belt for signs of wear and tear. Look for cracks, fraying, or other damage to the belt. If the belt is damaged, it will need to be replaced.
Gently touch the belt with your finger to see if it is loose. A loose belt may need to be tightened or replaced.
Rotate the brush roll to ensure it moves freely. If the brush roll is difficult to turn or makes a grinding noise, there may be debris or damage that needs to be addressed before using the vacuum again.
Make sure the belt is correctly positioned on the brush roll and motor spindle. If it has slipped out of place, use the screwdriver to reposition it.
Replace the belt cover and secure it in place with the screwdriver.
Plug the vacuum back in and test its performance to ensure everything is working well.
Remember, a broken belt can lead to poor suction and increased wear-and-tear on your motor. Checking and replacing the belt as needed will help keep your vacuum running efficiently for years to come. If you’re unsure about how to inspect or replace the belt, consult the manufacturer’s instructions or take your vacuum to a professional for maintenance.
Empty the Dustbin Regularly
As you use your upright vacuum to keep your home clean and tidy, the dustbin accumulates dirt and debris that needs to be emptied regularly. Neglecting this step can lead to reduced suction power and ultimately damage the vacuum. So, it’s important to understand the significance of dustbin maintenance and learn how to do it the right way. In this section, we’ll discuss the importance of emptying the dustbin on schedule and how to do it efficiently to keep your vacuum running at peak performance.
Importance of Dustbin Maintenance
Emptying the dustbin regularly is an essential part of upright vacuum maintenance that cannot be overlooked. Failure to maintain the dustbin can lead to a reduction in suction power, making it harder to clean your floors. Here are some reasons why dustbin maintenance is so critical.
Prevents Clogs: Over time, dirt and debris will accumulate in the dustbin, leading to clogs. If the dustbin is not emptied regularly, it will fill up and begin to affect the vacuum’s performance by reducing its suction power. This can cause a strain on the motor and other components, causing them to wear out faster.
Improves Indoor Air Quality: A full dustbin can release a cloud of dust and allergens into the air when the vacuum is turned on or opened for cleaning. Emptying the dustbin onto a trash bag outside allows homeowners to eliminate these particles from their indoor air, making it safer and healthier to breathe.
Prevents Unpleasant Smells: Food particles, pet hair, and other debris can begin to rot and decay if left in the dustbin for too long. This can lead to a terrible odor that spreads throughout the home every time you vacuum. By emptying the dustbin regularly, you can keep unpleasant smells at bay.
Protects the Vacuum: Regularly emptying the dustbin also helps to protect the vacuum’s motor and other components from potential damage caused by debris that has been left inside the bin for too long. This leads to a longer lifespan for your vacuum.
Emptying the dustbin regularly is an essential aspect of upright vacuum maintenance that simply cannot be ignored. It prevents clogs, improves indoor air quality, prevents unpleasant smells, and protects the vacuum from damage. By keeping the dustbin clean, homeowners can ensure that their vacuum continues to operate efficiently for years to come.
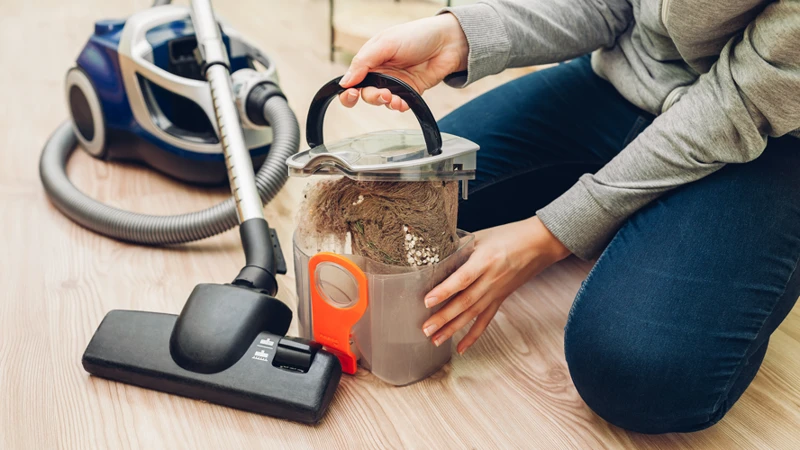
How to Empty the Dustbin
Emptying the dustbin is a vital part of maintaining your upright vacuum’s efficiency. Here are the steps to follow to properly empty the dustbin:
Step 1: First, turn off your vacuum and unplug it from the wall. This is important for safety reasons and to prevent any accidental starting while emptying the dustbin.
Step 2: Locate the dustbin on your vacuum. In most models, it is easily accessible and can be removed with the press of a button or latch.
Step 3: Once the dustbin is removed, take it to a trash can or bag outdoors to avoid spreading any dust or debris inside your home.
Step 4: Open the dustbin lid and carefully empty the contents into the trash can. Be sure to hold the dustbin away from your body and face to avoid inhaling any dust or debris.
Step 5: Using a soft cloth or brush, clean the interior of the dustbin to remove any remaining dust or debris. This will prevent buildup and ensure the vacuum operates efficiently in the future.
Step 6: After cleaning the dustbin, reattach it to your vacuum following the manufacturer’s instructions.
By regularly emptying the dustbin and cleaning the interior, you will prevent clogs and ensure your vacuum operates at peak performance.
Check the Hose for Blockages
Have you noticed a decrease in suction power when using your upright vacuum? Your hose may be the culprit! Over time, debris can get stuck in the hose and cause blockages, reducing the effectiveness of your vacuum. Don’t let a clogged hose limit the potential of your cleaning machine. In this section, we will discuss the importance of checking your vacuum’s hose for blockages and how to do it effectively.
Why Check the Hose?
Checking your vacuum’s hose for blockages is incredibly important for keeping your upright vacuum running efficiently. Here are some reasons why you should check the hose:
Prevents Loss of Suction Power: A blocked hose can cause a loss of suction power, which affects the vacuum’s ability to pick up dirt and debris. This means it will take longer to clean your floors and your vacuum may not be getting everything up off the ground.
Improves Overall Cleaning Experience: A vacuum with a blocked hose can require you to move the vacuum back and forth over the same area multiple times to get the job done. This can quickly become frustrating, resulting in a negative cleaning experience.
Extends the Life of Your Vacuum: When you check for blockages in the hose, you’re ensuring the vacuum’s motor isn’t working harder than it needs to. The harder the motor works, the quicker it will wear out, shortening the life of your vacuum.
Prevents Overheating: A blocked hose can cause the motor to overheat, which can burn out the motor or other components. This can be a costly repair and may even require you to replace your entire vacuum.
As you can see, checking the hose for blockages is crucial for keeping your upright vacuum running at its best. If you notice a loss of suction power or are having to move your vacuum over the same spot multiple times, be sure to check the hose for any blockages.
How to Check for Blockages
Checking for blockages in your upright vacuum is a crucial part of maintaining its efficiency. Here are some steps to follow:
Turn off and unplug the vacuum: Safety first! Always turn off and unplug the vacuum before performing any maintenance.
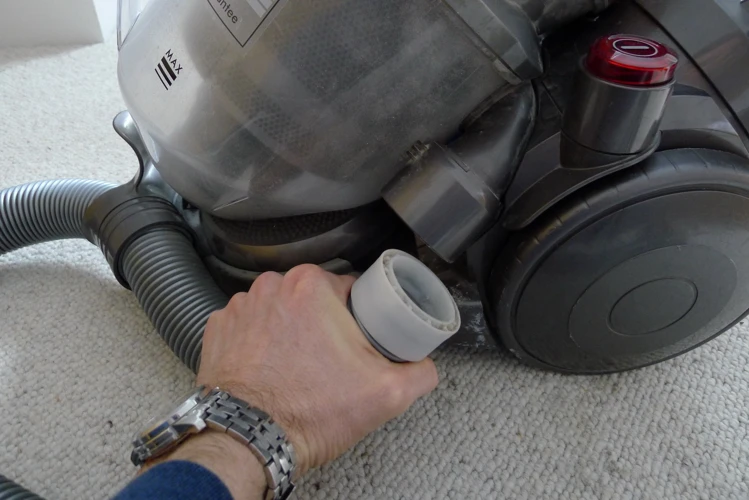
Check the hose: Detach the hose from the vacuum and inspect it for any clogs or obstructions. You can use a long object like a broom handle to gently push out any visible blockages.
Inspect the nozzle: Check the nozzle and remove any large debris or tangled hair. Use scissors or a brush to carefully cut or pull the tangled hair out of the brush roll or nozzle.
Use a straightened coat hanger: Straighten out a coat hanger and carefully insert it into the hose. Carefully move the coat hanger up and down the hose to dislodge any stubborn clogs.
Check the filters: Make sure to inspect the filters for any accumulated debris or clogs. Remove the filters and tap them gently against a hard surface to dislodge any dirt or debris. Depending on the type of filter your vacuum employs, you may also be able to rinse it with water to remove more stubborn debris or just replace the whole filter outright.
Reassemble: Once you have inspected and cleaned out all blockages, reassemble the parts in their proper place. Make sure that everything is properly secured before resuming vacuum use.
It’s important to check for blockages in your vacuum regularly to ensure its longevity, efficiency, and avoid any damage that can come from a vacuum overworked from trying to pull air through an obstructed hose. If you experience any difficulties clearing a blockage or risk damaging parts, it’s recommended to schedule service or consult with the manufacturer.
Store Your Vacuum Correctly
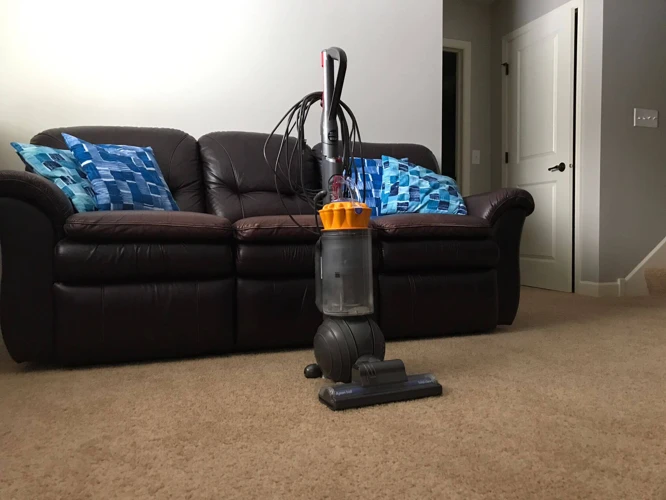
After ensuring that your upright vacuum is working at its best by following the tips mentioned earlier, you should also keep in mind the importance of proper storage. Storing your vacuum properly is essential in maintaining its longevity and effectiveness. It is important to take some time to properly store your vacuum after using it. Not only will proper storage make your vacuum last longer, but it will also make it easier to use next time. Let’s take a look at some of the best practices for storing your upright vacuum.
Why Proper Storage is Important
Properly storing your upright vacuum is an important aspect of maintenance that is often overlooked. Here are a few reasons why it’s important to take the time to properly store your vacuum:
Protects the vacuum from damage. When a vacuum is left out in the open, it is more susceptible to damage from accidental bumps, falls, or other mishaps. Proper storage provides a safe and secure place for your vacuum, ensuring that it stays in good working condition for years to come.
Prevents dust and debris buildup. When your vacuum is not in use, dust and debris can accumulate on its surface, and possibly even inside the inner workings of the machine. This buildup can clog the filters, impede the airflow, and reduce the performance of your vacuum. Proper storage helps keep your vacuum clean and free of these unwanted contaminants.
Keeps accessories and parts organized. Most vacuum cleaners come with a variety of accessories and parts, such as brushes, hoses, and nozzles. Proper storage allows you to keep all of these items in one place, making them easy to find and access when you need them.
Increases the lifespan of your vacuum. By protecting your vacuum from damage, preventing dust and debris buildup, and keeping its parts organized, proper storage can help extend the lifespan of your vacuum. By taking the time to store your vacuum properly, you can get the most out of your investment.
As you can see, proper storage is an essential part of maintaining your upright vacuum. By taking a few simple steps to store your vacuum correctly, you can help ensure that it stays in good working condition for years to come.
How to Store Your Vacuum
Proper storage of your upright vacuum is important for its longevity and efficiency. Here are some tips for storing your vacuum:
Tip
Description
1
Before storing, ensure that the vacuum is completely turned off and unplugged from the power source.
2
Remove any attachments or accessories attached to the vacuum.
3
Wipe down the exterior of the vacuum with a dry cloth or microfiber towel to remove any dust or debris.
4
Ensure that the vacuum’s brush roll is clean and free of any hair or debris. This will prevent any odors and also prevent the brush roll from getting tangled.
5
If your vacuum has a retractable cord, retract it fully before storing. If not, neatly wrap the cord around the vacuum.
6
Find a dry and cool location for storage to prevent any damage caused by moisture or extreme heat. A closet or dry storage room would be ideal.
7
If you need to store your vacuum for an extended period, it would be wise to cover it with a sheet or cover to protect it from dust and any other debris.
By following these tips, you can be assured that your upright vacuum will be safe, clean and ready for use the next time you need it.
Use the Right Vacuum Attachment for the Job
You may have a variety of vacuum attachments in your cleaning arsenal, but do you know which one to use for each specific job? Choosing the right attachment can make your cleaning more efficient and effective. It can also prolong the life of your vacuum. So, let’s dive into some tips on how to select the appropriate attachment for different surfaces and messes.
Why Use the Right Attachment?
Using the right attachment for your upright vacuum can make all the difference in its performance. If you use the wrong attachment, you may not be able to reach tight spaces or effectively clean certain surfaces. This can lead to a subpar cleaning job, and ultimately, a less efficient vacuum.
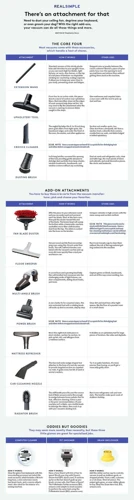
Table: Types of Vacuum Attachments and Their Uses
Attachment
Use
Crevice Tool
Reaches tight spaces such as corners and crevices
Dusting Brush
Cleans delicate surfaces such as curtains and lampshades without causing damage
Upholstery Tool
Cleans upholstery and furniture without damaging the fabric
Pet Hair Tool
Removes pet hair from carpets and furniture
Bare Floor Tool
Cleans bare floors such as hardwood, tile, and laminate without scratching the surface
By using the appropriate attachment for each job, you’ll be able to effectively clean all areas of your home. This will not only make your home look and feel cleaner, but it will also extend the life of your vacuum. Using the wrong attachment can cause unnecessary wear and tear on your vacuum, leading to the need for more frequent repairs or even replacement.
So the next time you pull out your upright vacuum, take a moment to assess the job at hand and choose the appropriate attachment. Your home will thank you, and so will your wallet.
How to Identify the Best Attachment for the Job
When it comes to picking the right attachment for the job with your upright vacuum, there are several factors to consider. Here’s a table to help you identify which attachment is best suited for specific cleaning tasks:
Cleaning Task
Best Attachment
Dusting shelves, blinds, or baseboards
Dusting brush attachment
Cleaning upholstery, curtains, or other delicate fabrics
Crevice tool attachment with soft brush
Cleaning hard floors or tile
Bare floor attachment or combination floor tool
Cleaning tight spaces (e.g. between couch cushions)
Crevice tool attachment
Cleaning pet hair from furniture or carpeting
Pet hair tool attachment
Cleaning staircases
Stair tool attachment
It’s important to choose the right attachment for the job in order to ensure efficient and effective cleaning. The wrong attachment can damage delicate surfaces or fail to pick up dirt and debris, wasting your time and effort. If you’re unsure which attachment to use, consult your vacuum’s user manual or contact the manufacturer for advice. With the right attachment for the job, your upright vacuum can handle a wide range of cleaning tasks with ease.
Adjust Your Vacuum Settings
Do you find that your upright vacuum is not picking up as well as it used to? One possible reason could be because the settings are not adjusted properly for the surface you are cleaning. Adjusting your vacuum settings can make a big difference in how efficiently it cleans carpets, floors, and other surfaces. Don’t worry if you’re not sure how to do it – we’ll walk you through the process step-by-step. So, let’s get started!
Why Adjust Your Settings?
Adjusting your vacuum settings is an important step in keeping your vacuum running efficiently. Vacuum settings affect performance, suction power, and energy usage , so it’s essential to make sure you’re using the right settings for the job.
For example, using too high of a suction power on delicate fabrics or surfaces can damage them , while using too low of a suction power on carpets can result in inefficient cleaning. By adjusting your vacuum settings, you can optimize its performance while ensuring that you’re not wasting energy or damaging your surfaces.
Not only that, but using the right vacuum setting can actually help prolong the life of your vacuum by reducing strain on the motor and other components. This means you’ll spend less money on maintenance and replacement parts over time.
Here’s an html table summarizing some common types of surfaces and the recommended vacuum settings:
Surface
Recommended Settings
Carpets and Rugs
High suction power, rotating brush roll
Hardwood Floors
Low suction power, no brush roll, hardwood floor attachment
Tiled or Laminate Floors
Medium suction power, hard floor attachment
Furniture and Upholstery
Low suction power, upholstery attachment
Remember to always consult your vacuum’s user manual for specific recommendations on how to adjust settings and use attachments for best results. By taking the time to adjust your vacuum settings, you’ll not only achieve a cleaner home but also prolong the life of your vacuum.
How to Adjust Your Vacuum Settings
When it comes to upright vacuum maintenance, adjusting your vacuum’s settings is an important part of keeping it running efficiently. Here are some steps you can follow to adjust your vacuum settings:
Assess the surface you will be cleaning: Before you turn on your vacuum, take a few moments to assess the surface you will be cleaning. Determine whether the surface is a hard floor or carpeted, and note the type of carpet, if applicable.
Adjust the height setting: Many upright vacuums have a height adjustment setting that allows you to raise or lower the vacuum head. This setting is essential for ensuring that your vacuum’s brush roll is making proper contact with the surface you are cleaning. For hard floors or low-pile carpets, adjust the head to the lowest setting. For high-pile carpets, adjust the head to a higher setting to prevent it from getting bogged down.
Select the correct suction power: Most upright vacuums have several suction power settings to choose from. For hard floors or delicate surfaces, choose a lower suction setting to prevent damage. For carpets, choose a higher suction setting to help lift dirt and debris from deep within the fibers.
Use the correct attachments: Depending on the surface you are cleaning, you may need to use a specific attachment to achieve optimal results. Use the crevice tool for tight spaces, the dusting brush for surfaces like window sills or baseboards, and the upholstery tool for furniture or drapes. Make sure to attach the appropriate tool securely to your vacuum.
Take breaks: Vacuuming can be physically demanding, especially if you are cleaning a large space or heavy traffic area. Take occasional breaks to rest and stretch to prevent physical strain.
By following these steps, you can adjust your vacuum settings to match the surface you are cleaning, ensuring that your vacuum is running efficiently and prolonging its lifespan.
Keep an Eye on Your Vacuum’s Performance
As much as you maintain your vacuum, it’s bound to develop some issues after a while. To keep your vacuum running efficiently, you need to keep an eye on its performance. Noticing changes in the way it operates can indicate maintenance needs that, if left unchecked, could lead to costly repairs. But how do you identify the signs of a vacuum that’s struggling? In this section, we’ll highlight some telltale signs you should look out for, explaining what they could mean and what you can do to address them.
How Performance Affects Maintenance Needs
The performance of your upright vacuum cleaner is a crucial factor in determining its maintenance needs. Poor performance could be an indication of underlying maintenance issues that need immediate attention. Here are some ways in which performance affects maintenance needs:
Losing suction power: If your vacuum starts losing suction power, it may be time to clean or replace the filters or empty the dustbin. Clogged filters and full dustbins can impede airflow, reducing the suction power and making it difficult to pick up debris. Additionally, a malfunctioning motor or a damaged hose could also cause a drop in suction power.
Brush roll not spinning: A brush roll that stops spinning could make it harder to clean carpets or pick up debris from floors. A brush roll that’s clogged with hair, fibers, or debris needs to be cleaned to prevent it from getting damaged or reducing suction power. If the brush roll still doesn’t spin after cleaning, you may need to check for belt damage or replace the belt.
Excessive noise: If your vacuum starts making a lot of noise, it could be due to debris getting stuck in the brush roll or hose. Foreign objects getting stuck in the vacuum’s mechanisms can cause serious damage if left untended, so be sure to clean any debris as soon as possible.
Overheating: An overheating vacuum cleaner can be a sign of an underlying problem, such as a clogged filter or dustbin or a damaged motor. Overheating can cause damage to the vacuum’s components or even start a fire, so it’s important to find and fix the issue as soon as possible.
Maintaining your vacuum’s performance is critical to extend the life of your machine and keep it running efficiently. By noticing any changes in performance and identifying the underlying problem, you can prevent small issues from turning into big headaches that require costly repairs or replacements. It’s better to take preventive steps regularly, such as cleaning filters and brush rolls and emptying dustbins, than to let performance issues pile up and worsen over time.
What to Look for in Your Vacuum’s Performance
As you use your upright vacuum, it’s important to pay attention to its performance to ensure that it’s running efficiently. Here are some key factors to look out for:
Suction Power: One of the most important aspects of your vacuum’s performance is its suction power. If you notice that the suction seems weak, it could be an indicator of a clogged hose or a full dustbin.
Noise: While no vacuum is completely silent, excessive noise could be a sign of something more serious. A loose part could be rattling around, or the motor could be failing.
Brush Roll: The brush roll is responsible for agitating and loosening dirt and debris from your carpets. If you notice that it’s not spinning properly or the bristles appear worn down, it may need to be cleaned or replaced.
Overall Movement: Your vacuum should glide easily across your floors without significant resistance or difficulty. If it’s harder to move than normal, it might be an indication of a clogged hose or worn-down parts.
Smell: A foul odor coming from your vacuum could be caused by a buildup of bacteria, mold, or dust. It’s important to clean your vacuum thoroughly to keep it smelling fresh.
These factors can help you determine if your vacuum is running as efficiently as it should be. If you notice any issues with your vacuum’s performance, it may be time to perform maintenance or replace worn or broken parts. Taking care of your vacuum’s performance is key to keeping it running efficiently for years to come.
Replace Worn or Broken Parts
As with any mechanical device, parts and components on your upright vacuum can wear down or break over time due to repetitive use. It’s important to keep an eye out for signs of wear and tear, as ignoring them can lead to more significant problems down the road. By replacing worn or broken parts on your Vacuum, you can ensure it continues to perform efficiently and effectively. Here are some potential issues to watch out for and how to address them.
Why Replace Worn or Broken Parts?
Regular maintenance and upkeep of your upright vacuum is crucial to ensure that it functions properly and efficiently. However, it is important to note that even with regular maintenance, some parts of your vacuum may eventually need to be replaced. Here are some reasons why replacing worn or broken parts of your vacuum is important:
Improved Performance: One of the main reasons to replace worn or broken parts is to maintain the performance of your vacuum. Over time, parts such as belts and brush rolls may become worn and ineffective, resulting in a decrease in suction power and overall cleaning ability.
Reduce Risks: A vacuum with worn or broken parts can also pose a risk to the user. Parts such as belts and brush rolls may break apart while in use, potentially causing injury or damage to your vacuum.
Extend Lifespan: Replacing worn or broken parts can also extend the lifespan of your vacuum. Neglecting to replace damaged or worn parts can lead to further damage and even more costly repairs down the line.
Save Money: Replacing worn or broken parts may seem like an additional expense, but in the long run, it can actually save you money. Properly functioning parts can help your vacuum operate more efficiently, meaning it will use less energy and require less frequent repairs or replacements.
Keeping your vacuum in good repair and replacing worn or broken parts as necessary can help ensure it functions at its best and lasts as long as possible.
How to Replace Parts
When it comes to upright vacuum maintenance, one of the most important things you need to keep in mind is replacing worn or broken parts. This can range from simple things like replacing the vacuum bag to more complex repairs like replacing the motor or the brush roll.
Identify the Issue: Before you set out to replace any part, you need to identify the issue as accurately as possible. This can involve testing your vacuum’s performance and checking for visible signs of wear and tear.
Order the Required Part: Once you have identified the part that needs to be replaced, you will need to order the required replacement part. This can typically be done online from reputable retailers or through the manufacturer.
Gather the Required Tools: Depending on the part that needs to be replaced, you may need a variety of tools to complete the job. This can include screwdrivers, pliers, and other tools commonly found in a basic toolkit.
Disconnect the Power: Before you begin any repair work, you need to disconnect your upright vacuum from the power source. This will help prevent any accidental electrical shocks or other injuries.
Remove the Old Part: Once you have everything you need, you can begin removing the old, broken or worn part. Refer to your vacuum’s user manual for specific instructions on how to remove different parts.
Install the New Part: With the old part removed, it’s time to install the new one. This process will vary depending on the part being replaced, but it’s typically straightforward if you follow the instructions provided with the replacement part.
Test Your Vacuum: Once you have replaced the worn or broken part, it’s important to test your vacuum’s performance to ensure everything is working properly. If the issue persists, you may need to consult a professional technician or consider replacing the entire vacuum.
Keeping your upright vacuum in good working order requires regular maintenance and part replacement when needed. By following these simple steps and taking a proactive approach to maintenance, you can extend the lifespan of your vacuum and keep it running efficiently for years to come.
Step
Action
1
Identify the Issue
2
Order the Required Part
3
Gather the Required Tools
4
Disconnect the Power
5
Remove the Old Part
6
Install the New Part
7
Test Your Vacuum
Keep Your Vacuum Clean and Free of Debris
Ensuring that your vacuum remains clean and free of debris is crucial for maintaining its efficiency and longevity. Over time, various types of debris like dirt, dust, and hair can accumulate within your vacuum’s various parts, hindering its suction and overall performance. Not only can this lead to a reduction in effectiveness, but it can also cause damage to various parts of the vacuum. In this section, we’ll discuss the importance of keeping your vacuum clean and free of debris, as well as provide some tips and tricks to help you achieve this.
Why Keep Your Vacuum Clean?
Keeping your vacuum clean is crucial for maintaining its performance and longevity. Here are some key reasons why you should prioritize vacuum cleanliness as part of your regular maintenance schedule:
Prevent loss of suction: A dirty vacuum filter or full dustbin can lead to a loss of suction power, making it harder for your vacuum to pick up dirt and debris. This can make your cleaning tasks more time-consuming and less effective, ultimately requiring more effort on your part to achieve the same level of cleanliness.
Extend your vacuum’s lifespan: A clean vacuum is less likely to experience mechanical issues and breakdowns. For example, a clogged and dirty brush roll can cause the motor to overheat and wear down more quickly, shortening the overall lifespan of your vacuum. By keeping your vacuum clean and free of debris, you can help it last longer and save money on replacement costs.
Improve indoor air quality: A vacuum that’s full of dust and other particles can release those particles back into the air as you clean – this is especially problematic if you or someone in your household has allergies or respiratory issues. By regularly cleaning your vacuum’s filters and dustbin, you can help to improve indoor air quality and alleviate allergy symptoms.
Maintain strong suction power: A clean vacuum is essential for maintaining strong suction power, which is critical for effectively cleaning carpets, upholstery, and other surfaces. When your vacuum’s filters and brush roll are free of dirt and debris, it can easily and thoroughly pick up dirt, pet hair, and other debris.
Reduce wear and tear: A dirty vacuum can experience more wear and tear on its internal components, which can eventually lead to mechanical failures and breakdowns. By keeping your vacuum clean and well-maintained, you can reduce the frequency of repairs and replacements, saving you time, money, and hassle in the long run.
Cleaning your vacuum is a simple but important step you can take to ensure that it continues to perform optimally and last for many years to come. By taking the time to regularly clean and maintain your vacuum, you can help it to operate at its full potential and provide you with efficient and effective cleaning for all your household needs.
How to Keep Your Vacuum Clean
To keep your vacuum running efficiently, it’s essential to keep it clean and free of debris. Here are some tips on how to keep your vacuum clean:
Regularly empty the dustbin: Empty the dustbin after every use or when it’s full. This prevents dust and debris from building up inside the vacuum and obstructing the airflow.
Clean the brush roll: Remove any hair, thread, or debris wrapped around the brush roll regularly. This ensures that the brush roll can continue to rotate freely and effectively remove dirt and debris from carpets and floors.
Wipe down the exterior: Use a damp cloth or microfiber cloth to wipe down the exterior of the vacuum. This helps to remove any dust or dirt that has accumulated on the surface of the vacuum.
Clean the filters: Check the filters regularly and replace or clean them as needed. Refer to the manufacturer’s instructions for specific cleaning methods for your vacuum’s filters.
Use a crevice tool: Use a crevice tool to clean tight spaces and hard-to-reach areas. This helps to remove any dirt and debris that may be lurking in the corners or crevices of your home.
Store your vacuum properly: When your vacuum is not in use, store it in a dry, cool place. This prevents any moisture from getting inside the vacuum and causing damage or rust.
By following these simple tips, you can keep your vacuum clean and running efficiently for years to come. Not only will this help to prolong the life of your vacuum, but it will also ensure that it continues to pick up dirt and debris effectively, keeping your home clean and healthy.
Conclusion
In conclusion, taking proper care of your upright vacuum is crucial in ensuring that it runs efficiently for a long time to come. By regularly cleaning the filters and the brush roll, replacing vacuum bags, inspecting the belt, emptying the dustbin, and checking the hose for blockages, you can help prevent damage and maintain optimal performance.
Storing your vacuum correctly, using the right attachment for the job, adjusting your vacuum settings, keeping an eye on its performance, and replacing worn or broken parts are all essential for ensuring that your vacuum continues to function well.
Remember, keeping your vacuum clean and free of debris is key to maintaining its suction power and preventing damage to internal components. Regular maintenance can also help extend the life of your machine and save you money in the long run.
So, make vacuum maintenance a part of your cleaning routine and reap the benefits of reliable and efficient cleaning power. Don’t neglect your vacuum! By following the tips outlined in this article, you can ensure that your investment in a high-quality upright vacuum pays off for years to come.
Frequently Asked Questions
How often should I clean the filters in my upright vacuum?
It is recommended to clean the filters after every use or at least once a month.
Can I reuse vacuum bags?
No, vacuum bags are meant to be single-use only. It is important to replace them as needed.
Why should I clean the brush roll in my vacuum?
A clean brush roll helps to maintain efficient suction and prevents damage to your carpets and floors.
How often should I inspect the vacuum belt?
You should inspect the belt every 6 months or when you notice reduced suction in your vacuum.
Why do I need to empty the dustbin regularly?
Regularly emptying the dustbin helps to maintain efficient suction and prevents damage to your vacuum’s motor.
Can I use any attachment with my upright vacuum?
No, it is important to use the correct attachment for the job to prevent damage to your floors and carpets.
Why should I adjust my vacuum settings?
Adjusting your vacuum settings can improve efficiency and prevent damage to your floors and carpets.
What should I look for to know if my vacuum needs maintenance?
You should look for reduced suction, unusual sounds, or debris buildup in the vacuum’s parts.
Can I replace parts in my vacuum myself?
Yes, many vacuum parts can be easily replaced by following the manufacturer’s instructions.
How often should I clean my vacuum?
You should clean your vacuum after every use or at least once a month to prevent debris buildup and maintain efficient suction.