You may be wondering how often should you replace the filters in your upright vacuum cleaner. It’s a common but perplexing question. While vacuuming can make your house look clean, a dirty filter can compromise the air quality and suction power of your vacuum, as well as negatively affect its lifespan. So, it’s essential to know when to replace the filters to ensure your vacuum cleaner performs at its best. In this article, we’ll discuss the types of filters found in an upright vacuum, the importance of cleaning and replacing them regularly, how often you should do it and steps to take to do it right. So, let’s dive in!
Why Should You Clean and Replace Filters?
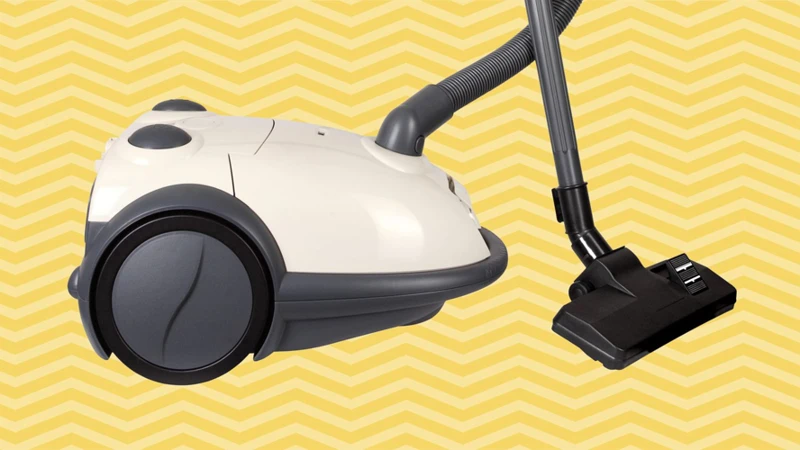
As a proud owner of an upright vacuum cleaner, it’s important to know that cleaning and replacing filters play a vital role in keeping your cleaning machine in tiptop shape. Neglecting this essential aspect of maintenance can lead to a bundle of problems that might affect your vacuum’s performance and your home’s air quality. In this section of the article, we’ll explore the benefits of regularly cleaning and replacing filters, including improved air quality, enhanced suction power, and a longer lifespan for your upright vacuum cleaner. So, let’s dive in and learn why it’s essential to keep your vacuum filters clean and fresh. For more tips on getting the most out of your upright vacuum cleaner, check out our article on upright vacuum maintenance tips.
Improve Air Quality
Cleaning and replacing filters in your upright vacuum cleaner is crucial for the overall performance of the appliance, and it has many benefits, including improving air quality. A properly functioning filter can trap dust, pet dander, and other allergens, preventing them from being recirculated back into the air you breathe.
Poor air quality can cause or worsen respiratory problems, so proper maintenance of your vacuum cleaner’s filter system should be a top priority. The accumulation of dust, debris, and other pollutants from your carpets or floors can hinder your indoor air quality and even lead to asthma and allergies. It may also cause unpleasant odors that can be difficult to get rid of.
Preventing these scenarios is possible when you clean and replace the filters in your vacuum cleaner regularly. Apart from relieving respiratory problems, cleaner air means better sleep, increased productivity, and an overall healthier environment.
To maintain cleaner air quality at home, it is essential to prioritize regular cleaning and replacement of different types of filters in your upright vacuum cleaner (best upright vacuum cleaner for your home). Below are some of the steps to help you clean and replace the filters.
| Filters | Frequency of cleaning | Frequency of replacement |
|---|---|---|
| Pre-motor filter | After every 3-4 uses or when visibly dirty | Every 6 months or as required |
| Post-motor filter | After every 4-6 uses or when visibly dirty | Every 6-12 months or as required |
| HEPA filter | After every 6 months or as recommended | Every 2 years or as required |
By following these recommended cleaning and replacement frequencies, you can maintain the optimal air quality (most effective upright vacuum tips). Keep your filter clean and your vacuum cleaner working efficiently.
Enhance Vacuum Cleaner’s Suction Power
Cleaning and replacing filters in your upright vacuum cleaner can enhance the suction power of the vacuum. When air flows through a clogged filter, it slows down, causing a decrease in suction power. A dirty filter can make your vacuum’s motor work harder, causing it to overheat and damage the machine.
By regularly cleaning and replacing your vacuum’s filters, you ensure that the airflows freely, and the motor doesn’t have to work as hard. This will lead to improved suction power, meaning that you can clean your home more efficiently.
It is also important to note that the suction power of an upright vacuum cleaner is one of its biggest advantages over a canister vacuum. Upright vacuums typically have stronger motors and wider cleaning paths, making them an excellent choice for high-traffic areas and larger homes. You can read more about the advantages of upright vacuum cleaners in our helpful article on the topic.
However, even the best upright vacuums can experience a decrease in suction power over time, due to the accumulation of dust and debris in the filters. By regularly cleaning and replacing the filters, you can extend your vacuum’s lifespan and maintain its excellent suction power.
In addition to cleaning and replacing the filters, there are other top features of an upright vacuum that can affect its suction power, such as the quality of the brushes and the height adjustment settings. You can learn more about these features in our comprehensive guide on the top features of an upright vacuum cleaner.
If you want to keep your upright vacuum cleaner performing at its best, regular maintenance is key. By properly cleaning and replacing the filters, you can enhance the suction power of the machine and keep your home clean and healthy. If you are experiencing any issues with your upright vacuum, including poor suction power, check out our article on common issues and how to fix them.
Extend Vacuum Cleaner’s lifespan
One of the significant benefits of cleaning and replacing the filters of your upright vacuum cleaner is that it extends the vacuum cleaner’s lifespan. It is a commonly known fact that regular maintenance of any appliance contributes to its long-lasting performance. The same rule applies to vacuum cleaners too.
Filters in a vacuum cleaner play a vital role in ensuring proper functioning of the machine. Layers of dust and debris accumulate on filters over time, causing the suction power to decrease. A decrease in suction power causes the machine to work harder, which puts additional strain on the components of the vacuum cleaner.
As a result of the excessive pressure, the motor and other essential parts of the vacuum cleaner tend to wear out faster. Regular cleaning and replacement of the filters in your upright vacuum cleaner is an integral part of ensuring it has a longer lifespan.
Cleaning or replacing filters doesn’t only reduce the chances of vacuum cleaner breakdown, but it also increases the machine’s effectiveness, therefore providing better cleaning results. In the long run, doing so will help you save a lot of money and prolong the life of your vacuum cleaner.
Below is a table that depicts some of the benefits of cleaning and replacing the filters in your vacuum cleaner that contribute to extending its lifespan.
| Benefits of cleaning and replacing filters |
|---|
| Prevents dust and debris from accumulating on components of the vacuum cleaner |
| Increases suction power and the effectiveness of the machine |
| Prevents breakdown or damage to the motor |
| Extends the lifespan of your upright vacuum cleaner |
Cleaning and replacing the filters of your upright vacuum cleaner can significantly extend the life of the machine. It will also improve its performance and save you considerable costs in the long run. To learn more about other types of vacuum cleaners, including upright versus canister options, feel free to check out our article about upright vs canister vacuums.
Types of Filters in Upright Vacuum Cleaner
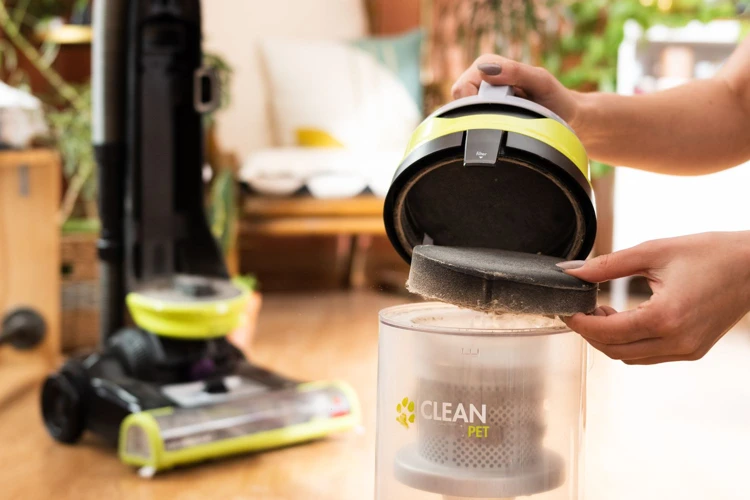
As you begin to familiarize yourself with your upright vacuum cleaner, you’ll discover that it contains several filters that efficiently capture dust and dirt particles before they are blown back into the air. Filters are essential components that help maintain the performance and longevity of your cleaning appliance. There are three main types of filters that can be found in an upright vacuum cleaner: the pre-motor filter, the post-motor filter, and the HEPA filter. Each filter serves a specific purpose in keeping your home clean and free from dust, allergens, and other harmful particles.
Pre-Motor Filter
The pre-motor filter is an essential component in any upright vacuum cleaner. It is located under the dustbin or bag, and its primary function is to protect the vacuum motor from dust and debris that is sucked in during cleaning. Without this filter, the motor would quickly become clogged, which could lead to a reduction in suction power or, in extreme cases, motor failure. It’s crucial to clean and replace this filter regularly to ensure your vacuum cleaner works at optimum capacity.
Why Clean and Replace the Pre-Motor Filter?
Cleaning and replacing the pre-motor filter has numerous benefits, including:
| Benefits | Explanation |
| Boosts suction power | If the pre-motor filter is clogged, it can reduce airflow and suction, making it hard to clean effectively. By cleaning or replacing it, you can regain the suction power of your vacuum cleaner. |
| Prevents overheating | If the motor has to work harder due to a clogged filter, it could overheat and cause damage to the vacuum cleaner. Cleaning or replacing the filter reduces the risk of overheating. |
| Extends vacuum cleaner lifespan | Regularly replacing the pre-motor filter helps protect the motor from dust and debris, prolonging the lifespan of the vacuum cleaner. |
How Often Should You Clean or Replace the Pre-Motor Filter?
The frequency with which you should clean or replace the pre-motor filter depends on the manufacturer’s recommendations, the type of vacuum cleaner, and the cleaning habits of your home. Typically, you should aim to clean or replace the filter every 3-6 months if you have a pet or 6-12 months if you do not have pets. However, if you have allergies or someone in your household has asthma or respiratory problems, then you should clean or replace the filter more frequently.
Steps to Clean or Replace the Pre-Motor Filter
Cleaning or replacing the pre-motor filter is a straightforward process. Here are the steps to follow:
Cleaning the Pre-Motor Filter:
1. Turn off the vacuum cleaner and unplug it from the wall socket
2. Locate the filter and remove it from the vacuum cleaner
3. Use a soft brush to remove any debris and hair from the filter
4. Rinse the filter under running water until it is clean
5. Leave the filter to dry completely before reinserting it into the vacuum cleaner
Replacing the Pre-Motor Filter:
1. Turn off the vacuum cleaner and unplug it from the wall socket
2. Locate the filter and remove it from the vacuum cleaner
3. Discard the old filter and replace it with a new one
4. Insert the new filter into the vacuum cleaner
5. Reassemble any parts that were removed during the process
Conclusion
Cleaning or replacing the pre-motor filter is an essential part of maintaining your upright vacuum cleaner. By doing it regularly, you can ensure that your vacuum cleaner works at its best and lasts longer, while also improving air quality in your home.
Post-Motor Filter
The post-motor filter is another essential component of an upright vacuum cleaner. Its primary function is to trap the microscopic dust particles and allergens that the suction action misses. This filter is located near the exhaust port and blocks the dirt and debris from the motor and the fan before it is released back into the room.
The Importance of Cleaning and Replacing the Post-Motor Filter
Routine maintenance of the post-motor filter is crucial to ensure that the air released from the vacuum cleaner is free of dirt, dust, and allergens. If you neglect to clean or replace the filter when required, it can result in the following:
| Issues | Consequences |
|---|---|
| Poor suction | The vacuum’s suction performance will significantly drop, making it challenging to pick up dirt and debris from floors and carpets. |
| Motor Damage | The dust and dirt accumulations in the filter can cause the motor to overheat and eventually burn out. Replacing the motor can be costly. |
| Reduced air quality | The unfiltered dust particles and allergens re-entering the room through the vacuum’s exhaust can cause allergic reactions and respiratory problems. |
How Often Should You Clean and Replace the Post-Motor Filter?
Cleaning and replacing the post-motor filter depends on several factors, including your vacuum usage, household, and environment conditions. The recommended cleaning and replacement intervals can vary between manufacturers and models. Generally, it is advisable to clean or replace the filter every three to six months, depending on usage.
Steps to Clean and Replace the Post-Motor Filter
Cleaning and replacing the post-motor filter is a simple process that you can do at home without professional help. Here are the steps you should follow:
| Cleaning the Post-Motor Filter | Replacing the Post-Motor Filter |
|---|---|
| Step 1: Locate the post-motor filter near the exhaust port | Step 1: Purchase a new post-motor filter that fits your vacuum model |
| Step 2: Remove the filter from its housing | Step 2: Turn off the vacuum and unplug it from the power source |
| Step 3: Tap the filter gently to remove the loose dirt and debris | Step 3: Locate the old filter and remove it from the housing |
| Step 4: Rinse the filter with water or clean it with a soft brush | Step 4: Replace the old filter with the new one |
| Step 5: Allow the filter to air dry completely before reinstalling it | Step 5: Reinstall the filter into its housing |
Conclusion
Regularly cleaning and replacing the post-motor filter of your upright vacuum cleaner is essential to maintain its suction power, extend its lifespan, and ensure that the air released into your home is clean and allergen-free. Refer to the manufacturer’s manual for specific cleaning and replacement instructions for your model of the vacuum.
HEPA Filter
The HEPA filter is an important part of your upright vacuum cleaner, responsible for capturing microscopic particles like allergens, dust mites, and pet dander that can cause respiratory problems. It is highly recommended for people with allergies and asthma. But how often should you clean and replace this essential filter?
Cleaning Frequency: HEPA filters should be cleaned every 2-3 months depending on usage. If you have pets, you may need to clean it more frequently.
Replacing Frequency: HEPA filters need to be replaced every 6-12 months depending on usage. If you are an allergy sufferer or have pets, it is advisable to replace the filter every 6 months to maintain optimal air quality and to avoid clogs that may reduce suction power.
HEPA filters are usually located at the rear or top of your vacuum cleaner. To clean or replace the HEPA filter, follow these steps:
| Step | Action |
|---|---|
| Step 1 | Unplug the vacuum cleaner from the power source and remove the filter cover. |
| Step 2 | Remove the HEPA filter from the vacuum cleaner. |
| Step 3 | Tap the filter gently against a hard surface to remove any loose dirt or debris. |
| Step 4 | Clean the filter with a soft brush or rinse it under cold water until the water runs clear. (Do not use soap or hot water as this may damage the filter) |
| Step 5 | Gently squeeze out the excess water and let the filter air dry completely before replacing it. (do not use any heating appliances to dry the filter) |
| Step 6 | Replace the filter cover and plug the vacuum cleaner back into the power source. |
Cleaning and replacing the HEPA filter is essential for maintaining the performance of your upright vacuum cleaner as well as the air quality in your home. Use the frequency guidelines outlined above to determine when to clean and replace the HEPA filter. Follow the steps carefully to ensure that the filter is cleaned and replaced properly.
How Often Should You Clean and Replace the Filters?
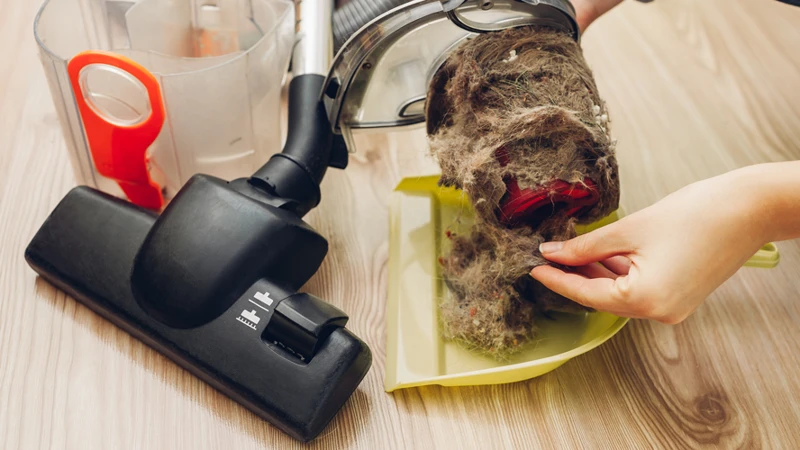
One of the keys to maintaining the performance and longevity of your upright vacuum cleaner is to regularly clean and replace its filters. With so many different types of filters and varying household cleaning conditions, it can be difficult to determine the proper cleaning and replacement schedule. However, neglecting the filters can result in decreased suction power, reduced air quality, and even cause damage to the vacuum’s motor. In this section, we will explore the recommended frequency for cleaning and changing the pre-motor filter, post-motor filter, and HEPA filter, as well as factors to consider based on your household.
Pre-Motor Filter
The Pre-Motor Filter in your upright vacuum cleaner is an essential component that helps protect the vacuum motor from dust and debris. It traps dirt particles before they reach the motor, preventing the motor from getting clogged and damaged. The Pre-Motor Filter plays a crucial role in keeping your vacuum cleaner functional and efficient. Here are some important details about the Pre-Motor Filter that you need to know:
- Types: Pre-Motor Filters can be made of foam, paper or fabric, depending on the brand and model of your vacuum cleaner.
- Cleaning: Generally, Pre-Motor Filters need to be cleaned every one or two months or after every five to six uses. If the filter is visibly caked with dust or debris, then you need to clean it immediately.
- Cleaning Process: Cleaning the Pre-Motor Filter is a simple process that you can accomplish using a few basic steps. First, remove the filter from the vacuum cleaner. Then, tap the filter gently against a hard surface to remove loose dirt and debris. Next, wash the filter with soap and water, and rinse it thoroughly. Allow the filter to dry completely before re-installing it in the vacuum cleaner.
- Replacement: On average, it is recommended to replace the Pre-Motor Filter every six to 12 months. However, this timeframe can vary based on the frequency of use and the amount of dirt and debris in your household.
By regularly cleaning and replacing the Pre-Motor Filter, you can maintain the suction power of your vacuum cleaner and prolong the lifespan of the motor. A clean Pre-Motor Filter also improves air quality in your home by trapping dust and allergens. Avoid neglecting the upkeep of your Pre-Motor Filter and make sure that it is always functioning optimally.
Post-Motor Filter
The post-motor filter is an essential component of an upright vacuum cleaner. It is responsible for trapping the fine particles that escape from the dustbin and preventing them from being released back into the air.
Why is it important to clean and replace the post-motor filter?
If the post-motor filter is not cleaned or replaced regularly, it can become clogged with dust, dirt, and debris. When this happens, the vacuum cleaner’s suction power is reduced, and it may even cause the motor to overheat. A clogged filter can also lead to a decrease in the vacuum’s performance, reducing its ability to pick up dirt and debris.
How often should you clean and replace the post-motor filter?
The frequency at which you should clean or replace the post-motor filter depends on how often you use your vacuum cleaner. Generally, it is recommended to clean the filter at least once a month and replace it every six months to a year. However, if you have pets or allergies, you may need to clean or replace the filter more frequently.
Steps to clean and replace the post-motor filter:
| Steps to clean the post-motor filter | Steps to replace the post-motor filter |
|---|---|
| 1. Turn off and unplug the vacuum cleaner | 1. Purchase a new post-motor filter |
| 2. Locate the post-motor filter (usually located near the exhaust port) | 2. Open the vacuum cleaner’s cover to access the filter |
| 3. Remove the filter from the vacuum cleaner | 3. Remove the old filter from its housing |
| 4. Tap the filter gently to remove any dust or debris | 4. Insert the new filter into the housing |
| 5. Rinse the filter in cool water until the water runs clear | 5. Close the cover |
| 6. Allow the filter to air dry completely | 6. Plug in the vacuum cleaner and turn it on to test its performance |
Conclusion
Cleaning and replacing the post-motor filter is crucial for improving your vacuum cleaner’s performance and extending its lifespan. Make sure to check your vacuum cleaner’s manual for specific instructions on how to clean or replace the post-motor filter. By following these steps, you can ensure that your vacuum cleaner continues to operate effectively for years to come.
HEPA Filter
HEPA filters are a special type of filter designed to capture small particles and allergens. They are advanced filters that offer five times the filtration capabilities of a standard filter. HEPA filters are installed in some upright vacuum cleaners to provide improved air quality and reduce the amount of dust and debris that may accumulate in your home.
How Often Should You Clean and Replace the HEPA Filter?
HEPA filters are designed to last for a long time, but over time they can become clogged with dirt and debris, which reduces their effectiveness. It is recommended to replace your HEPA filter every 6 to 12 months, depending on the usage of your vacuum cleaner. If you have pets or suffer from allergies, you may need to replace the filter more often.
Steps to Clean and Replace the HEPA Filter
Cleaning a HEPA filter is straightforward. The first step is to remove the filter from the vacuum cleaner. Check the manufacturer’s instructions for the specific location and method of removal. Some HEPA filters are washable, while others are disposable. If your filter is washable, rinse it under running water and allow it to dry completely before reinstalling. If it is a disposable filter, replace it with a new one.
Conclusion
Keeping your HEPA filter clean and replacing it periodically is important for the longevity of your vacuum cleaner and to maintain the air quality in your home. Check your vacuum’s manual for instructions on when and how to replace your specific filter type. By taking care of your vacuum and filters, you’ll enjoy a cleaner and healthier home with the added bonus of an efficient and powerful upright vacuum cleaner.
| Frequency of Replacement | Cleaning Method | |
|---|---|---|
| HEPA Filter | 6 to 12 months depending on usage | Washable: rinse under running water and allow to dry completely. Disposable: replace with a new one. |
Frequency Based on Household
The frequency at which you need to clean and replace the filters in your upright vacuum cleaner is not only determined by the type of filters you have but also by the amount and type of dirt and debris in your household. Here is a list of factors to consider:
- The number of people in your household
- The level of foot traffic indoors
- The presence of pets and their shedding habits
- The frequency and intensity of cooking activities
- The type of flooring in your home
- The environment surrounding your home (e.g. rural or urban areas; dusty or clean)
Based on these factors, here are some general guidelines for cleaning and replacing filters:
- For households with pets: If you have pets that shed often, you should clean and replace your vacuum filters more frequently. This is because pet hair and dander can easily clog the filters and reduce the suction power of your vacuum cleaner. Aim to clean or replace your filters every 1-2 months.
- For households with allergy sufferers: If someone in your household has allergies or respiratory issues, you should clean and replace your filters more frequently. This is because vacuum cleaners can stir up allergens and irritants in the air. Aim to clean or replace your filters every 1-2 months.
- For households with heavy foot traffic: If you have a lot of people going in and out of your home, you should clean and replace your filters more frequently. This is because dirt and debris can accumulate quickly and clog the filters. Aim to clean or replace your filters every 2-3 months.
- For households with light foot traffic: If you live alone or have a small family with little foot traffic in your home, you can clean and replace your filters less frequently. Aim to clean or replace your filters every 4-6 months.
Remember, these are general guidelines and it is important to check your vacuum cleaner’s user manual for specific recommendations on cleaning and replacing the filters. By regularly cleaning and replacing your filters, you can ensure that your vacuum cleaner performs optimally and lasts for years to come.
Steps to Clean and Replace Filters
Cleaning and replacing the filters in your upright vacuum cleaner is an essential part of its maintenance. It ensures that your vacuum cleaner operates optimally, has a longer lifespan, and helps to improve the air quality in your home. However, cleaning and replacing the filters in a vacuum cleaner can be a daunting task, especially if you’ve never done it before. Don’t worry, we’ve got you covered! In this section, we’ll walk you through the steps to clean and replace the filters in your upright vacuum cleaner so that it continues to perform its best. Read on to find out how you can prolong the life of your vacuum cleaner and keep your home’s air fresh and clean.
Pre-Motor Filter
The pre-motor filter is one of the most important components in your upright vacuum cleaner, as it helps to trap dust and debris before they reach the motor. This filter is typically made of foam or paper, and it requires regular maintenance to keep it functioning properly.
Why is it important to clean and replace the pre-motor filter?
1. Improved suction power: A clogged pre-motor filter can restrict the airflow in your vacuum cleaner, reducing its suction power. By cleaning or replacing the filter regularly, you can ensure that your vacuum cleaner maintains optimal performance.
2. Enhanced air quality: The pre-motor filter plays a crucial role in trapping dust and other allergens. A dirty or clogged filter can release these particles back into the air, leading to poor indoor air quality. Regular cleaning or replacement of the filter can help to improve the air quality in your home.
3. Extended lifespan of the vacuum cleaner: Dust and debris can build up quickly in a clogged filter and put more strain on the motor of your vacuum cleaner. By regularly cleaning or replacing the pre-motor filter, you can extend the lifespan of your vacuum cleaner.
How often should you clean or replace the pre-motor filter?
The frequency of cleaning or replacement depends on several factors, including the type of filter, the frequency of use of the vacuum cleaner, and the level of debris present in your home. As a general rule of thumb, it’s recommended to clean or replace the pre-motor filter every three to six months.
Steps to clean or replace the pre-motor filter:
1. Turn off and unplug the vacuum cleaner.
2. Locate the pre-motor filter. It is usually located in the main body of the vacuum cleaner, close to the motor.
3. Carefully remove the filter from its housing. Be sure to follow the manufacturer’s instructions to avoid damaging the filter.
4. If the filter is washable, rinse it under cold water to remove any debris. Allow the filter to air dry completely before putting it back in the vacuum cleaner.
5. If the filter is not washable or it is damaged, replace it with a new one.
6. Replace the filter in its housing and make sure it is secured properly.
7. Plug in the vacuum cleaner and turn it on to ensure that it is working properly.
By following these simple steps and cleaning or replacing the pre-motor filter regularly, you can ensure that your vacuum cleaner maintains optimal performance and lasts for years to come.
Post-Motor Filter
The post-motor filter is another critical component of your upright vacuum cleaner that requires regular cleaning and replacement. This filter ensures that the air leaving the vacuum is free of fine dust particles and other allergens, ensuring that your indoor air quality is pristine. Without a clean post-motor filter, the air expelled from the vacuum can still contain dirt and allergens, leading to allergies and respiratory problems.
Types of Post-Motor Filters
There are two types of post-motor filters: foam and pleated. The former is a dense filter that is designed to trap fine particles before they can reach the motor, preventing damage. Meanwhile, pleated filters are made of several layers of filter material folded like an accordion, designed to capture fine debris and microorganisms that the foam filter misses.
How Often Should You Clean and Replace the Post-Motor Filter?
The frequency of cleaning or replacement of the post-motor filter should follow the manufacturer’s guidelines. However, a general rule is to clean or replace the filter every six months, depending on usage. If you have pets, young children, or allergy sufferers in your home, you may need to clean or replace the filter more frequently.
Steps to Clean and Replace the Post-Motor Filter
To clean the post-motor filter, follow these simple steps:
| Step 1 | Unplug the vacuum cleaner from the power source and remove the filter cover to access the post-motor filter. |
| Step 2 | Gently remove the filter from the vacuum cleaner and tap it against a trash can to dislodge any large debris that may have accumulated in the filter. |
| Step 3 | Rinse the filter with cool water until the water runs clear. Avoid using hot water or soap as they can damage the filter’s material. |
| Step 4 | Allow the filter to dry completely before reinserting it into the vacuum cleaner. It is best to air dry the filter overnight, but if time is short, you can use a hairdryer on a cool setting. |
| Step 5 | Replace the filter cover and plug the vacuum cleaner back into the power source. |
To replace the post-motor filter, follow these steps:
| Step 1 | Unplug the vacuum cleaner from the power source and remove the filter cover to access the post-motor filter. |
| Step 2 | Remove the old filter from the vacuum cleaner and dispose of it responsibly. |
| Step 3 | Insert the new post-motor filter into the vacuum cleaner, ensuring that it is properly aligned and securely in place. |
| Step 4 | Replace the filter cover and plug the vacuum cleaner back into the power source. |
By regularly cleaning and replacing the post-motor filter, you can ensure that your upright vacuum cleaner performs at its best, producing clean indoor air while keeping your floors spotlessly clean.
HEPA Filter
The HEPA (High-Efficiency Particulate Air) filter is a very important component of an upright vacuum cleaner. It is designed to capture tiny particles such as dust mites, pet dander, and pollen that other filters may miss. This type of filter is particularly beneficial for people with allergies or asthma, as it helps to reduce the number of airborne allergens in the home.
Why Should You Clean and Replace HEPA Filters?
HEPA filters, like any other filter, can become clogged with dirt and debris over time. When this happens, the filter’s effectiveness is reduced, and it may even start to emit foul odors. By cleaning or replacing the HEPA filter regularly, you can ensure that your vacuum cleaner is working at its best.
How Often Should You Clean and Replace HEPA Filters?
The frequency with which you should clean or replace your HEPA filter will depend on several factors, including the manufacturer’s recommendations and the level of usage in your home. As a general rule, you should clean your HEPA filter at least once every three months and replace it once a year.
If you have pets, allergies, or you use your vacuum cleaner frequently, you may need to clean or replace the filter more often. Conversely, if you live alone in a smaller home and only use your vacuum cleaner occasionally, you may be able to go longer between cleanings and replacements.
Steps to Clean and Replace HEPA Filters
Cleaning and replacing a HEPA filter is a simple process that can be done in just a few easy steps. Here’s how:
| Cleaning | Replacing |
|---|---|
| 1. Turn off and unplug the vacuum cleaner. | 1. Purchase a new HEPA filter from the manufacturer or a reputable supplier. |
| 2. Remove the HEPA filter from the vacuum cleaner. | 2. Turn off and unplug the vacuum cleaner. |
| 3. Tap the filter gently on a hard surface to dislodge any loose dirt or debris. | 3. Locate the HEPA filter compartment on your vacuum cleaner. |
| 4. Use a soft-bristled brush to remove any remaining dirt or debris. | 4. Remove the old filter from the compartment. |
| 5. Rinse the filter with warm water and allow it to dry completely before reinserting it into the vacuum cleaner. | 5. Insert the new HEPA filter into the compartment. |
Conclusion
The HEPA filter is a critical component of an upright vacuum cleaner, and it’s important to clean or replace it regularly to ensure that your vacuum cleaner is working at its best. By following the steps outlined above, you can keep your HEPA filter clean and your home free from airborne allergens.
Conclusion
After reading through this article, it is clear that cleaning and replacing the filters in your upright vacuum cleaner is crucial to maintain its optimal performance. Neglecting to do so can result in reduced suction power, decreased air quality, and potentially even damage to the vacuum cleaner itself.
Regularly cleaning and replacing your vacuum’s filters can improve the air quality, enhance suction power, and extend the lifespan of your appliance. Whether you have pets, suffer from allergies, or simply want to keep your home as clean as possible, investing time and effort into keeping your vacuum cleaner’s filters clean and up-to-date is worth it.
It is important to remember that the frequency of cleaning and replacing the filters varies based on the type of filter and the amount of use that the vacuum cleaner receives. For pre-motor and post-motor filters, check them every 1-3 months while HEPA filters should be checked every 6-12 months. However, these are just general guidelines and it is important to pay attention to your vacuum cleaner’s manual for specific recommendations.
To clean your vacuum cleaner’s filters, follow the listed steps carefully. Most importantly, be sure to keep up with the recommended cleaning and replacement frequency in order to keep your appliance in top shape.
In conclusion, cleaning and replacing the filters in your upright vacuum cleaner is not only important but also a relatively easy task that can be completed in just a few simple steps. By doing so, you can improve your home’s air quality, enhance the suction power of your vacuum cleaner, and extend its lifespan. Keep up with the recommended cleaning and replacement frequency and enjoy a cleaner, healthier home for years to come.
Frequently Asked Questions
1. How often should you clean the pre-motor filter?
You should clean the pre-motor filter of your upright vacuum cleaner at least once a month to ensure optimal performance.
2. Can you wash the pre-motor filter?
Yes, you can wash the pre-motor filter. You should wash it with cool water and mild detergent, and let it air dry completely before using it again.
3. How often should you replace the post-motor filter?
You should replace the post-motor filter of your upright vacuum cleaner every six months to maintain good air quality and suction power.
4. Can you wash the post-motor filter?
No, you should not wash the post-motor filter. You should replace it with a new one when it gets dirty or after six months of use.
5. What is a HEPA filter?
A HEPA filter is a high-efficiency particulate air filter that can capture small particles including pet dander, dust mites, and pollen, and improve air quality in your home.
6. How often should you replace the HEPA filter?
You should replace the HEPA filter of your upright vacuum cleaner every six months or when the filter light indicator turns on.
7. Can you wash the HEPA filter?
In most cases, you should not wash the HEPA filter. Instead, you should replace it with a new one as washing may damage the filter and reduce its effectiveness.
8. Do all upright vacuum cleaners come with a HEPA filter?
No, not all upright vacuum cleaners come with a HEPA filter. Some models may come with a standard filter or a washable filter.
9. What can you do if you don’t have a replacement filter?
You can clean the filters thoroughly and let them air dry before using the vacuum cleaner again. However, it’s recommended to have replacement filters on hand to maintain the vacuum cleaner’s performance and air quality.
10. Why is it important to clean and replace filters in your upright vacuum cleaner?
Cleaning and replacing filters in your upright vacuum cleaner can improve air quality, suction power and extend the vacuum cleaner’s lifespan, preventing damage to the motor and reducing the risk of allergies or respiratory issues.

