All You Need to Know About Replacing Brushes and Rollers on Your Smart Vacuum Cleaner
Warning: A non-numeric value encountered in /var/www/html/wp-content/themes/generatepress/inc/structure/post-meta.php on line 165
by Dwight Gibson
Have you ever wondered how often you should replace the brushes and rollers on your smart vacuum cleaner? As a proud owner of a high-performance gadget that helps keeping your home clean, it’s important to ensure that all components are working in optimal condition. Not only does this enhance the vacuum cleaner’s performance, but it also prevents damage to your floors and carpets. However, with so many different models and parts to choose from, it can be perplexing to determine the best replacement schedule and method. In this article, we will explore the key reasons why replacing brushes and rollers on your smart vacuum cleaner is crucial, and provide practical tips on how to get it right. So, let’s dive in!
Table of Contents
Why is it important to replace brushes and rollers?
As household cleaning becomes increasingly automated, smart vacuum cleaners are gaining popularity for their convenience and efficiency. Nevertheless, proper maintenance of these devices is critical to ensure their longevity. One essential aspect of maintenance is replacing brushes and rollers at an appropriate time. This practice not only guarantees better cleaning performance but also prevents potential damage to floors and carpets. In this section, we will delve into the importance of brush and roller replacement, discuss the benefits of timely replacement, and provide essential information on how to maintain a smart vacuum cleaner. To learn more about smart vacuum maintenance tips, check out our comprehensive guide on the topic.
Enhances Vacuum Cleaner Efficiency
Regularly replacing the brushes and rollers on your smart vacuum cleaner can greatly enhance its efficiency. These components are responsible for picking up dust, dirt, and debris from your floors and carpets, and over time they can become worn down and less effective. When this happens, your vacuum cleaner may start to leave behind particles that it would normally pick up, reducing its effectiveness.
By replacing worn out brushes and rollers, you can ensure that your vacuum cleaner is operating at peak performance, picking up dirt and debris effectively and leaving your floors clean and fresh. Not only does this help keep your home looking its best, it can also help prevent allergens and pollutants from building up in your carpets and floors.
To keep your vacuum cleaner running smoothly, it’s important to replace the brushes and rollers as recommended by the manufacturer. This typically ranges from every 6 to 12 months, depending on usage and the type of flooring in your home. Regular maintenance of your vacuum cleaner can help extend the lifespan of these components, preventing the need for more frequent replacements.
Regularly replacing brushes and rollers can help protect your floors and carpets. Over time, worn out brushes and rollers can become rough and may scratch your hard flooring or snag your carpets. This can lead to costly damage that can be difficult or impossible to repair.
By keeping your brushes and rollers in good condition, you can avoid these issues and keep your floors and carpets looking their best. Plus, replacing these components regularly can help prolong the overall lifespan of your vacuum cleaner, saving you time and money in the long run.
Regularly replacing the brushes and rollers on your smart vacuum cleaner can prevent damage to your floors and carpets. Over time, the bristles on the brushes can become worn out and stiff, which can cause them to scratch and scuff your hardwood floors or snag and tear your carpets. This damage isn’t just aesthetic, as it can actually shorten the lifespan of your flooring and require costly repairs.
Replacing the brushes and rollers can help avoid this issue altogether, and ensure that your vacuum is doing its job effectively without causing any damage. This is particularly important if you have pets or children as they tend to create more messes that require frequent cleaning.
If your vacuum’s brushes or rollers are not rotating properly, this can also cause damage to your floors and carpets. For example, if the roller is not rotating as it should, it can leave behind streaks of dirt or debris that can be difficult to remove. This can also damage your carpets or hard floors because it requires you to go over the same spot multiple times to clean it properly.
To keep your floors and carpets in good condition, it’s important to replace the brushes and rollers on your smart vacuum cleaner at regular intervals. This simple maintenance routine can save you the headache of having to repair or replace your flooring in the future.
Replacing the brushes and rollers on your smart vacuum cleaner can ensure the longevity and durability of your vacuum cleaner. A properly maintained vacuum cleaner can last for years, providing top-notch cleaning performance. Here are some reasons why replacing brushes and rollers on a regular basis is essential for the long-term health of your vacuum cleaner.
Reason
Description
Prevents Wear and Tear on the Vacuum Cleaner Motor
Over time, the accumulation of dirt, hair, and debris can cause damage to the motor of your vacuum cleaner. By replacing brushes and rollers, you can reduce the amount of stress placed on the motor, thus extending the life of your vacuum cleaner.
Improves Suction Power
Old and worn-out brushes and rollers can negatively impact the suction power of your vacuum cleaner, making it difficult to pick up dirt and debris. By replacing these parts regularly, you can ensure that your vacuum cleaner is operating at maximum power, providing efficient cleaning performance.
Reduces the Risk of Damage to Other Components
When brushes and rollers are worn down, they can break and damage other components in your vacuum cleaner. Replacing these parts can reduce the risk of damage to other components, such as the belt or filters, which can lead to costly repairs or even the need for a new vacuum cleaner.
Provides a More Thorough Clean
Frayed brushes and stuck rollers can leave behind dirt and debris on your floors and carpets, even after you’ve vacuumed. Regular replacement of these parts can help ensure that your vacuum cleaner is providing a thorough clean every time, leaving your home spotless and hygienic.
Replacing the brushes and rollers on your smart vacuum cleaner can help ensure the longevity, performance, and efficiency of your vacuum cleaner, as well as reduce the risk of costly repairs. By following the recommended replacement intervals and performing regular maintenance, you can keep your vacuum cleaner running smoothly for years to come.
How Often Should You Replace Them?
One of the most common questions that smart vacuum cleaner owners ask is how often they should replace the brushes, rollers, and other components. The answer can be perplexing as it largely depends on the usage and the type of cleaning tasks performed. To help you determine the right time to replace them, we’ve compiled some important information that highlights the key factors you should consider. By understanding this information, you’ll be able to keep your vacuum cleaner working its best for longer periods, without any issues or performance-related troubles.
Brushes
The brushes on your smart vacuum cleaner are crucial for cleaning efficiency and maintenance. Over time, brushes can become worn out or damaged, decreasing the effectiveness of your vacuum cleaner. To keep your vacuum running smoothly, it is important to replace the brushes periodically.
How often should you replace vacuum cleaner brushes? The frequency of replacement depends on various factors, including the quality of the brushes, frequency of use, and the amount of debris picked up during cleaning. Typically, brushes need to be replaced every 6-12 months for optimal performance.
To ensure your vacuum cleaner performs at its best, it is important to choose high-quality brushes that can withstand regular use. Low-quality brushes may wear out faster, requiring more frequent replacements.
Signs it’s time to replace your brushes:
What to do:
Brushes are visibly worn out or damaged,
Replace the brushes immediately
The vacuum cleaner leaves debris behind after cleaning,
Inspect the brushes, if they are worn out, replace them.
The brushes are not spinning or do not make contact with the floor,
Check for clogs, if there aren’t clogs, replace the brushes.
Replacing vacuum cleaner brushes is not a difficult task, and can often be done by the user with self-replacements. Before starting, make sure to turn off your vacuum cleaner and unplug it from the power source.
Steps to replace vacuum cleaner brushes:
Locate the brush roll and remove the cover plate.
Remove the end caps from the brush roll, taking care not to lose them.
Slide the old brushes off the ends of the roller.
Slide the new brushes onto the roller.
Replace the end caps and secure them with the cover plate.
Additional tools such as scissors and cleaning brushes may be required to remove hair or tangled debris. It is important to regularly clean your brushes to prevent clogging and extend their lifespan.
Replacing your vacuum cleaner brushes is an essential maintenance task that will enhance cleaning efficiency, prevent damage to floors and carpets, and promote longevity of the vacuum cleaner. Knowing when and how to do this task can make all the difference in ensuring optimal performance for your smart vacuum cleaner.
Rollers
When it comes to replacing rollers on your smart vacuum cleaner, there are a few things to keep in mind. The rollers are responsible for picking up dust, dirt, and debris from your floors, so it’s important to ensure they are functioning properly.
Check for Wear and Tear: Over time, the bristles on the rollers can wear down, causing them to become less effective. It’s important to regularly check for any signs of wear and tear, such as frayed or broken bristles. If you notice any damage, it’s time to replace the rollers.
Frequency of Replacement: The frequency with which you need to replace your rollers largely depends on how often you use your vacuum cleaner. If you use it frequently or have a large home, you may need to replace them more often. On average, however, it’s recommended to replace the rollers every 6-12 months.
Compatibility: Make sure to choose rollers that are compatible with your smart vacuum cleaner. Using rollers that aren’t designed for your specific model can lead to inefficiencies or even damage.
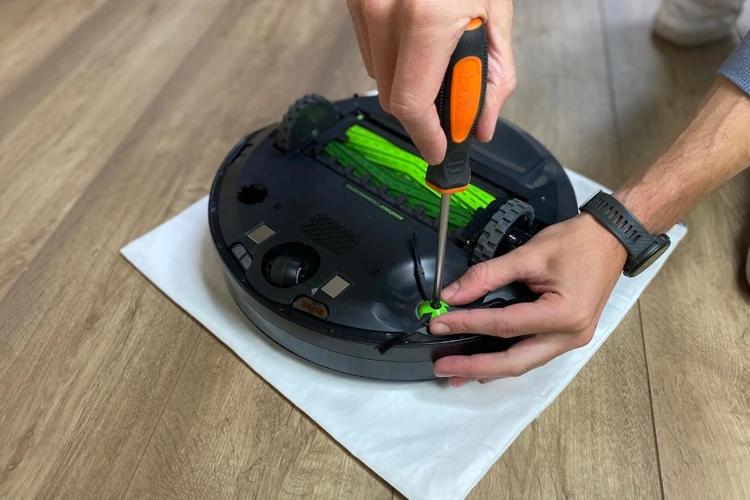
Tools Required: To replace the rollers, you’ll need a screwdriver to remove any screws holding them in place. Some vacuums may require additional tools or parts.
Steps to Replace Rollers:
Turn off your smart vacuum cleaner and unplug it from the power source.
Find the rollers and remove any screws or clips holding them in place.
Remove the old rollers and dispose of them properly.
Insert the new rollers and fasten them securely with any screws or clips.
Plug in your vacuum cleaner and turn it on to test the new rollers.
Tips for Maintenance: To ensure that your rollers last as long as possible, it’s important to keep them clean. Regularly remove any tangled hair, string, or other debris that may accumulate on the rollers. Additionally, you should clean the entire vacuum cleaner, including the rollers, after each use to prevent any build-up of dust or dirt that could cause future problems.
By following these simple tips and steps, you can ensure that your smart vacuum cleaner is functioning at its best and prolong its lifespan.
Filtration System
The filtration system of your smart vacuum cleaner is a crucial component that needs regular replacement to ensure maximum efficiency in cleaning. The filtration system consists of multiple filters that trap tiny particles such as dirt, dust, and pet hair. Over time, these filters become clogged, reducing the performance of your vacuum cleaner.
Here are the different filters that you need to replace:
Primary Filter: This filter is the first line of defense against larger particles and debris.
Secondary Filter: This filter traps smaller particles that were missed by the primary filter.
HEPA Filter: This filter catches the tiniest particles, such as allergens, pollen, and mold spores.
It is recommended to replace your vacuum cleaner’s filters every six months, or more frequently if you have pets or if you use your vacuum cleaner frequently. Regularly replacing the filtration system ensures that the air circulates freely through the machine, which reduces the risk of clogging and overheating.
Aside from replacing filters, you can also clean them by gently tapping them against a hard surface to remove excess dirt and debris. However, this method may not effectively remove all the trapped particles, so replacement should still be done periodically.
Regularly replacing the filters in your smart vacuum cleaner is essential to ensure its longevity and functionality. Remember to follow the recommended replacement schedule and keep your filters clean regularly to maximize your vacuum cleaner’s performance and keep the air in your home clean and healthy.
Clogs
Clogs in smart vacuum cleaners can be a major hindrance to their efficiency, and it’s important to regularly check and clear them out. Clogs usually occur when the vacuum cleaner is used to clean up larger debris or when smaller particles accumulate over time. Here are some signs that your vacuum cleaner may be experiencing clogs:
Reduced suction power: If your smart vacuum cleaner is not picking up dirt and debris as efficiently as it used to, then it could be an indication of a clog.
Visible debris: If you notice visible debris such as pet hair, dirt, or dust caked on the filter or around the brush area, it is a clear indication of a clog.
Strange noises: If your smart vacuum cleaner is making strange noises such as whirring, hissing or clicking noises, it could be due to a clog.
To prevent clogs from occurring, you should empty the dustbin regularly and ensure that your vacuum cleaner’s filters are clean. However, if you still experience clogs, it’s important to know how to clear them out. Here are some steps to clear clogs in your smart vacuum cleaner:
Turn off the vacuum cleaner: Always turn off the vacuum cleaner before attempting to unclog it.
Remove the source of the clog: If there is visible debris blocking the airflow, remove it with your hands or a tool.
Detach the hose: If the clog is further up the hose, detach it and use a long object like a broomstick or coat hanger to push out the clog.
Clean the filters: Check the filters and clean them if necessary to prevent more clogs from occurring.
Assemble the vacuum cleaner: After completing the above steps, reassemble the vacuum cleaner and turn it on to check if it’s unclogged and working efficiently.
Regularly checking and clearing out clogs in your smart vacuum cleaner will not only ensure that it continues to work efficiently but can also save you money in the long run by preventing potential damage to the machine.
How to Replace Brushes and Rollers?
Replacing the brushes and rollers on your smart vacuum cleaner may sound like a daunting task, but with the right tools and instructions, it can be a straightforward process. Proper maintenance of your vacuum cleaner ensures that it functions at optimal levels, thus prolonging its lifespan. In this section, we’ll explore the steps involved in replacing brushes and rollers and highlight some useful tips for maintenance. Whether you’re a first-time user or a seasoned pro, read on to discover how to give your smart vacuum cleaner the care it deserves.
Steps to Replace Brushes
Replacing the brushes on your smart vacuum cleaner is a simple process that can be done at home with just a few tools. Follow these steps:
Step 1:
Turn off the vacuum cleaner and unplug it from the power source.
Step 2:
Flip the vacuum cleaner over so that the cleaning brushes are facing up.
Step 3:
Use a screwdriver to remove the screws on the brush cover.
Step 4:
Remove the brush cover to reveal the brush roll.
Step 5:
Use your hands to gently pull the brush out of the vacuum cleaner.
Step 6:
Insert the new replacement brush into the vacuum cleaner. Make sure that it is aligned properly and fits into place snugly.
Step 7:
Replace the brush cover and reattach the screws using a screwdriver.
Step 8:
Turn on the vacuum cleaner to test the new brush.
Remember to consult your vacuum cleaner manual for specific instructions on how to replace the brushes for your particular model. It is also important to replace the brushes regularly to ensure the longevity and efficiency of your vacuum cleaner. Failing to replace them may cause damage to floors and carpets and reduce the vacuum’s suction power.
Steps to Replace Rollers
Replacing the rollers on your smart vacuum cleaner is essential to ensure optimal performance and prolong the life of your machine. Here are the steps to follow for replacing the rollers:
Step 1:
Unplug your vacuum cleaner and remove any attachments from the hose.
Step 2:
Lay the vacuum cleaner on its side and locate the roller compartment.
Step 3:
Remove the cover of the roller compartment by unscrewing or unclipping it.
Step 4:
Depending on the model of your vacuum cleaner, you may need to remove a belt or release the tension on it to remove the roller.
Step 5:
Remove the roller from the vacuum cleaner and discard it if it is too worn out or damaged.
Step 6:
Install the new roller by sliding it into place and securing the belt if necessary.
Step 7:
Replace the cover of the roller compartment and secure it with screws or clips.
Step 8:
Plug in your vacuum cleaner and test the new roller to make sure it is functioning properly.
Remember, it’s important to replace your rollers on a regular basis to ensure the longevity of your vacuum cleaner and to prevent damage to your floors and carpets. By following these simple steps, you can ensure that your smart vacuum cleaner is working at its best and keeping your home clean and dust-free.
Tools Required
When it comes to replacing brushes and rollers on your smart vacuum cleaner, you will need a few tools to get the job done. Here are the essential tools required to replace the brushes and rollers on your vacuum cleaner:
Screwdriver: You will need a screwdriver to loosen bolts and screws holding the brush and roller in place. The size of the screwdriver depends on the size of the bolts and screws in your vacuum cleaner.
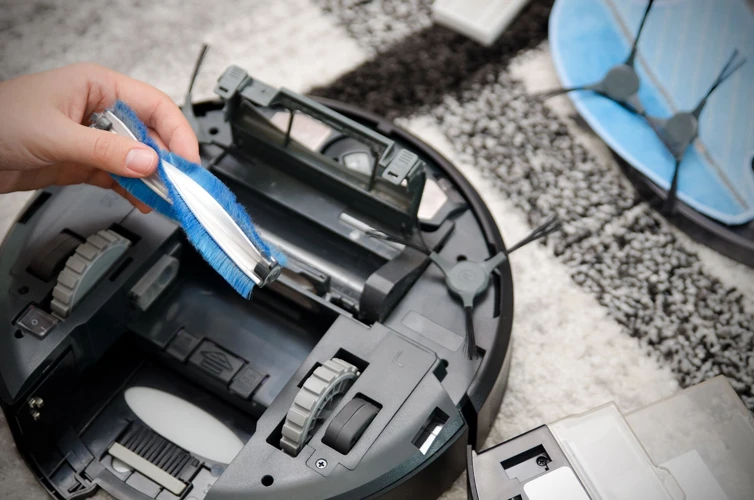
Scissors: Scissors are needed to cut off any tangled hair or debris wrapped around the brush and roller of your smart vacuum cleaner.
Cleaning Brush: A cleaning brush is a useful tool to clean your brush and roller before replacement. It helps you remove all the dirt and debris that might have accumulated on the bristles over time.
Replacement Brushes and Rollers: Having replacement brushes and rollers readily available is crucial so you can replace them immediately when needed.
It would be best to purchase brushes and rollers from the vacuum cleaner’s manufacturer to ensure compatibility and quality.
Before you begin the replacement procedure, make sure to unplug the vacuum cleaner and give it ample time to cool down. Safety always comes first, so wear protective gear such as gloves to avoid injury while replacing and cleaning the brushes and rollers.
Now that you know all the necessary tools to replace brushes and rollers, it’s time to get started with the replacement process!
Tips for Maintenance
As with any other home appliance, proper maintenance of your smart vacuum cleaner is crucial in maximizing its lifespan and ensuring optimal performance. Here are some useful tips for maintaining your vacuum cleaner:
Tips for Maintenance
1. Regular Cleaning:
After each use, make sure to clean the brushes and rollers thoroughly to prevent dirt and debris from accumulating. This will not only help maintain the cleanliness of your floors, but also prevent damage to the brushes and rollers.
2. Replace Filters:
Filters play an important role in capturing dust and other allergens. It is recommended to replace the filters at least every three to six months or as per the manufacturer’s instructions. This will improve the air quality in your home and prevent clogs in your vacuum cleaner.
3. Check for Clogs:
Clogs in the vacuum cleaner can affect its suction power and damage the motor. To avoid this, check for clogs regularly and remove any debris that may be blocking the vacuum path.
4. Brush Rollers:
Inspect the brush rollers regularly for wear and tear, and replace them as needed. Damaged brush rollers can cause scratches on floors and carpets, and reduce the efficiency of your vacuum cleaner.
5. Take Care of Power Cords:
Power cords can be damaged easily, so it is important to handle them with care. Avoid pulling the cord or running over it with the vacuum cleaner. Use cord hooks to keep the cord in place when not in use.
By following these tips, you can ensure that your smart vacuum cleaner operates smoothly and efficiently for years to come. Regular maintenance can prevent costly repairs and replacement of parts, saving you time and money in the long run.
Conclusion
In conclusion, keeping your smart vacuum cleaner in top working condition is vital to ensure it consistently performs at its best. This involves replacing brushes and rollers regularly and keeping the filtration system clean to prevent clogs.
Regular replacement of brushes and rollers can enhance your vacuum cleaner’s efficiency and prevent damage to floors and carpets. Neglecting to maintain your vacuum cleaner can lead to inefficient performance and decreased suction power, which can lead to ineffective cleaning.
The frequency of replacement for brushes and rollers will vary depending on usage and the quality of the brushes. As a general rule, brushes should be replaced every six months, while rollers can last up to a year. To maintain efficient cleaning, it’s important to monitor the condition of the brushes and rollers and replace them as needed.
Replacing brushes and rollers is a straightforward process, but it’s important to have the correct tools and follow the correct steps to ensure the job is done properly. With proper maintenance and regular replacement, your vacuum cleaner will continue to perform at its best for years to come.
Remember, replacing brushes and rollers is just one part of maintaining your vacuum cleaner. Be sure to regularly clean the filter and monitor for clogs to ensure your vacuum continues to perform at its best. With proper maintenance, you can enjoy a clean home without the worry of damaged floors or carpets from an inefficient vacuum cleaner.
Frequently Asked Questions
1. How do I know when to replace my vacuum cleaner’s brushes and rollers?
You should replace them when they start showing signs of wear and tear, such as frayed bristles or flattened rollers.
2. Can I replace the brushes and rollers on my own?
Yes, you can replace them on your own with the right tools and instructions.
3. How often should I replace the brushes on my vacuum cleaner?
It depends on how frequently you use your vacuum cleaner, but typically every six months to a year.
4. How often should I replace the rollers on my vacuum cleaner?
It also depends on usage, but usually every 12 to 18 months.
5. What is the importance of replacing brushes and rollers?
Replacing brushes and rollers enhances vacuum cleaner efficiency, prevents damage to floors and carpets, and ensures longevity of your vacuum cleaner.
6. Can I clean the brushes and rollers instead of replacing them?
Yes, you can clean them regularly to prolong their lifespan, but eventually they will need to be replaced.
7. What are the common tools required to replace brushes and rollers on a vacuum cleaner?
Screwdriver, pliers, and scissors are among the common tools needed for properly replacing the brushes and rollers.
8. How do I properly maintain my vacuum cleaner’s brushes and rollers?
You should regularly clean them, remove any hair or debris, and check for any signs of damage.
9. Can using the wrong brushes and rollers damage my vacuum cleaner?
Yes, not using the correct brushes and rollers can cause damage to your vacuum cleaner’s motor and affect its overall performance.
10. Are there any special considerations when replacing brushes and rollers on smart vacuum cleaners?
It is important to follow the manufacturer’s instructions for your specific model to ensure proper replacement and avoid damaging any electronic components.