Have you ever noticed that your vacuum cleaner doesn’t seem to be picking up dirt and dust as well as it used to? Or that the brush rollers are making strange noises? It’s likely that your vacuum’s brush rollers need a good cleaning. Brush rollers are an integral part of a vacuum cleaner’s cleaning mechanism as they help to agitate and loosen dirt and debris from carpets and floors. However, over time, they can become caked with dirt and hair, making them less effective and even damaging to the vacuum. In this article, we’ll discuss the importance of using the right tools to clean your vacuum’s brush rollers, including the benefits of doing so, the tools you’ll need, and step-by-step instructions for cleaning your brush rollers.
Table of Contents
Why Clean Your Vacuum’s Brush Rollers
Maintaining a clean and hygienic home always starts with keeping dust and dirt at bay. Vacuum cleaners make it easy to tidy up floors and carpets, but did you know that it’s essential to keep the vacuum’s brush rollers clean as well? A dirty vacuum brush roller can affect the cleaning performance of your vacuum and cause undue wear and tear on its components. This is why it’s crucial to include brush roller cleaning in your routine maintenance tasks. In this article, we will explore the benefits of cleaning your vacuum’s brush rollers and a step-by-step guide on how to do it properly. You’ll also discover the right tools to use to get this task done efficiently. But first, let’s delve into why cleaning your vacuum’s brush rollers is vital. To read more about the importance of cleaning your vacuum’s brush rollers, check out our article on the benefits of smart vacuum brush maintenance.
Reduce Maintenance Costs
Regular maintenance of your vacuum’s brush rollers not only results in improved cleaning performance, but it also helps reduce maintenance costs by preventing damage caused by excessive wear and tear.
If the brush rollers are not cleaned regularly, they will become clogged with debris, such as hair and pet fur, which can cause the brushes to stop spinning properly. This can lead to the vacuum cleaner working harder to pick up debris, and this can result in increased energy consumption and maintenance costs.
Neglecting to clean your vacuum’s brush rollers can cause damage to other components of your vacuum over time, such as the belt or the motor. Replacing these parts can be costly and may require professional servicing. However, by simply cleaning the brush rollers, you can avoid such costs altogether.
Regular cleaning of your vacuum’s brush rollers is easy and can be done with a few simple tools in less than 10 minutes. By following the right steps and using the right tools, you can reduce maintenance costs and extend the life of your vacuum cleaner. For more information about cleaning your vacuum’s brush rollers, check out our cleaning brush rollers guide.
Improved Cleaning Performance
Cleaning your vacuum’s brush rollers is crucial when it comes to improving the vacuum cleaner’s cleaning performance. Over time, the brush rollers accumulate dust, debris, and hair, which reduces their effectiveness in picking up dirt and dust from the flooring. Neglecting to clean the brush rollers can cause the vacuum to lose suction power and leave behind dirt and debris, defeating the purpose of vacuuming in the first place.
Regular cleaning of the brush rollers can avoid these issues and improve the overall cleaning performance of your vacuum cleaner. Additionally, clean brush rollers prevent dirt and dust from being redistributed back into the air, improving the air quality in your home.
According to a study by Consumer Reports, dirty vacuum brush rollers can decrease cleaning performance by up to 45 percent. This is a significant decrease in efficiency, and it can mean more time spent cleaning or rescheduling professional cleaner appointments.
To ensure that your vacuum cleaner is running at its best capacity, it is important to maintain clean brush rollers regularly. Using the right tools when performing maintenance will prevent any damage to the vacuum and ensure that the brush rollers are thoroughly cleaned.
If you fail to maintain your vacuum cleaner’s brush rollers, you might end up spending more money on professional cleaning or repair services that could have been easily avoided.
Benefits of Regular Brush Roller Cleaning
Consequences of Neglecting Brush Roller Cleaning
Improved cleaning performance
Increased suction power
Extended lifespan of your vacuum cleaner
Decreased cleaning performance
Reduced suction power
Dirt and dust redistribution
Increased risk of damage and costly repairs
Keeping the vacuum brush roll clean will also ensure that the vacuum cleaner’s motor doesn’t have to work extra hard, which can lead to faster motor burnouts. Additionally, maintaining clean brush rollers can help you avoid damaging your flooring from brush rollers with debris buildup, saving you from costly repairs.
Regular cleaning of your vacuum’s brush rollers is crucial for improving cleaning performance and extending the life of your vacuum cleaner. Don’t overlook this important task, and remember to use the right tools and techniques for the job to avoid damaging your vacuum.
Extend the Life of Your Vacuum Cleaner
Properly maintaining your vacuum cleaner is important not only for hygienic reasons but also for saving money in the long run. Regular cleaning of your vacuum’s brush rollers can actually extend the life of your vacuum cleaner. When the brush roll is clogged with debris, such as hair or dirt, it can cause stress on the motor, leading to overheating and eventually causing it to malfunction. Replacing a vacuum’s motor can be an expensive repair, but with proper maintenance and cleaning, you can avoid this expense.
Regular cleaning can also prevent damage to the bristles on the brush roll, which can wear down and become bent or broken over time. This will reduce the cleaning performance of your vacuum, as the brush roll won’t be able to effectively pick up dirt and debris from your floors. Using the right tools and cleaning solutions, as described in the previous section, can make brush roll maintenance effective and efficient, without damaging the bristles.
By taking the time to properly clean and maintain your vacuum’s brush rollers, you can avoid the frustration of having to deal with a vacuum that isn’t performing well. Investing in the right tools for the job and following the cleaning steps provided will not only reduce maintenance costs but also prolong the life of your vacuum. So, make sure to follow the steps and take care of your vacuum’s brush rollers. This way, you can ensure that your vacuum cleaner is working efficiently and effectively for years to come.
The Right Tools for the Job
When it comes to cleaning your vacuum’s brush rollers, it’s important to have the right tools for the job. Not only will using the proper tools make the cleaning process easier and more effective, but it can also help prevent damage to your vacuum or injury to yourself. From a handheld vacuum to protective gloves, having the right equipment can make all the difference. Before diving into the cleaning process, let’s take a look at the essential tools you’ll need. And, if you’re interested in learning about the long-term benefits of smart vacuum brush maintenance, check out our article on why it’s important to take care of your vacuum’s brush rollers.
Handheld Vacuum
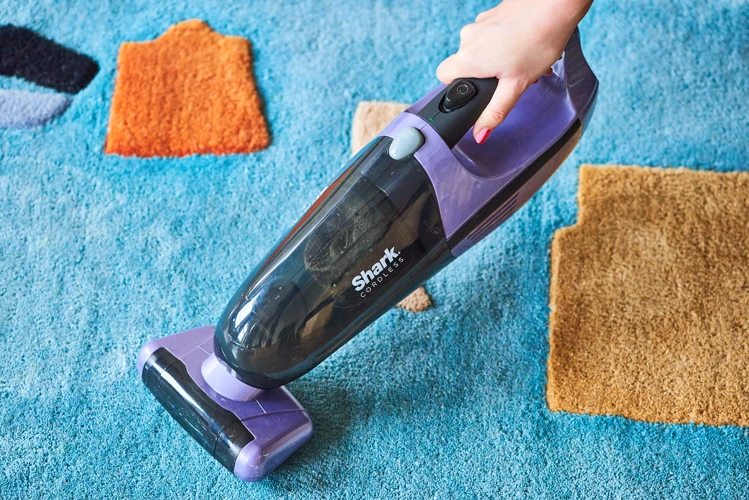
One of the essential tools you will need to clean your vacuum’s brush rollers is a handheld vacuum. A handheld vacuum allows you to access the tight spaces and small crevices in your vacuum cleaner that your regular vacuum cannot reach. Using a handheld vacuum to remove loose dirt and debris before disassembling the vacuum cleaner will make the cleaning process quicker and more efficient.
Here are some helpful tips on using a handheld vacuum for cleaning your vacuum’s brush rollers:
Make sure the handheld vacuum is fully charged or plugged in before use.
Use the crevice tool attachment to access hard-to-reach areas and small crevices.
Start cleaning from the top of the vacuum and work your way down.
Aim the nozzle at a slight angle to avoid pushing dirt and debris further into the brush rollers.
Be gentle with the handheld vacuum to avoid damaging any parts.
Using a handheld vacuum is a simple and effective way to remove loose dirt and debris from your vacuum’s brush rollers. However, do not solely rely on a handheld vacuum to clean the brush rollers as it may not be powerful enough to remove all debris. In the next section, we will discuss the importance of using a combination of tools for the best cleaning results.
One of the most essential tools you’ll need when cleaning your vacuum’s brush rollers is a scissors or seam ripper. These tools are typically used to cut away stuck hair, threads, and debris that wrap around the rollers.
While both scissors and seam rippers can be effective, seam rippers are the more precise option for getting into hard-to-reach areas. They have a pointed end that helps you pry out stuck debris from the brush rollers without damaging them. Additionally, seam rippers often have a curved design that allows for easier access to the brush rollers’ bristles.
It’s important to use only sharp scissors or seam rippers that are specifically designed for cutting fabric. Dull scissors or blades can snag the brush rollers’ bristles, potentially causing damage to the vacuum cleaner.
To ensure that your scissors or seam ripper are always on hand when you need them, it’s helpful to keep them in a designated cleaning kit alongside the other tools you’ll need for the job. This way, you can quickly access all the necessary tools without having to go searching for them.
Now that you know how essential a good pair of scissors or seam ripper can be in cleaning your vacuum’s brush rollers, be sure to keep them handy when it comes time to tackle this task. With the right tools, you can keep your vacuum cleaner running smoothly and efficiently for years to come.
Pros
Cons
Precise cutting
Dull blades can snag bristles
Curved design for easy access
May require separate purchase
Effective for hard-to-reach areas
Cleaning Solution
When it comes to cleaning your vacuum’s brush rollers, having the right cleaning solution can make a big difference in the effectiveness of the cleaning process. Not using the appropriate cleaning solution can sometimes cause more harm than good, possibly leading to damage or corrosion of the vacuum’s internal components. It is crucial to choose a cleaning solution that is safe and specifically designed for use with vacuum cleaners.
Here are some examples of suitable cleaning solutions for your vacuum’s brush rollers:
Vacuum cleaner-specific cleaning solutions: These cleaning solutions are specially formulated for use with vacuum cleaners, making them ideal for cleaning your vacuum’s brush rollers. They are designed to break down dirt, dust, and debris, without damaging or clogging the vacuum’s internal components. You can find these solutions at most hardware stores or online retailers.
Warm water and dish soap: A mix of warm water and dish soap is effective in getting rid of dirt and debris from your vacuum’s brush rollers. This solution should consist of a few drops of dish soap in a bowl of warm water. Avoid using hot water, as it can melt the roller brush’s bristles.
Vinegar solution:Another effective and natural cleaning solution is vinegar, and it has been used for decades as a natural, non-toxic way of cleaning. To create this solution, mix equal parts of vinegar and water in a bowl. Immerse the brush roller in the solution for about an hour, and then rinse with clean water to remove any residue.
Baking soda solution:Baking soda is another natural cleaning solution that works wonders on tough stains and grime. To incorporate this solution, mix baking soda with warm water to form a paste-like consistency. Then use a clean cloth and some elbow grease to scrub down the brush rollers.
Having the right cleaning solution is only one part of the puzzle in effectively cleaning your vacuum’s brush rollers. In the following sections, we will explore other essential tools and steps needed to complete the cleaning process successfully.
Clean Cloth
When it comes to cleaning your vacuum’s brush rollers, having a clean cloth on hand is essential. This will enable you to wipe away any remaining debris or cleaning solution residue that may be stuck to the brush rollers.
Here are some considerations to keep in mind when selecting a cloth for this task:
Microfiber cloths: These are great for capturing dust and other small particles. They are also gentle on surfaces, so you don’t have to worry about scratching the brush rollers or other parts of your vacuum cleaner.
Cotton cloths: If you don’t have a microfiber cloth handy, a cotton cloth can also do the job. However, keep in mind that they may not be as effective at capturing small particles as microfiber cloths.
Old t-shirts: If you’re in a pinch and don’t have any cloths specifically designated for cleaning your vacuum cleaner, an old t-shirt can work in a pinch. Just make sure it’s clean and doesn’t have any buttons or other embellishments that can scratch the brush rollers.
Regardless of the type of cloth you choose, make sure it’s clean before using it to wipe down the brush rollers. This will help prevent any additional debris from getting trapped in your vacuum cleaner.
In addition to cleaning the brush rollers, you may also need to use the cloth to wipe down other parts of your vacuum cleaner, such as the dust bin or filters. This will help to ensure that your vacuum cleaner is functioning at optimal performance levels.
Remember to also wash your cloth after use and let it dry completely before storing it away. This will help keep it clean and ready for the next time you need to clean your vacuum’s brush rollers.
Clean Water
When cleaning your vacuum’s brush rollers, using clean water is an essential tool to have at your disposal. Here are some benefits of using clean water:
Prevents cross-contamination: Using dirty water to clean your brush rollers can potentially transfer germs and bacteria from one surface to another. By using clean water, you can prevent cross-contamination and maintain a clean environment.
Removes dirt and debris: Brush rollers can accumulate a lot of dirt and debris over time. Using clean water can help remove these particles and leave your brush rollers sparkling clean.
Doesn’t damage your vacuum: Some cleaning solutions and chemicals can be abrasive and harmful to your vacuum. Using clean water is a gentle, safe way to clean your brush rollers without damaging any delicate components.
When using clean water to clean your brush rollers, it’s important to follow these tips:
Use warm water: Warm water is more effective in cleaning than cold water since it can help break down stubborn dirt and debris.
Don’t oversaturate: It’s important to avoid over-saturating your brush rollers with water. Too much water can damage the motor or other components of your vacuum cleaner.
Dry thoroughly: After cleaning your brush rollers with water, make sure to dry them thoroughly before putting them back in. This prevents rust, corrosion and any unwanted moisture in or on the brush roller.
Ultimately, using clean water is an effective and safe way to clean your vacuum’s brush rollers. It can help remove debris, prevent cross-contamination, and extend the life of your vacuum cleaner.
Protective Gloves
Protective gloves are an essential tool to have when cleaning your vacuum’s brush rollers. They serve to protect your hands from any sharp or dangerous objects that may be hiding in the roller bristles. It is imperative to wear protective gloves to ensure your safety during the cleaning process.
Here are some reasons why you should use protective gloves:
Sharp Objects: During the cleaning process, you may come across sharp objects that could cause injury to your hands. Wearing protective gloves minimizes any risks of cuts or punctures.
Chemicals: Some cleaning solutions can cause skin irritation and allergic reactions. Protective gloves serve as a barrier between the chemicals and your skin.
Dust and Dirt: Cleaning your vacuum’s brush rollers can be a dirty job, and wearing gloves can help protect your hands from getting covered in dust and dirt.
Hygiene: For hygiene reasons, it is always best to wear gloves when cleaning, especially if you are sharing your vacuum cleaner with others.
When choosing protective gloves, it is important to choose the right type for the job. Look for gloves that fit well and are comfortable to wear for extended periods. Nitrile gloves are a popular choice when it comes to cleaning, as they are durable and offer chemical resistance.
Remember these tips when using protective gloves:
Inspect the gloves for any defects or tears before using them to ensure their effectiveness in protecting your hands.
Dispose of gloves after each use to prevent any cross-contamination.
Wash your hands thoroughly after removing the gloves to remove any residue or bacteria.
Store gloves in a clean and dry place to prevent any damage or contamination.
Always follow the manufacturer’s instructions when using gloves.
Using protective gloves may seem like a small detail, but they can make a big difference in keeping you safe during the cleaning process. Don’t underestimate this crucial tool and make sure to wear them every time you clean your vacuum’s brush rollers.
Protective Eyewear
When cleaning your vacuum’s brush rollers, it’s important to prioritize your safety. One of the most critical safety measures you should take when cleaning your vacuum is to wear protective eyewear. This simple step can help protect your eyes from debris and any potential harmful chemicals that you may be using during the cleaning process.
Here are some reasons why wearing protective eyewear is so important:
Debris from the brush rollers can easily fly into your eyes and cause damage, especially if you’re using scissors or a seam ripper to remove tangled hair or debris.
If you’re using cleaning solutions or other chemicals to clean the brush rollers, it’s important to protect your eyes from any potential splashes or drips that could cause irritation, burns or other injuries.
Protective eyewear is also essential if you wear contacts or have sensitive eyes that are prone to irritation, as even small particles or fumes from chemicals can result in discomfort or even injury.
Remember, when it comes to cleaning your vacuum cleaner, safety should always come first. So, make sure to protect your eyes by wearing protective eyewear throughout the cleaning process. This simple step can go a long way in preventing accidents and protecting your vision.
Manual or User Guide
It’s important to have the right tools and resources when cleaning your vacuum’s brush rollers, including the manual or user guide provided with your vacuum cleaner. This guide can provide valuable insights and instructions that can help you perform the cleaning process effectively and safely.
The manual or user guide can provide:
1. Safety Instructions
The user guide will typically provide safety instructions that can help you avoid injury during the cleaning process. These instructions may include using protective gloves or eyewear and unplugging the vacuum cleaner before starting the cleaning process.
2. Brush Roller Removal Instructions
The manual may also provide step-by-step instructions for removing the brush rollers from your vacuum cleaner, which can help you avoid damaging the vacuum or the brush rollers themselves during the cleaning process.
3. Cleaning Recommendations
The manual or user guide may provide specific cleaning recommendations for the brush rollers, including the type of cleaning solution to use and how to apply it to the rollers to avoid causing damage. Following these recommendations can help extend the life of your vacuum cleaner and brush rollers.
4. Maintenance Tips
In addition to specific cleaning information, the manual may also provide general maintenance tips for your vacuum cleaner, such as when to replace the brush rollers and how to properly store the vacuum when it’s not in use. These tips can help you maintain your vacuum cleaner in good working condition for years to come.
The manual or user guide that comes with your vacuum cleaner can provide valuable information and insights that can help you clean your vacuum’s brush rollers effectively and safely. By following the instructions and recommendations provided in the manual, you can extend the life of your vacuum and keep it in good working condition.
How to Clean Your Vacuum’s Brush Rollers
Now that you understand the importance of cleaning your vacuum’s brush rollers, it’s time to learn how to do it right. Cleaning the brush rollers may seem like a daunting task, but it’s actually quite simple if you have the proper tools and follow the steps carefully. In this section, we’ll walk you through the process step-by-step, so you can get the job done quickly and easily. So, put on your gloves and let’s get started!
Step 1: Unplug Your Vacuum Cleaner
The first step in cleaning your vacuum’s brush rollers is crucial for your safety. Before starting any cleaning, unplug your vacuum cleaner from the electrical outlet . This is important to prevent any accidents from occurring. Failure to unplug the vacuum cleaner before cleaning the brush rollers could result in electric shock or personal injury.
To ensure maximum safety, it’s also recommended that you remove the vacuum cleaner from the cleaning area to prevent accidental switch-on. Make sure to place the vacuum cleaner on a flat and stable surface to prevent any tipping or falling over.
Once you have unplugged the vacuum cleaner and removed it from the cleaning area, check the power cord for any damages. Do not use a vacuum cleaner with a damaged power cord, as this could cause electric shock or fire. If the power cord is damaged, either replace it or bring the vacuum cleaner to a repair shop for professional assistance.
Taking the time to unplug your vacuum cleaner and ensure that it’s safe to work with may seem like an inconvenience, but it’s an important safety precaution. Skipping this step could lead to severe consequences that could have been avoided. So, make sure to always follow this step before starting any cleaning.
Step 2: Remove the Brush Rollers
Now that you have unplugged your vacuum and have the right tools ready, it’s time to proceed with step 2: removing the brush rollers.
Removing the brush rollers will give you access to clean it thoroughly and prevent damage to the vacuum’s motor. The process of removing the brush rollers may differ based on the vacuum cleaner brand and model. It is advisable to consult the manual or user guide for the proper way to remove the brush rollers.
Here are some general steps to remove brush rollers:
Steps to Remove Brush Rollers
Description
Step 1
Lower the vacuum’s handle and lay it flat on the floor.
Step 2
Locate the brush roller cover usually located on the bottom of the vacuum cleaner.
Step 3
Use a screwdriver to remove the screws securely holding the brush roller cover in place.
Step 4
Hold the brush roller firmly and pull it straight out towards you out of the vacuum cleaner.
Make sure you place the brush rollers in a safe place away from children and pets during cleaning. With the brush rollers out, you can move to the next step, removing debris and tangles.
Remember that removing the brush rollers is an important step in cleaning your vacuum’s brush rollers. Skipping this step can lead to incomplete cleaning and accumulated debris and tangles that can damage your vacuum cleaner over time.
Step 3: Remove Debris and Tangles
Before cleaning the brush rollers, it is essential to remove any debris and tangles that might be present. Failure to remove this debris can damage the vacuum cleaner and hinder its performance. Here are the steps to remove debris and tangles from your vacuum’s brush rollers:
1. Use a handheld vacuum: To remove the larger debris such as hair or pet fur, use a handheld vacuum. This will help loosen the dirt and make it easier to remove.
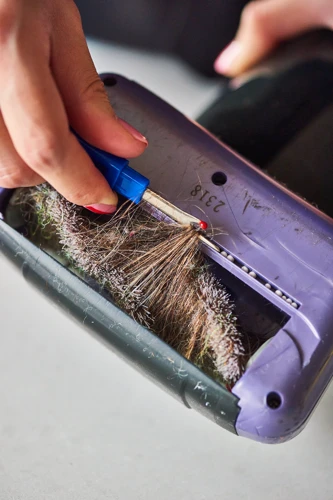
2. Cut through stubborn tangles: If the debris is too tangled up, use scissors or a seam ripper to cut through it. Be careful not to damage the brush roller in the process.
3. Pull out the remaining debris: After you have removed the larger debris, use your fingers or tweezers to pull out any remaining dirt, hair or string that might be tangled around the brush roller.
4. Check the end caps: Remove the end caps of the brush roller and clean them thoroughly. You can use a cloth and cleaning solution to gently scrub them clean.
Remember, cleaning the brush rollers is an essential task that needs to be performed regularly to ensure that your vacuum cleaner continues to operate optimally. Not removing debris and tangles from your vacuum’s brush rollers can result in poor performance and frequent breakdowns, which can be costly to repair. So, take the time to remove debris and tangles from your vacuum’s brush rollers before proceeding to the next step.
Step 4: Clean the Brush Rollers
Now that you have removed the debris and tangles from your vacuum’s brush rollers, it’s time to give them a thorough cleaning. The brush rollers can accumulate dirt, dust, hair, and other debris over time, which can affect the performance of your vacuum cleaner. Here’s a step-by-step guide on how to clean them:
Step 1: Prepare your cleaning solution. You can use a mild detergent mixed with warm water. Dip a clean cloth in the solution, then wring it out to avoid using excessive water.
Step 2: Take one brush roller at a time and hold it by its ends. Use the cloth to wipe the roller, rotating it as you go. Make sure to clean both the bristles and the sides of the roller.
Step 3: If you notice any stubborn dirt or debris, you can use a seam ripper or scissors to carefully cut it away from the bristles.
Step 4: If you want to disinfect the brush rollers, you can use a solution of water and vinegar in a 1:1 ratio. Dip a clean cloth in the solution, then wipe the brush rollers. Vinegar helps get rid of bacteria and unpleasant odors.
Step 5: After cleaning, rinse the brush rollers with clean water to remove any soap residue or vinegar. Wipe them dry with a clean cloth.
Step 6: Repeat the same process with the other brush roller.
By cleaning your vacuum’s brush rollers, you can improve its cleaning performance and extend its lifespan. It’s important to note that the cleaning frequency will depend on the frequency of use. If you vacuum regularly and notice that the brush rollers are becoming clogged, it’s better to clean them more frequently.
Step 5: Reassemble the Vacuum Cleaner
Now that you have finished cleaning your vacuum’s brush rollers, it’s time to reassemble your vacuum cleaner. Follow these steps to make sure you put everything back in its proper place:
Replace the brush rollers: Carefully place the brush rollers back in their original position. Be sure to align the gears properly and gently push them back into place until you hear a click.
Reattach the end caps: Take the end caps that you removed earlier and slide them back onto the brush rollers. Make sure they are securely fastened and in the correct position.
Replace the belt: If you had to remove the belt to access the brush rollers, now is the time to put it back on. Refer to your vacuum’s manual or user guide for instructions on how to properly reattach the belt.
Attach the bottom plate: Carefully place the bottom plate back over the brush rollers and attach it securely. Use a screwdriver if necessary.
Plug in your vacuum cleaner: Once everything is back in its place and secure, plug your vacuum cleaner back in and turn it on to make sure everything is working properly.
By reassembling your vacuum cleaner correctly, you can ensure that it will continue to perform at its best and the brush rollers will continue to do their job of lifting dirt and debris from your floors. It’s important to follow these steps carefully to avoid any possible damage to your vacuum cleaner.
Conclusion
In conclusion, it is essential to use the right tools and techniques to clean your vacuum’s brush rollers regularly. By doing so, you can reduce maintenance costs, improve cleaning performance, and extend the life of your vacuum cleaner. Neglecting to clean the brush rollers can result in poor suction, reduced efficiency, and potential damage to the machine.
To effectively clean the brush rollers, you need a handheld vacuum, scissors or a seam ripper, cleaning solution, clean cloth, clean water, protective gloves, protective eyewear, and the manual or user guide for your vacuum cleaner. It is crucial to follow the steps carefully to ensure that the brush rollers are thoroughly cleaned and reassembled correctly.
Regular maintenance of your vacuum cleaner can save you time and money, as well as provide a cleaner and healthier living environment. So don’t neglect to clean your brush rollers, and be sure to use the right tools and techniques to do so. By following these practices, you can maintain the effectiveness and longevity of your vacuum cleaner, ultimately providing a healthier and more hygienic home for you and your family.
Frequently Asked Questions
1. How often should you clean your vacuum’s brush rollers?
It’s recommended to clean your vacuum’s brush rollers once a month, or more frequently if you have pets or carpets that tend to accumulate a lot of debris.
2. Can I use any cleaning solution to clean my vacuum’s brush rollers?
No, it’s important to use a cleaning solution that is safe for the materials your brush rollers are made of. Check your vacuum’s manual or user guide for recommended solutions.
3. Why do I need protective gloves and eyewear to clean my vacuum’s brush rollers?
Protective gloves and eyewear are recommended as cleaning the brush rollers can release tiny particles of dust and debris that can be harmful if inhaled or come in contact with your skin.
4. Can I use a regular cloth to clean my vacuum’s brush rollers?
It’s important to use a clean cloth that won’t leave behind any fibers or debris that could get tangled in the brush rollers. A microfiber cloth is a good option.
5. Should I clean my vacuum’s brush rollers after each use?
No, cleaning your vacuum’s brush rollers after each use is not necessary. However, it’s important to clean them regularly to ensure optimal performance and longevity of your vacuum.
6. How do I know if my vacuum’s brush rollers need to be cleaned?
If you notice a decrease in suction power or an increase in debris left behind on your floors, it’s likely time to clean your vacuum’s brush rollers.
7. Is it difficult to remove the brush rollers from my vacuum?
No, removing the brush rollers is typically a simple process that requires just a few steps as outlined in the article.
8. Can I use a regular pair of scissors to cut away tangled hair and debris from my brush rollers?
It’s best to use a seam ripper or another tool designed specifically for removing tangles from brush rollers to avoid damaging them.
9. Will cleaning my vacuum’s brush rollers improve its overall cleaning performance?
Yes, cleaning your vacuum’s brush rollers regularly will help ensure optimal performance and improve its ability to pick up debris from floors and carpets.
10. Can I damage my vacuum by cleaning the brush rollers?
While it’s unlikely to damage your vacuum by cleaning the brush rollers, it’s important to follow the recommended steps in your vacuum’s manual or user guide to avoid accidentally damaging any parts or components.