5 Essential Maintenance Tips For Your Smart Vacuum Cleaner
Warning: A non-numeric value encountered in /var/www/html/wp-content/themes/generatepress/inc/structure/post-meta.php on line 165
by Dwight Gibson
You’ve invested in a cutting-edge smart vacuum cleaner that promises to take your cleaning game to the next level. But if you’re not maintaining your device regularly, you may be leaving it vulnerable to malfunctions that compromise its cleaning power. To help you keep your smart vacuum cleaner functioning at its best, we’ve assembled five essential maintenance tips that you need to follow. By following these tips, you can ensure that your smart vacuum cleaner stays in top condition for years to come, delivering the sparkling clean floors that you demand. So sit back, relax and let us guide you through everything you need to know to keep your smart vacuum cleaner performing at its best.
Table of Contents
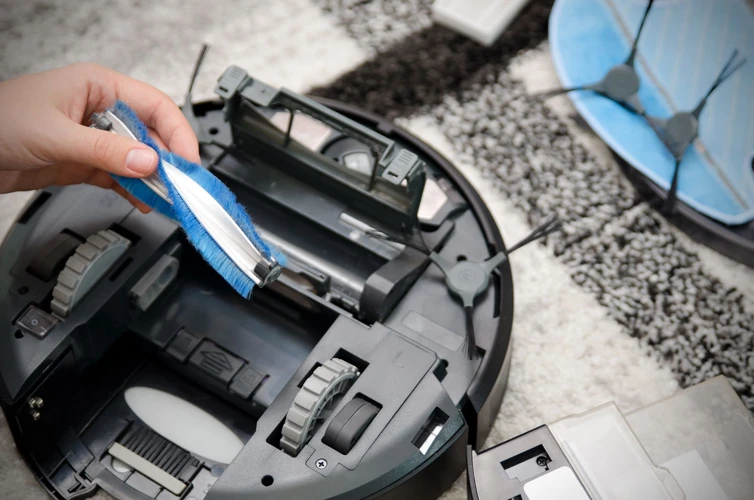
1. Clean the Brushes and Filters Regularly
Ensuring your smart vacuum cleaner is in top condition is essential for its longevity and efficient cleaning. One of the most important maintenance tasks is to clean the brushes and filters regularly. Over time, the brushes and filters can become clogged with dust, hair, and other debris, reducing the effectiveness of your vacuum. In this section, we will walk you through the step-by-step process of cleaning the brushes and filters in just a few simple steps. By the end of it, you’ll see just how easy it is to keep your smart vacuum cleaner running smoothly. To learn more about other maintenance tips for your smart vacuum, check out our Smart Vacuum Maintenance Guide.
1.1 Check the Brushes and Filters
Regularly checking the brushes and filters is an important step in maintaining the performance of your smart vacuum cleaner. It is recommended by experts to check the brushes and filters at least once a week, depending on how often you use your device. Here are some steps to help you check the brushes and filters:
Step 1: Turn off and unplug your smart vacuum cleaner to ensure safety.
Step 2: Place the device on a flat surface for easy access.
Step 3: Locate the brushes and filters on the bottom or side of your device.
Step 4: Check the brushes for any tangled hair, dust, or debris. This can affect the performance of your device and damage the brushes if not removed properly.
Step 5: Check the filters for any clogs or dirt build-up. It is important to clean or replace the filters regularly to maintain the air quality in your home and prevent any damage to the device.
Checking the brushes and filters regularly can also help you to identify any potential issues with your device before they escalate. If you notice any damage to the brushes or filters, it is recommended to replace them immediately. For more tips on maintaining your smart vacuum cleaner, check out our article on smart vacuum maintenance.
1.2 Remove the Brushes and Filters
Removing the Brushes and Filters is a critical part of maintaining your smart vacuum cleaner. It’s important to follow the manufacturer’s instructions to avoid any damage when removing them. Here are the steps you need to follow when removing the brushes and filters:
Step 1: Turn off your vacuum cleaner and unplug it from the power source. This is an essential safety measure that should not be skipped.
Step 2: Locate the brushes and filters on your vacuum cleaner. These typically are found at the bottom of the vacuum cleaner. Consult your user manual if you’re not sure where they are.
Step 3: Once you’ve located the brushes and filters, press the release buttons on either side of the brush roll to remove it. Be gentle when removing the brush roll to avoid breaking any fragile parts. Be aware that some models may have screws rather than release buttons. In that case, use a screwdriver to remove the screws.
Step 4: If you have a filter, locate it and remove it by pushing the release button or pulling it out. Be cautious not to tear or damage the filter when doing so.
To clean the brushes and filters, you’ll need to follow a few simple steps. First, make sure to turn off the vacuum cleaner and unplug it from the wall to avoid the risk of electrical shock. Then, using gloves or a brush, gently remove any hair or debris wrapped around the brushes. After that, you can use a damp cloth to wipe the brushes clean.
Next, remove the filters from the vacuum cleaner. Depending on your model, you may have a pre-filter and a HEPA filter. Pre-filters usually need to be cleaned or replaced every month, while HEPA filters can last several months to a year. You can check your vacuum cleaner’s manual to see the recommended replacement schedule.
Once you’ve removed the filters, use a soft brush to clean off any debris. Some filters can be gently washed with water, while others may need to be replaced entirely. Again, check your manual for specific instructions.
After you’ve cleaned the brushes and filters, make sure they are completely dry before re-attaching them to the vacuum cleaner. Wet filters or brushes can damage your vacuum cleaner’s motor or cause mold to grow inside.
Regularly cleaning the brushes and filters is crucial to keep your smart vacuum cleaner in top condition. Not only will it improve the performance of your vacuum cleaner, but it can also prevent costly repairs or replacements down the line. For more tips on maintaining your smart vacuum cleaner, check out our article on smart vacuum maintenance mistakes to avoid.
1.4 Re-attach the Brushes and Filters
Once you have cleaned the brushes and filters of your smart vacuum cleaner, it’s important to re-attach them properly to ensure optimal performance. Here are the steps to follow:
Step 1: Check the brushes and filters to make sure they are clean and free from debris.
Step 2: Align the brushes and filters correctly with their designated slots on the vacuum cleaner.
Step 3: Press down firmly on the brushes and filters until you hear a clicking sound, indicating that they are securely attached.
Step 4: Turn on your smart vacuum cleaner and run a quick test to ensure that the brushes and filters are working properly.
While cleaning is a chore that not many of us look forward to, owning a smart vacuum cleaner can make the task a lot easier. However, just like any other appliance, it requires maintenance to keep it running efficiently. In this section, we’ll discuss one of the essential maintenance tips for keeping your smart vacuum cleaner in top condition: emptying the dustbin frequently. A full dustbin could affect how well your vacuum cleaner is able to pick up debris, so it’s important to make a habit of emptying it regularly. Let’s explore this further in the following steps.
2.1 Check When Your Dustbin Is Full
Before emptying the dustbin of your smart vacuum cleaner, it is essential to check whether it is full or not. A full dustbin can prevent your vacuum cleaner from working efficiently, and can even cause it to stop working altogether. To check whether your vacuum cleaner’s dustbin is full or not, you need to follow a simple process.
The following table summarizes the steps to check when your dustbin is full:
Step
Description
Step 1
Turn off your smart vacuum cleaner and unplug it from the power source.
Step 2
Locate the dustbin on your vacuum cleaner.
Step 3
Remove the dustbin from the vacuum cleaner.
Step 4
Check the dustbin for any dust or debris.
Step 5
If the dustbin is full, empty it. If not, you can continue using your vacuum cleaner.
Step 6
Clean the dustbin before re-attaching it to the vacuum cleaner for optimal performance.
Regularly checking and emptying the dustbin is an essential part of maintaining your smart vacuum cleaner’s performance. It is recommended to check the dustbin after every cleaning session to ensure that it’s not full. Failure to do so can lead to clogging and reduced suction power. It’s also imperative to discard the contents of the dustbin appropriately and to handle the dustbin with care to prevent damaging it.
2.2 Remove and Empty the Dustbin
When it comes to keeping your smart vacuum cleaner in top condition, emptying the dustbin frequently is a crucial step. This ensures that the vacuum has enough space to capture dirt and dust particles, and it also prevents any clogging of the vacuum system. Here’s how you can remove and empty the dustbin with ease:
Step 1: Check when your dustbin is full
First of all, you need to check the dustbin and confirm whether it’s full or not. Most vacuums come with an indicator light that alerts you when the dustbin is full. If your vacuum doesn’t have this feature, you can manually check by opening the dustbin and inspecting the level of debris.
Step 2: Remove the dustbin
Once you confirm that the dustbin is full, you need to remove it from the vacuum. Different models come with different mechanisms for dustbin removal, so refer to your user manual for instructions. Typically, you need to push a button or lever to release the dustbin from the vacuum.
Step 3: Empty the dustbin
Now that the dustbin is removed, you can empty its contents into a waste bin. Make sure you do this over a waste bin or trash bag to prevent debris from scattering all over the floor. Depending on your vacuum model, you may need to detach the dustbin from the vacuum’s filter assembly to completely empty it. Again, refer to your user manual for specific instructions.
Step 4: Clean the dustbin
After emptying the dustbin, it’s important to give it a thorough cleaning to remove any residual dust or debris. You can use a dry cloth or brush to wipe the interior of the dustbin clean. Avoid using water or wet cleaning solutions as this can damage the vacuum’s electronic components.
Step 5: Re-attach the dustbin
Once the dustbin is emptied and cleaned, you can re-attach it to the vacuum. Make sure it’s securely in place before resuming vacuuming.
By following these steps regularly, you can ensure that your vacuum has ample space to capture dust and debris during each cleaning cycle. This will result in a cleaner home and a longer lifespan for your smart vacuum cleaner.
2.3 Clean the Dustbin
After you have removed the dustbin from your smart vacuum cleaner, it’s time to give it a good cleaning to keep your machine functioning at its best. Here’s how to clean the dustbin:
Step 1: Firstly, dispose of all the dirt and debris that has collected in the dustbin into a trashcan. Use a cleaning brush or a cloth to remove any stubborn dirt that might be sticking to the bin.
Step 2: Fill the sink with warm soapy water, and then submerge the dustbin fully into the soapy water. Let it soak for a few minutes to loosen any remaining dirt particles.
Step 3: Use a scrub brush or a sponge to agitate the water and clean the dustbin thoroughly. Scrub the inside and outside of the bin carefully, ensuring that all the dirt has been removed.
Step 4: Rinse the dustbin thoroughly with clean water to remove all the soap residue. You can also use a hose to rinse the bin if it’s easier for you.
Step 5: Towards the end, wipe the bin dry with a clean cloth or a towel. Leave the bin to air dry before you reattach it to the vacuum cleaner.
Remember to clean the dustbin regularly and avoid using harsh chemicals, which might damage it. By following these simple steps, you can extend the life of your smart vacuum cleaner and keep your home free from dust and debris.
2.4 Re-attach the Dustbin
Once you have finished cleaning the dustbin of your smart vacuum cleaner, it is important to properly re-attach it to ensure it is secure and ready to operate. Follow these steps to re-attach the dustbin:
Step 1:
First, ensure that the dustbin is completely dry before re-attaching it to the vacuum cleaner. This will prevent any moisture from damaging the internal components of your machine.
Step 2:
Next, line up the dustbin with the opening on the vacuum cleaner where it was originally attached. Make sure it is in the correct position and facing the proper direction.
Step 3:
Once the dustbin is properly aligned, gently push it into place until you hear a click or feel it lock into position. This may require slight force, but be careful not to use excessive pressure or you may damage the machine or the dustbin.
Step 4:
Finally, double-check that the dustbin is securely attached and won’t come loose during operation. You can do this by giving it a gentle tug to ensure it is properly locked into place.
By properly following these steps, you can ensure that your smart vacuum cleaner is ready to efficiently and thoroughly clean your home, as well as prevent any potential damage or malfunctions caused by a loose or improperly attached dustbin.
3. Check for Tangled Hair and Debris
We all love our smart vacuum cleaners for their effectiveness in cleaning our homes, but over time, they can get clogged with tangled hair, dust, and debris. This can lead to a decrease in their performance, making them less efficient in doing their job. It’s essential to check for tangled hair and debris regularly to keep your vacuum cleaner in top condition. In this section, we’ll go over some simple steps to help you keep your vacuum cleaner free from tangled hair and debris.
3.1 Turn Off The Vacuum Cleaner
Before attempting to remove any tangled hair or debris, it’s crucial to first turn off your smart vacuum cleaner. This ensures that the device is not operational and eliminates any potential risks or accidents.
To turn off the vacuum cleaner, simply locate the power button on the device and press it firmly until the device powers down. If you are unsure about the location of the power button, consult your device’s manual or contact customer support for assistance.
Once the device is completely powered off, you can proceed with removing tangled hair or debris from the brushes and floor plate. Remember to exercise caution when handling the device and avoid any contact with hot or sharp components.
Important note: Never attempt to remove any tangled hair or debris while the vacuum cleaner is still operational. This can cause harm to both yourself and the device. Always prioritize safety and turn off the device before conducting any maintenance tasks.
To ensure the longevity and optimal performance of your smart vacuum cleaner, it’s essential to follow each maintenance step carefully and with precision. Keeping your device in top condition will not only extend its lifespan, but it will also save you time and effort in the long run.
3.2 Remove the Tangled Hair and Debris
When it comes to maintaining your smart vacuum cleaner, one of the most important steps is to check for tangled hair and debris. Over time, pet hair and other debris can become wrapped around the brush roll or get trapped in other parts of the vacuum, which can inhibit its performance.
To remove tangled hair and debris from your smart vacuum cleaner, follow these steps:
Step 1:
Turn off the vacuum cleaner to ensure your safety.
Step 2:
Locate the brush roll and remove any tangled hair or debris using your hands or a pair of scissors.
Step 3:
Check the floor plate and remove any additional hair or debris that may have accumulated there.
Step 4:
Inspect the brush roll and floor plate for any signs of damage or wear and tear. If either of these components look damaged, it may be time to replace them.
By taking the time to remove any tangled hair or debris from your smart vacuum cleaner, you’ll help ensure that it can continue to operate at peak performance, keeping your floors clean and free of dirt and debris. Be careful when removing any tangled hair to avoid damaging the brush roll or other components of your vacuum cleaner.
3.3 Check the Brushes and Floor Plate
When you’re dealing with tangled hair and debris that seem to be stuck in your smart vacuum cleaner, it’s important to check the brushes and floor plate. These components work together to ensure that your cleaner can pick up any kind of dirt or debris from the floors.
Step 1: Turn Off The Vacuum Cleaner
Before you start inspecting the brushes and floor plate, make sure that the vacuum cleaner is turned off. This will prevent accidents, such as the brushes spinning unexpectedly, which can cause injury or damage to the device.
Step 2: Remove the Brushes and Floor Plate
Carefully remove the brushes and floor plate and set them in a safe area to work on. If you’re not sure how to remove these components, consult your user manual or the manufacturer’s website for guidance on your specific model.
Step 3: Check the Brushes and Floor Plate for Debris
Inspect the brushes and floor plate for tangled hair or large clumps of debris that might be preventing the cleaner from picking up dirt effectively. Make sure to remove anything you find, as this will improve the device’s functionality and prevent damage to the brushes over time.
Component
Action
Brushes
Inspect for tangled hair or debris
Floor Plate
Inspect for debris or obstructions
Step 4: Re-attach the Brushes and Floor Plate
Once you’ve thoroughly cleaned the brushes and floor plate, re-attach them to the vacuum cleaner. Make sure they’re securely in place before turning the device back on.
By following these simple steps, you can easily check the brushes and floor plate of your smart vacuum cleaner to ensure it’s operating at its best. This will help to maintain the device and extend its lifespan, saving you time and money in the long run.
3.4 Re-attach the Brushes and Floor Plate
After ensuring that the tangled hair and debris have been removed from the brushes and floor plate, it’s time to re-attach them. Follow these simple steps to re-attach the brushes and floor plate and ensure your smart vacuum cleaner is in top condition:
Place the brushes back in their designated slots: Line up the brushes with their slots and gently push them in until they click into place. Ensure that the brushes are securely in place and can’t be easily dislodged during the next use.
Slide the floor plate back on: Line up the floor plate with its designated spot and gently slide it back on. Ensure that it clicks into place and that there are no gaps or loose areas that could allow debris to get inside.
Test the brushes and floor plate: Turn on your smart vacuum cleaner and make sure that the brushes are spinning and that the floor plate is securely in place. If they’re not, turn off the vacuum cleaner and repeat steps one and two until everything is working properly.
By following these simple steps, you can rest assured that your smart vacuum cleaner’s brushes and floor plate are securely in place and can effectively clean your floors without any interruptions. Remember to regularly check for tangled hair and debris and clean your smart vacuum cleaner’s brushes and floor plate to keep it in top condition.
4. Check the Wheels and Sensors
When was the last time you checked your smart vacuum cleaner’s wheels and sensors? These two components are crucial for your vacuum cleaner’s performance and longevity. Over time, wheels can accumulate dirt and debris, preventing smooth movement, while sensors can become obstructed, leading to inaccurate navigation. In this section, we’ll guide you through the process of checking and cleaning your vacuum cleaner’s wheels and sensors, ensuring optimal performance for years to come. Let’s get started!
4.1 Check the Wheels for Debris or Stuck Objects
When it comes to maintaining your smart vacuum cleaner, it’s important not to overlook the wheels. Over time, debris can accumulate on the wheels, making it difficult for the vacuum cleaner to move around your home. In some cases, objects can even become stuck in the wheels, causing the vacuum cleaner to stop working altogether. To avoid these issues, it’s important to regularly check the wheels for debris or stuck objects.
The following table provides a step-by-step breakdown of how to check the wheels on your smart vacuum cleaner:
Step
Action
Step 1
Turn off the vacuum cleaner and unplug it from the wall.
Step 2
Flip the vacuum cleaner over and inspect the wheels.
Step 3
Look for any debris or objects that may be stuck in the wheels.
Step 4
Remove any debris or objects that you find using a pair of tweezers or a soft cloth.
Step 5
Clean the wheels with a soft cloth to remove any remaining debris or dirt.
Step 6
Check that the wheels are moving smoothly and without obstruction.
Step 7
Turn the vacuum cleaner back over and plug it back in.
By following these steps on a regular basis, you can help ensure that your smart vacuum cleaner continues to operate at its best. Not only will this help ensure that your vacuum cleaner is able to move around your home smoothly and without obstruction, but it can also help extend the life of your vacuum cleaner’s wheels.
4.2 Clean the Wheels
Keeping the wheels of your smart vacuum cleaner clean is another crucial maintenance tip to help it work correctly. Here are a few steps you can follow to clean the wheels:
Step 1: Turn off the vacuum cleaner and unplug it from the power source to prevent any accidents.
Step 2: Check the wheels for any debris, tangled hair, or any kind of stuck object.
Step 3: Use a clean and dry cloth to wipe the surface of the wheels gently. If there is any caked-on grime or dirt, use a toothbrush or another small brush to clean it.
Step 4: If required, use a little amount of water and mild cleaning detergent to clean the wheels thoroughly. Do not use too much water, as this could damage the vacuum cleaner’s inner workings.
Step 5: After thoroughly cleaning the wheels, dry them completely with a clean and dry cloth. It is crucial to make sure the wheels are entirely dry to prevent any damage to the vacuum cleaner’s motor or other components.
Step 6: Once you are done cleaning the wheels, check for any damaged parts or wear and tear. If any parts are damaged, consider replacing them to ensure the vacuum cleaner’s optimal performance.
By following these steps and keeping the wheels of your smart vacuum cleaner clean, you can ensure your vacuum cleaner works correctly and effectively. It is an essential maintenance tip to keep your smart vacuum cleaner in top condition and help it last longer.
4.3 Check the Sensors for Dust or Obstructions
Keeping the sensors of your smart vacuum cleaner free from any dust or obstructions is an important part of its maintenance. Sensors are responsible for detecting obstacles, stairs, and walls so the vacuum cleaner moves around and performs its task efficiently.
To ensure your smart vacuum cleaner’s sensors are working correctly, you should follow these steps:
Step
Description
Step 1:
Turn off your smart vacuum cleaner and unplug it from the power source to avoid any electrical shock.
Step 2:
Locate the sensors on your smart vacuum cleaner. They are usually found at the front and bottom of the device.
Step 3:
Use a soft and clean cloth to wipe the sensors gently. Make sure you remove any dust, hair or debris that may have accumulated on them. You can also use a small brush to remove any hard-to-reach dirt from the sensors.
Step 4:
Inspect the sensors carefully to ensure there are no obstructions or damages on them. Any cracks or scratches on the sensors can significantly affect their performance, so you may need to replace them if you notice any damages.
Step 5:
Once you have wiped and inspected the sensors, make sure to reattach them correctly before you start using your smart vacuum cleaner again.
Regularly cleaning the sensors of your smart vacuum cleaner can help to keep it in top condition and prolong its lifespan. By following these simple steps, you can ensure that your smart vacuum cleaner continues to work efficiently and effectively in keeping your home clean and tidy.
4.4 Clean the Sensors
Keeping your smart vacuum cleaner’s sensors clean is an essential part of maintaining its top condition. Sensors ensure that your vacuum navigates smoothly and detects obstacles and dirt. Neglecting sensor cleaning can result in malfunctioning or inaccurate movement, reducing the vacuum’s effectiveness. Here are steps to clean your vacuum sensors:
Step
Description
Step 1:
Gather Supplies
Step 2:
Take Out the Cleaning Cloth
Step 3:
Turn Off the Vacuum Cleaner
Step 4:
Locate the Sensors
Step 5:
Use the Cleaning Cloth to Gently Wipe the Sensor Surface
Step 6:
Clean Other Sensors
Step 7:
Turn the Vacuum Cleaner Back On
To clean the sensors, first, gather your supplies, which should include a microfiber cloth, water or cleaning solution, and a vacuum brush attachment. Take out the cleaning cloth and dampen it with water. However, be sure not to soak it entirely.
Next, turn off the vacuum cleaner so that you can access the sensors without harming the device. Locate the sensors, which are often small, round, and positioned near the bottom of the vacuum cleaner. Use the cleaning cloth to wipe each sensor surface gently. Be careful not to press too hard, as this could scratch or damage the sensor.
If your vacuum has more than one sensor, clean each of them with equal care. Once you have cleaned all the sensors, turn the vacuum back on.
Cleaning vacuum sensors isn’t complicated, and with the above steps, you can do it yourself with ease. By keeping your vacuum sensors clean, you ensure that your vacuum cleaner provides optimal performance and will last longer.
5. Keep the Firmware and App Updated
You might not think of updating the firmware and app for your smart vacuum cleaner as a necessary maintenance task, but it can greatly improve the performance and lifespan of your device. Keeping your firmware and app updated ensures that your smart vacuum is running the latest software and algorithms, which can introduce new features and improve cleaning efficiency. So, don’t forget to take care of the technological side of your smart vacuum cleaner, as it is just as important as the physical maintenance. Let’s dive into how you can keep your smart vacuum cleaner’s firmware and app up-to-date with these simple steps.
5.1 Install Firmware Updates
Keeping up with firmware updates is important to ensure your smart vacuum cleaner performs at its best. Manufacturers often release updates to fix bugs, add new features or improve performance. Here are the steps to install firmware updates:
Step 1:
Check for firmware updates on the manufacturer’s website or in the app.
Step 2:
Download the firmware update to your computer or phone.
Step 3:
Connect your smart vacuum cleaner to your computer or phone using the provided USB cable or Wi-Fi.
Step 4:
Open the app or file downloaded on your computer and follow the instructions to install the firmware update.
Step 5:
Wait for the installation process to complete and disconnect your smart vacuum cleaner from your computer or phone.
It is important to follow the manufacturer’s instructions carefully during the installation process to avoid damaging your smart vacuum cleaner. Additionally, make sure to download the correct firmware update for your specific model and only install official updates from the manufacturer’s website or authorized sources.
By keeping your smart vacuum cleaner’s firmware updated, you can optimize its performance and take advantage of new features. This simple step can save you time and effort in the long run.
5.2 Update the App Regularly
Regularly updating the app of your smart vacuum cleaner is important to ensure that you are getting the most out of your device. Here are some steps that you can take to update the app of your device:
Step 1: Open the app on your mobile device.
Step 2: Check for updates. Go to the app store on your device and click on the update button. Alternatively, check the settings in your smart vacuum cleaner app to see if there are any app updates available.
Step 3: Download and install the updates. Once you have found an available update, download and install it as soon as possible to ensure that you don’t miss any important features or bug fixes.
Step 4: Restart the app. After the update is installed, it’s always best to restart the app to ensure that all the new changes have taken effect.
By following these steps, you can ensure that your smart vacuum cleaner app is updated with the latest features and improvements, which can improve the performance of your device and make it more efficient. Updating the app also allows you to benefit from new features that can enhance the overall user experience, such as improved navigation, scheduling, and cleaning modes. So, make sure to update your app regularly to get the most out of your smart vacuum cleaner.
5.3 Follow the Instructions Carefully
When it comes to updating the firmware and app for your smart vacuum cleaner, it is crucial to follow the instructions carefully to avoid any damaging mistakes. Here are some tips to keep in mind:
Tip 1:
Read the instructions thoroughly before starting the update process. Make sure you understand all the steps involved.
Tip 2:
Follow the manufacturer’s recommended update process for your specific model. This may include downloading the update through an app or website, connecting your vacuum to a computer, or using a USB drive.
Tip 3:
Do not interrupt the update process once it has started. This can cause the update to fail or even damage the vacuum cleaner.
Tip 4:
Make sure your vacuum cleaner is fully charged or connected to a power source during the update process. Losing power during an update can cause issues and interrupt the update process.
By following these tips, you can ensure that your smart vacuum cleaner stays in top condition and continues to provide the best cleaning experience possible. Don’t rush the update process and make sure you understand each step before proceeding to ensure the best results.
Conclusion
In conclusion, maintaining your smart vacuum cleaner is not rocket science, but it does require a bit of time and effort. By regularly cleaning the brushes and filters, emptying the dustbin, checking for tangled hair and debris, and keeping the wheels and sensors clean, you can ensure that your machine remains in top condition and performs optimally.
Another important aspect of maintaining a smart vacuum cleaner is to keep the firmware and app updated. With regular software updates, you can ensure that your vacuum cleaner has access to the latest features and improvements, and that any bugs or glitches are quickly resolved.
Remember, prevention is always better than cure. By following these maintenance tips, you can prevent small problems from turning into major headaches down the road. Not only will a well-maintained smart vacuum cleaner function better, but it will also last longer and save you money in the long run.
So, whether you’re a proud owner of a Roomba or a Neato, make sure you follow these 5 maintenance tips to keep your smart vacuum cleaner in tip-top shape. Your floors (and your wallet) will thank you!
Frequently Asked Questions
1. How often should I clean the brushes and filters on my smart vacuum cleaner?
You should clean the brushes and filters on your smart vacuum cleaner at least once a week to ensure optimum performance.
2. How do I know when the dustbin is full?
Most smart vacuum cleaners will have an indicator light that illuminates when the dustbin is full, but you can also check manually by opening the dustbin and looking inside.
3. Is there a specific type of cleaning solution I should use to clean my smart vacuum cleaner?
No, you should only use water or a mild cleaning solution to clean your smart vacuum cleaner to avoid damaging any sensitive electronic components.
4. Can I use my smart vacuum cleaner on all floor surfaces?
Most smart vacuum cleaners are suitable for use on all floor surfaces, but you should check the manufacturer’s specifications to be sure.
5. Is it safe to clean the wheels and sensors on my smart vacuum cleaner with water?
Yes, it is safe to clean the wheels and sensors on your smart vacuum cleaner with water, but you should make sure that they are completely dry before using the vacuum again.
6. Can I continue to use my smart vacuum cleaner if the sensors are dirty or obstructed?
No, if the sensors on your smart vacuum cleaner are dirty or obstructed, it may not function properly and could potentially cause damage to your floors or furniture. Clean the sensors before using the vacuum again.
7. Can I control my smart vacuum cleaner with my smartphone?
Yes, most smart vacuum cleaners come with a companion app that allows you to control the vacuum and set cleaning schedules from your smartphone.
8. How often should I update the firmware on my smart vacuum cleaner?
You should check for firmware updates for your smart vacuum cleaner at least once every three months to ensure that you have the latest software features and bug fixes.
9. Can I use my smart vacuum cleaner without an internet connection?
Yes, you can use your smart vacuum cleaner without an internet connection. However, you will not be able to control the vacuum through the companion app or receive software updates.
10. How long do the batteries in a smart vacuum cleaner typically last?
The battery life on a smart vacuum cleaner can vary depending on the model and usage, but most batteries can last up to two hours on a single charge.