The Ultimate Guide to Scheduling Cleaning with Your Smart Vacuum Cleaner App
Warning: A non-numeric value encountered in /var/www/html/wp-content/themes/generatepress/inc/structure/post-meta.php on line 165
by Dwight Gibson
Have you ever wished to come home to a clean house without lifting a finger? Well, with a smart vacuum cleaner app, you can do exactly that! By simply scheduling your cleaning preferences, you can enjoy the convenience of automated cleaning without the hassle. But where do you start? In this article, we’ll guide you through six simple steps to scheduling cleaning with your smart vacuum cleaner app. So why wait? Let’s dive in and discover how you can enjoy a cleaner home with the touch of a button.
Table of Contents
Step 1: Download and Setup the App
Are you tired of manually cleaning your floors? Well, it’s time to bring out the big guns and invest in a smart vacuum cleaner. But, before you can enjoy the convenience of spotless floors, you need to download and set up the app that controls it. Don’t worry, we’ve got you covered with a step-by-step guide that will make it a breeze. In this section, we’ll go over everything you need to know about downloading the app and setting up your account. Let’s get started! And if you need help connecting your smart vacuum cleaner to the app later on, check out our guide to connecting your smart vacuum cleaner to WiFi.
Download the App
To enjoy the convenience of scheduling your cleaning with a smart vacuum cleaner app, the first step is to download and install the app on your smartphone. Most smart vacuum cleaner apps are compatible with both iOS and Android devices, which means you can download and set up the app on your preferred mobile device.
Here are the steps to download and install the app:
Open the App Store or Google Play Store on your smartphone.
Use the search bar to find the app by typing in the name of your smart vacuum cleaner brand or model.
Tap the “Install” or “Download” button, which might require you to sign in with your Apple ID or Google account.
Wait for the app to download and install on your smartphone. This might take some time depending on your internet speed.
Once the app is installed, find and tap the app’s icon to open it. Then proceed to set up the app by following the necessary prompts on the app interface.
Dear reader, it’s worth noting that some smart vacuum cleaner apps require a subscription or a one-time fee to access more features, like creating custom cleaning schedules or setting no-go zones. Check out our article on Smart Vacuum Cleaner Wi-Fi Costs for more insights.
Now that you have downloaded the app, it’s time to set up your account before you can connect your smart vacuum cleaner to the app.
Setup Your Account
Setting up your account on the smart vacuum cleaner app is the first step towards easy and convenient cleaning. Follow the steps below to create an account:
Open the smart vacuum cleaner app on your smartphone or tablet
Look for the “Sign Up” or “Create an Account” button and click on it
Fill in your personal information such as your name, email, and password
Confirm your email address by clicking on the link sent to your email
Make sure to choose a strong and unique password that you can easily remember. Your password should be made up of at least eight characters, including letters, numbers, and symbols. You can also use a password manager app to help create and store strong passwords.
After successfully setting up your account, you can log in to the smart vacuum cleaner app anytime, anywhere, and manage your cleaning tasks with ease.
Pro Tip: Want to know more about the pros and cons of using a WiFi smart vacuum cleaner? Check out our article on WiFi smart vacuum pros and cons to learn more.
Another Pro Tip: If you’re in the market for a new smart vacuum cleaner, read our guide on 10 best WiFi smart vacuum cleaners for 2021. You might find a model that’s perfect for your cleaning needs.
Now that you’ve set up your account, it’s time to connect your smart vacuum cleaner to the app. Follow the next step to learn how.
Step 2: Connect Your Smart Vacuum Cleaner to the App
So, you’ve downloaded the smart vacuum cleaner app and set up your account. Now, it’s time to connect your vacuum cleaner to the app! This step is essential to ensure that you can control and schedule your cleaning sessions from your smartphone seamlessly. In this section, we’ll guide you on how to connect your Wi-Fi-enabled vacuum cleaner to the app and enjoy the convenience of managing your household cleaning tasks with minimal effort. Let’s dive into the process and get your robot vacuum up and running! For specific directions on the vacuum app setup, check out this helpful guide.
Ensure Your Vacuum Cleaner is Compatible
Before connecting your smart vacuum cleaner to the app, it is crucial to ensure it is compatible to prevent any issues during the setup process. Here are some steps to determine compatibility:
Check the packaging or manual that came with the vacuum cleaner to see if it is compatible with a smartphone app.
Search online for the model of your vacuum cleaner and check for any specific instructions or compatibility requirements.
Ensure your smartphone meets the requirements to run the vacuum cleaner app. Some apps may only be compatible with certain operating systems or versions.
If you are unsure about the compatibility of your vacuum cleaner, it’s always best to reach out to the manufacturer for more information. They can help you determine compatibility and provide support if needed.
It’s essential to ensure compatibility because if the vacuum cleaner is not compatible with the app, it can lead to frustration, wasted time, and potentially costly mistakes. By taking the time to check compatibility beforehand, you can ensure a smoother and stress-free setup process.
Pair the Vacuum Cleaner with the App
Once you’ve confirmed that your smart vacuum cleaner is compatible with the app, it’s time to pair them together. Here’s a step-by-step guide to help you do just that:
Turn on your vacuum cleaner: Before you start pairing your vacuum cleaner with the app, turn on your vacuum cleaner and make sure that it is in pairing mode. Refer to your vacuum cleaner’s user manual for instructions on how to do this.
Go to the “Add Device” screen: Open the app on your smartphone or tablet and go to the “Add Device” screen. This screen may be named differently depending on the app you’re using, but typically you can find it on the navigation menu or on the app’s homepage.
Search for your vacuum cleaner: On the “Add Device” screen, your app will begin searching for nearby devices. Wait for your vacuum cleaner to appear on the list of available devices.
Select your vacuum cleaner: Select your vacuum cleaner from the list of available devices on the app.
Enter the pairing code: The app will now prompt you to enter a pairing code. This code can be found either on the packaging of your vacuum cleaner or in the user manual. Enter the code into the app when prompted.
Wait for confirmation: After entering the pairing code, wait for the app to confirm that your vacuum cleaner has been paired successfully. This may take a few moments.
Test the connection: Once your vacuum cleaner has been paired with the app, try running a test cleaning program. This will allow you to see how the app controls your vacuum cleaner and whether the connection is stable and working properly.
Make sure that you follow these pairing steps carefully to ensure a seamless connection between your smart vacuum cleaner and the app. Once you have successfully paired them, it’s time to move on to the next step of selecting your cleaning settings.
Step 3: Choose Your Cleaning Settings
Now that you have successfully connected your smart vacuum cleaner to the app, it’s time to personalize your cleaning settings based on your preferences. This step is crucial in ensuring that your smart vacuum cleaner provides you with the most efficient and effective cleaning experience. With a few simple taps on your mobile device, you can ensure that your floors are cleaned according to your needs and schedule. But how exactly can you customize these settings? Let’s dive into the details together.
Select Your Cleaning Mode
When it comes to selecting your cleaning mode in your smart vacuum cleaner app, there are typically several options to choose from depending on your cleaning needs. Here are some cleaning modes you may encounter in your app:
Auto Mode: This mode is designed for general cleaning and will clean your floors in a random pattern. Your vacuum cleaner will navigate throughout your home until it has cleaned all accessible areas.
Spot Mode: If you have a specific area that needs deep cleaning or has a concentrated mess, you can use Spot Mode. This mode will focus on one area and clean in a circular motion to ensure a thorough clean.
Edge Mode: For those with furniture or baseboards, Edge Mode is great for cleaning corners and tight crevices. This mode will clean along your walls and edges.
Manual Mode: If you prefer to have complete control over where your robotic vacuum is cleaning, you may enjoy Manual Mode. In this mode, you can manually control the movement of your vacuum using your app.
When selecting your cleaning mode in the app, it’s important to consider the type of flooring you have, the amount of dirt and debris, and any obstacles or furniture that may be in the way. For example, Spot Mode may be ideal for high-traffic areas like your kitchen or living room, while Edge Mode may be more appropriate for your bedroom or home office.
Remember, your smart vacuum cleaner can make cleaning your home a breeze, but it’s important to select the right mode for your needs. Experiment with different modes and find the one that works best for you and your home.
Adjust Your Cleaning Schedule
After selecting the cleaning mode, you can adjust the cleaning schedule according to your preferences. The app allows you to choose the days of the week and the specific time when you want the vacuum cleaner to start cleaning.
Here is a step-by-step guide on how to adjust your cleaning schedule:
Step
Action
Tip
1
Tap on the “Schedule” icon in the app
Make sure your vacuum cleaner is connected to the app before adjusting the schedule.
2
Select the days of the week you want the cleaner to run
You can choose one or multiple days, depending on your cleaning needs.
3
Choose the time you want the cleaner to start
You can set a different time for each day of the week if desired.
4
Save your schedule
Make sure to confirm and save your changes before exiting the app.
By adjusting your cleaning schedule, you can ensure that your home remains clean and tidy without any extra effort on your part. Depending on your lifestyle and specific needs, you may find it useful to schedule the cleaner to run during the day, when you are out at work, or at night when you and your family are sleeping.
Pro Tip: If you have pets or young children in your home, you may find it useful to set your cleaning schedule to run more frequently, such as every day or every other day, to keep your floors free of hair and debris.
Adjusting your cleaning schedule with the smart vacuum cleaner app is a quick and easy process that can save you time and effort in the long run.
Step 4: Customizing Your Cleaning Preferences
Now that you’ve connected your smart vacuum cleaner to the app and chosen your preferred cleaning settings, it’s time to explore some advanced customization options to make your cleaning experience even better. With Step 4, you can tailor your cleaning preferences to match your unique needs and preferences. From selecting a specific room to clean to setting cleaning boundary lines, this step is all about giving you more control over your cleaning routine. Let’s dive in and see what customizations are available in Step 4.
Selecting a Specific Room to Clean
One of the greatest advantages of a smart vacuum cleaner app is the ability to select specific rooms to clean. This feature is especially helpful if you have multiple rooms in your house or if you only want to clean specific areas. Here are the steps to follow when selecting a specific room to clean:
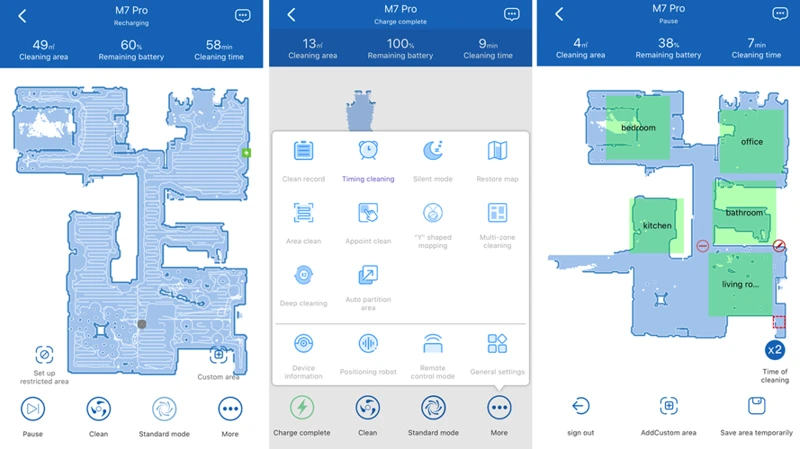
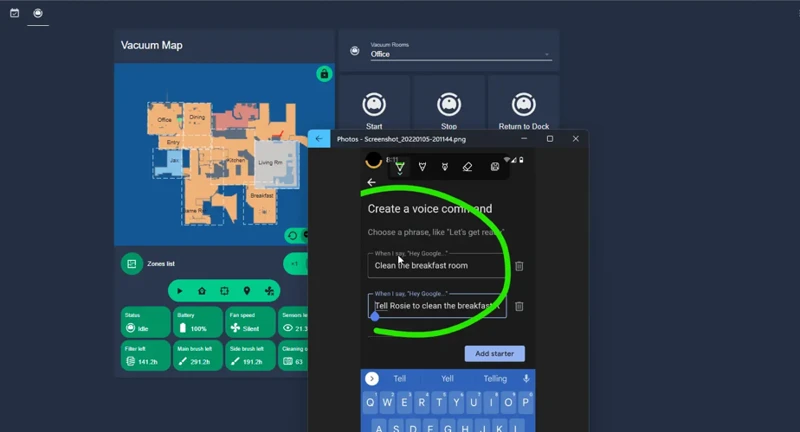
Step 1: Map Your Home – Before selecting a specific room to clean, make sure that your home’s map is complete and accurate. Most smart vacuum cleaners use advanced mapping technology to identify and navigate through your house. If your map is not accurate, the cleaner may not be able to clean the intended room properly.
Step 2: Select the Room – Once your home is mapped, you can then select the room you want to clean. Smart vacuum cleaner apps typically provide a list of rooms that have been identified on the map. Simply select the room you want to clean, and the vacuum cleaner will be directed to that specific area.
Step 3: Adjust the Cleaning Settings – After selecting the room, you can then adjust the cleaning settings to suit your preferences. You can choose the cleaning mode, adjust the cleaning power, and set the cleaning duration. This level of customization ensures that you get the best cleaning performance and the desired cleaning experience.
Step 4: Save Your Settings – Once you’re satisfied with your cleaning preferences, make sure to save your settings. This ensures that the next time you want to clean that specific room, your preferred settings will be applied automatically.
When selecting a specific room to clean, it’s important to consider the layout of your home and the cleaning needs of each room. For example, if you have hardwood floors in your living room and carpet in your bedrooms, you may want to adjust the cleaning settings accordingly.
Take advantage of this feature to get the most out of your smart vacuum cleaner app. It saves time and energy and leaves your home looking spotlessly clean!
Setting No-Go Zones
One of the most helpful features of a smart vacuum cleaner app is the ability to set no-go zones. These are areas in your home where you don’t want your vacuum cleaner to go, such as a room with delicate decor or an area with lots of cords and wires.
Setting no-go zones is easy with a smart vacuum cleaner app. Here’s how to do it:
Open the app and go to your cleaning preferences.
Select the option for setting no-go zones.
Using the app’s mapping feature, outline the area you want to mark as a no-go zone. This could be an entire room or just a small section of a room.
Label the area clearly to avoid any confusion.
Save your changes and your vacuum cleaner will now avoid that area during its cleaning cycle.
Setting no-go zones is especially useful for pet owners or families with children. You can designate certain areas as off-limits for your vacuum cleaner, ensuring that it doesn’t disturb your furry friends or accidentally vacuum up your child’s toys.
It’s important to note that some smart vacuum cleaners may not have the ability to detect no-go zones without physical barriers. For these models, you may need to use physical barriers, such as magnetic tape or virtual walls, to block off areas you don’t want the vacuum cleaner to go.
Setting no-go zones is a handy feature that will make using your smart vacuum cleaner app even more convenient. With this feature, you can customize your cleaning preferences and let your vacuum cleaner take care of the rest.
Selecting Your Cleaning Power
When it comes to selecting your cleaning power on your smart vacuum cleaner app, you will have various options available to you. It’s important to choose the right cleaning power that suits your specific cleaning needs. Here are some of the cleaning power options that you can choose from:
Cleaning Power
Description
Eco Mode
Uses minimal power and noise to conserve energy while still ensuring efficient cleaning. This is ideal for light cleaning.
Standard Mode
Provides a balance of power and energy consumption that can be used for daily cleaning. This is recommended for typical everyday cleaning.
Max Mode
Provides maximum cleaning power and is recommended for heavily soiled or high-traffic areas. This mode generates more noise and consumes more battery.
Choosing the right cleaning power will not only ensure efficient cleaning, but it can also prolong the life of your vacuum cleaner. If you have pets or children, or if you live in a dusty area, you may need to use a higher cleaning power more often. However, if you’re concerned about noise or energy consumption, then Eco Mode may be more suitable for you.
It’s important to note that selecting a higher cleaning power may also affect the battery life of your vacuum cleaner. It’s recommended to use the appropriate cleaning power for the cleaning task at hand in order to optimize cleaning efficiency and battery usage.
Setting Cleaning Boundary Lines
One of the most unique features of a smart vacuum cleaner app is the ability to set cleaning boundary lines. This allows you to create virtual barriers within your home that your vacuum cleaner will not cross. A few common scenarios where this feature might come in handy include preventing your vacuum cleaner from falling down the stairs, blocking off a specific room, or protecting fragile items from accidental collisions.
To set cleaning boundary lines with your smart vacuum cleaner app, follow these simple steps:
Step 1: Open the app and navigate to the cleaning settings.
Step 2: Look for an option that says “Boundary Lines” or something similar. Click on it.
Step 3: You will be prompted to select an area on your home map where you want to set the boundary line. Tap and drag the line to create the virtual barrier you want.
Step 4: Once you have created the boundary line, save your settings and exit the app.
It’s important to note that not all smart vacuum cleaners are capable of setting cleaning boundary lines, so be sure to check your user manual or app settings to confirm if this feature is available.
By setting cleaning boundary lines, you can have peace of mind knowing that your smart vacuum cleaner will stay within the areas you want it to clean. This feature can save you time and effort from constantly having to move items or block off areas that you don’t want your vacuum cleaner to clean. So, take advantage of this convenient feature and make the most of your smart vacuum cleaner app!
Step 5: Save Your Cleaning Schedule
As you wrap up the cleaning schedule, it’s essential to save and confirm your settings to ensure your smart vacuum cleaner will clean your home as per your preferences on a set schedule. This step is critical to ensure that your smart vacuum cleaner operates autonomously, allowing you to focus on other vital activities or even going to work, knowing that your home is kept tidy. In this section, we’ll walk you through the simple process of saving and confirming your cleaning schedule using your smart vacuum cleaner app. Let’s get started!
Preview Your Cleaning Schedule
Before saving your cleaning schedule, it’s important to preview it to ensure that it aligns with your cleaning needs. Thankfully, your smart vacuum cleaner app makes it easy for you to see your schedule in a clear and organized layout.
When you preview your cleaning schedule, you will see a summary of the information you inputted in the previous steps. This includes the cleaning mode, cleaning schedule, and any customizations you made to the preferences.
The layout of the preview may differ depending on the smart vacuum cleaner app you are using, but most apps will display the information in a table format. The table may include columns such as day, start time, end time, cleaning mode, and customizations.
It’s important to thoroughly review the table to ensure that there are no errors or discrepancies. If you notice any mistakes, be sure to go back and make the necessary changes before saving and confirming your schedule.
Pro Tip: It’s a good idea to take a screenshot of your cleaning schedule preview in case you need to refer back to it in the future.
Previewing your cleaning schedule is a crucial step in ensuring that your smart vacuum cleaner is operating efficiently and effectively. Take the time to carefully review your schedule and make any necessary changes before saving and enjoying a cleaner home with the convenience of your smart vacuum cleaner app.
Save and Confirm Your Cleaning Schedule
After previewing your cleaning schedule, you’re all set to save and confirm it. Make sure to double-check that all the settings are correct before saving, to avoid any inconvenience later on. To save and confirm your cleaning schedule, follow these simple steps:
Click on the ‘Save’ button: Once you’re satisfied with your cleaning schedule, hit the ‘Save’ button. This will save your cleaning schedule to the app.
Confirm your cleaning schedule: After saving, the app will ask you to confirm your cleaning schedule. This is to ensure that you’re satisfied with all the settings and are ready to set your vacuum cleaner in motion.
Check the time and date: Before confirming, check that the date and time are correct. If you need to make any changes, go back and adjust your cleaning schedule as necessary.
Confirm your cleaning schedule: Once everything looks good, confirm your cleaning schedule. The app will send the cleaning schedule to your vacuum cleaner, and it will start cleaning automatically at the scheduled time.
Keep in mind that if you need to make any changes to your cleaning schedule, you can always go back and adjust it within the app. The app is designed to be user-friendly and intuitive, so you can customize your cleaning schedule whenever you need to. Just be sure to save and confirm your changes before exiting the app. With a little practice, you’ll be a pro at scheduling cleaning with your smart vacuum cleaner app in no time!
Step 6: Enjoy the Convenience of a Cleaner Home!
After going through the process of downloading and setting up your smart vacuum cleaner app, connecting it to your vacuum cleaner, choosing your cleaning settings, and customizing your cleaning preferences, you’re finally ready to enjoy the convenience of a cleaner home!
Clean Home without the Hassle
Gone are the days of you having to manually vacuum your home. With your smart vacuum cleaner app, you can easily schedule cleaning sessions weekly or even daily, ensuring your home is always clean without having to lift a finger.
Increased Efficiency
The app’s cleaning schedule feature allows you to set cleaning times that are most convenient for you. You can even customize the cleaning preferences to clean specific rooms, and set no-go zones, saving you time and effort.
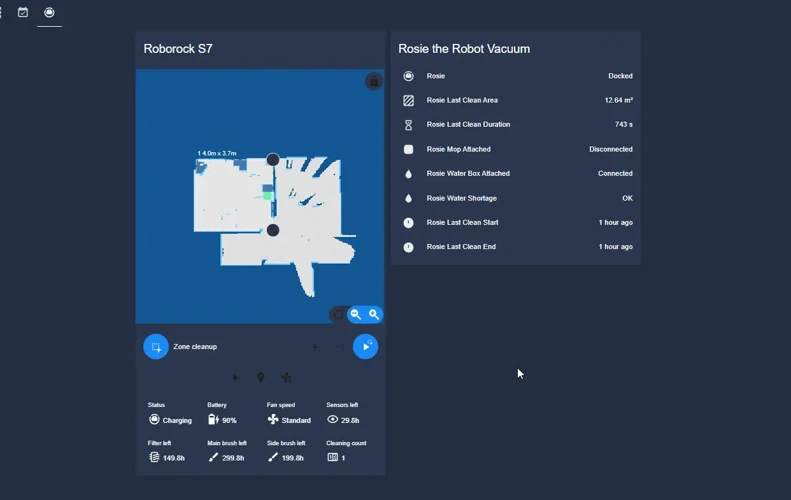
Remote Control
With your smart vacuum cleaner app, you can remotely control your vacuum cleaner, even when you’re away from home. You can adjust the cleaning schedule, change the cleaning power, and even check on the vacuum cleaner’s progress from the comfort of your phone.
Peace of Mind
The app’s security features provide peace of mind, knowing that your smart vacuum cleaner and personal information are safe and secure. You can even set cleaning boundary lines for your vacuum cleaner, ensuring that it stays within the designated cleaning areas.
Using a smart vacuum cleaner app is a game-changer for your cleaning routine. It not only saves you time and effort but also provides greater convenience and efficiency. Sit back and enjoy the comfort of a cleaner home, without any hassle.
Tips for Using Your Smart Vacuum Cleaner App
As you start using your smart vacuum cleaner app, it’s important to keep in mind that even the most advanced technology requires proper care and maintenance. In this section, we’ll share valuable tips and tricks to help you get the most out of your app and ensure the longevity of your smart vacuum cleaner. From firmware updates to security measures, we’ve got you covered with essential advice for using your smart vacuum cleaner app with confidence. So, let’s dive in!
Ensure Proper Maintenance of Your Vacuum Cleaner
Maintaining your smart vacuum cleaner is vital to ensure its longevity and effectiveness. Here are some tips for keeping your vacuum cleaner in top-notch condition:
Tip
Description
Empty the dustbin regularly
Make sure to empty the dustbin after each cleaning cycle. A full bin can hamper the suction power of the vacuum cleaner.
Clean the brushes and filters
Check the brushes and filters of the vacuum cleaner regularly. They can get clogged with hair, dirt, and debris, which can affect the efficiency of the vacuum cleaner.
Check for wear and tear
Inspect the vacuum cleaner for any signs of wear and tear. Replace any parts that are worn out, such as the brushes or rollers, to ensure optimal performance.
Keep the sensors clean
The sensors on the vacuum cleaner can get dirty or covered with dust. Wipe them clean regularly to avoid any issues with navigation.
Store properly
Store the vacuum cleaner in a cool and dry place when not in use. Avoid storing it in hot areas or direct sunlight, which can damage the battery and affect its overall performance.
By following these maintenance tips, you can ensure that your smart vacuum cleaner works at its best, keeping your home cleaner and more pleasant to live in. Don’t forget to check your user manual for any specific maintenance needs for your particular model of smart vacuum cleaner.
Regularly Update Your Vacuum Cleaner Firmware and App
Keeping your smart vacuum cleaner app and firmware updated is crucial in ensuring that your device is working at its best. Here are some tips to help you stay on top of updates:
Enable Automatic Updates: Many smart vacuum cleaner apps have an option for automatic updates. Enabling this feature ensures that you receive the latest updates without having to manually check for them.
Check for Updates Frequently: Even with automatic updates, it’s a good idea to check for updates frequently to ensure that you’re not missing out on any crucial updates.
Read Release Notes: Before installing updates, be sure to read the release notes to understand what changes and improvements the update will bring. This will help you determine if the update is necessary for your device.
Follow Proper Update Procedures: Always follow proper update procedures to ensure that the update is installed correctly. This may include charging your vacuum cleaner fully before updating, ensuring a stable internet connection, and following any prompts or instructions provided by the app.
Check for System Requirements: Some firmware updates may require certain system requirements to be met. Always check the system requirements before updating to avoid any compatibility issues.
Stay Informed: Stay informed of any potential security risks associated with your app and firmware versions. Keep an eye out for any security updates and install them as soon as possible.
By regularly updating your smart vacuum cleaner app and firmware, you can ensure that your device operates smoothly and efficiently. Additionally, staying up-to-date on updates can help you take advantage of new features and improvements as they become available.
Keep Your Vacuum Cleaner and App Secure
It is important to keep both your smart vacuum cleaner and its app secure in order to prevent any unauthorized access to your personal information. Here are some tips to ensure the security of your smart vacuum cleaner and app:
Set up a strong password: When setting up your app account, choose a strong password that is difficult to guess. Avoid using easily identifiable information such as your name, birthdate or common words.
Enable two-factor authentication: Consider enabling the two-factor authentication feature in your vacuum cleaner’s app. This will provide an extra layer of security by requiring a unique confirmation code sent to your phone or email.
Regularly update your app and firmware: Keeping your app and firmware updated with the latest security patches will help protect your vacuum cleaner and app from any potential vulnerabilities or threats.
Only download the official app: Be careful when downloading the app for your vacuum cleaner. Only download the app from the official app store to avoid getting a malicious version of the app.
Avoid using public Wi-Fi: When accessing your vacuum cleaner’s app, avoid using public Wi-Fi networks as they may not be secure. Use a trusted network at home or connect to a VPN for added security.
By following these security tips, you can ensure that your smart vacuum cleaner and app are safe to use and enjoy the convenience of a cleaner home without any worries about your personal information being compromised.
Conclusion
In conclusion, using a smart vacuum cleaner app can greatly simplify your cleaning routine by allowing you to schedule cleaning sessions with ease. With just a few simple steps and the right equipment, you can customize your cleaning preferences and let the app do the rest. Plus, the convenience of being able to control your vacuum cleaner from your smartphone is too good to pass up!
However, it is important to remember to maintain your vacuum cleaner properly and keep it up-to-date with firmware and app updates. Regularly checking for updates and making sure your device is secure will keep your cleaning routine hassle-free and smooth.
Overall, if you’re looking for a way to make your cleaning routine more efficient and convenient, investing in a smart vacuum cleaner and using its app is definitely worth considering. With the ability to customize your cleaning preferences and schedule cleaning sessions with just a few taps on your smartphone, you’ll never look at cleaning the same way again. Say goodbye to mess and hello to a cleaner, more organized home!
Frequently Asked Questions
What is a smart vacuum cleaner app?
A smart vacuum cleaner app is a smartphone application that connects to your smart vacuum cleaner and allows you to control its cleaning features remotely.
Can I use a smart vacuum cleaner app to schedule cleaning?
Yes, you can use a smart vacuum cleaner app to schedule cleaning. Simply select your cleaning preferences and set the cleaning schedule using the app.
What types of cleaning modes are available on smart vacuum cleaner apps?
Most smart vacuum cleaner apps offer cleaning modes such as auto, edge cleaning, spot cleaning, and manual cleaning.
Do I need a specific type of vacuum cleaner to use a smart vacuum cleaner app?
Yes, you need a smart vacuum cleaner that is compatible with your chosen app. Be sure to check the compatibility of your vacuum cleaner before downloading the app.
Can I use a smart vacuum cleaner app to clean specific rooms in my home?
Yes, you can use a smart vacuum cleaner app to set cleaning preferences for specific rooms in your home. This feature allows you to target cleaning in high-traffic or dirt-prone areas.
What is a no-go zone in a smart vacuum cleaner app?
A no-go zone is an area of your home that you do not want your smart vacuum cleaner to clean. You can set up no-go zones using your app to prevent your vacuum cleaner from cleaning sensitive or private areas of your home.
How often should I update my smart vacuum cleaner app?
You should check for app updates regularly to ensure that you have the latest features and bug fixes. Typically, app updates are released every few months.
How do I know if my vacuum cleaner firmware is up-to-date?
You can check for firmware updates on your vacuum cleaner’s app or website. Be sure to follow the instructions carefully to avoid damaging your vacuum cleaner.
What is the benefit of setting a cleaning boundary line using my smart vacuum cleaner app?
Setting a cleaning boundary line can prevent your smart vacuum cleaner from entering areas that you want to keep clean or undisturbed. This feature is especially useful for pet owners or parents of young children.
Can I customize the cleaning power of my smart vacuum cleaner using the app?
Yes, you can customize the cleaning power of your smart vacuum cleaner using the app. This feature allows you to adjust the suction power and filter settings for optimal cleaning performance.