Picture the scene: you’re sitting at work or maybe you’re out running errands, and suddenly you realize that you forgot to clean your floors before leaving the house. But fear not, with the power of a Wi-Fi connected smart vacuum cleaner and a mobile app, you can control your vacuum from anywhere. Sounds great, right? But how do you set it up? That’s where we come in. In this article, we’ll take you through the step-by-step process of setting up the mobile app for your Wi-Fi connected smart vacuum cleaner. So, grab your smartphone and let’s get started!
Table of Contents
Step 1: Download the App
Are you tired of manually cleaning your floors? Luckily, with advancements in technology, you can now own a Wi-Fi connected smart vacuum cleaner. This means you can easily control your vacuum from your smartphone with the help of a mobile app. In this guide, we will take you through the step-by-step process of setting up your smart vacuum cleaner app. The first step is to download the app. But which app should you download and how? Keep reading to find out. And if you’re interested in other aspects of Wi-Fi connected smart vacuums, check out our list of the top 10 best Wi-Fi smart vacuums in 2021.
Choose Your App Store
When it comes to setting up your mobile app for your Wi-Fi connected smart vacuum cleaner, the first step you need to take is to choose the app store where you want to download the app. This can be either the Apple App Store or Google Play Store, depending on the operating system of your smartphone or tablet.
Apple App Store: This is the app store for iOS devices such as iPhones and iPads. To access it, open the App Store app that comes with your device. You can find it on your home screen, or by swiping down on your screen and using the search bar. Once you’ve found the App Store, you can search for the smart vacuum cleaner app you need and begin the download process.
Google Play Store: This is the app store for Android devices such as Samsung, LG, and Google Pixel phones. To access it, open the Google Play Store app that comes with your device. You can find it on your home screen or by swiping up on your screen and using the search bar. Once you’ve found the Google Play Store, you can search for the smart vacuum cleaner app you need and begin the download process.
Once you’ve found the app store of your choice and located the smart vacuum cleaner app you need, simply click on the download button and wait for the app to install on your device. Remember, if you need any assistance during this process, you can always refer to the user manual for your smart vacuum or check out our other helpful articles such as /smart-vacuum-wifi-troubleshooting/ or /smart-vacuum-app-cleaning-schedule/ for further guidance.
Search for Your Vacuum Cleaner App
When searching for your vacuum cleaner app, there are a few key points to keep in mind. First, make sure you are searching for the correct app based on the brand and model of your vacuum. You can usually find this information in the user manual that came with your vacuum or by checking the manufacturer’s website.
Next, be sure to search for the app in the correct app store for your device. For example, if you have an iPhone, you would search for the app in the Apple App Store. If you have an Android phone or tablet, you would search for it in the Google Play Store.
It’s important to note that some vacuum cleaners may not have a corresponding app. Be sure to check the user manual or manufacturer’s website to confirm whether or not your vacuum cleaner is Wi-Fi enabled and has an app available.
Once you have confirmed that your vacuum cleaner has an app available and you have selected the correct app store, use the search bar to search for the name of the app. This may include the name of the manufacturer or the model number of your vacuum.
If you are having trouble finding the app, try refining your search terms or checking the featured and recommended apps in the app store. You can also try searching for the app directly on the manufacturer’s website or through an online search engine.
Searching for the correct app for your vacuum cleaner is an essential step in setting up your Wi-Fi connected smart vacuum cleaner. Doing so will allow you to control your vacuum cleaner remotely, monitor its progress, and customize its settings to meet your specific cleaning needs.
Once you have found the app for your Wi-Fi connected smart vacuum cleaner, the next step is to download and install it to your device. This step is crucial because, without the app, you won’t be able to control your vacuum cleaner remotely. Follow the step-by-step guide below to ensure a successful app download and installation process.
Step 1:
Go to your device’s app store
Step 2:
Search for the app by either entering the name of your vacuum cleaner or the brand name in the search bar.
Step 3:
Once you find the app, click on the ‘Download’ button.
Step 4:
Wait for the app to download and install on your device. This may take a few minutes based on your device’s speed and your internet connection.
If you encounter any issues during the app download and installation process, make sure you have a stable internet connection and you have enough storage space on your device. You can also try restarting your device and repeating the steps again.
Once you have successfully downloaded and installed the app, move on to the next step of registering your account. Follow the guidelines given in the article carefully for a seamless connection of your vacuum cleaner to your phone via the app. Also, if you encounter any issues, refer to the troubleshooting section of this article or check out our comprehensive guide on how to connect your smart vacuum cleaner to Wi-Fi.
Step 2: Register Your Account
Now that you have downloaded and installed the app, it’s time to register your account. This step is crucial as it allows you to access your vacuum’s features remotely and receive important notifications. Creating an account is a quick and easy process, and will take no longer than a few minutes. Just follow the simple steps below and you’ll be registered in no time. So, let’s get started!
Open the App and Select ‘Register’
To create an account for the mobile app of your Wi-Fi connected smart vacuum cleaner, open the app on your smartphone or tablet, and select the ‘Register’ button. This option will allow you to fill in your information and create an account.
Please note: Before proceeding, make sure your device is connected to the internet.
Once you have opened the app, follow these steps to register your account:
Step
Action
Step 1
Select the ‘Register’ button on the home screen
Step 2
Fill in your email address and a unique password. Make sure your password is strong and unique
Step 3
Enter your personal information, such as your full name, billing address, and contact details
Step 4
Read and agree to the terms of service and privacy policy by checking the box next to them
Step 5
Select ‘Create Account’ to complete the registration process
After you have entered all of your information and created your account, you will need to confirm your email address through email verification. Be sure to check your inbox, and follow the instructions in the email to confirm your account.
Remember to keep your login credentials safe and secure. Use unique and strong passwords for all your accounts. Once you’ve registered your account, you can proceed to the next step of connecting your vacuum cleaner to Wi-Fi.
Fill in Your Information and Create an Account
When creating your account for the smart vacuum cleaner app, you’ll need to provide some basic information. Here’s what you should expect to see:
Full Name: Enter your first and last name in the required fields.
Email Address: Enter a valid email address that you can access to complete the registration process.
Password: Create a new password for your account. Make sure that it’s strong and secure by using upper and lowercase letters, numbers, and symbols.
Confirm Password: Re-enter your chosen password to confirm it.
Agree to Terms and Conditions: Read through the terms and conditions carefully before checking the box to indicate your agreement.
It’s important to provide accurate and up-to-date information when creating your account. This will ensure that you’re able to receive important updates and notifications about your vacuum cleaner’s performance. Once you’ve filled in all the required fields, click ‘Submit’ or ‘Create Account’ to complete the registration process.
Remember to keep your login credentials safe and secure. Do not share your password with anyone, and avoid using the same password for multiple accounts. A strong password is your first line of defense against hackers and other online threats.
Confirm Your Account through Email Verification
After filling in your information and creating an account on the app, it is important to confirm your account through email verification. This step verifies that you are the true owner of the email address you provided during registration. To complete the process, follow these steps:
Check your email inbox for a new message from the app
Open the email and locate the verification link
Click on the verification link to confirm your account
Once you have confirmed your account, you will be directed back to the app, where you can continue to set up your Wi-Fi connected smart vacuum cleaner. It is essential to complete this step to ensure that your account is active and able to communicate with your device.
If you do not receive a verification email within a few minutes, be sure to check your spam folder. If it is not there, you may need to try resending the email verification link through the app. Keep in mind that it is possible for some email services to block verification emails or send them to spam, so check with your email provider if you continue to experience issues.
By confirming your account through email verification, you are taking an important step towards fully utilizing the app and ensuring the best user experience.
Step 3: Connect Your Vacuum Cleaner to Wi-Fi
So, you’ve downloaded and registered for your smart vacuum cleaner app. Now, it’s time to connect your vacuum cleaner to Wi-Fi, so you can control it remotely and enjoy some hassle-free cleaning with just a few taps on your smartphone. This may seem daunting at first, but with the right guidance and proper instructions, connecting your vacuum to Wi-Fi can be a breeze. In this section, we will outline the steps you need to take to successfully connect your smart vacuum cleaner to Wi-Fi and add it to your app dashboard. Get ready to say goodbye to manual labor and hello to a clean, technology-driven home!
Ensure Your Vacuum is Set Up Correctly and Turned On
Before connecting your Wi-Fi connected smart vacuum cleaner to the app, it’s important to make sure that it is set up correctly and turned on. Here are some steps you can follow to ensure that your device is ready to be connected:
Step 1:
Unbox your vacuum cleaner and ensure all parts are included.
Step 2:
Make sure your vacuum’s battery is charged or if it is plugged in, ensure it is connected to a power source.
Step 3:
Check the instruction manual to see if there are any specific steps you need to follow to set up your particular model of the smart vacuum cleaner.
Step 4:
Ensure that your vacuum is properly assembled, with all parts securely attached.
Step 5:
Turn on your vacuum cleaner by pressing the power button, and wait for it to fully initialize and calibrate.
By following these steps, you can ensure that your smart vacuum cleaner is set up correctly and ready to be connected to Wi-Fi and the app.
Open the App and Select ‘Add Device’
To connect your Wi-Fi connected smart vacuum cleaner to the mobile app, you need to open the app and select the option to add the device. This process is simple and straightforward, and it usually takes a few minutes to complete.
Here are the steps to follow when adding your device:
Launch the mobile app on your smartphone or tablet
Look for the option to add a device in the main menu
Click on the add device button to start the connection process
Wait for the app to start searching for available devices
Ensure your smart vacuum cleaner is turned on and nearby
Once your device appears on the list, click on it to start the pairing process
Follow the instructions on the screen to connect your device to Wi-Fi
Wait for the app to confirm the successful connection
It’s vital to ensure your vacuum cleaner’s set up is correct and powered on before attempting to pair it with the app. And while the process is usually straightforward, you may run into some issues during the pairing process.
If you experience any connectivity issues during the process, consider the following:
Ensure your phone is connected to the same Wi-Fi network you want to connect your vacuum cleaner too.
Make sure that your password is entered correctly if it does not connect with the first attempt.
Ensure your device is in range of your Wi-Fi network.
If your vacuum cleaner does not show up in the app, try the following:
Check if the vacuum cleaner is powered on.
Ensure it’s not too far from the Wi-Fi router.
Try resetting the vacuum cleaner and trying again.
If none of these solutions work, contact the manufacturer’s customer service for further support.
By following these simple steps, you can easily connect your Wi-Fi connected smart vacuum cleaner to your mobile app and enjoy the convenience of controlling your device from your smartphone or tablet.
Follow the App’s Instructions for Connecting to Wi-Fi
Connecting your Wi-Fi connected smart vacuum cleaner to the app is essential to take advantage of its features. To do so, you need to follow the app’s instructions carefully. Here are the steps you should follow:
Step 1: Open the app and go to the “Add Device” option. This should be located in the main menu or on the dashboard of the app.
Step 2: Once you have selected the “Add Device” option, the app will prompt you to enter your Wi-Fi network’s credentials. Make sure to enter this information correctly to ensure the connection is successful.
Step 3: After entering your Wi-Fi network’s credentials, the app will try to connect to your vacuum cleaner. It may take a few seconds for the app to locate your vacuum cleaner, so be patient.
Step 4: When the app has found your vacuum cleaner, it will prompt you to confirm the connection. Verify that the information displayed on the app is correct and then click on the “Connect” button.
Step 5: Once connected, the app will display a message informing you that your vacuum cleaner has been added. Now you can start using the app to control and monitor your vacuum cleaner.
Remember, if you experience any difficulty connecting your vacuum cleaner to the app, check your Wi-Fi connection or try resetting your vacuum cleaner. If this does not work, refer to the troubleshooting section of the app or contact customer support.
Wait for Your Vacuum to Be Added to Your App Dashboard
Once you have completed the steps for connecting your vacuum cleaner to Wi-Fi, you will need to wait for your vacuum to appear on your app dashboard. This process may take a few minutes, so be patient and allow some time for the app to detect and connect to your vacuum.
While you’re waiting for the vacuum to be added to your app dashboard, here are a few important things to keep in mind:
Do not turn off your vacuum cleaner. If you turn off your vacuum cleaner while it is still connecting to the app, you may disrupt the connection process and need to start over.
Stay within range of your Wi-Fi network. Your vacuum cleaner needs to be in range of your Wi-Fi network to connect to the app. If you move too far away from your Wi-Fi network while your vacuum is connecting, the connection may be lost.
Ensure that your app is up to date. A new version of the app may be required to connect to your vacuum cleaner, so be sure to check if there are any updates available before you begin the process.
Once your vacuum appears on your app dashboard, you are ready to start using the app to customize your cleaning settings and control your vacuum remotely. If your vacuum does not appear on the app dashboard, refer to the troubleshooting section of this article for help with common connection issues.
Step 4: Customize Your Settings and Start Cleaning
Now that your vacuum cleaner is connected to Wi-Fi and added to your app dashboard, it’s time to customize your settings and start cleaning. With just a few taps on your smartphone, you can set up cleaning schedules, adjust suction power, and even map out specific areas of your home for your vacuum to clean. In this step, we’ll explore the various features of the app and how to make the most of them for a seamless cleaning experience. So let’s dive in!
Explore the App’s Features and Customize Your Settings
Once you’ve connected your vacuum cleaner to the app, it’s time to explore all the amazing features available to you.
Firstly, take some time to familiarize yourself with the app’s layout and interface. You’ll find a menu button that provides access to all of the app’s features. Make sure to tap on each one so that you can get a good sense of what’s available.
One of the most important features to explore is the scheduling option. With this feature, you can set up a regular cleaning schedule for your robot vacuum cleaner. This means you can have your vacuum cleaner clean your home while you’re out running errands or at work. It’s a great way to keep your home clean without having to worry about it every day.
You may also want to customize your settings to fit your personal preferences. For example, you can adjust the suction power to create a more powerful cleaning experience or a more gentle one if you have delicate surfaces that require a lighter touch. You might also be able to adjust the noise level of the vacuum cleaner to ensure it’s not too loud or disruptive.
Another feature to explore is the mapping function. This feature allows you to map your home and create virtual boundaries. You can also set up “no-go” zones that your vacuum cleaner will avoid. This can be especially helpful if you want to keep your vacuum cleaner from damaging particular items in your home.
Of course, you’ll also want to make sure you understand the navigation features. You need to be able to set up the path your robot vacuum will follow so it can clean specific areas of your home and avoid obstacles.
Finally, don’t forget to take advantage of notifications and alerts. Many vacuum cleaner apps will send you alerts when cleaning is complete, or if there are any issues with the device. This can be especially helpful if you’re not at home and want to ensure that everything is working properly.
By taking advantage of all the available features and customizations, you can ensure that your vacuum cleaner is set up to clean your home effectively and efficiently. So, take your time to explore the different options available to you and customize your settings so your robot vacuum cleans your home just the way you like it.
Select the Room or Area You Want to Clean and Start Cleaning
Once your vacuum cleaner is connected to Wi-Fi through the app, it’s time to start cleaning! To get started, follow these steps:
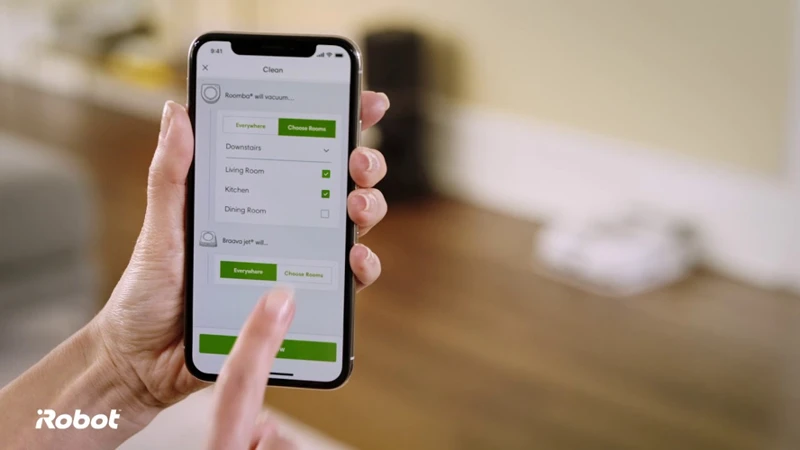
Open the app and select the ‘Clean’ option: Once you have opened the app, you’ll see a dashboard with various options. To clean your home, select the ‘Clean’ option.
Select the room or area you want to clean: Many smart vacuum cleaners come equipped with mapping and room selection features. These features allow you to select a specific room, area or even a zone for your vacuum to clean. Use the App to select the room or area that you want to be cleaned.
Start cleaning: After selecting the room or area that you want to be cleaned, it’s time to start cleaning! Select the ‘Start’ option and your vacuum cleaner will begin its cleaning process.
Monitor the cleaning process: Most apps display the cleaning process in real time. You can monitor your vacuum cleaner and view its progress from the App. This feature is particularly useful if you have pets or young children, and you want to make sure that they stay clear of the area being cleaned.
Receive notifications: Smart vacuum cleaners and their associated apps usually offer the option to receive notifications relating to the cleaning schedule, the cleaning process or even when your vacuum cleaner has finished cleaning. Make sure to enable notifications to keep up to date with your vacuum’s cleaning.
It is important to remember that smart vacuum cleaners and their apps can have varying features and functionalities. Hence, it’s always best to read the product manual or contact customer service if you encounter any issues or problems. Otherwise, enjoy your Wi-Fi connected smart vacuum cleaner and enjoy having the convenience of a clean home without lifting a finger!
Monitor Your Vacuum’s Progress and Receive Notifications
Once you have customized your settings and started the cleaning process, you can easily monitor your vacuum’s progress and receive notifications through the app. Here’s how:
Real-Time Monitoring: The app allows you to monitor the cleaning progress of your vacuum in real-time. You can see which areas have been cleaned and which ones still need attention.
Status Updates: The app also provides status updates on your vacuum’s battery level, cleaning time, and more. This will help you keep track of your vacuum’s performance and know when it’s time to recharge or empty the dustbin.
Push Notifications: You can receive push notifications on your phone when your vacuum has completed a cleaning cycle or needs attention. This ensures that you never miss a beat and that your home stays clean all the time.
Custom Scheduling: Many smart vacuums come with a scheduling feature that allows you to automatically schedule cleaning sessions. With the app, you can easily set up a custom schedule and get notifications when your vacuum starts or stops a cleaning cycle.
These features make it easy to manage your cleaning schedule and ensure that your home stays clean at all times. Whether you’re at work or on vacation, you can always stay updated on your vacuum’s progress and receive notifications when it needs attention.
Troubleshooting
Despite following the aforementioned steps, you may still encounter some difficulties when setting up your mobile app for your Wi-Fi connected smart vacuum cleaner. Don’t panic! We’ve got you covered. Below are some solutions to common issues you may encounter, so you can get back to enjoying a clean home without any hiccups. Let’s dive into some troubleshooting tips.
If You Experience Connection Issues
If your vacuum cleaner is having trouble connecting to Wi-Fi, don’t worry! Follow these steps to troubleshoot connection issues:
Step 1:
Check Your Wi-Fi Connection.
What to do:
Make sure your Wi-Fi connection is stable and strong. Check your Wi-Fi router and modem to ensure they are working properly. Restart your router and modem if necessary.
Step 2:
Check Your Vacuum Cleaner’s Settings.
What to do:
Make sure your vacuum cleaner’s settings are configured for Wi-Fi. Check the user manual to ensure you have followed all the necessary steps to set up the Wi-Fi connection.
Step 3:
Reset Your Vacuum Cleaner.
What to do:
Reset your vacuum cleaner back to the factory settings if none of the above steps work. Consult the user manual for directions on how to reset your specific vacuum cleaner model.
Step 4:
Contact Customer Support.
What to do:
If you still experience connection issues, contact the customer support team of your vacuum cleaner’s manufacturer for assistance. They will be able to provide further guidance and walk you through any necessary steps to get your vacuum connected to Wi-Fi and working properly.
By following these steps, you should be able to troubleshoot and resolve any connection issues with your Wi-Fi connected smart vacuum cleaner. Remember, patience and persistence are key when it comes to technology troubleshooting!
If Your Vacuum Cleaner Does Not Show Up in the App
It can be frustrating if your Wi-Fi-connected smart vacuum cleaner does not appear in the app after attempting to connect it. If your vacuum cleaner does not show up in the app, try the following troubleshooting steps:
Check the Wi-Fi Connection: Make sure that your vacuum cleaner is still connected to Wi-Fi. If the connection is lost, reconnect the vacuum cleaner to Wi-Fi by going to the Wi-Fi settings on the vacuum cleaner and following the steps to connect to your Wi-Fi network.
Restart the Vacuum Cleaner: Sometimes, the vacuum cleaner may need to be restarted to properly connect to the app. Turn off the vacuum cleaner and unplug it from the power source for at least 30 seconds. After 30 seconds, plug it back in and turn it on, and then wait for it to connect to the Wi-Fi network.
Try Resetting the Vacuum Cleaner: If the above steps do not work, try resetting the vacuum cleaner to its default settings. Look for the reset button on your vacuum cleaner and hold it down for at least 10 seconds. After 10 seconds, release the button and wait for the vacuum cleaner to restart. Then, try connecting it to the app again.
Make Sure You Have the Right App: Double-check that you have downloaded the correct app for your vacuum cleaner model. If you have downloaded the wrong app, it will not work with your vacuum cleaner.
Update the App: Make sure that your app is up to date. Sometimes, an outdated app may not be compatible with your vacuum cleaner. Check for any available updates in your app store and download them.
Contact Customer Support: If you have tried all of the above steps and your vacuum cleaner still does not appear in the app, contact the customer support team for your vacuum cleaner brand. They may be able to offer additional troubleshooting steps or send a technician to assist you.
By following these troubleshooting steps, you can get your Wi-Fi-connected smart vacuum cleaner connected to the app and ready to start cleaning your home.
Conclusion
In conclusion, setting up your Wi-Fi connected smart vacuum cleaner with its mobile app is a convenient and easy process, enabling you to clean your home efficiently and effectively. With just a few simple steps, you can customize your settings and control your vacuum cleaner from your smartphone or tablet, freeing up your time to focus on other tasks.
Remember to download the correct app for your specific vacuum cleaner, register an account, and connect your vacuum cleaner to your Wi-Fi network. Once connected, explore the app’s features and customize your settings to suit your cleaning preferences.
If you encounter any issues during the setup process, refer to the troubleshooting section for guidance.
Overall, a Wi-Fi connected smart vacuum cleaner and its mobile app can be a valuable addition to your home cleaning routine. With the ability to control and monitor your vacuum cleaner from your device, you can keep your home clean and tidy with ease. Give it a try and see the difference it can make in your life.
Frequently Asked Questions
1. Can I control my Wi-Fi connected smart vacuum cleaner from anywhere?
Yes, as long as your vacuum cleaner is connected to Wi-Fi and you have the app installed on your smartphone, you can control and manage your vacuum cleaner from anywhere in the world.
2. Can I schedule cleanings with my Wi-Fi connected smart vacuum cleaner?
Yes, most Wi-Fi connected smart vacuum cleaners come with scheduling options, allowing you to set up a cleaning schedule that works best for you.
3. How much does a Wi-Fi connected smart vacuum cleaner cost?
The cost of a Wi-Fi connected smart vacuum cleaner can vary depending on the brand and model. You can expect to pay anywhere from $150 to $800 or more.
4. Can I use the app to track the cleaning history of my Wi-Fi connected smart vacuum cleaner?
Yes, the app typically keeps a record of the cleaning history, allowing you to track the number of cleanings, areas cleaned, and any issues that may have occurred.
5. Does my Wi-Fi connected smart vacuum cleaner work with Amazon Alexa or Google Assistant?
Many Wi-Fi connected smart vacuum cleaners are compatible with Amazon Alexa or Google Assistant, allowing you to control your vacuum cleaner with voice commands.
6. How do I know if my Wi-Fi connected smart vacuum cleaner is connected to Wi-Fi?
You can check the connection status in the app, which typically displays the Wi-Fi connection strength, signal, and any connection issues.
7. Can I set up multiple accounts for my Wi-Fi connected smart vacuum cleaner?
Yes, some Wi-Fi connected smart vacuum cleaners allow you to set up multiple accounts, allowing other users to access and control the vacuum cleaner as well.
8. Do I need to have Wi-Fi in my home to use a Wi-Fi connected smart vacuum cleaner?
Yes, a Wi-Fi connection is required to use a Wi-Fi connected smart vacuum cleaner and its app.
9. Can I get notifications on my smartphone when my Wi-Fi connected smart vacuum cleaner is done cleaning?
Yes, you can receive notifications on your smartphone when the vacuum cleaner has finished cleaning or if there were any issues during the cleaning process.
10. How often should I clean the filters and brushes on my Wi-Fi connected smart vacuum cleaner?
The frequency of cleaning the filters and brushes can vary depending on usage and the manufacturer’s recommendations. Check the manual or app for specific instructions on how often to clean the filters and brushes.