Remotely Schedule Your Smart Vacuum Cleaner in Minutes
Warning: A non-numeric value encountered in /var/www/html/wp-content/themes/generatepress/inc/structure/post-meta.php on line 165
by Dwight Gibson
Are you tired of manually cleaning your floors? Do you wish there was an easier way to keep your home tidy? Fortunately, the advancement of technology has made it possible to set up remote vacuum scheduling on your smart device. This means that you can control your vacuum cleaner from anywhere, at any time. But you might be wondering, how do I go about setting this up? In this comprehensive guide, we will walk you through the step-by-step process of setting up remote vacuum scheduling. Get ready to discover how to simplify your cleaning routine with just a few taps on your smart device.
Table of Contents
Step-by-Step Guide to Setting Up Remote Vacuum Scheduling
Setting up your smart vacuum cleaner to be controlled remotely through your smartphone or other smart devices is a great way to simplify your cleaning routine. With just a few easy steps, you’ll be able to enjoy the convenience of scheduling cleaning sessions from anywhere, anytime. In this guide, we’ll walk you through the process step-by-step, so you can start enjoying the benefits of remote vacuum scheduling for your home. And if you want to learn more about the benefits of scheduling your vacuum remotely, check out our article on the benefits of remote vacuum scheduling.
Step 1: Download the App
To begin the process of setting up remote vacuum scheduling on your smart device, the first step is to download the app for your specific smart vacuum cleaner model. The app is essential for remote access to your smart vacuum cleaner.
Here are the simple steps to download the app:
1. Open the app store on your smart device.
2. Search for your smart vacuum cleaner’s app using its name or manufacturer as keywords.
3. Once you’ve found the app, click “Download” or “Install” (depending on the app store).
4. Wait for the app to download and install on your device.
5. Now that you’ve downloaded the app, open it on your smart device and create an account if necessary. Some apps require accounts to save cleaning schedules and connect multiple devices.
Downloading the app is crucial to remote scheduling and other features that make smart vacuum cleaners such a popular choice for homeowners.
Connecting your smart vacuum cleaner is an extremely important step in enabling remote vacuum scheduling. Follow these simple steps to get started:
First, ensure that your smart vacuum cleaner is fully charged and in range of your Wi-Fi network.
Download and install the app for your specific smart vacuum cleaner model from the App Store or Google Play Store.
Open the app and create an account, if one is required.
Next, select the option to add a new device from within the app.
Put your smart vacuum cleaner in pairing or connection mode, following the instructions in your user manual.
The app will search for nearby smart vacuum cleaners in pairing mode.
Once your smart vacuum cleaner has been detected, select it within the app and follow the remaining steps to connect it to your Wi-Fi network.
For specific instructions on how to connect your particular smart vacuum cleaner model, refer to your user manual or the manufacturer’s website. If you experience any issues, consult the tips for troubleshooting remote vacuum scheduling issues article.
It is important to note that remote vacuum scheduling can conserve energy by only using the device when necessary. However, always make sure that your smart vacuum cleaner is energy efficient and suitable for your needs.
It is also important to keep security in mind when using a smart vacuum cleaner with remote scheduling capabilities. Learn more about this topic in our article on the security of remote scheduling for smart vacuums.
Once your smart vacuum cleaner is properly connected, refer to the following steps on how to create a cleaning schedule. For tips on optimizing your scheduling for the best results, refer to our article on maximizing remote scheduling for smart vacuums.
Step 3: Create a Cleaning Schedule
Creating a cleaning schedule for your smart vacuum cleaner is easy and customizable according to your needs. Here’s how you can do it step-by-step:
Step 1: Select the Days and Times: The first thing you need to decide is when you want your vacuum cleaner to clean. From the app, you can select the days and times you want it to start, and how frequently you want it to clean.
Step 2: Set the Duration: After you select the time and frequency, you need to set the cleaning duration. This depends on the size of your house and the cleaning needs. You can set it to clean for a specific time, or until it completes the cleaning cycle.
Step 3: Choose a Cleaning Mode: Smart vacuum cleaners come equipped with different cleaning modes, such as spot cleaning, edge cleaning, etc. Choose the mode that suits you best based on your cleaning needs.
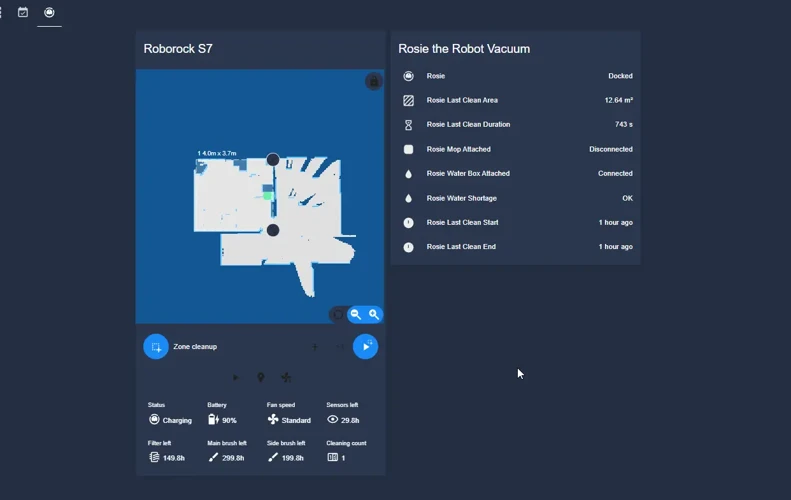
Step 4: Set Up Cleaning Zones: You can also set up specific cleaning zones for your smart vacuum cleaner. Use the app to mark or name areas that need extra cleaning, or areas to avoid while cleaning.
Step 5: Review and Save: After selecting your preferred settings, review them before saving them. That way, you can ensure that your smart vacuum cleaner cleans your house exactly as you want it to, whenever you want it to.
To make things easier, create a cleaning schedule table, as shown:
Day
Time
Duration
Cleaning Mode
Cleaning Zones
Monday
08:00 AM
60 minutes
Normal Cleaning
Kitchen, Living Room
Wednesday
12:00 PM
30 minutes
Edge Cleaning
Bedroom 1, Bathroom
Friday
06:00 PM
90 minutes
Spot Cleaning
Main Hallway, Stairs
By following these steps, you can create a cleaning schedule that works for you and ensure that your smart vacuum cleaner always cleans your house thoroughly and whenever you want it to. Remember to review and update your schedule as needed for optimal results.
Step 4: Enable Remote Access
Now that you’ve created a cleaning schedule, it’s time to enable remote access so that you can control your smart vacuum cleaner from anywhere. Follow these simple steps to enable remote access:
Step
Instruction
1
Open the app on your smart device.
2
Navigate to the settings menu.
3
Select “Remote Access.”
4
Enter your Wi-Fi network name and password.
5
Click “Enable Remote Access.”
Enabling remote access allows you to control your smart vacuum cleaner from anywhere in the world, as long as you have an internet connection. You can start or stop a cleaning session, change the cleaning mode, and adjust the suction power by using the app on your smart device.
It’s important to note that enabling remote access requires a stable Wi-Fi connection. If your Wi-Fi network is unstable or frequently drops the connection, it may not be possible to enable remote access. In this case, you may need to optimize your Wi-Fi network to ensure that it delivers a stable connection.
Once you’ve enabled remote access, you’ll be able to control your smart vacuum cleaner from anywhere with an internet connection. This means that you can start a cleaning session while you’re at work or on vacation, ensuring that your home stays clean and tidy even when you’re not there.
Step 5: Test the Scheduling
Once you’ve set up your remote vacuum scheduling, it’s important to test it out to ensure everything is working as it should be. Follow these simple steps to test your scheduling:
Step 1:
Ensure your smart vacuum cleaner is turned on and connected to your Wi-Fi network.
Step 2:
Open the app on your smart device and select the scheduled cleaning option.
Step 3:
Select the cleaning schedule you’ve created and press the ‘start’ button.
Step 4:
Wait for your smart vacuum cleaner to start cleaning.
Step 5:
Once the cleaning has finished, check to make sure that all of the areas you’ve scheduled have been cleaned properly.
If you encounter any issues during the test, go back and double-check each step of the setup process to ensure everything is working correctly. Once you’re confident that your scheduling is working perfectly, sit back and let your smart vacuum cleaner take care of the cleaning for you. No more manual vacuuming or worrying about messes – your smart device has got you covered!
Tips for Optimal Results
Now that you’ve successfully set up remote vacuum scheduling on your smart device, it’s time to get the most out of your new technology. Here are some tips for achieving optimal results and keeping your home clean with minimal effort. These tips are designed to help you navigate any potential obstacles that may arise during your cleaning journeys, so you can ensure a smooth and efficient experience every time you use your smart vacuum cleaner.
Tip 1: Create Cleaning Zones
One of the best ways to maximize the efficiency of your smart vacuum cleaner is to create cleaning zones. This will not only ensure that your vacuum cleaner focuses on the areas that need cleaning the most but also saves time and energy.
Why Create Cleaning Zones?
Creating cleaning zones allows your smart vacuum cleaner to focus on high-traffic areas, such as your living room or kitchen. If these areas are not cleaned frequently, they tend to accumulate more dirt and debris. Hence, creating specific zones for cleaning ensures that these areas receive extra attention and cleaning, leaving you with a cleaner and fresher home.
How to Create Cleaning Zones?
Most smart vacuum cleaners come with an app that allows you to create cleaning zones with ease. To create a cleaning zone, simply open the app and select the rooms or areas you want your vacuum cleaner to focus on. You can create as many cleaning zones as you need, making it possible for you to prioritize areas that need cleaning the most.
Here’s a simple example of how to create cleaning zones for your smart vacuum cleaner:
Zone
Area
Priority
Zone 1
Living Room
High
Zone 2
Kitchen
High
Zone 3
Bedroom
Low
Zone 4
Bathroom
Low
In the example above, the living room and kitchen have been given the highest priority and will be cleaned more frequently than the bedroom and bathroom areas.
Benefits of Creating Cleaning Zones
Creating cleaning zones not only saves time and energy but also provides several other benefits:
1. Customized Cleaning: By creating cleaning zones, you can customize how and where your smart vacuum cleaner cleans, ensuring that your home is cleaned exactly the way you want it.
2. Saves Energy: By focusing on specific zones, your smart vacuum cleaner can conserve energy, which means less time spent charging and more time spent cleaning.
3. Cleaner Home: With the ability to prioritize high-traffic areas, you’ll end up with a cleaner and fresher home, leaving you with more time to relax and enjoy your space.
Creating cleaning zones is an excellent way to maximize the efficiency of your smart vacuum cleaner. It not only saves time and energy but also ensures that your home stays cleaner and fresher at all times.
Tip 2: Keep Obstacles Clear
It’s important to keep obstacles clear when using a smart vacuum cleaner for optimal results. Here are some tips to keep your floors clear of obstructions:
Move small objects: Your smart vacuum cleaner can easily get stuck on small objects lying around, like children’s toys, books, or shoes. Make sure to move these objects out of the way before starting your cleaning schedule.
Avoid loose cords: Loose cords, like those from lamps or electronics, can pose a tripping hazard for your smart vacuum cleaner. Make sure to tuck cords away or lift them off the ground to keep them clear.
Secure rugs or carpets: Loose rugs or carpets can easily bunch up and get stuck underneath your smart vacuum cleaner. Use rug tape or grips to keep them securely in place or remove them altogether during cleaning.
Close doors: If you have rooms with open doors, make sure to close them to keep your smart vacuum cleaner from getting stuck or lost in an unfamiliar area.
By keeping obstacles clear, you can ensure that your smart vacuum cleaner moves smoothly around your home and effectively cleans your floors. Remember to do a quick sweep of the room before starting your cleaning schedule to ensure everything is clear and ready to go.
Tip 3: Check the Battery and Filter Regularly
One important tip for maintaining optimal performance of your smart vacuum cleaner is to regularly check the battery and filter. A well-maintained vacuum cleaner will not only ensure effective cleaning but also prolong the life of the device. Here are some important steps that you should take to ensure that your vacuum cleaner stays in top condition:
Step
Description
Step 1:
Check the battery level regularly. Most smart vacuum cleaners have a battery life indicator that shows you the amount of battery remaining. If the battery is low, put the vacuum cleaner back to the charging dock to recharge it.
Step 2:
Keep the filter clean. A dirty filter can drastically reduce the suction power and cleaning efficiency of the vacuum cleaner. Depending on the model, the filter may need to be cleaned or replaced after a certain number of uses. Consult the user manual to determine the specific requirements for your vacuum cleaner.
Step 3:
Perform regular maintenance. In addition to cleaning or replacing the filter, you should also check other parts of the vacuum cleaner regularly, such as the brushes and the wheels. If any parts are damaged or worn out, replace them promptly to avoid further damage to the vacuum cleaner.
By following these steps and taking care of your smart vacuum cleaner, you can enjoy cleaner floors and a longer lifespan for your device. Remember, prevention is always better than cure, so do not neglect the importance of regular maintenance.
FAQs
As you venture into the world of remote vacuum scheduling, you may come across some questions or uncertainties about the process. It’s completely normal to have some perplexity, especially if you’re new to this kind of technology. To help clear things up for you, we’ve compiled a list of frequently asked questions (FAQs) about remote vacuum scheduling. Below you’ll find some useful and insightful answers that will enable you to make the most out of your smart vacuum cleaner. Let’s dive in!
Q: Can I Control My Vacuum Cleaner Remotely While I’m Away from Home?
Yes, you absolutely can control your vacuum cleaner remotely while you are away from home! This is one of the key features of a smart vacuum cleaner, and it’s one of the reasons why they are so popular. Here are some steps you can take to ensure that you are able to control your vacuum cleaner no matter where you are:
Connect to the Internet: In order to control your vacuum cleaner remotely, you will need to ensure that it is connected to the internet. This is usually done through your home Wi-Fi network. Make sure that your vacuum cleaner is connected to your Wi-Fi before you leave home.
Download the App: Most smart vacuum cleaners come with an app that you can download to your smartphone or tablet. This app will allow you to control your vacuum cleaner remotely. Make sure that you have downloaded the app before you leave home.
Create an Account: In order to use the app, you will need to create an account. This will allow you to log in to the app from anywhere and control your vacuum cleaner. Make sure that you create an account before you leave home.
Enable Remote Access: Once you have downloaded the app and created an account, you will need to enable remote access. This will allow you to control your vacuum cleaner from anywhere. Check the app settings to ensure that remote access is enabled.
Test the App: Before you leave home, you should test the app to ensure that it is working properly. Try starting and stopping your vacuum cleaner, and make sure that all of the features are functioning as they should.
By following these steps, you can ensure that you are able to control your vacuum cleaner remotely, no matter where you are in the world. This is a great feature that can save you time and energy, and it’s a must-have for anyone who wants to make their home cleaning routine more efficient.
Q: Can I Create Multiple Cleaning Schedules?
Absolutely! One of the benefits of setting up remote vacuum scheduling on your smart device is the ability to create multiple cleaning schedules. This means you can have different cleaning schedules for various days of the week, or even different rooms in your house.
Here are some examples of when you might want to create multiple cleaning schedules:
You have a pet that sheds a lot, and you want to schedule more frequent cleanings for the rooms they spend the most time in.
You work from home on Mondays and Wednesdays, and would prefer it if the vacuum ran on Tuesdays, Thursdays and Fridays.
You have guests coming over and want to make sure the living room is extra clean, so you add an additional cleaning schedule for that room before they arrive.
To create multiple cleaning schedules, simply follow the steps outlined in the previous sections for creating a cleaning schedule. Once you’ve created one schedule, you can simply add another one and adjust the settings as needed. You should also give each schedule a unique name to avoid confusion.
Tip: When creating multiple cleaning schedules, be sure to pay attention to the time settings for each one. You don’t want them overlapping or running at the same time, as this can cause your vacuum to become confused and start cleaning the wrong room.
With the ability to create multiple cleaning schedules, you can customize your smart vacuum cleaner to fit your household’s specific needs. Whether it’s for different rooms or different days of the week, having this feature makes it easier than ever to keep your home clean without any hassle.
Q: Can My Smart Vacuum Cleaner Clean Specific Areas?
Can My Smart Vacuum Cleaner Clean Specific Areas?
Yes, most smart vacuum cleaners are equipped with advanced technology that allows them to clean specific areas according to your preferences. This is an incredibly useful feature, especially if you have pets, kids, or frequently used spaces that require extra cleaning.
Below is a table of some popular smart vacuum cleaners and their specific area cleaning feature:
Brand
Model
Specific Area Cleaning Feature
iRobot
Roomba i7+
Imprint Smart Mapping
Xiaomi
Roborock S5 Max
Mopping and Spot Cleaning
Ecovacs
Deebot Ozmo 950
Area Cleaning and Customizable Mapping
Shark
ION Robot Vacuum R85
Boundary Strips for Area Restriction
As you can see from the table, most smart vacuum cleaners have some form of specific area cleaning feature. Some models use mapping technology to create a visual representation of your home, allowing you to select the specific areas you want to have cleaned. Other models have boundary strips that you can place around areas that you don’t want your vacuum cleaner to enter.
To take advantage of this feature, you will need to enable it through your smart device app. Each app is different, but generally, you will need to select the specific area you want to be cleaned, set a schedule or cleaning mode, and then the smart vacuum cleaner will do the rest.
The ability to clean specific areas is a game-changer when it comes to smart vacuum cleaners. It’s an incredibly useful feature that can save you time and ensure that your home stays clean and tidy.
Q: Does My Smart Vacuum Cleaner Work with Amazon Alexa or Google Home?
Many people wonder whether their smart vacuum cleaner is compatible with Amazon Alexa or Google Home. This is a valid concern, as voice commands can be an incredibly convenient way to control your device. Fortunately, most modern smart vacuum cleaners are designed to be compatible with these popular voice-activated speakers.
Here are a few notable examples:
The iRobot Roomba series is compatible with both Amazon Alexa and Google Home. This means you can use voice commands to initiate a cleaning job, pause or stop the vacuum, and send it back to the charging station.
The Neato Botvac series also works with both voice assistants. You can ask your device to start or stop cleaning, as well as locate it in case it gets stuck somewhere.
The Xiaomi Mi Robot Vacuum is another popular choice that can be paired with Amazon Alexa or Google Home. With this device, you can start, pause, resume, and stop cleaning via voice commands. You can also check the vacuum’s battery life and cleaning history using your voice.
It’s important to note that the specific voice commands you can use may differ depending on the model of your smart vacuum cleaner and your virtual assistant. It’s helpful to consult the instruction manual or the manufacturer’s website to get a full list of compatible commands.
If you’re someone who appreciates hands-free control over your devices, choosing a smart vacuum cleaner that works with Amazon Alexa or Google Home is a smart move. Not only can it save you time, but it can be incredibly convenient when you’re busy or simply want to relax without having to worry about cleaning.
Conclusion
In conclusion, setting up remote vacuum scheduling on your smart device is an easy and convenient way to keep your home clean without any effort. With just a few simple steps, you can schedule regular cleaning sessions that fit perfectly into your daily routine. By downloading the app, connecting your smart vacuum cleaner, creating a cleaning schedule, and enabling remote access, you can sit back and relax, knowing that your floors will remain spotless.
To optimize your results, use the tips provided in this article. By creating cleaning zones, keeping obstacles clear, and checking the battery and filter regularly, you can ensure that your smart vacuum cleaner works efficiently and effectively. And if you have any questions, refer to the FAQs section to get all the answers you need.
Overall, incorporating a smart vacuum cleaner into your home is a worthwhile investment. Not only does it save you time and energy, but it also ensures that your floors are always clean and free of debris. So why not give it a try? With our step-by-step guide and helpful tips, you’ll be enjoying a cleaner, more hygienic home in no time.
Frequently Asked Questions
Q: How can I connect my smart vacuum cleaner to my Wi-Fi network?
You can connect your smart vacuum cleaner to your Wi-Fi network by downloading the app, creating an account, and following the steps provided. The app will guide you through the process of connecting your vacuum cleaner to your Wi-Fi network.
Q: Can I create a cleaning schedule for my smart vacuum cleaner?
Yes, you can create a cleaning schedule for your smart vacuum cleaner through the app. You can set the cleaning schedule for specific days and times, and you can customize the cleaning options for each individual cleaning session.
Q: Can I control my smart vacuum cleaner remotely?
Yes, you can control your smart vacuum cleaner remotely through the app. As long as your vacuum cleaner is connected to Wi-Fi, you can turn it on and off, change the cleaning mode, and adjust the cleaning schedule from anywhere.
Q: Can I set up multiple cleaning schedules for my smart vacuum cleaner?
Yes, you can set up multiple cleaning schedules for your smart vacuum cleaner through the app. You can create individual cleaning schedules for different rooms or areas, and you can customize the cleaning options for each individual schedule.
Q: Can my smart vacuum cleaner clean specific areas?
Yes, some smart vacuum cleaners come with features that allow them to clean specific areas. For example, some models come with sensors that can detect areas that require extra cleaning, such as high-traffic areas or areas with a lot of debris.
Q: Will my smart vacuum cleaner work on all types of flooring?
Most smart vacuum cleaners are designed to work on a range of flooring types, including carpets, hardwood floors, and tile floors. However, it’s important to check the product specifications before purchasing to ensure that the vacuum cleaner is suitable for your flooring type.
Q: Can I create cleaning zones for my smart vacuum cleaner?
Yes, you can create cleaning zones for your smart vacuum cleaner through the app. Cleaning zones allow you to specify which areas of your home you want your vacuum cleaner to clean, so you can focus on areas that require more attention.
Q: How often should I change the battery in my smart vacuum cleaner?
The frequency with which you need to change the battery in your smart vacuum cleaner will depend on the model and how often you use it. Most manufacturers recommend changing the battery every 12 to 24 months, or as needed.
Q: How do I check the filter in my smart vacuum cleaner?
To check the filter in your smart vacuum cleaner, refer to the product manual for instructions. Most models have a filter that can be easily removed and cleaned, so you can ensure that your vacuum cleaner is working at its best.
Q: Will my smart vacuum cleaner work with Amazon Alexa or Google Home?
Many smart vacuum cleaners are designed to work with Amazon Alexa or Google Home. To find out if your vacuum cleaner is compatible with these devices, refer to the product specifications or contact the manufacturer.