Program Your Smart Vacuum Cleaner to Respond to Unique Phrases
Warning: A non-numeric value encountered in /var/www/html/wp-content/themes/generatepress/inc/structure/post-meta.php on line 165
by Dwight Gibson
Table of Contents
Introduction: Why Program Your Smart Vacuum Cleaner?
Having a smart vacuum cleaner that can be controlled using voice commands is a great convenience in today’s busy world. You can program your smart vacuum cleaner to respond to unique phrases that you choose, making it easier for you to give commands to your device without having to physically access it. This is particularly helpful when you’re busy with other tasks and don’t have the time or desire to manually control your device.
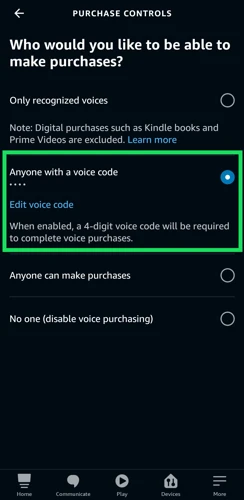
Voice-controlled smart vacuums can be integrated with popular voice assistants such as Amazon Alexa, Google Assistant, Siri Shortcuts, and Samsung’s Bixby. However, before you start programming your smart vacuum to respond to voice commands, you need to ensure that it is compatible and accessible to voice commands. You should also choose a voice assistant that aligns with your personal preferences and needs.
The good news is that setting up your vacuum cleaner with voice commands is a simple process that you can do from the comfort of your home. By following a few steps, you can program your smart vacuum cleaner to respond to your unique voice commands and integrate it with other smart devices to create a seamless cleaning routine.
In the following sections, we will guide you through the step-by-step process of programming your smart vacuum cleaner to respond to custom voice commands. We’ll start by determining if your vacuum is compatible with voice commands and connected to a smart assistant. Then, we’ll help you choose the right voice assistant that fits your needs and preferences. Finally, we’ll guide you on setting up custom voice commands and integrating them with routines to automate your cleaning process.
Whether you’re new to voice-controlled smart vacuums or just looking to maximize your device’s potential, this guide will help you create a more efficient and hassle-free cleaning experience. So let’s dive in and get started!
Step 1: Check Compatibility and Accessibility
When it comes to programming your smart vacuum cleaner to respond to custom voice commands, the first step is to ensure that your device is both compatible with voice commands and set up with a smart assistant. This process may vary depending on the type of vacuum you have and the smart assistant you choose to use. Before diving into the specifics of custom voice commands, let’s take a closer look at how you can check the compatibility and accessibility of your smart vacuum. If you’re using Alexa as your smart assistant, check out our guide on how to connect your smart vacuum to Alexa.
Determine if Your Vacuum is Compatible with Voice Commands
Determining compatibility with voice commands is the first step in setting up a custom voice control system for your smart vacuum cleaner. Before proceeding, ensure that your vacuum is compatible and manageable using voice commands. Here is a list of steps to identify compatibility:
Step
Description
Step 1:
Identify the brand and model of your vacuum cleaner.
Step 2:
Check the manual or product specifications to validate if the vacuum cleaner is compatible with voice commands.
Step 3:
Research online or contact the customer support of the vacuum cleaner brand to confirm the compatibility of your machine with smart assistants or voice control platforms, like Amazon Alexa or Google Assistant.
Step 4:
If your vacuum cleaner is compatible, check if any additional accessories are required for voice control functionality, such as microphones or adapters.
It’s essential to double-check the compatibility at the outset, since attempting to create custom voice commands when your device is not compatible can be frustrating and unproductive. If you need additional assistance in determining compatibility or setting up voice control, there are many resources online, such as Google Home’s Smart Vacuum Guide. With the right information, you can easily ensure your smart vacuum cleaner is compatible with voice commands, unlocking the convenience of custom voice control.
Ensure Your Vacuum is Set Up with a Smart Assistant
Once you have determined that your vacuum is compatible with voice commands, the next step is to ensure that it is set up with a smart assistant. This is a crucial step as it enables your vacuum to receive and execute voice-activated commands.
Here are some steps to ensure that your vacuum is set up with a smart assistant:
Make sure that your smart assistant is set up and running on your mobile device. The most popular smart assistants are Siri, Google Assistant and Amazon Alexa.
Check if your vacuum is compatible with the smart assistant you are using. You can check the manufacturer’s website for details or check the smart assistant’s official website for a list of compatible devices.
Install the relevant app for your smart assistant on your mobile device, and then connect your vacuum to the app. You may need to enter your Wi-Fi network credentials to enable connectivity.
Allow access for the app to control your vacuum. Some smart assistants may require detailed permissions to be enabled to control your vacuum, so make sure to give the necessary permissions.
It is essential to ensure your vacuum is set up with a smart assistant before proceeding to the next step of programming custom voice commands. This step will enable your vacuum to receive voice commands and execute them efficiently.
If you want to know more about how to enable voice control of your smart vacuum through Siri shortcuts, click here. If you want to learn how to integrate your smart vacuum with Bixby, click here.
Step 2: Choose Your Voice Assistant
Now that you have determined the compatibility and accessibility of your smart vacuum cleaner, it’s time to choose the voice assistant that will work best for you. With so many options available, it can be overwhelming to decide which one to use. However, selecting the right voice assistant is crucial in ensuring that your custom voice command system runs smoothly and efficiently. In this section, we will explore the considerations to keep in mind when selecting a voice assistant, and how to connect it to your smart vacuum cleaner.
Research and Compare Voice Assistants
When it comes to choosing a voice assistant for your smart vacuum cleaner, it’s important to do your research and compare your options to ensure you find the right fit for your needs. Here are some factors to consider when making your decision:
Compatibility: Make sure the voice assistant you choose is compatible with your smart vacuum cleaner. Some popular options include Amazon Alexa, Google Assistant, and Apple Siri.
Features: Each voice assistant has its own unique features and capabilities. For example, Alexa has over 100,000 skills and can integrate with a wide range of smart home devices, while Siri is particularly useful for Apple users and can be accessed from multiple devices.
Ease of use: Consider how user-friendly each voice assistant is, particularly in terms of setting up and programming custom voice commands for your smart vacuum cleaner.
Privacy and Security: Look into the privacy and security measures of each voice assistant, and ensure you’re comfortable with the level of access it requires to your personal information and home network.
Cost: Some voice assistants may require a subscription or additional fees for certain features, so make sure you understand the costs involved and factor these into your decision.
By researching and comparing your options, you can choose the voice assistant that best suits your needs and helps make your cleaning routine more efficient and convenient.
Connect Your Vacuum to Your Chosen Assistant
Once you’ve chosen your voice assistant, it’s time to connect your smart vacuum cleaner to it. This step may vary depending on the make and model of your vacuum cleaner, as well as the voice assistant you’ve selected. However, there are some general guidelines you can follow to ensure a successful connection.
Firstly, consult the user manual for your smart vacuum cleaner. It should have specific instructions on how to connect to a voice assistant. This might include putting your vacuum in pairing mode or using the accompanying app to link it with your chosen assistant.
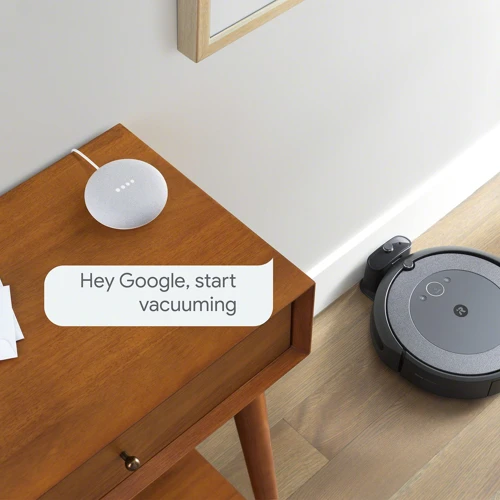
Next, make sure your voice assistant is set up and ready to connect. You may need to enable certain skills or permissions for your vacuum cleaner to be recognized. For instance, if you’re using Amazon Alexa, you might need to install the “Roomba” skill to control your Roomba vacuum. If you’re using Google Assistant, you’ll need to have the “Google Home” app installed on your mobile device.
Once both your vacuum cleaner and voice assistant are ready, you can start the pairing process. This may involve speaking a certain phrase or using the app to scan for available devices. If successful, you should receive a notification that your vacuum cleaner has been detected and is now connected to your voice assistant.
To ensure that the connection is secure and stable, test out some basic voice commands. For example, you can say, “Hey Google, ask my vacuum to start cleaning” or “Alexa, ask Roomba to pause”. If your cleaner responds appropriately, then you’re good to go.
Connecting your smart vacuum cleaner to your chosen voice assistant may take a bit of effort, but it’s worth it for the convenience of being able to control your vacuum by voice. Just be patient, follow the instructions carefully, and enjoy the benefits of a cleaner home with less effort!
Connect Your Vacuum to Your Chosen Assistant
1. Consult the user manual for your vacuum cleaner
2. Ensure your voice assistant is set up
3. Begin the pairing process
4. Test basic voice commands to ensure successful connection
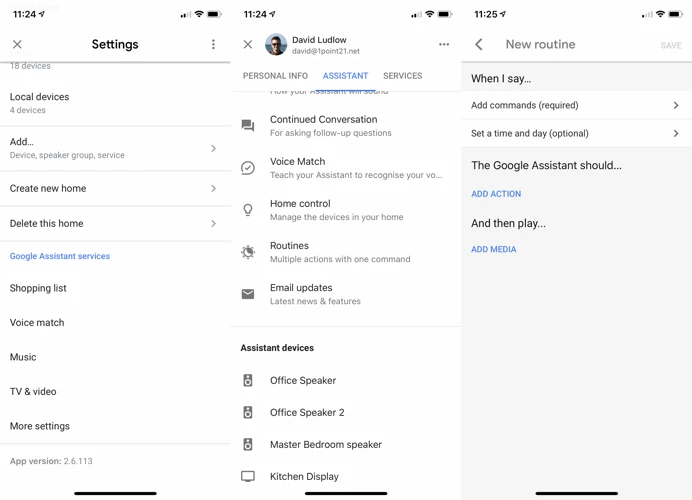
Step 3: Set Up Custom Voice Commands
As you become more comfortable with using your smart vacuum through voice commands, you may start to notice that some of the pre-set phrases feel too repetitive or difficult to remember. This is where setting up custom voice commands becomes incredibly useful. By taking just a few extra steps, you’ll be able to program your vacuum to recognize and respond to unique phrases that feel more natural to you. Not sure how to get started? Don’t worry – we’ll walk you through the process step-by-step.
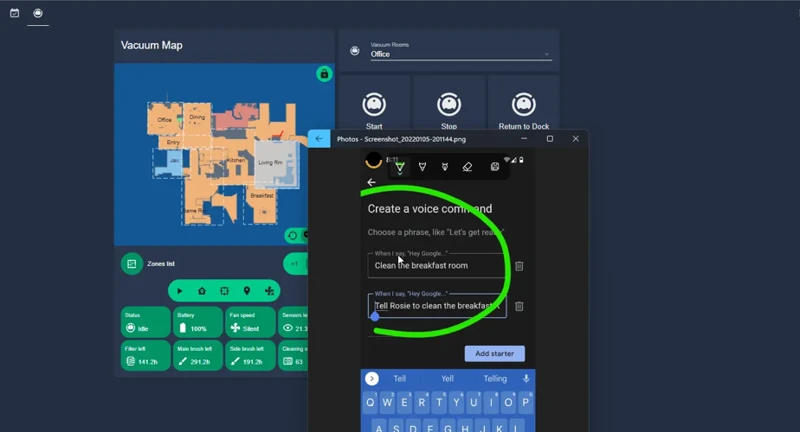
Choose Unique Phrases that are Easy to Remember
When choosing unique phrases for your custom voice commands, there are a few things to consider. You want to choose phrases that are easy to remember and are not commonly used in everyday language. Here are some tips for choosing the right phrases:
Be creative: Use phrases that are unique and not commonly used. This will ensure that your commands are not accidentally triggered by other people or devices.
Keep it short and sweet: Choose phrases that are easy to say and remember. Short and simple phrases like “clean up” or “begin cleaning” will work best.
Avoid complex phrases: Avoid using phrases that are too complex or difficult to remember. If your commands are too long or complicated, you may forget them or struggle to say them correctly.
Use keywords: Use keywords in your phrases that are directly related to the cleaning process, such as “sweep”, “vacuum”, or “mop”. These keywords will help your voice assistant understand the intent of your commands.
Avoid common phrases: Avoid using phrases that are commonly used in everyday language, such as “turn on” or “stop”. These phrases may trigger other devices or actions and make it difficult for your voice assistant to understand what you want it to do.
By choosing unique and easy-to-remember phrases for your custom voice commands, you’ll be able to easily control your smart vacuum cleaner without any confusion or frustration. Remember to keep it simple and use keywords that are relevant to the cleaning process to ensure that your voice assistant understands your commands correctly.
Create Commands with Clear and Direct Language
When creating custom voice commands for your smart vacuum cleaner, it’s important to keep in mind that the language used in the commands should be clear and direct to ensure that the vacuum understands what you’re asking it to do. Here are some tips to help you create effective commands:
TIP
EXPLANATION
Use Simple Language
Use simple and concise language to help the vacuum understand your command. Avoid using complex words or phrases that could be misinterpreted by the vacuum.
Avoid Ambiguity
Avoid using ambiguous language that could cause confusion. For example, don’t use the command “clean the room” if you have multiple rooms in your home. Instead, use a more specific command like “clean the living room.”
Use Keywords
Use specific keywords in your commands to help the vacuum understand what action you want it to take. For example, you could use the command “start vacuuming” instead of “turn on the vacuum.”
Be Consistent
Be consistent with the language used in your commands. Use the same words and phrases each time you give a command to help the vacuum learn and recognize the commands more quickly.
Avoid Repetition
Avoid using repetitive language in your commands. For example, don’t use the command “vacuum the floor” multiple times in a row. Instead, use a variety of commands to help the vacuum understand what you want it to do.
By following these tips, you can create custom voice commands that are clear and direct, making it easier for your smart vacuum cleaner to understand and respond to your requests.
Test and Revise Your Commands
Once you have created custom voice commands for your smart vacuum cleaner, it is important to test and revise them to ensure they work effectively. Testing your commands will help you identify any issues or errors, and tweaking them will enhance the accuracy and responsiveness of your vacuum.
The following table outlines some steps you can take to test and revise your commands:
Step
Description
1
Speak Clearly and Concisely: Test your custom commands by speaking clearly and concisely. Make sure the words you use to activate your vacuum are easy to pronounce and enunciate.
2
Train Your Voice Assistant: If your voice assistant is having trouble understanding your commands, you may need to train it to recognize your voice better.
3
Test in Different Environments: To ensure your commands work in various settings, try testing them in different environments, such as a noisy room or a quiet space.
4
Revise Commands: If you find that your commands are not working effectively, revisit your phrasing and adjust your commands accordingly.
5
Create Alternatives: Consider creating alternative commands as backup options in case your main ones fail to work properly.
6
Solicit Feedback: Ask others to test your commands and provide feedback. This can help you identify any issues or improvements you may have missed.
By thoroughly testing and revising your commands, you can ensure that your smart vacuum cleaner responds accurately and efficiently to your voice commands. This will enhance your cleaning experience and give you a better sense of control over your household chores.
Step 4: Integrate Your Commands with Routines
As you continue on your journey to program your smart vacuum cleaner with custom voice commands, you’ll quickly discover that setting simple commands for individual tasks is just the beginning. The true benefits of voice control come to light when you’re able to create routines that automate your entire cleaning process. By integrating your custom voice commands with routine functionality, you can kick back and relax while your smart cleaner takes care of the dirty work. But where do you start? How can you ensure that your routines are optimized for maximum efficiency? Let’s dive into the final step of this process and explore the world of routine integration.
Sync Your Voice Commands with Other Smart Devices
Once you’ve programmed your smart vacuum cleaner with custom voice commands, you can take things to the next level by syncing these commands with other smart devices in your home. This will allow you to easily manage various smart systems using the same set of voice commands, making your home even more efficient and in-sync with your needs.
Here’s how you can sync your voice commands with other smart devices:
1. Identify compatible devices: Check to see which other smart devices are compatible with your chosen voice assistant. You might find that some devices require additional hardware or software to be fully integrated, while others may not be compatible at all. Make a list of the devices you’d like to sync, and double-check that they can work with your chosen voice assistant.
2. Connect devices to your network: Once you’ve identified the devices you’d like to sync, make sure that they’re all properly connected to your home network. This means that they should all be online and accessible using your smartphone or another device with the relevant apps installed.
3. Set up your voice commands: Now it’s time to set up your custom voice commands. As mentioned earlier, it’s important to choose unique phrases that are easy to remember and use clear and direct language. This will make it easier for you to execute your commands quickly and accurately.
4. Sync your commands: Next, you’ll need to sync your custom voice commands with each of the other smart devices you’d like to connect. This process will vary depending on the type of device and voice assistant you’re using, so be sure to consult the relevant documentation for each device.
5. Test and refine: Once you’ve synced your commands, it’s a good idea to test them out and make any necessary refinements. This might involve tweaking your phrasing or adjusting your commands to ensure that they’re working effectively.
6. Enjoy the benefits: Once you’ve successfully synced your voice commands with other smart devices in your home, you can sit back and enjoy the benefits of a fully integrated smart system. With just a few simple voice commands, you’ll be able to manage your entire home with ease – from turning on your lights to adjusting your thermostat and, of course, commanding your smart vacuum cleaner to keep your floors in tip-top shape.
Create Routines to Automate Your Cleaning Process
One of the biggest benefits of programming custom voice commands for your smart vacuum cleaner is the ability to create routines that can automate your cleaning process. By following these simple steps, you can free up your time and let your smart vacuum do the cleaning for you.
Step 1: Identify Your Cleaning Needs
Before you begin creating your routines, it’s important to identify your specific cleaning needs. Do you need your floors vacuumed every day or just on certain days of the week? Once you have an understanding of your needs, you can begin creating your routines accordingly.
Step 2: Create Your Routines
Using your chosen voice assistant, you can create routines that activate your custom voice commands at specific times or under specific conditions. For example, you can create a routine that activates your custom voice command when you say “clean the living room” at 7:00 PM every day. Here are some examples of routines you can create:
Set a routine to clean the entire house once a week
Create a routine to clean the living room every day at a specific time
Turn on the vacuum when you leave the house and turn it off when you return
Step 3: Test and Refine Your Routines
Once you have created your routines, it’s important to test them out and refine them as needed. Make sure your custom voice commands are being recognized correctly and that your routines are activating at the correct times. If you encounter any issues, make adjustments to your routines until you achieve the desired results.
Step 4: Enjoy Your Newfound Freedom
With your custom voice commands and routines set up, you can enjoy the benefits of a clean home without lifting a finger. Your smart vacuum cleaner will take care of the cleaning, leaving you free to focus on other tasks or simply relax and enjoy your newfound freedom.
By taking the time to create routines that automate your cleaning process, you can save valuable time and energy, all while keeping your home looking its best.
Conclusion: Enjoy the Benefits of Custom Voice Commands
Custom voice commands can greatly enhance the way you interact with your smart vacuum cleaner. By programming your vacuum cleaner to respond to unique phrases, you can save time and effort in controlling and customizing your cleaning experience.
With custom voice commands, you can:
– Streamline your cleaning process: Say goodbye to manually controlling your vacuum cleaner and navigating through apps. Custom voice commands allow you to control your vacuum cleaner in a way that suits your needs and preferences.
– Personalize your cleaning experience: You have the freedom to choose phrases that resonate with you and commands that match your cleaning requirements. You can tailor the commands to suit specific rooms or cleaning scenarios.
– Integrate with other smart devices: Custom voice commands can integrate with other smart devices, allowing you to create routines and automate the cleaning process. Imagine saying a single phrase to turn on the lights, close the curtains, and start your vacuum!
Remember to:
– Check compatibility: Ensure that your vacuum cleaner is compatible with custom voice commands and set up with a smart assistant.
– Research and choose: Take time to research and compare different voice assistants and choose the one that best suits your needs.
– Create clear and direct commands: Choose unique phrases that are easy to remember and use clear and direct language when creating your commands.
– Test and revise: Don’t be afraid to test and revise your commands until you find a set of commands that works seamlessly.
Custom voice commands are a valuable feature for any smart vacuum cleaner owner. By following these simple steps, you can enjoy a personalized and efficient cleaning experience that is tailored to your unique needs and preferences.
Frequently Asked Questions
1. Can I program my smart vacuum cleaner to respond to any voice assistant?
It depends on the brand and model of your vacuum cleaner. Some models are designed to work with specific voice assistants, while others may be compatible with multiple options. Check the user manual or manufacturer’s website to find out which voice assistants are compatible with your vacuum cleaner.
2. What are some popular voice assistants for smart homes?
The most popular voice assistants for smart homes include Amazon Alexa, Google Assistant, and Apple HomeKit. However, there are also many other options available, such as Microsoft Cortana and Samsung Bixby, that may work with your smart vacuum cleaner.
3. What kind of voice commands can I give my smart vacuum cleaner?
You can give your smart vacuum cleaner a wide range of voice commands, including starting or stopping the cleaning process, sending it back to its charging station, scheduling cleaning times, and even telling it to clean a particular room or area of your home.
4. How do I connect my smart vacuum cleaner to my chosen voice assistant?
The specific steps for connecting your vacuum cleaner to your chosen voice assistant may vary, but generally, you will need to download the corresponding app, enable voice control in the app settings, and follow the on-screen prompts to link your vacuum cleaner to your voice assistant.
5. Are there any security concerns with using voice commands to control my smart vacuum cleaner?
There is always the potential for security risks when using any internet-connected device, including smart vacuum cleaners. However, by using secure passwords, keeping your software up to date, and not sharing your login information with others, you can help minimize these risks.
6. Can I use voice commands to control my smart vacuum cleaner when I’m not at home?
Yes, if you have a compatible voice assistant set up on your phone, you can use it to give commands to your smart vacuum cleaner while you’re away from home. This can be a convenient way to ensure that your home stays clean, even if you’re not there to oversee the process.
7. What are some common mistakes to avoid when setting up custom voice commands?
Some common mistakes to avoid include choosing overly complex or lengthy phrases, using ambiguous or unclear language, and not testing your commands thoroughly before using them in a real-world scenario.
8. Can I integrate my smart vacuum cleaner with other smart devices in my home?
Yes, many smart vacuum cleaners can be integrated with other devices in your smart home setup, such as smart thermostats, cameras, and lighting systems. This can allow you to create more complex routines and automations that can enhance the overall functionality of your home.
9. How can custom voice commands save me time and effort in cleaning my home?
By allowing you to control your smart vacuum cleaner with your voice, custom commands can make the cleaning process more streamlined and efficient. You won’t have to fiddle with buttons or remotes, but rather can simply give verbal instructions to your vacuum cleaner.
10. Are there any drawbacks to using custom voice commands to control my smart vacuum cleaner?
One potential drawback is that the voice recognition technology may not always be accurate, which could lead to frustrating experiences or miscommunications. Additionally, some people may prefer more tactile control over their vacuum cleaner, rather than relying solely on voice commands.