Connect Your Smart Vacuum Cleaner with Amazon Alexa in Just a Few Simple Steps
Warning: A non-numeric value encountered in /var/www/html/wp-content/themes/generatepress/inc/structure/post-meta.php on line 165
by Dwight Gibson
Are you tired of manually vacuuming your house and looking for a more efficient way to keep your floors clean? Then look no further than connecting your smart vacuum cleaner to Amazon Alexa! With this convenient feature, you can control your vacuum using voice commands, making cleaning your house a breeze. But how do you set it up? Don’t worry, we’ve got you covered with this step-by-step guide on how to connect your smart vacuum cleaner with Amazon Alexa. So sit back, relax, and let technology do the cleaning for you.
Table of Contents
Step 1: Download the App
You’re ready to take the next step in automating your cleaning routine with your smart vacuum cleaner and Amazon Alexa. Before we jump into the process, make sure you have both the Amazon Alexa app and the app for your smart vacuum cleaner installed on your phone. If you haven’t installed the app for your vacuum cleaner yet, you can download it from the manufacturer’s website or the app store. Once you have the app, follow these easy steps to connect your smart vacuum cleaner with Amazon Alexa. And if you have a different assistant, such as Siri or Bixby, we have guides for those as well: Siri Shortcuts, Bixby, or custom voice commands. For now, let’s get started on connecting your Alexa to your smart vacuum cleaner.
Download the App
To connect your smart vacuum cleaner with Amazon Alexa, you will need to download the app for your specific brand of vacuum. Follow these steps to get the app:
Step
Action
1
Open the App Store on your mobile device.
2
Search for the app by typing in the name of your smart vacuum cleaner brand.
3
Click on the Install button to download the app onto your device.
Once you have successfully downloaded the app, you will need to create an account to proceed. This will usually involve providing an email and choosing a password. From here, you can move on to the next step of connecting your Alexa to your smart vacuum cleaner.
To connect your Smart Vacuum Cleaner with Amazon Alexa, you first need to download the relevant app and create an account. Follow these steps to create an account:
Step 1:
Open the Smart Vacuum Cleaner app on your mobile device and click on the “Create an Account” button.
Step 2:
Fill out the registration form with your personal details, including your name, email address, and a secure password.
Step 3:
Read and accept the terms and conditions of the app and click on the “Create Account” button to complete the registration process.
Step 4:
Check your email inbox for a verification email from the app, and follow the instructions to verify your email address.
Once you have created an account, you can log in to the app using your email address and password. From there, you can connect your Smart Vacuum Cleaner to your Alexa device and start controlling it with your voice. Remember, creating an account is an essential step in the process, so don’t skip it.
Step 2: Connect Your Alexa to the Smart Vacuum Cleaner
Now that you have downloaded the app and created your account, it’s time to connect your Amazon Alexa to your smart vacuum cleaner. This is an important step as it will allow you to control your smart vacuum cleaner with voice commands. By following these simple instructions, you’ll be on your way to a more effortless cleaning experience with just a few easy steps. So, let’s dive in and get started!
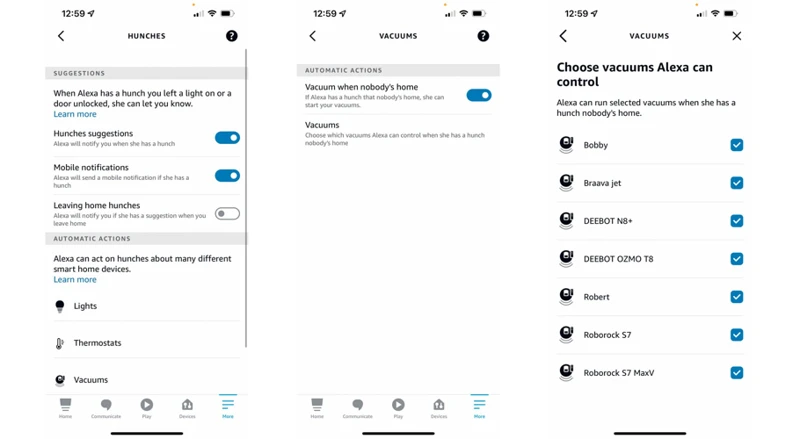
Enable the Skill
To enable the skill on your Alexa device, follow these steps:
Open the Alexa App: Open the Alexa app on your smartphone or tablet. If you don’t have the app yet, you can download it for free from the App Store or Google Play Store.
Search for the Skill: Use the search bar within the Alexa app to search for the specific skill for your smart vacuum cleaner. Make sure to spell it correctly to ensure that you find the right one.
Enable the Skill: Once you find the skill, select it and click on “Enable”. If the skill requires permission to access certain features, make sure to allow it.
Link Your Accounts: The Alexa app will prompt you to link your smart vacuum cleaner account with your Alexa account. Follow the instructions to complete the linking process.
Discover Your Devices: After linking your accounts, Alexa will automatically search for your smart vacuum cleaner. Once the device is discovered, Alexa will confirm it and you’re ready to go!
It’s important to note that enabling the skill may vary depending on the specific smart vacuum cleaner you have. Make sure to follow the instructions provided by the manufacturer to ensure a successful connection between your Alexa and smart vacuum cleaner devices.
Link the Skill to the Smart Vacuum Cleaner
Linking the skill to your smart vacuum cleaner is an essential step to ensure that you can control it using voice commands. Here’s a step-by-step guide on how to link the skill to your smart vacuum cleaner:
Step 1:
Open the Alexa app on your smartphone.
Step 2:
Tap on the menu icon on the top left corner of the app.
Step 3:
Select “Skills & Games” from the menu.
Step 4:
Type the name of your smart vacuum cleaner in the search bar and select it from the results.
Step 5:
Tap on “Enable to Use” to connect the skill with your Alexa device.
Step 6:
Follow the prompts to sign in to your account with your smart vacuum cleaner’s app.
Step 7:
Grant Alexa permission to access your smart vacuum cleaner’s data by clicking “Allow.”
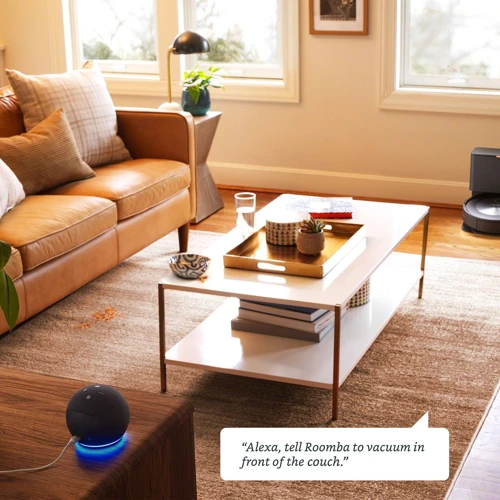
Once you’ve successfully linked the skill to your smart vacuum cleaner, you can start controlling it through voice commands using your Alexa device. You can say things like “Alexa, ask [your smart vacuum cleaner’s name] to start cleaning” or “Alexa, tell [your smart vacuum cleaner’s name] to stop cleaning.” It’s an easy way to make cleaning your home hassle-free and efficient.
Step 3: Test the Connection
Now that you’ve successfully connected your smart vacuum cleaner with Amazon Alexa, it’s time to test the connection. This step is crucial in ensuring that your devices are working together seamlessly to keep your home clean. In this section, we’ll guide you through two methods for testing the connection to ensure that both Alexa and the vacuum cleaner are responding appropriately to your voice or app commands. Let’s dive in!
Test the Connection Using Voice Commands
Once you have successfully connected your smart vacuum cleaner to Amazon Alexa, it is time to test the connection using voice commands. This step ensures that your smart vacuum cleaner is properly integrated with Alexa and can follow commands without any issues.
To test the connection, try giving basic voice commands to Alexa to control your smart vacuum cleaner. Use commands such as “Alexa, ask [your vacuum cleaner name] to start cleaning” or “Alexa, tell [your vacuum cleaner name] to stop cleaning”. You can also use voice commands to change the cleaning mode or scheduling.
Here is a table of some basic voice commands you can use to test your smart vacuum cleaner’s connection with Alexa.
Command
Description
“Alexa, ask [your vacuum cleaner name] to start cleaning”
This command starts the cleaning process.
“Alexa, tell [your vacuum cleaner name] to stop cleaning”
This command stops the cleaning process.
“Alexa, ask [your vacuum cleaner name] to go home”
This command sends the vacuum cleaner back to its charging station.
“Alexa, ask [your vacuum cleaner name] to change mode to [mode name]”
This command changes the cleaning mode to the specified mode. Modes can include “Turbo mode” or “Quiet mode.”
“Alexa, ask [your vacuum cleaner name] to schedule a cleaning for [day/time]”
This command schedules a cleaning for the specified day and time.
If your smart vacuum cleaner responds appropriately to these voice commands, then your connection with Amazon Alexa is working correctly. If not, try troubleshooting the connection issue or contacting customer support for assistance.
Test the Connection Using the App Commands
To test the connection between your smart vacuum cleaner and Amazon Alexa using app commands, follow these steps:
Open the smart vacuum cleaner app on your phone.
Make sure that the app is connected to the same Wi-Fi network as your Alexa. If not, connect the app to the same Wi-Fi network as your Alexa.
Select the device that you want to control with Alexa.
Tap the button for the specific cleaning mode that you want your smart vacuum cleaner to run. For example: “Auto”, “Edge Clean”, or “Spot Clean”.
After selecting the cleaning mode, you should see a notification that Alexa has received the command.
Wait for a few seconds, and then try asking Alexa to confirm that the command was received. For instance, ask, “Alexa, ask [your smart vacuum cleaner name] to clean the floor.”
If Alexa responds by saying “I’ve asked [your smart vacuum cleaner name] to start cleaning”, then congratulations, the connection is working! Your smart vacuum cleaner should start the cleaning process.
It’s important to note that the connection between the app and Alexa may sometimes encounter glitches. If you encounter any issues, make sure to check that both the app and Alexa are up-to-date, and connected to the same Wi-Fi network. You can also try restarting both devices.
Testing the connection between your smart vacuum cleaner and Amazon Alexa using app commands is just one of the ways that you can leverage the power of voice commands to control your smart devices. By following these simple steps, you can make your daily routine more convenient and efficient.
Step 4: Troubleshoot Connection Issues
Connecting your smart vacuum cleaner to Amazon Alexa can be a great time-saver, but occasionally issues may arise that can affect the connection between the two devices. When this happens, it can be frustrating, but don’t worry – there are several troubleshooting methods you can try to get your smart vacuum cleaner and Alexa working together seamlessly again. In this section, we’ll explore some of the most common connection issues people experience and offer solutions to help you troubleshoot and resolve them. So let’s get started and get your smart vacuum cleaner back on track!
Make Sure the Devices are Compatible
Before attempting to connect your smart vacuum cleaner with Amazon Alexa, it is important to ensure that both devices are compatible with each other. This step is crucial in ensuring a smooth and seamless connection between your smart vacuum cleaner and Alexa.
Below is a table that outlines the compatibility requirements for some popular smart vacuum cleaners and Alexa:
Smart Vacuum Cleaner
Compatible with Alexa?
iRobot Roomba Series
Yes
Ecovacs Deebot Series
Yes
Shark ION Series
Yes
Eufy Robovac Series
Yes
Neato Robotics D Series
Yes
Hoover Rogue Series
No
It is important to note that while some smart vacuum cleaners may be compatible with Amazon Alexa, not all models within a brand’s product line may be compatible. Before purchasing a smart vacuum cleaner, be sure to check its compatibility with Amazon Alexa.
Ensuring compatibility between your smart vacuum cleaner and Alexa is the first step in troubleshooting any connection issues you may encounter. By following this step and using compatible devices, you can avoid compatibility-related issues and enjoy the benefits of a connected smart home ecosystem.
Check the Connection Status
To ensure your smart vacuum cleaner is connected with Alexa, you need to check the connection status. Here are some steps to follow to check the connection status:
Open the App: Open the app that you downloaded on your smartphone or tablet. Make sure that you are logged into your account.
Locate the Device: Look for the device that you connected to Alexa on the app’s main screen. This will be the smart vacuum cleaner that you connected earlier.
Check the Connection Status: Once you have located the device, check its connection status. It should be indicated by a green dot or a check mark. If you see a red dot or an “X” mark, then the connection is not working properly.
Reconnect the Device: If the connection is not working, try disconnecting and reconnecting the device. You can do this by following the instructions in Step 2 of this article.
Contact Support: If you are still having trouble connecting your smart vacuum cleaner to Alexa, don’t hesitate to contact customer support. They can help troubleshoot any issues you may be experiencing.
Checking the connection status is an important step in ensuring that your smart vacuum cleaner is working properly with Alexa. If you encounter any issues, try not to worry too much! Most connection issues can be resolved by following the steps above.
Check for App and Alexa Updates
It’s important to make sure that both the app and Alexa are up to date so that they can work smoothly together. Here are some steps to check for updates:
Check your app store: Check your app store for any updates to your smart vacuum cleaner app. If there are any updates available, download and install them as soon as possible.
Open the app: Once installed, open the app to make sure everything is up to date.
Check Alexa app: Open your Alexa app and check for updates. Make sure you have the latest version of the app.
Check for device firmware updates: Check if there are any firmware updates for your smart vacuum cleaner. If there are any available, make sure to install them.
Checking for updates regularly can ensure that any bugs or issues are fixed, and that new features are added. So, it’s recommended to check for updates at least once a month or whenever you face any connectivity issues with your smart vacuum and Alexa.
Remember, keeping up with the latest updates can make your smart vacuum cleaner experience smoother and more enjoyable.
Tips and Advice
Congratulations, you’ve successfully connected your smart vacuum cleaner with Amazon Alexa! Now it’s time to optimize your experience and get the most out of this technology. To help you with that, we’ve gathered some useful tips and advice that will ensure your home stays squeaky clean. From strategically placing your vacuum cleaner to scheduling regular cleaning with the app, continue reading to discover how you can streamline your cleaning routine and make the most out of this innovative technology.
Place Your Smart Vacuum Cleaner Strategically
When it comes to placing your smart vacuum cleaner in your home, there are a few strategic locations to consider. The placement of your vacuum cleaner can have a big impact on its efficiency and effectiveness in cleaning your floors.
One important consideration is the layout of your home. If you have a multi-level home, consider placing your vacuum on the floor where it will be most frequently used. For example, if your main living area is on the first floor, that may be the best location to store and charge your vacuum.
Another factor to consider is the type of flooring in your home. If you have a mix of carpets and hard floors, it may be beneficial to place your vacuum in a central location where it can easily transition between surfaces. Additionally, if you have pets or high-traffic areas, you may want to place your vacuum in a spot where it can easily access those areas.
Here are some other tips to keep in mind when placing your smart vacuum cleaner:
Tips for Placing Your Smart Vacuum Cleaner
Place the vacuum in a clutter-free area
Make sure the vacuum has clear access to the areas you want cleaned
Keep the vacuum away from stairs or areas where it could fall
Consider placing the vacuum near an outlet for easy charging
By strategically placing your smart vacuum cleaner, you can ensure that it effectively cleans your floors and makes your life easier.
Use Different Modes for Different Floor Types
When it comes to cleaning floors, different types of floors require different approaches. Some floors may be carpeted, while others are hardwood, tile, or laminate. For this reason, your smart vacuum cleaner may have different modes that are tailored to the different types of floors in your home. By using the right mode for the right floor, you can maximize the effectiveness of your smart vacuum cleaner and keep your floors sparkling clean.
Type of Floor
Suggested Mode
Hardwood/Laminate
Gentle Mode
Tile
Normal Mode
Low-Pile Carpet
Normal Mode
High-Pile Carpet
Max Mode
For hardwood or laminate floors, the gentle mode is recommended. This mode provides a gentler suction force that won’t scratch or damage your floors. For tile floors, normal mode is suggested as it provides enough suction to pick up dirt and dust without causing any damage. Normal mode is also recommended for low-pile carpets as they do not provide any significant resistance unlike high-pile carpets. However, high-pile carpets require more suction force to pick up dirt and debris. In such cases, max mode should be used for more effective cleaning.
Using the right mode for the right floor type is a great way to ensure the longevity of your floors and your smart vacuum cleaner as well. By using the right mode, you can also save time and energy by preventing the need for manual cleaning.
Schedule Cleaning with the App
To make the most of your smart vacuum cleaner, it is important to use its scheduling feature. This feature is available through the app, and it allows you to set up a cleaning schedule according to your needs. Scheduling is a great way to keep your home clean and save precious time.
To schedule your smart vacuum cleaner’s cleaning sessions, follow these steps:
Step
Instructions
1
Open the Smart Vacuum Cleaner App on your smartphone or tablet.
2
Tap on the scheduling icon. It is usually located on the home screen or in the settings menu.
3
Select the cleaning mode for your scheduled cleaning session. You can choose from different cleaning modes such as normal, quiet, or turbo.
4
Select the days and times for the cleaning session.
5
Review the schedule and make sure that all the settings are correct.
6
Save the schedule settings and exit the app.
It is important to note that scheduling may not be available for all smart vacuum cleaners. Make sure to check your user manual or contact customer support if you are unsure about how to use this feature.
Additionally, it is important to keep in mind that scheduled cleaning sessions do not replace manual cleaning. While they help keep your home clean on a regular basis, they are not a substitute for thorough cleaning sessions. Use your smart vacuum cleaner’s scheduling feature as a convenient tool, but remember to regularly clean your floors and surfaces manually as well.
Conclusion
As you can see, connecting your smart vacuum cleaner with Amazon Alexa can make your life much easier. By following the simple steps we’ve outlined, you can enjoy the convenience of controlling your smart vacuum cleaner with your voice or the app.
However, don’t forget to always check for compatibility issues and to make sure your devices are updated. This can save you from potential connection problems down the line.
Using different modes for different floor types can also help you achieve a more thorough clean. Plus, scheduling cleaning sessions via the app can save you time and hassle.
Overall, we encourage you to experiment and explore the full capabilities of your smart vacuum cleaner and Alexa integration. It can be a great addition to your home automation system. With a little practice, you’ll be able to sit back, relax, and let technology do the cleaning for you.
Frequently Asked Questions
1. How do I know if my smart vacuum cleaner is compatible with Amazon Alexa?
You can check the compatibility of your smart vacuum cleaner with Amazon Alexa on the manufacturer’s website or in the Alexa app under the “Skills” section.
2. What is the benefit of connecting my smart vacuum cleaner to Amazon Alexa?
Connecting your smart vacuum cleaner to Amazon Alexa allows you to control it with your voice, making it more convenient and hands-free.
3. Can I use any voice commands to control my smart vacuum cleaner with Amazon Alexa?
No, you need to use specific voice commands that are supported by both Amazon Alexa and your smart vacuum cleaner. You can find the list of supported commands in the manufacturer’s website or in the Alexa app under the “Skills” section.
4. How do I schedule cleaning with the app?
You can schedule cleaning with the app by selecting the desired date and time in the app’s scheduling menu. Make sure your smart vacuum cleaner is connected to Wi-Fi for scheduling to work.
5. How often should I clean my smart vacuum cleaner?
You should clean your smart vacuum cleaner’s dustbin, filter, and brush after every use. Additionally, you should deep clean the brushes, filters, and sensors once a month or as recommended by the manufacturer.
6. Can I use my smart vacuum cleaner on different floor types?
Yes, most smart vacuum cleaners are designed to work on different floor types, including carpets, hardwood, tile, and laminate. You can use different cleaning modes depending on the floor type.
7. How do I enable the skill for my smart vacuum cleaner?
You can enable the skill for your smart vacuum cleaner by searching for it on the Alexa app or on the Amazon website, and clicking the “Enable” button. You will need to link your smart vacuum cleaner account to your Amazon account.
8. Can I connect my smart vacuum cleaner to multiple Alexa devices?
Yes, you can connect your smart vacuum cleaner to multiple Alexa devices, as long as they are connected to the same Wi-Fi network and linked to the same Amazon account.
9. How do I troubleshoot connectivity issues between my smart vacuum cleaner and Alexa?
You can troubleshoot connectivity issues by checking the Wi-Fi and internet connection, ensuring that the devices are compatible and updated with the latest software, and resetting both the smart vacuum cleaner and Alexa device.
10. How do I reset my smart vacuum cleaner or Alexa device?
You can reset your smart vacuum cleaner by holding down the power button for 10 seconds or following the instructions in the manufacturer’s manual. You can reset your Alexa device by holding down the microphone on/off button for 20 seconds or following the instructions in the Alexa app.