Easy Steps to Connect Your Smart Vacuum Cleaner with Google Home
Warning: A non-numeric value encountered in /var/www/html/wp-content/themes/generatepress/inc/structure/post-meta.php on line 165
by Dwight Gibson
As the world becomes increasingly digitized, it’s no surprise that more and more smart devices are being released to optimize our daily lives. One such device that has been gaining popularity is the smart vacuum cleaner. With its ability to efficiently clean your home, you’ll never have to manually push around a heavy vacuum cleaner again. But did you know that you can take it up a notch and control your smart vacuum cleaner with your voice? That’s right. By setting up your Google Home with your smart vacuum cleaner, you can now control it hands-free. In this comprehensive guide, we will walk you through the step-by-step process to set up your smart vacuum cleaner with your Google Home, so you can enjoy a pristine home with ease.
Table of Contents
Step 1: Check compatibility
You’ve just received your new smart vacuum cleaner and are eager to set it up with your Google Home. However, before you get started, it’s important to check the compatibility of your devices to ensure a seamless connection. You don’t want to get halfway through the setup process only to find out that your smart vacuum is not compatible with Google Home. So, let’s take a closer look at how to check compatibility before proceeding with the setup process. If you’re interested in connecting your smart vacuum to other voice assistants, such as Amazon Alexa or Samsung Bixby, be sure to check out our guides on how to do so: Connect your smart vacuum to Amazon Alexa or Integrate your smart vacuum with Samsung Bixby. If you’re looking to tailor your voice commands to your preferences, check out our guide on setting up custom voice commands for your smart vacuum, or take control with Siri Shortcuts.
Ensure your smart vacuum cleaner is compatible with Google Home
Before setting up your Google Home with your smart vacuum cleaner, it’s important to ensure that they are compatible with each other. Here are some steps you can take to verify compatibility:
Check the brand: Look up the brand of your smart vacuum cleaner and check if it is compatible with Google Home. Some of the popular brands that work well with Google Home include iRobot Roomba, Ecovacs, and Neato.
Check the model: Check if the model of your smart vacuum cleaner is compatible with Google Home. Some models from the same brand may not work with Google Home, so it’s important to double-check the compatibility of your specific model.
Check the app: Verify if the app used to control your smart vacuum cleaner can be connected to Google Home. Check the app’s settings or user manual for any information related to compatibility and connectivity with Google Home.
Check Google’s compatibility page: Google provides a comprehensive list of compatible devices on its website. Check this list to see if your smart vacuum cleaner is compatible with Google Home.
Check with the manufacturer: If you are still unsure about the compatibility of your smart vacuum cleaner with Google Home, contact the manufacturer for more information. They will be able to provide specific details about your device’s compatibility with Google Home.
Verifying compatibility between your smart vacuum cleaner and Google Home is an important step to ensure that the setup process goes smoothly. By taking the time to check compatibility, you can ensure that you have the right equipment and avoid any potential issues down the line.
Step 2: Connect Google Home with Smart Vacuum Cleaner via Wi-Fi
Do you want to connect your smart vacuum cleaner to your Google Home and make your cleaning routine easier? Well, you’ve come to the right place! The next step in setting up your smart home is to connect your Google Home with your smart vacuum cleaner via Wi-Fi. This process may seem daunting, but once you follow the steps outlined below, you’ll have your vacuum cleaner connected to your Google Home in no time. So grab your smartphone and let’s get started!
Connect your smart vacuum cleaner to the same Wi-Fi network as your Google Home
In order to connect your smart vacuum cleaner to your Google Home, it’s important that they are both on the same Wi-Fi network. This allows them to communicate with each other and for you to control your vacuum cleaner using voice commands through your Google Home.
Follow these steps to connect your smart vacuum cleaner to the same Wi-Fi network as your Google Home:
Step
Action
Step 1
Ensure your smart vacuum cleaner is turned on and within range of your Wi-Fi network. Check the manufacturer’s instructions on how to enable Wi-Fi on your specific model of vacuum cleaner.
Step 2
Access the Wi-Fi menu on your vacuum cleaner. This may involve pressing a button on the device or using the relevant app. Again, refer to the manufacturer’s instructions for details on how to do this on your specific vacuum model.
Step 3
Scan for available Wi-Fi networks and select the network that matches the one your Google Home is connected to.
Step 4
Enter the network password (if applicable) and wait for the vacuum cleaner to connect to the same Wi-Fi network as your Google Home.
Once your smart vacuum cleaner is connected to the same Wi-Fi network as your Google Home, you can move on to the next step of connecting them via the relevant app. Ensuring they are both on the same network is an essential step to successfully controlling your vacuum cleaner using voice commands.
Ensure the smart vacuum cleaner is on and within range of your network
To ensure that your smart vacuum cleaner is properly connected to your Google Home device, you’ll need to make sure that it’s turned on and within range of your Wi-Fi network. Here are some steps to help you with these tasks:
1. Check the power source: Make sure your smart vacuum cleaner is plugged into a power source and turned on. This is vital, as if the vacuum cleaner is not turned on, it won’t be able to connect with your Wi-Fi network.
2. Verify the Wi-Fi range: Ensure that your smart vacuum cleaner is in range of your Wi-Fi network by placing it near your router or extender. If your smart vacuum cleaner is too far from the router or extender, it may not be able to connect to the Wi-Fi network, resulting in connection failures.
3. Check signal strength: Check the signal strength of your Wi-Fi network by going to the location where you plan to use your smart vacuum cleaner. Use your smartphone to find the signal strength of your Wi-Fi network in that area. If the signal strength isn’t strong enough, you may need to reposition your router or invest in a Wi-Fi extender.
4. Check the LED lights: Most smart vacuum cleaners have LED lights that indicate whether they’re properly connected to your Wi-Fi network. Check your vacuum cleaner’s user manual to find out what the LED lights mean and whether they’re indicating that the vacuum cleaner is connected to the network.
By following these steps, you can ensure that your smart vacuum cleaner is properly connected to your Wi-Fi network and ready to be linked with your Google Home device.
Connect your smart vacuum cleaner to the relevant Google Home app
To connect your smart vacuum cleaner to the relevant Google Home app, follow these simple steps:
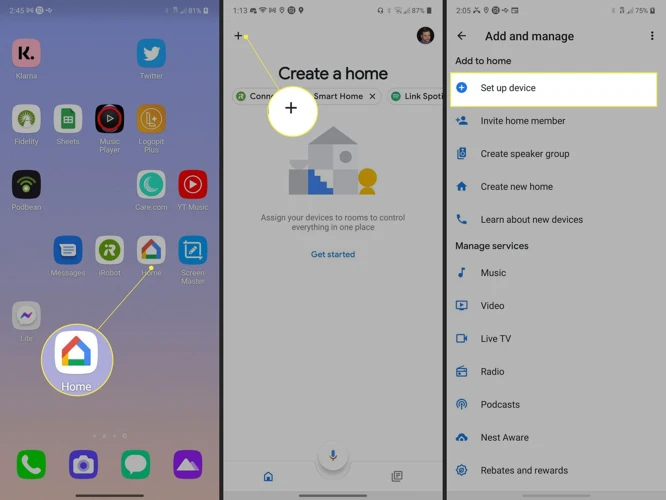
Step 1: Open the Google Home app on your mobile device.
Step 2: Tap on the plus (+) icon located in the top left corner of the screen. This will take you to the “Add and manage” devices page.
Step 3: From the top of the page, select “Set up device”.
Step 4: Choose the type of device you want to set up, in this case, “smart vacuum cleaner”.
Action
Result
Select “Works with Google”
A list of compatible devices will appear
Find your smart vacuum cleaner brand from the list
If your brand is not listed, use the search bar to find it
Enter your smart vacuum cleaner’s login credentials
This will allow the Google Home app to connect to your device
Follow the on-screen instructions
These instructions will help you complete the process of connecting your smart vacuum cleaner to the Google Home app
Step 5: Once your device is connected, give it a name that is easy to remember, such as “vacuum cleaner” or “RoboVac”.
Step 6: Finally, assign the room or area of your home where the vacuum cleaner is located to make it easier to use voice commands.
By following these simple steps, you’ll have your smart vacuum cleaner connected to the Google Home app in no time, allowing you to easily control your cleaner with just your voice.
Step 3: Enable voice commands
As you may know, the essence of having a smart home is being able to control it with your voice. That said, enabling voice commands to fully control your smart vacuum cleaner is essential to enjoy a hands-free experience. In this step, we will guide you through the process of enabling voice commands for your smart vacuum cleaner using Google Home. So, sit back, relax, and get ready to be amazed by the magic of voice commands!
Ensure the smart vacuum cleaner is compatible with voice commands
Before proceeding with setting up your smart vacuum cleaner with Google Home, it is important to ensure that it is compatible with voice commands. Not all smart vacuum cleaners have the capability to be operated through voice commands, so it is essential to check this in the user manual first.
To make things easier, we have created a table below that lists some popular smart vacuum cleaners and their compatibility with voice commands:
Brand and Model
Voice Command Compatible?
iRobot Roomba 960
Yes
Eufy RoboVac 11S
Yes
Shark ION ROBOT R75
Yes
Xiaomi Mi Robot Vacuum
Yes
Ecovacs Deebot N79S
Yes
bObsweep PetHair Plus
No
Neato Botvac D7 Connected
Yes
As you can see, some of the popular smart vacuum cleaners such as iRobot Roomba 960 and Neato Botvac D7 Connected are compatible with voice commands and can be easily connected to your Google Home. However, other models such as bObsweep PetHair Plus do not support voice commands and cannot be operated through Google Home.
It is important that you check your smart vacuum cleaner’s compatibility before setting it up with Google Home, so that you can avoid any potential disappointments.
Link it to the Google Home
To link your smart vacuum cleaner to Google Home, you need to follow these steps:
Step 1:
Open the Google Home app on your smartphone or tablet.
Step 2:
Tap on the device icon on the top right corner of the screen.
Step 3:
From the list of available devices, select the smart vacuum cleaner that you want to link to Google Home.
Step 4:
Tap on the Add to a room option to assign the smart vacuum cleaner to a specific room in your home.
Step 5:
Review the information on the screen and press the Link button to complete the process.
Step 6:
Wait for the app to verify the connection between Google Home and the smart vacuum cleaner.
It’s important to note that not all smart vacuum cleaners are compatible with Google Home. Check the manufacturer’s website to ensure your device is compatible before attempting to link it to Google Home.
Once the smart vacuum cleaner is linked to Google Home, you can use voice commands to control it. But before you do that, make sure the device is compatible with voice commands and specify the type of voice commands you want to use. We’ll cover this in the next step.
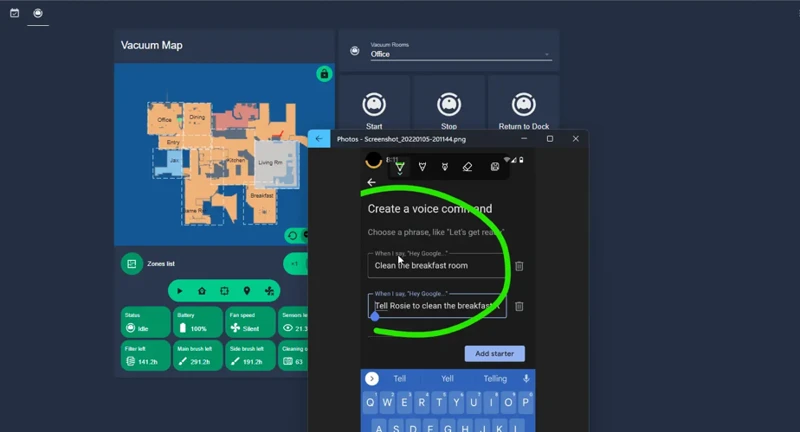
Specify the type of voice commands to be used
After linking the smart vacuum cleaner to the Google Home app, it’s essential to specify the type of voice commands you want to use. Google Home supports various voice commands that can help you control different features of the vacuum cleaner with ease.
Here are some common voice commands that can be used to control your smart vacuum cleaner:
Command
Description
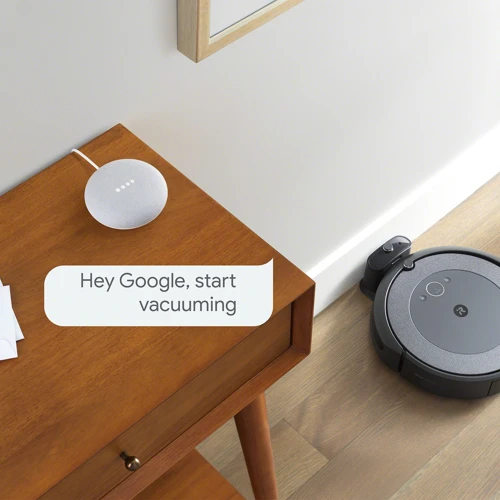
“Hey Google, start vacuuming”
This command will start the vacuuming process immediately.
“Hey Google, pause the vacuum”
This command will pause the vacuuming process so that you can move the vacuum to a different area.
“Hey Google, dock the vacuum”
This command will send the vacuum back to its charging dock, allowing it to recharge automatically.
“Hey Google, resume vacuuming”
This command will resume the vacuuming process where it was paused.
In addition to the above voice commands, there are many other commands that can be used to control your smart vacuum cleaner. It’s essential to choose the commands that are most suitable for you and remember them for easy usage. It’s also crucial to train your Google Assistant to recognize your voice and accent correctly to avoid any issues when giving commands to your smart vacuum cleaner.
Using voice commands can make life easier and more comfortable when it comes to cleaning your home. Now that you’ve specified what type of voice commands you want to use, you’re ready to take control of your smart vacuum cleaner with the help of your Google Home device.
Step 4: Test connection
You’re almost there! Your Google Home and smart vacuum cleaner are connected and the setup process is almost complete. The final step is to test the connection and ensure that everything is working as it should. This step is crucial because if the connection is not properly established, voice commands won’t work and controlling the smart vacuum cleaner through Google Home will become impossible. Let’s dive in and check if everything is functioning correctly.
Activate Google Home and ask it to control the smart vacuum cleaner
To ensure that the smart vacuum cleaner is properly connected to Google Home, you will need to test the connection. This can be done by activating Google Home and asking it to control the smart vacuum cleaner. Here are the steps to follow:
Activate Google Home: To activate Google Home, say “Hey Google” or “Ok Google”, followed by your command. You should see the lights on the device light up, indicating that it is ready to receive your command.
Ask Google Home to control the smart vacuum cleaner: You can use a variety of commands to control the smart vacuum cleaner, including “start”, “stop”, “pause” and “resume”. For example, you can say “Hey Google, start the vacuum cleaner” or “Ok Google, pause the vacuum cleaner”.
Check the response: Once you have given your command, Google Home should respond with an acknowledgement. For example, it might say “Sure, starting the vacuum cleaner” or “Ok, pausing the vacuum cleaner”.
It is important to note that the specific voice commands that you can use to control your smart vacuum cleaner will depend on the model and brand of the device. Be sure to consult the user manual or visit the manufacturer’s website to get a full list of compatible commands.
By following these steps, you should be able to successfully connect and control your smart vacuum cleaner using Google Home. With this setup, you can enjoy the convenience of using voice commands to keep your home clean and tidy.
Conclusion
In conclusion, setting up your smart vacuum cleaner with Google Home is a relatively easy process that can enhance your life in many ways. With the ability to control your vacuum cleaner with your voice and without the need for physical interaction, you can focus on other important tasks.
By following the step-by-step guide provided, you can ensure that your Google Home and smart vacuum cleaner are synchronized and in working order. This will allow you to start cleaning your house effortlessly by simply asking your Google Home to do it for you.
Not only does this setup provide you with greater convenience and control, but it also allows you to customize your experience to meet your specific needs. You can choose the type of voice commands you prefer and create a personalized cleaning schedule that suits your daily routine.
Overall, integrating your smart vacuum cleaner with Google Home is a great way to take advantage of the latest technology and make your life easier. By streamlining your cleaning process and freeing up your time, you can focus on the things that matter most in your life. So why wait? Get started today and enjoy the benefits of a smart home!
Frequently Asked Questions
What smart vacuum cleaners are compatible with Google Home?
Most leading smart vacuum cleaners such as iRobot Roomba, Ecovacs Deebot, and Neato Botvac are compatible with Google Home.
What if my smart vacuum cleaner is not compatible with Google Home?
You can either replace it with a Google Home-compatible smart vacuum cleaner, or use an alternative voice command device such as Amazon Echo or Apple HomePod.
How do I connect my smart vacuum cleaner to the same Wi-Fi network as my Google Home?
You can do this via the Wi-Fi settings on your smart vacuum cleaner, ensuring it connects to the same network as your Google Home.
What if my smart vacuum cleaner is out of range of my Wi-Fi network?
You may need to move it closer to your Wi-Fi router or use a Wi-Fi extender to increase the range of your network.
What if I can’t find the relevant Google Home app for my smart vacuum cleaner?
You may need to check the manufacturer’s website for a download link, or search for it in the Google Play Store or Apple App Store.
How do I enable voice commands on my smart vacuum cleaner?
You can do this through the settings on your Google Home app, linking your smart vacuum cleaner and specifying the type of voice commands to be used.
What if my smart vacuum cleaner is not recognizing voice commands?
You may need to check that it is compatible with voice commands, and also ensure that your Google Home app is up to date with the latest firmware.
How do I test the connection between my Google Home and smart vacuum cleaner?
You can do this by activating your Google Home and ask it to control the smart vacuum cleaner, such as “Ok Google, start my vacuum”.
What if I can’t get my Google Home and smart vacuum cleaner to connect?
You may need to reset your Wi-Fi connection or contact customer support for your smart vacuum cleaner or Google Home.
Can I set up multiple smart vacuum cleaners with one Google Home device?
Yes, you can link and set up multiple smart vacuum cleaners with one Google Home device through the Google Home app.