Warning: A non-numeric value encountered in /var/www/html/wp-content/themes/generatepress/inc/structure/post-meta.php on line 165
by Dwight Gibson
Upright vacuum cleaners have become an essential tool for maintaining a clean and healthy environment at home or in the workplace. However, they may sometimes malfunction, leaving you perplexed and wondering what could be the problem. Poor suction, brush roll not working, loud or strange noise, loss of suction in hose, overheating, and burning smell are some of the most common issues that upright vacuum cleaners may encounter. In this article, we will uncover step-by-step how to troubleshoot and fix these problems to ensure your vacuum cleaner is working efficiently.
Table of Contents
Poor Suction
Maintaining the suction power of your upright vacuum cleaner is essential for a spotless clean, but what if you notice the suction isn’t as strong as it used to be? This can be frustrating and make cleaning your floors a daunting task. Instead of throwing your vacuum cleaner away, there are simple steps you can take to troubleshoot and fix the issue. Let’s dive into some solutions for poor suction in your upright vacuum cleaner. For more information on the advantages of owning an upright vacuum cleaner, check out this article.
Check the Filters
Regular maintenance of your upright vacuum cleaner is necessary to keep it in top condition at all times. One of the main reasons for poor suction power is a dirty or clogged filter. The filters in an upright vacuum cleaner are designed to trap dirt and debris from the surfaces you are vacuuming. Over time, these filters can become clogged, resulting in poor suction and the failure of your vacuum cleaner to pick up dirt and debris effectively.
To check the filters of your upright vacuum cleaner, locate the filter housing and remove the filter(s). Depending on the model of your upright vacuum cleaner, it may have one or more filters. Once you have removed the filter(s), check them for dirt buildup. If the filters appear dirty, clean or replace them immediately with a new one.
To clean the filter(s), gently brush off the dirt and debris using a soft-bristled brush. After brushing, tap the filter(s) gently to free any loose debris. If your filter(s) are washable, thoroughly wash them with water and let them dry completely before reinstalling them.
It is essential to clean or replace the filters of your upright vacuum cleaner regularly to ensure maximum suction power and performance of your machine.
Step
Action
Step 1
Locate the filter housing and remove the filter(s).
Step 2
Check the filter(s) for dirt buildup and clean or replace if necessary.
Step 3
Brush off the dirt and debris using a soft-bristled brush and tap gently to free any loose debris.
Step 4
If the filter(s) are washable, wash them with water and let them dry completely.
Step 5
Reinstall the filter(s) back into the filter housing.
Regularly checking and cleaning the filters of your upright vacuum cleaner will not only improve the lifespan of your machine but also enhance its performance. To learn more about the best maintenance tips for upright vacuum cleaners, visit our article on upright vacuum cleaner maintenance tips.
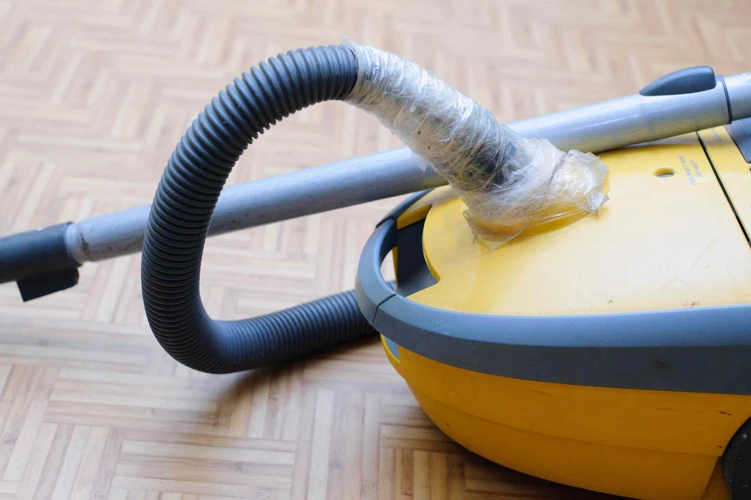
Check the Hose
When experiencing poor suction with your upright vacuum cleaner, one of the first places to check is the hose. Over time, debris and dirt can get stuck, causing a blockage that hinders performance. Here are a few steps to follow when checking the hose:
Step
Description
Step 1
Unplug the vacuum cleaner and detach the hose from the machine. Check both ends of the hose for any visible debris or blockages.
Step 2
If there are any blockages, attempt to remove them with a long, thin object like a broom handle or coat hanger. Avoid using sharp objects that could damage the hose.
Step 3
If an object in the middle of the hose is hard to reach, try attaching a smaller hose or a crevice tool to the end of your upright vacuum’s hose to dislodge the blockage.
Step 4
If the hose is split, cracked or otherwise damaged, it will need to be replaced. Refer to our article on top features to look for in an upright vacuum for advice on purchasing a replacement hose.
Once you have removed any blockages and assessed any damage to the hose, reattach it to the machine and turn it back on to check if the suction has improved. If this did not resolve the issue, refer to our article on most effective upright vacuum tips for further troubleshooting steps.
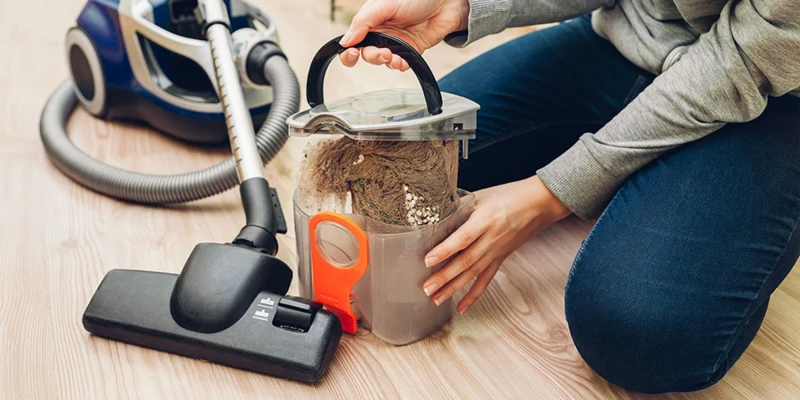
Check the Bag or Canister
One common issue that many people face with their upright vacuum cleaners is poor suction. If you notice that your vacuum cleaner is not picking up dust and dirt as it used to, there are several things you can check to fix the issue. One of the causes of poor suction could be a full or clogged bag or canister.
Check the Bag or Canister
The bag or canister of your vacuum cleaner is designed to collect dirt and debris that the cleaner picks up as you move it around. If this bag or canister is full or clogged, it can reduce the suction power of your vacuum cleaner. To fix this issue, follow these steps:
Steps to Check the Bag or Canister
What to Do
Step 1
Turn off the vacuum cleaner and unplug it from the power source.
Step 2
Remove the bag or canister from the vacuum cleaner. If it is a bag, dispose of it properly and replace it with a new one. If it is a canister, empty it into a trash bin.
Step 3
Clean the bag or canister with a damp cloth to get rid of any dust or debris that may be stuck to it.
Step 4
Reattach the bag or canister to the vacuum cleaner and turn it on to check if the suction has improved.
If the bag or canister is already clean and empty, then the issue may be with the filters or the hose of your vacuum cleaner. You can read more about how to clean or replace the filters of an upright vacuum cleaner in this article. Additionally, if you’re considering investing in a new vacuum cleaner, you may want to read the comparison of upright and canister vacuums in this article, or explore the options for the best upright vacuum cleaners for your home in this guide.
Brush Roll Not Working
When you start vacuuming your home, you expect the brush roll to effectively collect dirt and debris. However, if you notice that the brush roll is not spinning, it can be frustrating and you may be left wondering what went wrong. A potential issue can be caused by either an obstruction or a malfunctioning part. Without proper knowledge, it can be difficult to diagnose the problem and find a solution. Don’t worry, in this section, we will explore the possible causes of a brush roll not working and provide you with step-by-step solutions to fix it.
Check for Obstructions
One of the most common issues with upright vacuum cleaners is the brush roll not working properly. If you notice that the brush roll isn’t spinning, the first thing you should check for is obstructions. Here are some steps you should take:
Turn off the Vacuum: Before checking for obstructions, it’s important to turn off the vacuum and unplug it from the power source to prevent any accidents.
Remove the Brush Roll: Most upright vacuum cleaners allow you to remove the brush roll easily. You can consult your user manual for specific instructions, but in most cases, you simply need to remove a few screws or release some clips to take it out.
Inspect the Brush Roll: Once the brush roll is removed, inspect it for any hair, threads, or other debris that may be wrapped around it. Use a pair of scissors or a seam ripper to carefully cut away any tangled hair or debris that you find.
Check the Bearings: While you have the brush roll out, check the bearings on both ends of the roll. They should spin freely without any resistance. If you notice any stiffness, you may need to replace the bearings.
Check the Belt: The brush roll is connected to the motor via a belt. Check that the belt is in good condition and that it’s not stretched or broken. If it’s worn out, replace it with a new one.
Reassemble the Vacuum: After you’ve cleaned the brush roll and checked the other components, reassemble the vacuum cleaner and test it to see if the brush roll is working properly again.
By checking for obstructions and following these steps, you can ensure that your upright vacuum cleaner is running smoothly and that the brush roll is spinning as it should be.
Check the Belt
When your upright vacuum cleaner’s brush roll isn’t working, one of the culprits could be a broken or worn-out belt. A belt that is old or stretched-out can’t effectively spin the brush roll, resulting in poor cleaning performance. Here are the steps to check and replace the belt:
Step
Description
Step 1
Unplug the vacuum cleaner from the wall outlet to avoid electric shock.
Step 2
Locate the brush roll and its housing. Depending on your vacuum model, you may need to remove a cover or release a latch to access the brush roll.
Step 3
Remove the brush roll by pulling it out of its housing.
Step 4
Inpect the belt for signs of wear or damage. If the belt is broken or stretched out, it needs to be replaced.
Step 5
Get the replacement belt that is compatible with your vacuum model.
Step 6
Attach the new belt to the brush roll, then carefully slide the roll back into its housing.
Step 7
Test the vacuum cleaner to see if the brush roll works properly. Plug the cleaner back in and turn it on. If the brush roll spins normally, then you’ve successfully replaced the belt.
Remember, it’s important to replace your vacuum’s belt every 6-12 months to ensure optimal cleaning performance. If your brush roll still doesn’t work after replacing the belt, then further inspection or a repair may be necessary.
Loud or Strange Noise
It’s common to hear a vacuum cleaner make some noise while it’s working, but if you notice a piercing screech or strange clanging noises, this could be a sign that something is not quite right. Don’t ignore these sounds! They could be an indication that something is amiss with your vacuum cleaner. In this section, we’ll go over some of the most common noisy issues with upright vacuum cleaners and give you step-by-step guidance on how to fix them.
Check for Clogs
One common issue with upright vacuum cleaners is clogs in the system. These clogs can obstruct the airflow, causing poor suction, overheating, and even a burning smell. Checking for clogs is an essential step in troubleshooting the problems of your vacuum cleaner. Here are some steps to take to check for clogs:
Unplug the vacuum cleaner: Before checking for clogs, you must first turn off and unplug your vacuum cleaner to ensure your safety.
Inspect the hose: Start by inspecting the hose for any visible clogs. Check both ends of the hose and clear out any debris, dirt or hair that may have accumulated inside.
Check the attachments: If your vacuum cleaner has any attachments, remove them and check for any blockages or clogs inside.
Check the brush roll: The brush roll can also accumulate hair, dust, and debris, which may cause clogs. Check the brush roll for any tangles, and clean them out carefully with scissors or a brush.
Inspect the bag or canister: If your upright vacuum cleaner uses a bag or canister, unclip or open it to check for any clogs inside.
Once you have checked for clogs, clear them out carefully, ensuring that you do not damage any part of the vacuum cleaner, and then try running the cleaner again. If the problem persists, then there might be other issues that need to be addressed.
Check for Broken Parts
If your upright vacuum cleaner is making loud or strange noises, check for broken parts. This could be the result of the vacuum cleaner being dropped or hit against furniture causing damage. Any physically broken parts will require replacement. Here are some parts to check for damage:
Part
Symptoms of Damage
Brush roll
Wobbling or loose in its housing, bent or cracked
Fan
Chipped or cracked blades, or loose in its housing
Motor
Burnt smell, smoke, or loud noises
Hose
Cracks, holes, or tears in the material, or looseness where it connects to the vacuum cleaner or accessories
Handle
Cracks, broken pieces, or looseness
If you notice any of the above symptoms, it’s important to replace the damaged part as soon as possible. Continuing to use a vacuum cleaner with broken parts can lead to further damage and even more expensive repairs. Remember, routine maintenance and proper handling can help prevent damage to your vacuum cleaner’s parts.
Loss of Suction in Hose
One of the most baffling issues that can afflict an upright vacuum cleaner is a sudden reduction in suction power via the hose. This can leave you with questionable cleaning results and a frustrating cleaning experience. Don’t worry, with a bit of troubleshooting, you can easily restore the suction power of your vacuum cleaner in no time! In this section of the article, we’ll cover the most common causes of a loss of suction power in the hose and how to fix them step-by-step.
Check for Clogs
One of the most common issues with upright vacuum cleaners is clogs. When the vacuum cleaner is clogged, the suction power decreases, causing dust and debris to accumulate inside the machine. If you notice that your vacuum cleaner is not picking up dirt from the floors or carpets as well as it used to, then it might be clogged.
Here are some steps to follow to check for clogs:
First, turn off and unplug the vacuum cleaner to ensure safety.
Check the hose and brush roll for any visible obstructions, such as hair or large debris. If there is any, remove it immediately.
Next, detach the hose from the vacuum cleaner and examine it for any blockages. You can do this by shining a flashlight through the hose or using a long stick to push any debris out of the hose.
If you suspect the clog is in the main vacuum cleaner unit, remove the bag or canister and inspect it for any obstructions.
Use a long stick or any other tool to dislodge any visible dirt, dust or debris from the bag or canister.
For stubborn clogs, you may need to use a wire hanger or a plumbing snake to remove them.
After cleaning the clog, reattach the hose, bag or canister and turn on the vacuum cleaner to test the suction power.
It’s essential to check for clogs regularly, as they can cause the vacuum cleaner to overheat and, in extreme cases, burn out the motor. By taking the time to check for clogs, you’ll ensure your vacuum cleaner continues to function correctly and last longer.
Check the Hose for Damage
One of the most common issues with upright vacuum cleaners is a loss of suction in the hose. If you have already checked for clogs and found none, it is important to inspect the hose for damage. A damaged hose can cause suction to be weaker or even nonexistent. Here’s how to check the hose for damage:
Step
Description
Step 1:
Remove the hose from the vacuum cleaner.
Step 2:
Inspect the entire length of the hose carefully.
Step 3:
Look for any cracks or holes in the hose.
Step 4:
Bend the hose to check for kinks or other types of damage.
Step 5:
Check for any loose or disconnected parts in the hose.
Step 6:
If any damage is found, replace the hose.
By following these steps, you can determine whether or not a damaged hose is the cause of your vacuum cleaner’s loss of suction. If a damaged hose is the issue, replacing it should solve your suction problem. As always, make sure to read your vacuum cleaner’s manual or contact the manufacturer for guidance on purchasing a replacement hose.
Overheating
One of the most frustrating issues that can occur with upright vacuum cleaners is when they overheat. This is not only inconvenient, but it can also be scary as it poses a fire risk. If your vacuum cleaner has been overheating lately, you may be wondering what causes this problem and how you can fix it. Fortunately, there are a few things that you can do to troubleshoot and resolve this issue. Let’s dive into some of the possible solutions.
Check for Clogs
A common issue that can cause a loss of suction, loud noises, overheating, and even a burning smell in upright vacuum cleaners is the presence of clogs. These clogs may occur in various places such as in the hose, the filters, the bag or canister, and even the brush roll. To address this problem, it is necessary to check for clogs by following a series of steps.
First, turn off the vacuum cleaner and unplug it from the electrical outlet. Then, remove the hose, filter or bag/canister, and brush roll to check for any debris or blockages that may have accumulated inside. Use a flashlight to help you see through the hose or other area and examine it closely. You can also use a long, skinny object such as a coat hanger or straightened paper clip to carefully dislodge any clogs present.
To make the process easier, use the following table as a guide to check for clogs:
Location of Clog
How to Fix It
Hose
Detach the hose from both ends and use a flashlight to look for any visible clogs. If present, use a coat hanger or straightened paper clip to remove it.
Filters
Remove the filters and tap them gently against a hard surface to dislodge any dust and debris. If this does not work, replace the filters.
Bag or Canister
Empty the contents of the bag or canister and check for any debris that may be causing the clog. If you notice any tears or holes in the bag or canister, replace it.
Brush Roll
Remove the brush roll and check for any hair or large debris such as string or carpet fibers. Use a pair of scissors or a seam ripper to carefully cut and remove any tangled hair or debris caught around the brush roll.
Checking for clogs is an important step in ensuring that your upright vacuum cleaner functions properly. By following the steps outlined above and using the table as a guide, you can easily identify and remove any blockages that may be causing issues with your vacuum cleaner.
Check the Filters
One of the most common reasons for poor suction and overheating in upright vacuum cleaners is a clogged filter. Filters are essential for trapping dirt and allergens that are sucked up during cleaning. Over time, filters can become clogged with dust, debris, and other particles, causing them to lose their effectiveness and even overheat the motor. Checking and cleaning the filters should be a regular part of vacuum maintenance.
Here’s how to check the filters:
Step
Description
Step 1
Locate the filter(s) in your vacuum cleaner. Filters can be found in several locations, including the dustbin, the air intake, and the exhaust.
Step 2
Remove the filter(s) from the vacuum cleaner. Refer to your vacuum’s owner manual for specific instructions on how to remove the filters.
Step 3
Inspect the filter(s) for dirt, debris, and damage. If the filters are dirty, gently tap them on a hard surface or use a soft brush to remove the debris. If the filters are damaged, replace them with new ones.
Step 4
Clean or replace the filter(s) if necessary, and then reinsert them back into the vacuum cleaner. Make sure the filters are properly seated before securing them in place.
Step 5
Run the vacuum cleaner to test its suction power. If the suction power has improved, then the clogged filter was the issue. If the suction power is still weak, proceed to check the other parts of the vacuum cleaner.
By keeping the filters clean and replacing them when needed, vacuum cleaners will operate more efficiently, and their lifespan will be prolonged. Don’t forget to check the filters regularly as they are vital for the performance of the vacuum cleaner.
Burning Smell
As you set about completing your cleaning tasks with an upright vacuum cleaner, you might suddenly detect a pungent odor. Abaffling smell originating from your vacuum cleaner might make you wonder if there is something going wrong with it. One possible culprit could be a burning smell emanating from your trusty cleaning device. This issue needs immediate attention and should not be ignored as it could lead to more problems with your vacuum cleaner in the long run. In this section, we will explore the probable causes of a burning smell and suggest some practical steps to help you get the issue resolved.
Check for Clogs
One of the most common issues with upright vacuum cleaners is the presence of clogs that can block the suction and decrease the efficiency of your vacuum. Here are a few steps you can take to identify and fix clogs in your vacuum:
Turn off Your Vacuum Cleaner: First things first, turn off your vacuum cleaner and unplug it from the power socket. This ensures that you don’t accidentally injure yourself or damage the machine.
Locate Potential Clogs: The next step is to locate the potential areas where clogs might be present. There could be clogs in the hose, nozzle, brush roll, or filter. Check each part of the vacuum that could potentially be clogged.
Remove Blockage: Once you’ve located the clog, use a long, thin tool such as a coat hanger, to remove the blockage. Be gentle when removing the clog, so you don’t damage the vacuum cleaner.
Clean Filters: Clogs often occur due to dirty filters. It’s important to clean your filters regularly to prevent clogs from forming. Check your vacuum’s manual to see how often you should clean the filter.
Check the Vacuum Bag or Canister: Dirt and dust particles also accumulate in the vacuum bag or canister, so it’s important to check these regularly and empty them when necessary. Failure to empty the bag or canister can cause blockages, which could lead to overheating or poor suction.
Turn on the Vacuum and Test: Once you’ve checked and removed any clogs, turn on the vacuum and test the suction. If your vacuum cleaner is still not working correctly, you may need to take it to a professional for assessment and repair.
Checking for clogs and removing them is an essential part of regular maintenance for your upright vacuum cleaner. Continuing to use a vacuum with a clog could cause further damage and decrease the vacuum’s lifespan. By regularly checking for and removing clogs, you can increase the efficiency and lifespan of your vacuum.
Check the Belt
One common issue with upright vacuum cleaners is a brush roll that is not working. This can be caused by a broken or worn-out belt. Checking the belt periodically is essential to keep the vacuum cleaner running smoothly. Here’s how you can check the belt of your upright vacuum cleaner.
First, unplug the vacuum cleaner and turn it over, so you can see the brush roll. Locate the belt that connects the brush roll to the motor. Look for signs of wear and tear, such as cracks or fraying.
If the belt looks worn or broken, you will need to replace it. You can find the proper replacement belt for your vacuum cleaner in the owner’s manual or by contacting the manufacturer. Make sure to purchase the correct type and size of belt.
To replace the belt, remove the old belt from the brush roll and the motor pulley. Install the new belt by looping it over the motor pulley and then over the brush roll. Make sure the belt is properly aligned with the brush roll and the motor pulley.
Once the new belt is in place, test the brush roll by turning on the vacuum cleaner. If the brush roll is now working correctly, you have successfully fixed the issue. Keep in mind that the belt will wear out over time, so you may need to replace it periodically to ensure the vacuum cleaner’s proper operation.
Checking the belt of your upright vacuum cleaner is essential to keep it working correctly. If you notice any signs of wear and tear, you should replace the belt as soon as possible to prevent more significant problems.
Conclusion
In conclusion, maintaining and fixing common issues with your upright vacuum cleaner is essential to keeping it running smoothly and efficiently. By regularly checking the filters, hoses, and bags or canisters, you can prevent poor suction and loss of power. If you noticed that the brush roll has stopped working, it’s important to check for obstructions and replace the belt if necessary. If your vacuum is making loud or strange noises, there may be an underlying issue such as a clog or broken parts, which require immediate attention to avoid further damage. In the case of overheating or a burning smell, stop using your vacuum immediately and check for clogs or replaced broken parts.
It’s always best to address any issues promptly and take preventative measures to keep your vacuum in top condition. Regular cleaning and maintenance, such as replacing filters and belts, can help prevent problems from occurring in the first place.
Remember to always refer to the user manual provided by the manufacturer for specific troubleshooting and maintenance instructions, and never attempt to repair any broken or malfunctioning parts yourself unless you have the necessary knowledge and experience. With these tips and techniques, you can extend the life of your upright vacuum cleaner and ensure it continues to provide reliable and efficient cleaning performance for years to come.
Frequently Asked Questions
Why is my upright vacuum cleaner losing suction power?
There could be several reasons for weak suction in your upright vacuum cleaner, including clogged filters, a full bag or canister, or a kinked hose.
How do I fix the suction power in my upright vacuum cleaner?
First, turn off the vacuum and check the filters, bag or canister, and hose for blockages. If you find a blockage, remove it carefully. If the filters are dirty, clean or replace them. Straighten any kinks in the hose to restore suction power.
Why is the brush roll not working on my upright vacuum cleaner?
If the brush roll is not working, it could be due to a tangled or obstructed brush, a damaged or broken belt, or a motor problem.
How do I fix a brush roll that’s not working?
First, turn off the vacuum and remove any debris from the brush roll. Then, check the belt for damage or wear and replace it if necessary. If the motor is the issue, consider taking your vacuum to a repair shop.
Why is my upright vacuum cleaner making loud or strange noises?
Loud or strange noises in your vacuum could be caused by a blockage in the suction path, loose or broken parts, or a malfunctioning motor.
How do I fix my vacuum cleaner if it’s making loud or strange noises?
First, turn off the vacuum and check for blockages in the suction path. Then, inspect the vacuum for any loose or broken parts. If the problem persists, take your vacuum to a repair shop.
Why has the hose on my upright vacuum cleaner lost suction power?
The hose on your vacuum might lose suction power if it’s clogged or damaged, or if there is an obstruction in the hose.
How do I fix a hose that’s lost suction power?
Check the hose for any blockages or damage, and clear any obstruction you find. If the hose is damaged, consider replacing it.
Why is my upright vacuum cleaner overheating?
An overheating vacuum cleaner can be caused by a clogged filter, a blockage in the suction path or hose, or a problem with the motor.
How do I fix an upright vacuum cleaner that is overheating?
Turn off the vacuum cleaner and check the filter, hose, and suction path for blockages. Clean or replace the filter if necessary. Allow the vacuum to cool down before turning it back on.