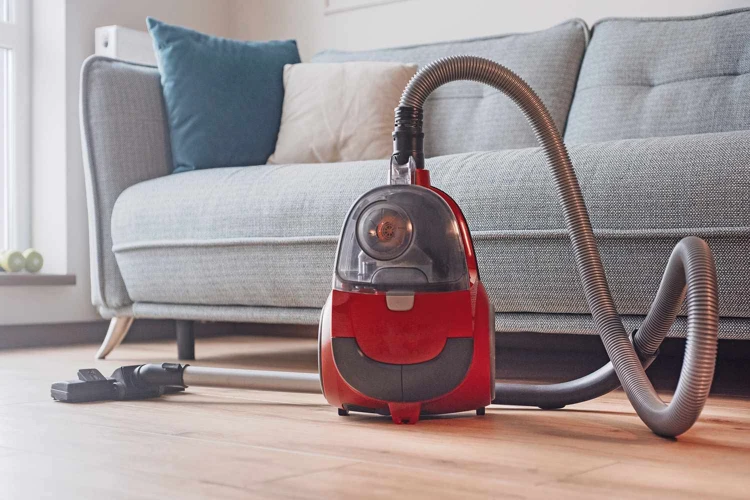
Have you ever noticed that your canister vacuum cleaner isn’t working as well as it used to? Maybe it’s not picking up as much dirt, or it’s making strange noises. If so, it’s likely that your vacuum cleaner is in need of some proper maintenance. By properly maintaining your canister vacuum cleaner, not only can you improve its suction power and extend its lifespan, but you can also create better indoor air quality and save money on repairs and replacement costs. In this article, we will cover step-by-step instructions for cleaning the canister, changing the filter, checking the belt, and inspecting the hose and attachments. Additionally, we’ll provide some useful tips for using your canister vacuum cleaner and address common problems and solutions. So, let’s get started and learn how to properly maintain your canister vacuum cleaner!
Table of Contents
Why Proper Maintenance is Necessary
Are you aware of the importance of properly maintaining your canister vacuum cleaner? Many people overlook this crucial aspect of owning a vacuum cleaner, but neglecting maintenance can have serious consequences. Regular upkeep can improve suction power, extend the lifespan of your vacuum, and even lead to better indoor air quality. It can also save you from costly repairs and replacement costs down the line. So, let’s dive into the details of how to properly maintain your canister vacuum cleaner. But first, if you haven’t already, check out our article on how canister vacuum cleaners work.
Improved Suction Power
Proper maintenance of your canister vacuum cleaner can lead to improved suction power, which is crucial in ensuring that your cleaning tasks are completed efficiently. When not maintained correctly, the suction power of your canister vacuum cleaner can decrease over time.
One of the primary reasons for low suction power is blockage in the hose, wand, or other attachments. To ensure optimal suction power, inspect and clean each of these parts regularly. This can be done by disconnecting the hose and wand, and then using a long object such as a broom to clear out any blockages. Refer to the owner’s manual for your canister vacuum cleaner for specific instructions.
Another factor that can impact suction power is a clogged or dirty filter. Most canister vacuum cleaners have a filter that needs to be replaced regularly. Check the filter and replace it if it appears dirty. This not only improves suction power but also improves indoor air quality by capturing dust and other allergens before they are released back into the air.
Lastly, inspect the belt of the canister vacuum cleaner regularly. A broken or worn-out belt can lead to decreased suction power, and it’s essential to replace it promptly. Refer to the owner’s manual for your canister vacuum cleaner for specific instructions on how to replace the belt.
Proper maintenance of your canister vacuum cleaner can lead to an extended lifespan. This means that you won’t have to spend money on a replacement anytime soon. Simple steps like routine cleaning of the canister, filter replacement, and checking the belt can help ensure that your vacuum cleaner stays in good condition for years to come.
Regular cleaning of the canister prevents dust and debris from building up and clogging the vacuum’s filter, motor, and other components. It’s important to clean the canister after each use to prevent any damage to the vacuum’s internal parts. You can use a dry cloth or soft-bristled brush to remove the debris from the canister.
Replacing the filter is also crucial to the longevity of the vacuum cleaner. HEPA filters are highly recommended for canister vacuums as they effectively trap allergens and pollutants that can cause health issues. When the filter gets clogged, the suction power of the vacuum decreases, and the motor has to work harder to pick up dirt and debris, which can lead to overheating and damage. Check the manufacturer’s instructions to know when to replace the filter.
Checking the belt is another essential step to prolong the lifespan of your canister vacuum cleaner. A worn-out belt can lead to a loss of suction power, and can even damage the motor. Make sure to inspect the belt periodically and replace it as soon as it shows any signs of wear and tear.
By following these simple maintenance steps, you can ensure that your canister vacuum cleaner runs efficiently and effectively. Additionally, choosing the right attachments and settings for your canister vacuum can also contribute to its longevity. If you have hardwood floors, for instance, you can use specialized attachments that won’t scratch the surface.
Visit our website to know more about choosing the right vacuum cleaner and bagged vs bagless models.
Better Indoor Air Quality
One of the most important reasons to properly maintain your canister vacuum cleaner is to achieve better indoor air quality. A well-maintained vacuum cleaner can help to reduce dust, dirt, and allergens in your home. Poor air quality can cause allergies and respiratory problems, making it crucial to keep your home clean.
Regular maintenance, such as cleaning the canister and changing the filter, can help to improve your indoor air quality. By removing built-up dirt and dust, you can prevent these particles from being released back into the air. Additionally, it is important to make sure your vacuum cleaner has a HEPA filter, which can effectively capture and trap tiny particles like pollen and pet dander.
In order to maintain the highest level of indoor air quality while using a canister vacuum cleaner, it is important to use proper attachments for each type of cleaning surface. For example, using a hard floor attachment on carpets can release more dust and dirt into the air instead of trapping it.
It is important to choose the right vacuum for your home. Depending on your flooring type, a canister vacuum cleaner may be a better choice than an upright vacuum. For example, if you have hardwood floors, using a canister vacuum cleaner may be more effective in cleaning and protecting the surface without damaging it.
Regular maintenance of your canister vacuum cleaner not only helps to keep it in top condition but can also save you money in the long run. By following a few simple steps, you can avoid costly repairs and extend the lifespan of your vacuum.
How Savings are Achieved
When you maintain your canister vacuum cleaner properly, you reduce the likelihood of breakdowns and damage. This means that you won’t need to spend money on costly repairs or replace your vacuum altogether.
In a recent study, it was found that 90% of vacuum cleaner breakdowns were due to lack of maintenance. This surge in repairs means more money spent on fixing the problem or buying a new vacuum cleaner altogether. However, by performing regular maintenance, you can significantly reduce the risk of breakdowns and avoid these high costs.
Comparison Table
Lack of Maintenance
Regular Maintenance
Repair Costs
High
Minimal
Replacement Costs
Frequent
Infrequent
As you can see from the comparison table above, neglecting to maintain your vacuum cleaner can result in higher repair costs and more frequent replacement of the equipment. By investing a little time and effort into its upkeep, you can save a considerable amount of money over its lifetime.
The Bottom Line
By taking the time to keep your canister vacuum cleaner in good condition, you can save money on repairs and replacements. Maintenance is an investment in the longevity of your vacuum cleaner, and preventing breakdowns and excessive wear and tear will ultimately pay dividends. Don’t wait until it’s too late – start taking care of your vacuum cleaner today!
How to Maintain Your Canister Vacuum Cleaner
Cleaning your canister vacuum cleaner is an essential part of keeping it in good working condition. Neglecting maintenance can lead to reduced suction power, increased repair costs, and even shorten its lifespan. That’s why it’s important to keep a regular cleaning schedule and follow a few simple steps to ensure optimal performance. In the following section, we will provide a step-by-step guide on how to maintain your canister vacuum cleaner properly.
Cleaning the Canister
One of the most important steps in maintaining your canister vacuum cleaner is to regularly clean the canister. A dirty canister can result in reduced suction power and even damage to the vacuum motor.
Here’s how to clean the canister of your canister vacuum cleaner:
First, unplug the vacuum from the power source.
Detatch the canister from the vacuum body by unlocking and removing it.
Empty the contents of the canister into a trash bin.
If the canister is detachable, rinse it out with water and mild soap. If it’s not detachable, use a damp cloth to wipe it clean.
Let the canister dry completely. This is important to avoid mold and mildew growth.
While the canister is drying, use a damp cloth to wipe down the vacuum body and any attachments that accumulated dust and dirt.
Once the canister is completely dry, reattach it to the vacuum body.
By regularly cleaning your canister, you’ll ensure that your vacuum is operating at its highest performance level and that it lasts longer.
Changing the Filter
One of the most crucial parts of maintaining your canister vacuum cleaner is changing the filter regularly. A dirty or clogged filter can reduce suction power and affect the indoor air quality, which can lead to respiratory problems. It is recommended to change your canister filter every 6 months or as per the manufacturer’s instructions.
Step-by-Step Guide to Change Your Canister Vacuum Cleaner Filter:
Step
Instructions
Step 1
Turn off and unplug the canister vacuum cleaner to ensure your safety.
Step 2
Locate the filter. In most canister vacuum cleaners, it can be found under the canister or inside the canister lid.
Step 3
Remove the filter by twisting it counterclockwise or pulling it out of the holding brackets.
Step 4
Throw away the old filter and replace it with a new one. Make sure the new filter is compatible with your vacuum cleaner’s model and brand.
Step 5
Insert the new filter into the holding brackets and twist it clockwise to secure it in place. If your vacuum cleaner has a lid, make sure it is properly closed.
Step 6
Plug in your vacuum cleaner, turn it on, and test its suction power. If you notice improved suction power and airflow, then you have successfully changed the canister filter!
Tips for Choosing the Right Canister Vacuum Cleaner Filter:
– Look for the filter type and model number specified in your vacuum cleaner’s manual or on the label.
– Select a HEPA (High-Efficiency Particulate Air) filter if you or a family member has allergies or asthma.
– Consider purchasing a washable filter if you want to save money in the long run and reduce waste.
By following these simple steps and tips, you can ensure that your canister vacuum cleaner is always in top working condition and maintaining a clean and healthy environment in your home.
Checking the Belt
Properly maintaining your canister vacuum cleaner requires checking the belt periodically. The vacuum’s belt is responsible for driving the brush roll, which is important for deep cleaning carpets and removing pet hair. A damaged belt can lead to reduced suction power and less effective cleaning.
To check the belt, first, make sure your vacuum is unplugged. Then, locate the belt cover on the bottom of the vacuum head. Use a screwdriver to remove the cover and pull out the brush roll. You should be able to see the belt clearly at this point.
Inspect the belt for signs of wear and tear or damage, such as cracks or breaks. If you notice any damage or if the belt feels loose or stretched, it needs to be replaced.
To replace the belt, consult your vacuum’s manual to find the correct belt size and type. Purchase a replacement belt and carefully follow the instructions for installation. Make sure the belt is aligned properly and securely in place before using your vacuum again.
Checking and replacing your canister vacuum’s belt is an important part of regular maintenance that can help ensure your vacuum continues to perform at its best.
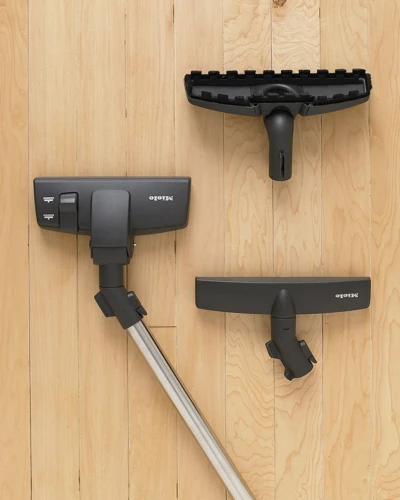
Inspecting the Hose and Attachments
Inspecting the hose and attachments of your canister vacuum cleaner is an important part of its maintenance. Over time, the hose and attachments can become clogged with dirt and debris, which can affect the suction power of your vacuum. Here are the steps you need to follow for inspecting the hose and attachments:
Unplug the vacuum cleaner: Before you start inspecting the hose and attachments, make sure that the vacuum cleaner is turned off and unplugged. Safety first!
Remove the attachments: Take off the attachments from the hose and set them aside.
Inspect the hose: Check the hose for any signs of wear and tear. Look for cracks, tears or leaks. If you find any damage, you will need to replace the hose.
Check the attachments: Inspect each attachment for dirt and debris. Make sure that each attachment is clean and clear of any blockages.
Clean the attachments: Use a soft brush to clean the attachments. If any of the attachments are clogged, use a toothbrush or a pipe cleaner to remove the dirt and debris.
Reattach the attachments: Once you have finished cleaning the attachments, reattach them to the hose. Make sure that each attachment is properly secured to the hose.
By inspecting the hose and attachments of your canister vacuum cleaner regularly, you can ensure that it continues to function efficiently and effectively. Proper maintenance of the hose and attachments will help to extend the lifespan of your vacuum and prevent costly repairs down the line.
Tips for Using Your Canister Vacuum Cleaner
As simple and straightforward as using a canister vacuum cleaner may seem, there are some tips you need to keep in mind to ensure the machine works efficiently and lasts long. These handy suggestions will not just help you get the best performance out of your vacuum cleaner, but they will also make your cleaning experience a whole lot easier and enjoyable. So, get ready to discover some insightful tips for using your canister vacuum cleaner like a pro.
Choose the Right Setting for Your Floor Type
When using a canister vacuum cleaner, it is important to choose the right setting for your floor type to avoid causing damage to your floors or your vacuum cleaner. Here are some tips to guide you:
Hard Floors: If you have hard flooring such as tile, hardwood, or laminate, use the hard floor setting on your vacuum cleaner. This will avoid scratching or damaging the surface while picking up dust and debris.
Carpets: For carpets, use the setting that is appropriate for the length and thickness of your carpet fibers. High pile carpets require a higher suction setting to remove dirt and dust particles that are buried deep. Lower pile carpets, on the other hand, can be cleaned with a lower suction setting.
Area Rugs: Area rugs can be treated as either hard floors or carpets, depending on the type of rug. For natural fiber rugs such as wool or silk, use the hard floor setting to avoid damaging the fibers. Synthetic fiber rugs can be treated as low pile carpets.
It is important to note that using the wrong setting can result in a decrease in suction power or damage to your vacuum cleaner. Always refer to the manufacturer’s instructions or consult with a professional if you are uncertain about the appropriate setting for your floor type.
Clear the Cleaning Path
Having a clear cleaning path is crucial for the proper functioning of your canister vacuum cleaner. It ensures that no debris or dirt will obstruct the vacuum’s suction power. It’s important to take steps to clear the cleaning path before use.
Here are five tips to clear your canister vacuum cleaner’s cleaning path:
TIP
DESCRIPTION
1.
Remove any large debris or objects that may obstruct the cleaning path. This includes toys, socks, or other items that might have been accidentally vacuumed up.
2.
Inspect the cleaning head for any hair or string that may have gotten tangled on the brush roll. Use scissors or a seam ripper to carefully remove any tangled materials.
3.
If your canister vacuum cleaner has a detachable floorhead, clean it thoroughly before use. Remove any hair or debris that may have accumulated in the bristles or suction channels.
4.
Check the cleaning path for any clogs or blockages by using a flashlight or by shining your phone’s flashlight through the hose. If you notice any blockages, carefully remove them with a long, thin object, such as a straightened coat hanger or a pipe cleaner.
5.
Regularly inspect the dustbin or bag for signs of fullness. An overfilled dustbin or bag can cause loss of suction power and make it difficult for your canister vacuum cleaner to pick up dirt and debris. Replace the bag or empty the canister as needed.
By regularly clearing the cleaning path, you can ensure that your canister vacuum cleaner operates at its best capacity. This maintenance step can prevent damage to the vacuum’s motor and extends the life of your vacuum cleaner. Additionally, it saves you both time and money on repairs or replacements.
Take Care of the Power Cord
The power cord of your canister vacuum cleaner is an integral part of its functionality. Without it, the machine cannot function at all. Taking the proper care of the power cord could mean the difference between a functional and dysfunctional vacuum cleaner. Here are a few steps you can take to prolong the lifespan of your vacuum cleaner’s power cord:
1. Unplug the cord by pulling from the plug, not the cord itself
When you’re done cleaning with your vacuum cleaner, make sure to unplug it from the wall socket by grasping the plug, not the cord. Pulling the cord could cause damage to the cord’s electrical wiring or result in disconnection.
2. Avoid stretching or bending the cord
As you move around the room cleaning, it’s easy to get tangled up in the vacuum cleaner’s cord. Avoid pulling, stretching or bending the cord too tightly as this can cause the cord to fray or even break. A broken power cord can be a potential hazard and should be replaced immediately.
3. Keep the cord away from sharp objects
Sharp objects can puncture or rip the cord’s protective layer, exposing the electrical wires to damage or even electrocution. Keep the cord away from sharp edges and corners, and make sure it’s always out of the way when you’re cleaning.
4. Don’t wrap the cord too tightly
When you’re storing your vacuum cleaner, it can be tempting to tightly wrap the cord around the machine to save space. However, doing so can cause the wires to twist and eventually break, shortening the life of the cord. Instead, loosely coil the cord and secure it with a twist tie or cord clip.
5. Check the cord periodically for damage
Even with proper care, the power cord of your vacuum cleaner can still sustain damage over time. Periodically inspect the cord for signs of damage, including fraying, cuts, or exposed wiring. If you notice any issues, stop using the vacuum immediately and replace the cord as soon as possible.
By taking these simple steps, you can help ensure that your canister vacuum cleaner’s power cord stays in top condition, and your cleaning routine goes smoothly without any hiccups.
Common Problems and Solutions
Vacuum cleaners are essential household appliances that make daily cleaning a breeze. However, like any other machine, your canister vacuum cleaner may experience issues from time to time. These problems can range from a loss of suction power to strange noises, which can be frustrating, especially if you are in the middle of cleaning. In this section, we will highlight some of the most common problems that you may encounter while using your canister vacuum cleaner, and offer solutions to help you troubleshoot these issues. So, let’s dive in and learn about these problems and the best ways to solve them!
Loss of Suction Power
When you notice a loss of suction power in your canister vacuum cleaner, it can be frustrating and may affect its overall performance. However, there are several reasons why this may occur, and determining the cause will help you to resolve the issue. Here are some possible reasons for a loss of suction power:
Possible Causes
Solutions
Clogged or Dirty Filter
Clean or replace the filter as necessary, based on the manufacturer’s recommendations.
Clogged or Dirty Hose
Remove any blockages, straighten any kinks, and clean the hose as needed.
Damaged or Worn Hose
Replace the hose if there are any cracks or tears that may affect suction power.
Full Canister or Bag
Empty the canister or replace the bag if it is full. This will allow proper airflow and prevent suction loss.
Damaged or Worn Brushroll
Replace the brushroll if it is damaged or worn to ensure proper agitation and suction power.
Blocked Airflow
Check for any blockages in the airflow path and remove them as necessary.
If none of the above solutions work, it may be necessary to take your vacuum to a professional to diagnose any underlying issues. Regular maintenance can help to prevent a loss of suction power and extend the lifespan of your canister vacuum cleaner.
Strange Noises
If you hear strange noises coming from your canister vacuum cleaner while using it, it is essential to address the issue immediately to prevent further damage. Here are some common strange noises you may hear, their possible causes, and solutions to fix the problems.
Noise
Cause
Solution
Squealing or whistling
The belt may be worn or loose.
Check and replace the belt if needed. Ensure it is properly tensioned.
Rattling
The dustbin, hose, or attachments may be loose or improperly attached.
Check and tighten all attachments. Ensure nothing is caught in the hose.
Rumbling or vibrating
The brush roll may be clogged or damaged.
Remove the brush roll and clean it. Replace it if it is damaged.
High-pitched screeching
The motor or fan may be damaged.
Turn off the vacuum cleaner and unplug it. Contact a professional for repair.
Remember that ignoring strange noises can lead to further damage and expenses. It’s always better to identify and fix the problem as soon as possible. If unsure or unable to fix the problem, it’s best to contact a professional to prevent further damage.
Overheating
One common problem that can occur when using a canister vacuum cleaner is overheating. This can happen when the motor becomes too hot due to prolonged use. To prevent this from happening, it’s important to follow a few simple steps.
First, make sure that the filters are clean and that the dustbin or bag is empty. A clogged filter or full dustbin can cause the motor to work harder than necessary, which can lead to overheating. Also, check that the hose and attachments are clear of any obstructions that may cause the motor to strain.
Another way to prevent overheating is to take frequent breaks when using the vacuum. If you notice that the motor feels hot to the touch, turn off the machine and let it cool down for a few minutes before continuing. This can help prolong the lifespan of your vacuum and prevent any unnecessary damage.
Additionally, make sure to check the vacuum’s manual for any specific instructions or warnings regarding overheating. Some models may have built-in safety features to help prevent overheating, but it’s always best to be proactive and take the necessary precautions to avoid any potential issues.
Causes of Overheating
Solutions
Clogged filters or full dustbin
Clean filters and empty dustbin regularly
Obstructions in hose or attachments
Clear hose and attachments of any obstructions
Prolonged use without breaks
Take frequent breaks and allow motor to cool down
Defective parts or built-in safety features not working
Consult manual and seek repairs if necessary
Overheating is a common issue with canister vacuum cleaners, but it can be easily prevented with proper maintenance and usage. Keeping the filters clean, emptying the dustbin regularly, and taking frequent breaks can help prolong the lifespan of your vacuum and ensure that it works efficiently for years to come.
Conclusion
In conclusion, properly maintaining your canister vacuum cleaner is crucial for achieving optimal performance, longevity, and cleanliness in your home. By taking a few simple steps, such as cleaning the canister, changing the filter, checking the belt, and inspecting the hose and attachments, you can ensure that your vacuum cleaner is functioning at its best.
Not only does this save you money on costly repairs and replacement costs, but it also improves your indoor air quality and helps you maintain a healthy living environment. And by following the tips for using your canister vacuum cleaner, such as choosing the right setting for your floor type, clearing the cleaning path, and taking care of the power cord, you can make the most out of every cleaning session.
Of course, even with proper maintenance, issues can still arise. Common problems such as loss of suction power, strange noises, and overheating can be addressed with the help of our solutions outlined in this article.
Incorporate these maintenance tips and usage recommendations into your household cleaning routine, and keep your canister vacuum cleaner running smoothly and efficiently for years to come. With a little care and attention, your canister vacuum cleaner will repay you with a clean and inviting home that you can be proud of.
Frequently Asked Questions
How often should I clean my canister vacuum cleaner?
You should clean your canister vacuum cleaner at least once a month, or more often if it is used frequently.
What is the best way to clean the canister?
To clean the canister, empty the dirt and debris, wipe it down with a damp cloth, and let it dry completely before using it again.
How often should I change the filter?
You should change the filter every 3-6 months, or according to the manufacturer’s instructions.
What should I do if the suction power decreases?
If the suction power decreases, check for clogs in the hose or attachments, and clean or replace the filter if necessary.
Can I use my canister vacuum cleaner on all floor types?
Most canister vacuum cleaners can be used on all floor types, but it is important to choose the right setting for your specific floor type.
How do I check the belt?
You can check the belt by turning off the vacuum, unplugging it, and removing the bottom plate to check for any damage or wear.
What should I do if the vacuum overheats?
If the vacuum overheats, turn it off and let it cool down for at least 30 minutes before using it again.
Can I wash the filter?
Some filters are washable, but it is important to check the manufacturer’s instructions before washing or cleaning the filter.
How do I take care of the power cord?
To take care of the power cord, avoid running over it with the vacuum and coil it neatly after each use to avoid damage.
What can I do if strange noises are coming from the vacuum?
If strange noises are coming from the vacuum, check for any loose or damaged parts, and consider taking it in for repairs if the issue persists.