Guide to Cleaning and Maintaining Your Robot Vacuum’s Filters
Warning: A non-numeric value encountered in /var/www/html/wp-content/themes/generatepress/inc/structure/post-meta.php on line 165
by Dwight Gibson
Have you noticed that your robot vacuum is not performing as well as it used to? That could be a sign that it’s time to clean or replace the filters. The filters in your robot vacuum play a crucial role in its function, ensuring effective cleaning and preventing damage to the device. But with so many different types of filters available, it can be confusing to figure out how to care for them properly. In this comprehensive guide, we will explore everything you need to know about cleaning and maintaining your robot vacuum filters. From tips on effective cleaning to step-by-step instructions for different types of filters, this guide has got you covered. So, let’s dive in and ensure that your robot vacuum is functioning at its best!
Table of Contents
Why Cleaning and Maintaining Your Robot Vacuum’s Filters is Important
Cleaning and maintaining your robot vacuum’s filters may seem like a tedious task, but it is crucial for the overall performance and lifespan of your device. By regularly cleaning the filters, you not only ensure effective filtration but also prevent dust and debris from accumulating and affecting your vacuum’s motor. Neglecting to clean your filters regularly can result in your robot vacuum not working as well as it should or even breaking down completely. In this section, we will explore the benefits of cleaning and maintaining your robot vacuum’s filters and the different types of filters that require special attention. To learn more about robot vacuum maintenance, check out our article on tips to keep your robot vacuum running smoothly.
Effective Filtration
Clean and well-maintained filters are essential for effective filtration in robot vacuums. As the vacuum moves around your home, it picks up all sorts of debris from floors, carpets, and upholstery. If the filter is dirty or clogged, it won’t trap these particles effectively, and they can spread around your home. This can lead to health problems such as allergies, respiratory issues, and asthma, especially if you have pets or small children at home.
Here is a table that explains the importance of effective filtration in robot vacuums:
Importance of Effective Filtration in Robot Vacuums
Explanation
Reduces Indoor Pollution
A dirty filter can spread dust, dirt, and debris around your home instead of trapping it.
Improves Indoor Air Quality
A clean filter traps allergens, dust, and other fine particles, leading to better indoor air quality.
Protects Your Health
Clean filters are important for people with allergies, asthma, or other respiratory conditions, as they help prevent the spread of pollutants that can exacerbate these conditions.
Increases the Lifespan of Your Robot Vacuum
A clean filter extends the lifespan of your vacuum’s motor and other parts, reducing the risk of breakdowns and expensive repairs.
Not only does effective filtration prevent the spread of dust and debris around your home, but it also protects your health and extends the lifespan of your robot vacuum. To learn more about the benefits of robot vacuum maintenance, check out our article on the importance of robot vacuum maintenance.
Extended Lifespan
Keeping your robot vacuum’s filters clean can go a long way in extending its lifespan. By regularly cleaning and maintaining the filters, you can prevent harmful debris and dust from building up and causing costly damage to your machine. According to a study, vacuum cleaners have an average lifespan of 8 years. However, with proper maintenance, they can last much longer.
The following table illustrates how cleaning and maintaining your robot vacuum’s filters can help extend its lifespan:
Maintenance
Lifespan Increase
Regular cleaning and maintenance of pre-motor filters
6 months to 2 years
Regular cleaning and maintenance of post-motor filters
1 to 2 years
Regular cleaning and maintenance of HEPA filters
2 to 3 years
As you can see from the table, regular cleaning and maintenance of your robot vacuum’s filters can effectively increase the lifespan of your machine by several months to years. By doing this, you can avoid the hassle and cost of purchasing a new one too soon.
Cleaning and maintenance of filters may also help prevent other parts of the robot vacuum from breaking down due to clogging or overheating caused by dirty filters. An unmaintained robot vacuum may suffer from problems such as decreased suction power, overheating, and even complete breakdown.
It is crucial for robot vacuum owners to pay attention to the maintenance of their machines, including the cleaning and replacement of filters. Regular cleaning and maintenance can help prevent damage and extend the life of your robot vacuum.
If you want to learn more about the benefits of robot vacuums and traditional vacuums maintenance, you can check out our article on robot vs. traditional vacuums maintenance. And for more information on the benefits of owning a robot vacuum, check out our article on the benefits of robot vacuums.
Better Performance
Ensuring your robot vacuum’s filters are clean and well-maintained can significantly improve its performance. A vacuum with dirty filters struggles to pick up debris and dust, making it less effective at cleaning your home. Clogged filters can cause your vacuum to work harder than necessary, reducing the lifespan of the motor and other components. In this section, we will explore how clean filters can lead to better performance in your robot vacuum by detailing the following points:
Performance Boost
Benefits
Improved Suction
Filters tend to clog over time as dust and debris accumulate inside them. When the filters are clogged, the vacuum’s suction is compromised. By cleaning and maintaining the filters regularly, you will ensure effective filtration and increase suction power. This ensures your robot vacuum picks up all the debris and dust when cleaning your home, leaving behind spotless floors and carpets.
Longer Battery Life
Clogged filters force the robot vacuum to work harder than it’s supposed to, which results in a faster battery drain. As a result, you will need to recharge the vacuum more frequently, which can be a hassle. However, clean filters enable the vacuum to work with greater efficiency, drawing less power from the battery and reducing the need for frequent recharges. This means your robot vacuum can run for longer periods between charges and clean your home more effectively.
Quieter Operation
A vacuum with clean, functioning filters also operates more quietly than one with clogged filters. This is because a robot vacuum with clogged filters needs to work hard to pick up dust and debris while maintaining the same suction power. Consequently, the motor has to work harder, creating more noise. However, by cleaning and maintaining your robot vacuum’s filters, you can enjoy a quieter and more efficient vacuuming experience.
By focusing on cleaning and maintaining your robot vacuum’s filters, you can enjoy cleaner floors, longer battery life, smoother operation, and ultimately better performance from your robot vacuum. Taking care of your vacuum’s filters will also ensure that it lasts longer and performs flawlessly over an extended period. For more details on how to maintain your robot vacuum, check out our article on robot vacuum maintenance fixes. And if you’re wondering how robot vacuums compare to traditional vacuums, we’ve got you covered with our detailed article on traditional vs robot vacuums.
Types of Filters in Robot Vacuums
As you delve deeper into the world of robot vacuums, you’ll notice that these cleaning devices come with different types of filters that serve different purposes. These filters play a crucial role in keeping your home clean by trapping dirt, dust, and other particles. Each filter has a specific task and knowing how it works will help you choose the right one for your needs. Let’s take a closer look at the different types of filters in robot vacuums and how they improve the overall performance of your machine.
Pre-Motor Filters
Pre-motor filters are an essential part of any robot vacuum cleaning system. They prevent dirt, dust, and debris from getting into the motor and other crucial parts of the vacuum. This filter type is typically made of foam or felt, which is washable and reusable. Pre-motor filters need to be cleaned regularly for the robot vacuum to function effectively.
When to Clean:
How to Clean:
If the robot vacuum’s suction power decreases
Remove the filter and tap gently to remove any loose dust and debris. Rinse the filter under running water until the water runs clear. Squeeze out any excess water and let it air dry completely before reinstalling it.
Every 3-6 months or as needed
Wash the filter as described above.
Regular maintenance of pre-motor filters will improve the robot vacuum’s performance and extend its lifespan. When a pre-motor filter is clogged, it restricts air flow into the vacuum’s motor, which can lead to overheating and damage over time. Cleaning this filter regularly ensures that your robot vacuum operates at optimum efficiency. It is important to note that pre-motor filters are washable and reusable, but will eventually need to be replaced as they lose effectiveness.
Post-Motor Filters
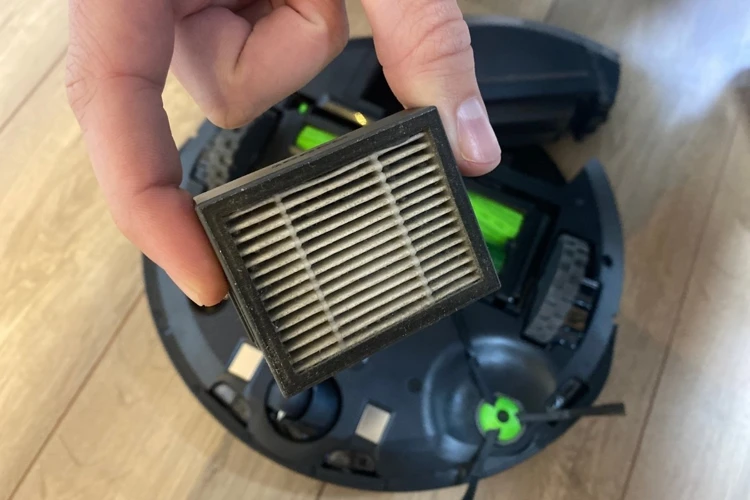
Post-motor filters are responsible for capturing fine particles that have passed through the robot vacuum’s exhaust. Unlike pre-motor filters, which are situated close to the suction source, post-motor filters are located after the vacuum’s motor, in the exhaust path. As a result, they play a crucial role in improving indoor air quality by removing allergens, dust, and other pollutants.
Types of Post-Motor Filters:
Foam filter: This type of filter is the simplest and the most basic post-motor filter. It is a disposable filter made of foam that traps large particles and prevents them from being discharged into the air.
HEPA filter: High-Efficiency Particulate Air (HEPA) filters are the most effective type of filter for capturing tiny particles as small as 0.3 microns. HEPA filters are made of a dense mat of fine fibers that trap microscopic particles, ensuring that the air that is expelled from the vacuum is clean and healthy.
When to Clean and Replace Post-Motor Filters:
It’s important to clean and replace post-motor filters regularly to ensure that your robot vacuum is operating efficiently. Over time, the filters will become clogged with dirt and debris, which can decrease the vacuum’s suction power and reduce its overall performance.
Here are some general guidelines to follow:
Foam filter: Foam filters are typically disposable and should be replaced every three to six months, depending on usage. However, if you notice that the filter is dirty, it’s a good idea to replace it sooner.
HEPA filter: HEPA filters can last up to a year, but it’s recommended to check them every three months and replace them as needed. If you have pets, allergies, or live in a dusty environment, you may need to replace the HEPA filter more frequently.
How to Clean Post-Motor Filters:
Cleaning post-motor filters is a straightforward process that requires minimal effort. Here’s how to do it:
Turn off the robot vacuum and unplug it from the power source.
Locate the post-motor filter. Depending on the model of your robot vacuum, it may be situated in the dustbin or housed separately.
Remove the filter from its housing and tap it gently to dislodge any loose debris. Alternatively, you can use a soft-bristled brush to brush away any dirt and dust.
Rinse the filter under running water, taking care not to use hot water, as this can cause the filter to shrink and deform. Use a gentle stream of water to avoid damaging the filter.
Allow the filter to air dry completely before reinstalling it.
Tips for Effective Cleaning:
Don’t use soap or detergent to clean post-motor filters, as this can damage the filter material.
Never use a hair dryer or other heating source to dry the filter, as this can cause it to shrink and deform.
Always wait until the filter is completely dry before reinstalling it, as moisture can encourage mold growth and cause odors.
By regularly cleaning and replacing your robot vacuum’s post-motor filters, you can enjoy a healthier and more efficient home. Remember to refer to your robot vacuum’s user manual for specific instructions on cleaning and maintaining the filters.
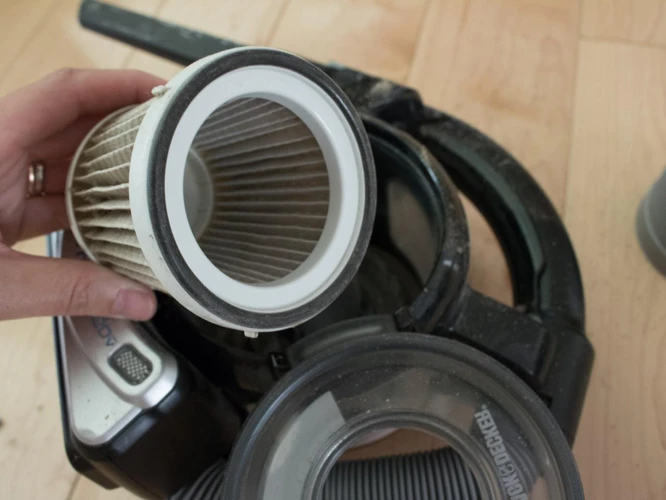
HEPA Filters
HEPA (High-Efficiency Particulate Air) filters are designed to capture particles as small as 0.3 microns, including dust, pet dander, and pollen. These filters are essential for people who suffer from allergies or have respiratory issues. Maintaining and replacing HEPA filters are important for maintaining the air quality in your home.
Here is a table that shows the benefits of HEPA filters:
BENEFITS
EXPLANATION
Effective Filtration
HEPA filters are 99.97% effective in capturing microscopic particles.
Improved Air Quality
HEPA filters are essential for people who suffer from allergies or have respiratory issues. These filters capture particles that can trigger symptoms.
Longer Lifespan
Cleaning and maintaining your HEPA filters can extend their lifespan, providing better filtration for a longer period.
Better Performance
Clean HEPA filters ensure that your robot vacuum is performing at its best, picking up even the smallest particles.
When it comes to cleaning and replacing HEPA filters, it is important to follow the manufacturer’s instructions. HEPA filters are not typically washable and should be replaced every 6-12 months, depending on usage. Some robot vacuums may have a filter replacement indicator, which will help you keep track of when it’s time to replace the filter.
Cleaning HEPA filters involves gently tapping them to remove any loose debris and wiping them down with a soft, damp cloth. You should never use soap or water to clean a HEPA filter as it can damage the filter and reduce its effectiveness. It’s important to let the filter completely dry before placing it back in the robot vacuum.
HEPA filters are essential for maintaining clean air in your home, and proper maintenance can make them last longer and perform better. Make sure to check your robot vacuum’s manual for specific instructions on how to maintain and replace HEPA filters, and don’t hesitate to contact customer support for any questions or concerns.
Other Types of Filters
Robot vacuums have become increasingly popular, and with their popularity comes the demand for high-quality filters. Apart from the pre-motor, post-motor, and HEPA filters, there are also other types of filters that can be found in some robot vacuums.
One type of filter that you might encounter is the foam filter. Foam filters are designed to capture large particles that can clog up other types of filters. They are washable but have a limited lifespan and need to be replaced regularly.
Another type of filter that you might find in a robot vacuum is the charcoal filter. Charcoal filters use activated charcoal to trap odors, chemicals, and gases. They are excellent for households with pets or smokers, as they can help to eliminate unwanted smells.
Some robot vacuums also come with electrostatic filters. These filters use static electricity to attract and capture dust particles, pollen, and other allergens. They are easy to clean and can be washed with water.
Lastly, some robot vacuums come with UV-C lights, which are used to kill bacteria and germs. These types of filters are particularly valuable for people with allergies or respiratory issues.
Each of these filters has a unique function and helps to keep your home clean and healthy. By cleaning and maintaining these filters regularly, you can prolong their lifespan and maximize their performance.
To summarize:
Filter Type
Description
Maintenance
Lifespan
Foam filter
Captures large particles
Washable, replace regularly
Limited
Charcoal filter
Traps odors, chemicals, and gases
Replace regularly
Limited
Electrostatic filter
Attracts and captures dust and allergens with static electricity
Washable
Long
UV-C filter
Kills bacteria and germs
Replace regularly
Limited
When to Clean and Replace Your Robot Vacuum’s Filters
It can be easy to overlook the filters in your robot vacuum, but they play a crucial role in keeping your home clean and maintaining the vacuum’s performance. To ensure that your robot vacuum is working as efficiently as possible, it’s important to know when to clean and replace the filters. Over time, the accumulation of dirt and debris can cause the filters to become clogged, reducing the vacuum’s suction power and ability to pick up dirt and debris. In this section, we’ll explore the different types of filters in robot vacuums and provide guidance on when to clean and replace them for optimal performance.
Pre-Motor Filters
Pre-motor filters are the first line of defense against dust and debris in your robot vacuum’s suction system. They are typically made of foam or felt material and are located near the motor in the robot vacuum. These filters are responsible for trapping larger particles before they reach the motor and can cause damage.
Types of Pre-Motor Filters
Materials Used
Recommended Cleaning Frequency
Standard Foam Filter
Foam
After every use or as often as needed
High-Efficiency Foam Filter
High-density foam
After every 3-4 uses, depending on household conditions
Felt Filter
Felt material
When visibly dirty or after every 5-7 uses
It is important to note that different robot vacuum models may have different types of pre-motor filters. It is crucial to refer to the user manual or manufacturer’s suggestions for the specific type of filter and recommended cleaning frequency. Neglecting to clean or replace pre-motor filters can result in the reduced suction power of your vacuum, which in turn affects its cleaning performance.
To clean pre-motor filters, gently remove them from the vacuum and tap off any excess debris. Rinse the filter under lukewarm water until the water runs clear. Allow the filter to air dry completely before replacing it. Avoid using any cleaning solutions or detergents as they can damage the filter’s material and reduce its effectiveness.
Regularly cleaning and maintaining the pre-motor filters in your robot vacuum ensures that it operates at optimal performance and reduces the need for more costly repairs or replacements.
Post-Motor Filters
Post-motor filters are an important component of your robot vacuum’s filtration system. They capture any particles that may have passed through the pre-motor filters, preventing them from being released back into the air. Without proper cleaning and maintenance, post-motor filters can become clogged and diminish the effectiveness of your robot vacuum’s suction.
There are several types of post-motor filters, including foam filters, felt filters, and combination filters. Foam filters are washable and reusable, while felt and combination filters need to be replaced regularly.
To determine when to clean or replace your post-motor filter, check your robot vacuum’s user manual for recommendations specific to your model. As a general rule of thumb, foam filters should be cleaned every 4-6 weeks, while felt and combination filters should be replaced every 3-6 months.
To clean foam filters, remove the filter from the robot vacuum and rinse it thoroughly with cool water until the water runs clear. Squeeze the excess water out of the filter and let it air dry completely before reinstalling.
For felt or combination filters, gently remove any loose debris with a soft brush or gently tap the filter against a clean surface. Do not wash these types of filters, as they can be damaged. Replace the filter if it cannot be cleaned or if it shows signs of wear and tear.
To replace a post-motor filter, refer to your robot vacuum’s user manual for specific instructions. Typically, these filters can be easily removed and replaced with a new one.
Regular cleaning and maintenance of your robot vacuum’s post-motor filters will ensure that it operates effectively and efficiently, providing you with a cleaner home and better air quality.
| | Foam Filters | Felt Filters | Combination Filters |
|——————–|————–|————–|———————|
| Cleaning Frequency | Every 4-6 weeks | N/A | N/A |
| Replacement | N/A | Every 3-6 months | Every 3-6 months |
HEPA Filters
HEPA filters, or High Efficiency Particulate Air filters, are some of the most effective filters on the market. These filters are designed to capture even the smallest particles, making them perfect for individuals with allergies or asthma. Here are some important things to know about HEPA filters:
HEPA filters can capture particles as small as 0.3 microns.
These filters are made up of a dense layer of fibers that trap particles as they pass through the filter.
HEPA filters are commonly found in air purifiers, vacuums, and other filtration systems.
If you or a family member suffer from allergies, upgrading your vacuum to one with a HEPA filter can greatly improve air quality in your home.
HEPA filters require regular cleaning and replacement to maintain their effectiveness. A clogged filter can actually decrease the performance of your vacuum.
Cleaning or replacing the filter in your vacuum can be done easily at home with a few simple tools.
To clean a HEPA filter, you can use a soft brush or gently tap it to remove loose particles. Do not use water or harsh cleaning products to clean the filter.
If your HEPA filter is damaged, warped, or excessively dirty, it should be replaced with a new one.
The lifespan of a HEPA filter depends on factors such as frequency of use and the amount of particles it captures, but it generally needs to be replaced every 6-12 months.
Remember, keeping your HEPA filter clean and replacing it as needed will ensure that your vacuum continues to effectively remove harmful particles from your home.
Other Filters
Robot vacuums can also have other types of filters besides pre-motor, post-motor, and HEPA filters. These filters may include foam, felt, or mesh filters, which can play a vital role in cleaning and maintaining your robot vacuum.
Benefits of Other Filters:
Help capture fine dust and debris that may not be picked up by the main brushroll or suction mechanism
Can prevent clogs and ensure optimal performance of your robot vacuum
If your robot vacuum has other types of filters that need cleaning or replacement, it’s essential to do it regularly. Here’s how to clean and replace them:
Step-by-Step Guide for Cleaning Other Filters:
Remove the filter from the robot vacuum’s bin or compartment, according to the manufacturer’s instructions.
Tap the filter gently against a hard surface to dislodge any loose dirt or debris.
Rinse the filter under cool running water from the opposite side until the water runs clear.
Avoid using hot water, as it can damage the filter.
Squeeze the excess water out of the filter.
Let the filter air dry completely, which may take several hours.
Re-insert the filter back into the robot vacuum, making sure it is placed securely and correctly.
Tips for Effective Cleaning:
Check the manufacturer’s manual for specific instructions on how to clean and replace the filters.
If the filter is torn, damaged, or worn out, replace it immediately.
To extend the lifespan of the filters, clean them at least once a month or more frequently if you have pets or allergies.
Clean the robot vacuum’s dustbin and brushroll after each use to prevent dirt and debris from building up and clogging the filters.
When to Replace Other Filters:
If the filter is damaged, worn out, or has holes that cannot be repaired, it is time to replace it.
If the filter appears discolored or has a foul odor, it’s also time to replace it.
Check the manufacturer’s manual for specific guidelines on how often to replace each filter.
Cleaning and maintaining your robot vacuum’s filters is essential for efficient operation and optimal performance. By following these simple steps, you can ensure that the other types of filters in your robot vacuum do their job and keep your home clean and fresh.
Signs of a Clogged Filter
Not cleaning your robot vacuum’s filters on a regular basis can lead to clogging which can negatively affect your robot vacuum’s performance. Here are some signs that could indicate your robot vacuum’s filters are clogged and need cleaning:
Weak suction power: One of the most prominent signs that your robot vacuum’s filters are clogged is weak suction power. If you notice that your robot vacuum isn’t picking up dirt and debris as effectively as it used to, it could be a sign that its filters need cleaning.
Dusty and dirty floors: Another sign that your robot vacuum’s filters might be clogged is when you notice a layer of dust and debris still present on your floors, even after the robot has cleaned them. Clogged filters not only reduce suction power, but also prevent the vacuum from removing all the dust and dirt from surfaces.
Strange noises: Clogged filters can create a buildup of pressure that makes your robot vacuum work harder. This extra effort can cause strange noises, such as grinding or squeaking, which are not usually present when the vacuum is working correctly.
Unpleasant odors: Another significant sign of a clogged filter is an unpleasant odor coming from your robot vacuum. This odor could be a result of a buildup of dirt and debris on the filter, which can become a breeding ground for bacteria. It is important to note that a bad smell could also be a signal of a more severe issue, so if you experience persistent unpleasant odors, it is best to seek expert assistance.
If you notice any of these signs, it is crucial to clean your robot vacuum’s filters as soon as possible. Neglecting to do so could lead to the breakdown of the vacuum’s motors and components due to overwork, potentially resulting in costly repairs.
How to Clean Your Robot Vacuum’s Filters
Maintaining a clean filter is key to ensuring that your robot vacuum operates at its best performance. Over time, dust, dirt, and debris can accumulate and clog the filters, leading to reduced suction power and decreased efficiency. Regular cleaning of your robot vacuum’s filters can prevent these issues and extend its lifespan. In this section, we’ll explore step-by-step guides on how to clean different types of filters in your robot vacuum, including pre-motor filters, post-motor filters, HEPA filters, and other filters. Additionally, we’ll provide tips for effective cleaning and suggest how often you should clean your robot vacuum’s filters.
Step-by-Step Guide for Pre-Motor Filters
Cleaning the pre-motor filter is an important part of maintaining your robot vacuum’s performance. To ensure it’s done well, follow these steps:
Step 1: Turn off your robot vacuum and unplug it from the charger.
Step 2: Locate the pre-motor filter. This is usually located at the bottom or top of the dustbin or in the intake area.
Step 3: Remove the pre-motor filter from the vacuum. This may involve sliding it out or unclipping it.
Step 4: Tap the filter gently to remove any large dust particles.
Step 5: Rinse the filter with warm water. Be gentle and avoid using soap or other cleaning agents.
Step 6: If the filter is still dirty, gently scrub it using a soft-bristled brush or toothbrush.
Step 7: Rinse again until the water runs clear.
Step 8: Squeeze out the excess water.
Step 9: Leave the filter to air-dry completely. This may take several hours – make sure it’s completely dry before replacing it in the vacuum.
Step 10: Once the filter is completely dry, replace it into its original position and close any clips, locks, or holders that keep it in place.
Following these steps will help you effectively clean the pre-motor filter in your robot vacuum. Remember to clean this filter regularly to keep your robot vacuum’s suction power strong and boost its overall performance.
Step-by-Step Guide for Post-Motor Filters
When it comes to maintaining your robot vacuum’s post-motor filter, it’s important to follow a step-by-step process to ensure that you don’t accidentally damage the filter.
Step 1: First, locate the post-motor filter on your robot vacuum. This filter is typically located behind the dustbin or on the bottom of the vacuum.
Step 2: Once you have located the filter, carefully remove it from the vacuum. It is important to handle the filter gently to avoid causing any damage.
Step 3: Once you have removed the filter, take a closer look at it to check for any signs of damage or wear and tear. If the filter appears damaged, it will need to be replaced.
Step 4: To clean the filter, you can use a soft brush or a dry cloth to gently remove any dust and debris from the surface of the filter. Avoid using water or any cleaning solutions on the filter, as this can damage the filter’s ability to trap dust and allergens.
Step 5: If you notice that the filter is still dirty after brushing it off, you can use a vacuum cleaner with a soft brush attachment to remove any remaining debris.
Step 6: Once you have finished cleaning the filter, carefully place it back into the vacuum. Make sure that the filter is properly seated and secured in place to ensure that it functions correctly.
Step 7: Finally, turn on the vacuum and ensure that it is working properly. If the robot vacuum still isn’t picking up dirt and debris as effectively as it once did, you may need to replace the filter.
By following these steps, you can effectively clean and maintain your robot vacuum’s post-motor filter, helping to ensure that it continues to work as efficiently as possible.
Step-by-Step Guide for HEPA Filters
Cleaning the HEPA filter in your robot vacuum is an important step in maintaining effective filtration and extending the lifespan of your device. Here’s a step-by-step guide to help you keep your robot vacuum in top shape:
Step 1: Turn off your robot vacuum and unplug it from the charging dock.
Step 2: Locate the HEPA filter. Depending on the model and make of your robot vacuum, the HEPA filter may be located under the dustbin or on the side of the device.
Step 3: Remove the HEPA filter from its housing. Be gentle when handling the filter to avoid damaging it.
Step 4: Tap the HEPA filter gently on the side of a trash can or another surface to remove any loose dirt or debris.
Step 5: Use a soft-bristled brush or a clean, dry cloth to gently wipe away any remaining dust or debris on the filter. Make sure to remove any dirt or particles that may be stuck between the filter’s fibers.
Step 6: If the filter is particularly dirty, you can rinse it under running water. However, make sure to read the manufacturer’s instructions first to ensure that your particular filter can be rinsed without damaging it.
Step 7: After cleaning, allow the filter to air dry completely before replacing it back into the vacuum. This can take several hours, so plan accordingly.
Step 8: Once the filter is completely dry, insert it back into the vacuum and reassemble the device.
Step 9: Turn the vacuum back on and test it to ensure that it is functioning properly.
Remember to clean your HEPA filter regularly to maintain the best performance of your robot vacuum. Generally, it’s recommended to clean your HEPA filter after every few uses or as indicated by the manufacturer’s instructions. By regularly cleaning and maintaining your robot vacuum’s filters, you can keep it functioning at its best, and extend its lifespan, making it worth the investment.
Step-by-Step Guide for Other Filters
When it comes to cleaning the other filters in your robot vacuum, such as foam or carbon filters, the process can vary based on the brand and model of your vacuum. However, here are some general steps you can follow:
Refer to the Owner’s Manual: The first step is to always refer to the owner’s manual to understand the specific type of filter in your robot vacuum and any manufacturer guidelines for cleaning and maintenance.
Remove the filter: Depending on the design of the robot vacuum, you may need to open the dustbin or remove a cover to access the other filters. Once you have access to the filter, remove it from the vacuum.
Shake or brush the filter: Use a soft brush or gently shake the filter to remove any loose dust and debris.
Clean with water: Depending on the type of filter, you may be able to clean it with water. Run the filter under cold water and gently rub it to remove dirt and debris. Avoid using hot water or chemicals as this can damage the filter.
Let the filter dry: After cleaning the filter, gently squeeze out any excess water and allow it to air dry completely before reinstalling it into the robot vacuum.
Replace the filter: If the filter appears damaged or worn out, it may be time to replace it with a new one. Refer to the owner’s manual to ensure you purchase the correct replacement filter for your robot vacuum.
Remember to always refer to the specific guidelines provided by the manufacturer when cleaning or replacing filters in your robot vacuum. And don’t forget to clean the dustbin and brushroll as well, to ensure your vacuum is working effectively and efficiently.
How to Clean the Dustbin and Brushroll
Cleaning the dustbin and brushroll is an essential part of maintaining your robot vacuum. These components tend to accumulate a lot of debris, dust, and hair, which can affect the vacuum’s performance. Here’s how to clean them effectively:
Cleaning the Dustbin:
1. First, remove the dustbin from the robot vacuum.
2. Empty the contents of the dustbin into a trash can.
3. Use a soft-bristled brush or cloth to clean the dustbin thoroughly.
4. If necessary, use a damp cloth to wipe the interior of the dustbin.
5. Check the filter in the dustbin and replace it if necessary.
6. Once the dustbin is dry, reattach it to the robot vacuum.
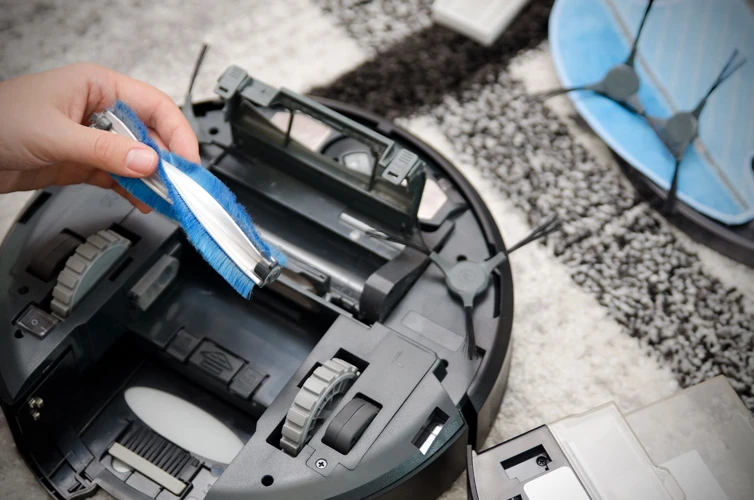
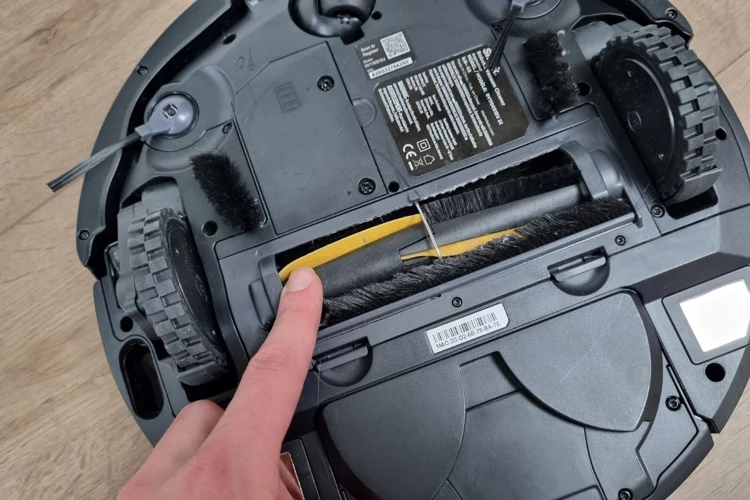
Cleaning the Brushroll:
1. Remove the brushroll from the robot vacuum.
2. Use a pair of scissors or a brush to remove any hair or debris that has accumulated around the brushroll.
3. Use a soft cloth to wipe down the brushroll and remove any remaining debris.
4. Check the brushroll for any signs of wear or damage, and replace it if necessary.
5. Once the brushroll is clean and in good condition, reattach it to the robot vacuum.
Tips for Effective Cleaning:
• Clean the dustbin and brushroll after each use to prevent buildup.
• Use a small brush or toothbrush to clean hard-to-reach areas.
• If the dustbin or brushroll is particularly dirty, you can soak it in warm, soapy water for a few minutes before cleaning it.
• Always make sure the dustbin and brushroll are completely dry before reattaching them to the robot vacuum.
By regularly cleaning and maintaining the dustbin and brushroll, you can ensure that your robot vacuum always performs at its best. Don’t neglect these important components, as they can make a big difference in how well your vacuum works.
Tips for Effective Cleaning
When it comes to cleaning and maintaining your robot vacuum’s filters, there are a few tips you can follow to ensure that the process is as effective as possible. These tips will help to remove as much debris as possible from the filters, thereby restoring suction power and improving the overall performance of your robot vacuum.
Tip 1: Always refer to the manufacturer’s instructions for cleaning and maintaining the filters. These instructions can vary depending on the type and model of the robot vacuum that you own.
Tip 2: Use a soft-bristled brush or a toothbrush to gently remove debris from the filters. Avoid using harsh chemicals or scrubbing too hard, as this can damage the filters.
Tip 3: Wash the filters with warm water and mild soap if the manufacturer’s instructions permit. Rinse thoroughly and allow the filters to air dry completely before reinserting them into the robot vacuum.
Tip 4: Consider purchasing extra filters so that you always have a clean filter ready to go. This will save you time and effort in the long run.
Tip 5: Clean the filters regularly, ideally once a week, to prevent excessive buildup of debris. This will help to ensure that your robot vacuum performs at its best at all times.
Tip 6: Take care when removing and inserting the filters to avoid damaging them or the vacuum itself. Follow the manufacturer’s instructions and be gentle to avoid causing any unnecessary wear and tear.
By following these tips, you can ensure that the cleaning and maintenance of your robot vacuum’s filters is as effective as possible. Doing so will help to keep your robot vacuum performing at its best and will prolong the life of the filters and the vacuum.
How Often to Clean Your Filters
Keeping your robot vacuum’s filters clean is crucial for optimal performance and longevity. But how often should you be cleaning your filters? Well, it depends on the type of filter and how frequently you use your robot vacuum.
In general, it’s recommended to clean your robot vacuum’s filters at least once a month. However, if you have pets, allergies, or a house that gets a lot of traffic, you may need to clean your filters more often. It’s also important to note that some filters may need to be cleaned or replaced more frequently than others.
Take a look at the following table for a general guideline on how often to clean your robot vacuum’s filters:
Filter Type
Cleaning Frequency
Pre-Motor Filters
Every 2-3 weeks
Post-Motor Filters
Every 2-3 months
HEPA Filters
Every 6-12 months
Other Filters
Check manufacturer’s instructions
Remember, these are just general guidelines and your specific vacuum and circumstances may require more frequent cleaning. It’s important to pay attention to your filters and monitor their condition regularly. If you notice decreased suction, unusual noises, or an unpleasant odor, it’s likely time to clean or replace one or more of your filters.
By following a regular cleaning schedule and monitoring your filters, you can ensure that your robot vacuum continues to perform at its best and provide the clean floors you desire.
How to Replace Your Robot Vacuum’s Filters
As much as we want our robot vacuums to work efficiently, there comes a time when the filters need to be replaced to maintain its functionality. Replacing the filters may seem daunting at first, but it’s actually a quick and easy process that will make a significant impact on the performance of your machine. In this section, we’ll provide you with a step-by-step guide on how to replace the different types of filters found in robot vacuums, including pre-motor filters, post-motor filters, HEPA filters, and other filters. So, let’s get started!
Step-by-Step Guide for Pre-Motor Filters
Proper maintenance of pre-motor filters is essential to ensure optimal performance of your robot vacuum. The pre-motor filter helps to capture and filter out larger particles before they reach the motor. Ideally, cleaning the pre-motor filter should be done after every use or at least once a week. Here is a step-by-step guide for cleaning the pre-motor filter:
Step 1:
Locate the pre-motor filter on your robot vacuum. It is typically located near the brushroll or at the back of the dustbin.
Step 2:
Remove the pre-motor filter from the robot vacuum. This can usually be done by pressing a release button or unlocking a latch.
Step 3:
Tap the filter gently on a hard surface, such as a trash can, to remove any loose dirt and debris.
Step 4:
Rinse the pre-motor filter under running water to remove any remaining dirt and debris. Be sure to use cool or lukewarm water and avoid using any cleaning products as they may damage the filter.
Step 5:
Allow the pre-motor filter to air dry completely before reinserting it back into the robot vacuum. This may take several hours or overnight.
By following these steps, you can ensure that your robot vacuum’s pre-motor filter is cleaned and maintained properly. Remember, a clean filter means better suction, which translates to a cleaner home.
Step-by-Step Guide for Post-Motor Filters
Cleaning your robot vacuum’s post-motor filter is essential to ensure optimal performance and prevent damage to your vacuum’s motor. Here’s a step-by-step guide on how to clean this type of filter:
Step
Description
1
Check your vacuum’s user manual to identify the location of the post-motor filter.
2
Remove the dustbin or the filter compartment cover to access the post-motor filter.
3
Remove the post-motor filter from its housing. In some cases, the filter may be secured in place by clips or screws, so make sure to read the user manual or check for any visible attachments before attempting to remove it.
4
Using a soft brush or the crevice tool attachment of your vacuum cleaner, gently remove any visible dirt or debris from the filter. Make sure to clean both sides of the filter thoroughly.
5
Rinse the post-motor filter under running water to remove any remaining dirt or dust particles. Do not use soap or any cleaning agents, as they can damage the filter’s mesh and reduce its effectiveness.
6
Shake off the excess water and let the post-motor filter air dry completely. Do not attempt to use the filter if it’s still wet, as it can promote mold growth and lead to unpleasant odors.
7
Once the post-motor filter is completely dry, reinstall it in its housing and secure it in place according to the manufacturer’s instructions.
Remember to clean your robot vacuum’s post-motor filter at least once a month to maintain optimal suction power and prolong the life of your vacuum’s motor. If you notice that the filter is damaged, torn, or excessively dirty, it may be time to replace it with a new one. Check your user manual or contact the manufacturer for guidance on how to properly dispose of the old filter and choose the appropriate replacement model.
Step-by-Step Guide for HEPA Filters
Maintaining your robot vacuum’s HEPA filter is crucial to ensure that it continues to effectively capture allergens and other small particles. Here is a step-by-step guide on how to clean your robot vacuum’s HEPA filter.
Step 1: Turn off and unplug your robot vacuum to ensure your safety.
Step 2: Locate the HEPA filter, which is typically located near the dustbin.
Step 3: Remove the filter from the robot vacuum.
Step 4: Gently tap the filter to remove any loose debris and dirt.
Step 5: Rinse the filter under cool running water. Be sure to rinse from the clean side to the dirty side to avoid pushing any debris into the filter.
Step 6: Use a soft brush, such as a toothbrush, to gently scrub the filter. Be sure not to apply too much pressure as this can damage the filter.
Step 7: Rinse the filter thoroughly again under cool running water.
Step 8: Gently shake the filter to remove any excess water.
Step 9: Allow the filter to air dry completely before installing it back into the robot vacuum.
It’s important to note that HEPA filters should be replaced every three to six months, depending on usage. Keeping track of when you last replaced your HEPA filter is important to ensure that your robot vacuum is operating at peak performance.
Regularly cleaning and replacing your robot vacuum’s filters is an essential part of proper maintenance. By following these steps, you can ensure that your robot vacuum’s HEPA filter is effectively capturing airborne allergens and other small particles, so you and your family can breathe easy.
Step-by-Step Guide for Other Filters
Cleaning and maintaining the other filters in your robot vacuum is just as important as cleaning the pre-motor, post-motor, and HEPA filters. The other filters may vary depending on the model and brand of your robot vacuum. Here is a step-by-step guide on how to clean and maintain these filters:
Step
Instructions
Step 1:
Refer to your robot vacuum’s user manual to identify the other filters in your machine.
Step 2:
Remove the filter from the machine by following the instructions in your user manual.
Step 3:
Tap the filter gently against a hard surface, such as a trash can, to remove any loose dirt or debris.
Step 4:
Use a soft-bristled brush to gently remove any remaining dirt or debris from the filter.
Step 5:
Rinse the filter with water, making sure to not use hot water or any cleaning solutions.
Step 6:
Shake the filter gently to remove any excess water, then let it air-dry completely before replacing it in your robot vacuum.
It is important to note that the cleaning instructions for other filters may vary depending on the type, brand, and model of the robot vacuum. Make sure to always refer to your user manual for specific cleaning and maintenance instructions.
How Often to Replace Your Filters
Knowing when to replace your robot vacuum’s filters is crucial for maintaining its performance, filtration effectiveness, and lifespan. Replacing the filters on schedule will also prevent damage to your robot vacuum’s motor.
The frequency of filter replacement depends on several factors, such as the frequency of use, the type of filter, the level of dust and debris in your home, and whether or not you have pets. As a general rule of thumb, it is recommended that you replace your filters every three to six months, or more frequently if you have pets.
Pre-Motor Filters: The pre-motor filter is responsible for removing larger dirt particles before they enter the machine. The frequency of pre-motor filter replacement depends on usage and your home environment. We recommend checking the pre-motor filter every two months and replacing it every three to six months.
Post-Motor Filters: The post-motor filter captures fine dust particles and prevents them from being released into the air. The frequency of replacement depends on usage and your home environment. We recommend checking the post-motor filter every two months and replacing it every three to six months.
HEPA Filters: High-efficiency particulate air (HEPA) filters capture fine dust, pollen, and other allergens. The frequency of HEPA filter replacement depends on several factors such as usage and the level of allergens in your home. We recommend that you check the HEPA filter every two months and replace it every six to twelve months.
Other Filters: Some robot vacuums may have additional filters, such as foam or charcoal filters for removing odors. The frequency of replacement for these filters can vary depending on usage and your home environment. Check your manufacturer’s manual for recommendations.
Signs of a Clogged Filter: If you notice reduced suction power or airflow, it may be time to check and replace your filters. Another sign of a clogged filter is if you notice dust or debris escaping from the vacuum. If you notice any of these signs, it’s best to check and replace your filters sooner rather than later.
Maintaining your robot vacuum’s filters is critical to its performance, longevity, and effectiveness. Knowing when to replace your filters and following the manufacturer’s recommendations is key to keeping your robot vacuum functioning at its best. Don’t forget to routinely check your filters, and enjoy a clean home with your robot vacuum!
Type of Filter
Frequency of Replacement
Pre-Motor Filter
Check every two months; replace every 3-6 months
Post-Motor Filter
Check every two months; replace every 3-6 months
HEPA Filter
Check every two months; replace every 6-12 months
Other Filters
Check manufacturer’s recommendations
Conclusion
As we come to the end of this guide on how to clean and maintain the filters in your robot vacuum, it’s clear that taking care of your vacuum’s filters is essential to ensure its effective performance and longevity. By following the steps outlined in this article, you can rest assured that your robot vacuum will continue to operate at its best. Let’s take a moment to summarize the importance of maintaining your filters and the benefits it can have for both your vacuum and your home.
Benefits of Cleaning and Maintaining Your Robot Vacuum’s Filters
Regularly cleaning and maintaining your robot vacuum’s filters can offer a range of benefits that can help prolong its lifespan and improve its performance. Here are some of the key benefits of regular filter maintenance:
Effective Filtration: Clean filters can effectively trap dust, dirt, allergens, and other particles, preventing them from recirculating back into your indoor air. This means cleaner and healthier air for you and your family.
Extended Lifespan: Regular filter maintenance can help prolong the lifespan of your robot vacuum by preventing dirt and debris from clogging the filters and other system components. This can also help prevent the motor from overheating, leading to potential damage or failures.
Better Performance: Clogged filters can cause your robot vacuum to lose suction power and become less effective at cleaning your floors. By regularly cleaning and maintaining your filters, you can keep your robot vacuum running at peak performance and ensure that it consistently picks up all of the dirt and debris in your home.
Cost Savings: Regular filter maintenance can help prevent costly repairs or replacements down the line. By taking care of your robot vacuum’s filters, you can help prevent damage to other system components, ensuring that it runs effectively for as long as possible.
Health Benefits: Airborne particles captured by filters can cause or exacerbate allergies and respiratory problems, such as asthma. By keeping your robot vacuum’s filters clean, you can help create a healthier environment for you and your family.
Cleaning and maintaining your robot vacuum’s filters is a simple and effective way to improve its performance and lifespan, while also promoting a healthier living space. Don’t forget to follow the recommended cleaning and replacement schedules for your specific model, and take good care of your robot vacuum to ensure it lasts for years to come.
Final Thoughts
As we conclude this article on cleaning and maintaining the filters in your robot vacuum, it is important to emphasize the importance of regularly maintaining your robot vacuum’s filters. By doing so, you can ensure your robot vacuum is performing at its optimal level, picking up even the smallest particles, and extending the life of your vacuum.
Remember these key takeaways:
Cleaning and maintaining your robot vacuum’s filters is essential for effective filtration, extended lifespan, and better performance.
Know the types of filters in your robot vacuum and when to clean and replace them.
Follow the step-by-step guide for cleaning and replacing each filter.
Regularly clean your dustbin and brushroll to prevent clogs and ensure optimal performance.
Pro tip: Set a reminder on your calendar to clean and maintain your filters every 1-3 months.
By taking the time to properly maintain your robot vacuum’s filters, you can ensure it continues to clean your floors efficiently and effectively for years to come. As a result, you’ll also save money in the long run by extending the lifespan of your robot vacuum.
So, make sure to give your robot vacuum some necessary TLC and stay on top of its filter maintenance. Your floors (and wallet) will thank you for it.
Frequently Asked Questions
1. How often should I clean my robot vacuum’s filters?
It is recommended to clean your robot vacuum’s filters after every use, or at least once a week if you use it regularly.
2. Can I wash my robot vacuum’s filters?
Yes, most filters can be washed with water, but make sure to check the manufacturer’s instructions first.
3. How do I know when it’s time to replace my robot vacuum’s filters?
You should replace your robot vacuum’s filters when they become damaged, worn out, or if you notice a decline in its performance.
4. What are pre-motor filters and why are they important?
Pre-motor filters are the first line of defense against dust and debris. They help prevent larger particles from reaching the motor, which can cause damage over time.
5. Why are HEPA filters beneficial for those with allergies or pets?
HEPA filters can capture particles as small as 0.3 microns, which can help reduce allergens and pet dander in the air.
6. Can I use my robot vacuum without any filters?
No, using your robot vacuum without filters can damage the motor and decrease its lifespan.
7. Are there any special precautions I should take when cleaning HEPA filters?
Yes, HEPA filters are delicate and can be easily damaged. Use a soft-bristled brush to gently remove debris, and avoid washing if possible.
8. How often should I replace my robot vacuum’s HEPA filter?
It is recommended to replace your robot vacuum’s HEPA filter at least once a year, or more frequently if you have pets or allergies.
9. Can I use compressed air to clean my robot vacuum’s filters?
It is not recommended to use compressed air to clean your robot vacuum’s filters, as it can damage the delicate filter fibers and cause them to tear.
10. Do I need to clean my robot vacuum’s dustbin and brushroll as often as the filters?
Yes, it is important to clean your robot vacuum’s dustbin and brushroll after every use, or at least once a week if you use it regularly. This helps prevent clogs and ensures optimal performance.