How to Extend the Lifespan of Your Wet and Dry Vacuum Cleaner
Warning: A non-numeric value encountered in /var/www/html/wp-content/themes/generatepress/inc/structure/post-meta.php on line 165
by Dwight Gibson
As we go about our daily cleaning tasks, we rely heavily on our trusty wet and dry vacuum cleaners to keep our living spaces spick and span. However, how often do we stop to think about the maintenance of these essential cleaning tools? The truth is, without proper upkeep, these machines can easily break down, leading to costly repairs or even replacement. That’s why we’ve put together a list of 10 crucial maintenance tips that will help you extend the lifespan of your wet and dry vacuum cleaner and keep it performing at peak levels for years to come.
Table of Contents
Why Is Maintaining Your Wet and Dry Vacuum Cleaner Important?
Maintaining your wet and dry vacuum cleaner is essential to ensure it performs at its best and lasts for years to come. Neglecting maintenance may lead to breakdowns, costly repairs or even a shorter lifespan for your vacuum cleaner. Here are a few reasons why it is important to invest your time in maintaining your wet and dry vacuum cleaner.
Prevents breakdowns and costly repairs: Regular maintenance of your wet and dry vacuum cleaner can help prevent breakdowns and malfunctions. Over time, debris and dust may accumulate in the filters, hoses, and attachments, which can cause clogging and restrict the airflow, leading to a loss in suction power. Regular cleaning of these parts can help prevent such issues and keep your vacuum cleaner functioning optimally.
Improves performance and suction power: Maintaining your vacuum cleaner can ensure that it operates at its highest level of performance. The cleaner the hoses, attachments, dustbin, and filters are, the better your vacuum cleaner will function. Regular cleaning of these parts can help your vacuum cleaner maintain its suction power, picking up more dirt and debris.
Increases the lifespan of your vacuum cleaner: Regular maintenance can extend the life of your wet and dry vacuum cleaner. A well-maintained vacuum cleaner is less likely to break down, and with the improved performance, it is less likely to overheat, which can cause damage to the motor. Proper maintenance such as regular cleaning, lubrication, and replacement of worn out parts can keep your vacuum cleaner functioning for a longer time.
Maintaining your wet and dry vacuum cleaner is vital to keep it running efficiently for a long time. The effort to maintain your vacuum cleaner is minimal and can make a massive difference in the longevity and performance of your vacuum cleaner. It is essential to understand that cleaning a wet and dry vacuum cleaner is not the same as cleaning a traditional vacuum cleaner. It is vital to follow the correct maintenance procedures. If you are unsure, you can check out some of the informative links below to know more about wet and dry vacuum cleaners, how to choose the best ones and their benefits over traditional vacuum cleaners.
Prevents breakdowns and costly repairs
Having a wet and dry vacuum cleaner at home is a blessing, but it comes with its own set of responsibilities, and maintenance is one of them. It is crucial to carry out regular maintenance to ensure that your vacuum cleaner works efficiently for years to come. One of the major benefits of maintaining your wet and dry vacuum cleaner is that it prevents any unexpected breakdowns and saves you from costly repairs. It’s always better to be proactive when it comes to maintenance rather than reactive. Regular maintenance not only saves you from the hassle of sudden breakdowns but also prolongs the lifespan of your beloved vacuum cleaner. You can learn more about the benefits of owning a wet and dry vacuum cleaner and how to choose the best one from our guide on the topic.
Improves performance and suction power
Regular maintenance of your wet and dry vacuum cleaner plays a crucial role in improving its performance and suction power. By keeping your vacuum cleaner in top shape, you can ensure that it is working to its full potential, no matter how often you use it.
Here are some ways in which maintaining your wet and dry vacuum cleaner can improve its performance and suction power:
1. Prevents Clogging: Over time, dirt, dust, and debris can accumulate in the various parts of your vacuum cleaner. This can lead to clogging, which can reduce the suction power of your vacuum. By cleaning the filter and emptying the dustbin on a regular basis, you can prevent clogging and ensure that your vacuum is functioning at its best.
2. Increases Airflow: A clogged filter or dustbin can restrict the airflow in your vacuum cleaner, which can impact its suction power. Regular maintenance ensures that air can flow freely through the vacuum, which enhances its overall performance.
3. Reduces Wear and Tear: When your vacuum cleaner is clogged or not functioning at its optimal level, it has to work harder to pick up debris. This can lead to faster wear and tear on the motor, which can ultimately reduce the lifespan of your vacuum cleaner. By maintaining your vacuum cleaner regularly, you can reduce the workload on the motor and extend its life.
4. Improves Filtration: Regular cleaning and maintenance of your vacuum cleaner’s filter can ensure that it is working effectively to trap dust and allergens. This can improve the indoor air quality of your home and reduce the risk of respiratory issues for you and your family.
5. Enhances Functionality: A well-maintained vacuum cleaner ensures that all of its parts are working correctly and smoothly, which can enhance its functionality. This can make cleaning quicker and more efficient, saving you time and effort.
By following the maintenance tips above, you can ensure that your wet and dry vacuum cleaner is working to its full potential. Not only will this improve its performance and suction power, but it can also extend its lifespan and save you money in the long run. For more information on choosing the best wet and dry vacuum for your needs, check out our article on how to choose the best wet and dry vacuum cleaner.
Increases the lifespan of your vacuum cleaner
Regularly maintaining your wet and dry vacuum cleaner not only helps improve its performance and suction power but also extends its lifespan. The following are some ways that proper maintenance can help increase the lifespan of your vacuum cleaner:
Maintenance Tips
How It Increases Lifespan
Empty the Dustbin Regularly
Prevents clogging and stress on the motor
Clean the Filter
Improves airflow and prevents blockages in the motor
Check the Hoses and Attachments
Identifies and fixes any potential leaks or blockages
Replace Worn Out Parts
Prevents further damage and stress to the machine
Lubricate Moving Parts
Helps reduce friction and wear on the parts
Check and Replace Belts, if required
Keeps the vacuum running smoothly and prevents damage to other parts
Don’t Overload the Dustbin
Reduces strain on the motor and prevents overheating
Clean the Brushroll
Keeps the brushroll from getting tangled and possibly damaging the motor
Use the Right Cleaning Agents
Prevents damage to the machine and extends its lifespan
Store the Vacuum Cleaner Properly
Protects the machine from dust, moisture, and other elements that can cause damage over time
By following these maintenance tips, you can ensure that your wet and dry vacuum cleaner lasts longer, saving you money in the long run. For more information on wet and dry vacuums, check out our article “Top 10 Wet and Dry Vacs for Home Use” or read our comparison guide on “Wet and Dry vs. Traditional Vacuums.”
10 Wet and Dry Vacuum Cleaner Maintenance Tips
Maintaining your wet and dry vacuum cleaner is essential for making sure it functions at its best over the years. Regular maintenance can help prevent costly repairs, improve suction power and extend the lifespan of your vacuum cleaner. To keep your vacuum cleaner in top shape, here are some maintenance tips that you can follow. By implementing these tips, you can ensure that your vacuum cleaner works efficiently and effectively, every single time. So, let’s dive right in and discover how to keep your wet and dry vacuum cleaner running like new.
1. Empty the Dustbin Regularly
One of the most important steps in maintaining your wet and dry vacuum cleaner is to regularly empty the dustbin. Failure to do so can cause suction problems and even potentially damage the vacuum cleaner. That’s why we cannot stress enough the importance of this maintenance tip, especially if you use your vacuum cleaner frequently.
Why is it important to empty the dustbin regularly?
The dustbin is where all the dirt, debris, and dust are collected when you vacuum. When the dustbin is full, suction power is reduced and the vacuum cleaner has to work harder to pick up more dirt. This can lead to overheating of the motor, which can cause damage and costly repairs.
The frequency of emptying the dustbin depends on how much dirt and debris your vacuum cleaner accumulates. A good rule of thumb is to empty it after every use or when it’s half full. This will help ensure optimal performance and extend the lifespan of your vacuum cleaner.
How to empty the dustbin
Emptying the dustbin is a simple process, but it’s important to do it correctly to avoid making a mess or damaging the vacuum cleaner. Follow these steps for safe and effective emptying of the dustbin:
Step 1:
Turn off the vacuum cleaner and unplug it from the power source
Step 2:
Locate the dustbin, which is usually located at the back or bottom of the vacuum cleaner, and remove it
Step 3:
Take the dustbin to a trash can or waste bin and empty the contents carefully. Depending on the type of debris, you may need to wear gloves for protection
Step 4:
Clean the dustbin with soap and water or a disinfectant cleaner to remove any remaining dirt or odor. Make sure to rinse thoroughly and let it dry completely before re-attaching it to the vacuum cleaner
Step 5:
Reattach the dustbin securely to the vacuum cleaner
In addition to these steps, it’s important to check the dustbin for any damage or wear and tear that may need to be repaired or replaced.
By following this simple yet crucial maintenance tip of regularly emptying the dustbin, you can ensure that your wet and dry vacuum cleaner operates at its best and lasts for years to come.
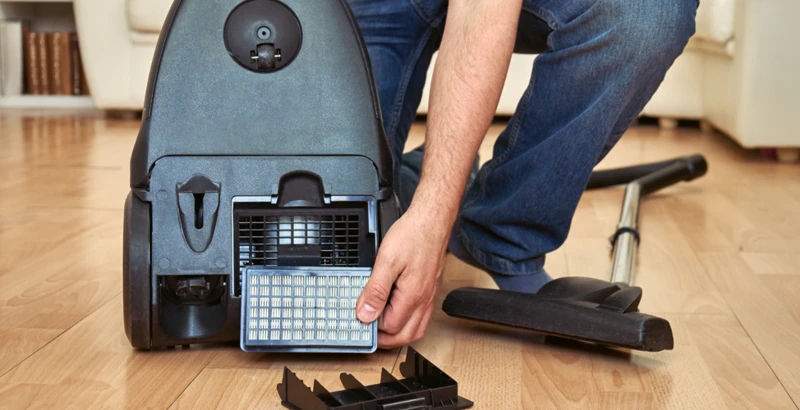
2. Clean the Filter
Cleaning the filter of your wet and dry vacuum cleaner is an essential maintenance step that should not be overlooked. Over time, the filter can become clogged with dust, dirt, and debris, which can affect the vacuum’s suction power and reduce its efficiency. Here are some steps to follow when cleaning the filter:
Step 1: First, unplug the vacuum cleaner from the power source and remove the filter from the unit. Consult your owner’s manual for the location of the filter and the proper way to remove it.
Step 2: Check the filter for any tears, holes or other signs of wear, and replace it if necessary. You can order a new filter from the manufacturer or at a local appliance store.
Step 3: Use a soft brush or a clean, dry cloth to gently remove any loose dust or debris from the filter. Be careful not to damage the filter during this process.
Step 4: Now it’s time to wash the filter. First, check if the filter is washable or if it is meant to be replaced. If it’s washable, rinse it under running water, using warm water and mild soap if needed. Be sure to rinse thoroughly, until there are no more suds.
Step 5: Allow the filter to air dry completely before putting it back into the vacuum cleaner. Never use the vacuum cleaner with a wet filter or before it’s completely dry.
Step 6: Finally, while the filter is out, it’s a good idea to wipe down the inside of the unit where the filter sits. Make sure this area is free of dust and debris as well.
Cleaning the filter is a simple process that you can do at home with just a little bit of time and effort. Regularly cleaning the filter can improve the performance and suction power of your wet and dry vacuum, allowing you to clean your home more efficiently.
3. Check the Hoses and Attachments
As part of your wet and dry vacuum cleaner maintenance routine, it’s important to regularly check the hoses and attachments to make sure they’re in good condition and functioning properly. Neglecting this step could result in reduced suction power or even damage to the vacuum cleaner.
The Importance of Checking the Hoses and Attachments
The hoses and attachments are crucial components of your vacuum cleaner, as they allow you to reach tight spaces and effectively remove dirt and debris from various surfaces. Over time, however, these parts can become clogged or damaged, leading to reduced performance.
How to Check the Hoses and Attachments
To check the hoses and attachments, start by examining them for any visible signs of wear and tear, such as cracks, tears, or holes. If you notice any damage, it’s best to replace the affected parts as soon as possible.
Next, disconnect the hoses and attachments and inspect them for any obstructions or clogs. Use a long, flexible object like a straightened coat-hanger or a rod to remove any debris that may be stuck inside.
Table: Signs of Damage to Hoses and Attachments
Sign of Damage
Possible Cause
Solution
Cracks, tears or holes
Normal wear and tear or improper storage
Replace the affected part
Reduced suction power
Clogs or obstructions
Clean the hoses and attachments
Brittle or stiff texture
Exposure to high temperatures or UV radiation
Replace the affected part
Loose or wobbly fittings
Normal wear and tear or improper use
Tighten or replace the affected fitting
Preventative Measures
To prevent damage to your vacuum cleaner hoses and attachments, it’s important to store them properly and handle them with care. Always disconnect the hoses and attachments gently, and avoid scraping them across rough surfaces. Additionally, don’t expose the parts to extreme temperatures or direct sunlight for extended periods.
By following these wet and dry vacuum cleaner maintenance tips and checking the hoses and attachments regularly, you can help ensure that your vacuum cleaner continues to function at its best and last for years.
4. Replace Worn Out Parts
As with all appliances, parts can wear out over time, and your wet and dry vacuum cleaner is no exception. Regular use and sometimes rough handling can lead to worn out parts that compromise the performance and longevity of your machine. Here are some of the parts you may need to replace and how often they should be checked:
Part
How Often to Check
Brushroll
Every 6 months or as needed
Belts
Every 6-12 months or as needed
Filter
Every 3-6 months or as needed
Hoses and attachments
Inspect regularly and replace as needed
Dustbin
Empty after every use and replace as needed
It’s important to keep an eye on these parts so that they don’t cause damage to other components of your vacuum cleaner. Replacing worn out parts also ensures that your vacuum is operating efficiently, meaning you’ll get better suction power and cleaning performance. Plus, you’ll extend the life of your machine, saving you money in the long run.
If you’re unsure whether a part needs replacing, consult your vacuum cleaner’s user manual or contact the manufacturer for guidance. And always make sure you use genuine replacement parts, as off-brand or generic parts may not fit correctly or last as long. With regular maintenance and timely replacements, your wet and dry vacuum cleaner will work effectively for years to come.
5. Lubricate Moving Parts
Maintaining the moving parts of your wet and dry vacuum cleaner is essential to ensure that it continues to function optimally. Over time, the components such as the motor bearings and other internal mechanisms can become stiff or make noise. Lubricating these moving parts can help reduce friction and keep these parts in good condition for longer periods. Here are a few tips on how to lubricate the moving parts of your vacuum cleaner.
1. Identify the Moving Parts: Before you begin to lubricate your vacuum cleaner’s moving parts, it is important to locate them. Common areas include the motor bearings, fan blades, pivot points, and roller brush bearings.
2. Choose the Right Lubricant: Always use the manufacturer’s recommended lubricant for your vacuum cleaner. Some parts may require different types of lubricants, so make sure to read the owner’s manual for the correct product.
3. Apply the Lubricant Carefully: Apply the lubricant sparingly and carefully to your vacuum cleaner’s moving parts. Too much lubricant can attract dust and dirt, causing the components to start squeaking and repeating n-gramms.
4. Wipe off Excess Lubricant: Use a clean, dry cloth to wipe off excess lubricant from the moving parts. This will ensure that the lubricant stays only on the intended parts, preventing it from spreading to other components and causing malfunction.
5. Repeat at Regular Intervals: Depending on how heavily your vacuum cleaner is used, you may need to lubricate it more or less frequently. As a general rule, aim to lubricate the moving parts of your wet and dry vacuum cleaner every 6 months to keep it functioning smoothly.
By following these simple tips, you can keep the moving parts of your wet and dry vacuum cleaner lubricated and in good condition, thereby extending its lifespan and improving its performance.
6. Check and Replace Belts, if required
When it comes to maintaining your wet and dry vacuum cleaner, the belts are a crucial component that you shouldn’t overlook. Over time, belts can wear out or break, which can lead to a significant reduction in the vacuum’s suction power, and in some cases, the vacuum may not even start.
To ensure the smooth operation of your vacuum cleaner, it is essential to check the belts periodically, and if required, replace them promptly. The best way to check the belts is by turning off the vacuum and examining them.
Here are some signs that indicate your vacuum cleaner’s belt needs replacement:
Signs that indicate belt replacement is necessary
Action to take
The vacuum cleaner brushroll doesn’t spin
Check the belt for signs of wear or damage. If it’s worn out, replace it immediately
The vacuum cleaner emits a burning smell
Turn off the vacuum cleaner and unplug it from the power source. Check the belt for signs of damage, such as cracking or fraying. If you see any signs of damage, replace the belt
The vacuum cleaner makes a loud squealing noise
Check the belt for signs of wear or damage. If the belt is worn out, replace it immediately
Regularly inspecting and replacing the belts, when necessary, will help to enhance the vacuum cleaner’s functionality and extend its lifespan. In some cases, replacing a worn-out belt can make your vacuum cleaner feel brand new. So, don’t neglect this important aspect of vacuum maintenance.
7. Don’t Overload the Dustbin
The dustbin of a wet and dry vacuum cleaner is specifically designed to hold a certain amount of debris and liquid. Overloading the dustbin can lead to various issues such as decreased suction power and potential damage to the vacuum cleaner. Here are some tips to help you avoid overloading the dustbin:
Regularly check the fill level: As a general rule of thumb, you should check the fill level of your dustbin after every use. If it’s close to being full, it’s best to empty it out before you start your next cleaning session.
Empty the dustbin frequently: If you’re cleaning up a large amount of debris, it’s essential to empty the dustbin frequently. Otherwise, you risk overloading the dustbin and decreasing your vacuum’s suction power.
Don’t attempt to vacuum large items: Although a wet and dry vacuum cleaner is designed to handle wet and dry debris, it’s important not to vacuum large items that can clog the vacuum and potentially damage it.
Use the right attachment: Using the wrong attachment can lead to overloading the dustbin. Make sure you’re using the appropriate attachment for the job you’re doing.
Clean as you go: If you’re vacuuming up a large area, it’s best to clean as you go instead of waiting until the end. This way, you can empty the dustbin before it gets overloaded and maintain maximum suction power.
Following these tips can help you avoid overloading the dustbin of your wet and dry vacuum cleaner and prolong its lifespan. Remember, taking care of your vacuum cleaner with proper maintenance can save you from costly repairs and replacements in the future.
8. Clean the Brushroll
It’s important to clean the brushroll of your wet and dry vacuum cleaner regularly to ensure it continues to function at its best. Dirt and hair can become tangled in the brushroll over time, which can lead to decreased suction power and even cause damage to the machine. Here are some steps you can follow to clean the brushroll:
Step
Description
Step 1:
Unplug the vacuum cleaner and turn it over onto a flat surface.
Step 2:
Remove any hair or debris that you can see wrapped around the brushroll with a pair of scissors or a brush.
Step 3:
Use a screwdriver to remove the cover plate that’s protecting the brushroll. Some models may have clips or tabs holding the cover plate in place.
Step 4:
Remove the brushroll from its slot by gently pulling it out.
Step 5:
Use a clean cloth or brush to remove any dirt or hair that’s stuck to the brushroll.
Step 6:
Clean the brushroll bearings with a cloth or brush to remove any remaining debris.
Step 7:
Put the brushroll back into its slot and replace the cover plate, making sure it’s secure.
Cleaning the brushroll should be done every few uses and is an essential part of maintaining your wet and dry vacuum cleaner. In addition to improving suction power, it also prevents the accumulation of dirt and debris, which can negatively impact the hygiene of your home.
9. Use the Right Cleaning Agents
When it comes to keeping your wet and dry vacuum cleaner in top shape, using the right cleaning agents can make all the difference. Here are some tips for using the right cleaning agents:
1. Read the Manual First
Before using any cleaning agents on your wet and dry vacuum cleaner, be sure to read the manual that came with the product. The manual will provide you with important information about the recommended cleaning agents to use, as well as any warnings or precautions that you need to take.
2. Avoid Harsh Chemicals
Harsh chemicals can cause damage to the internal components of your wet and dry vacuum cleaner, so it’s best to avoid using them altogether. Instead, opt for mild cleaning agents that are safe for use on all surfaces. Mild detergents, vinegar and water solutions and baking soda are all popular choices.
3. Test on Small Surfaces First
Before using any cleaning agent on a large surface area, it’s important to test it on a small, inconspicuous area first. This will help you determine if the cleaning agent is safe to use on the entire surface.
4. Don’t Use Abrasive Cleaning Tools
Abrasive cleaning tools, such as steel wool or abrasive sponges, can scratch the surface of your wet and dry vacuum cleaner. Instead, use soft cloths, sponges or brushes to gently scrub any dirt or debris.
5. Clean any Residue after Using Cleaning Agents
Make sure to always clean off any residue left by cleaning agents once you’re done using them. This will help to prevent any build-up of residue which can loosen screws or damage electric components.
By using the right cleaning agents and following the above tips, you can ensure that your wet and dry vacuum cleaner stays in great condition for years to come.
10. Store the Vacuum Cleaner Properly
To extend the lifespan of your wet and dry vacuum cleaner, it is crucial to store it properly. Here are some tips to ensure your vacuum cleaner stays in good condition when not in use:
Clean the Vacuum Cleaner: Before storing your vacuum cleaner, ensure that it is clean. Empty the dustbin, clean the brushroll and filter, and wipe down the exterior of the machine. This will prevent dirt and debris from accumulating and causing damage.
Find the Right Storage Space: Choose a dry, cool, and dark area to store your vacuum cleaner. Avoid storing it in direct sunlight or damp areas, as moisture can cause rust and damage to the motor. Keep it away from children and pets to prevent any accidental damage or injury.
Store Attachments Separately: Detach any hoses, nozzles or tools that are attached to the vacuum cleaner and store them separately. This will prevent them from getting lost or damaged, and keep them in good condition for the next use.
Protect the Cord: Carefully wrap the cord around the hooks provided to prevent it from tangling or getting damaged. Avoid pulling or yanking the cord, as this can damage the connections and shorten its lifespan.
Cover the Vacuum Cleaner: Use a dust cover or cloth to protect the vacuum cleaner from dust and dirt when not in use. This will prevent debris from accumulating and causing damage to the machine.
Keep the Vacuum Cleaner Upright: Store the vacuum cleaner in an upright position, as it is designed to be used this way. Storing it horizontally or on its side can cause damage to the motor and other components.
By following these tips for proper storage, you can safeguard your wet and dry vacuum cleaner against damage and ensure it lasts for years to come. Remember to always refer to the manufacturer’s instructions for additional guidance on proper storage and maintenance.
Troubleshooting Wet and Dry Vacuum Cleaner Maintenance Issues
Maintaining your wet and dry vacuum cleaner is crucial if you want to extend its lifespan and ensure peak performance. However, even with regular maintenance, you may encounter some issues with your vacuum cleaner. These troubleshooting tips will help you identify and address common issues, so you can keep your vacuum cleaner in top condition. From power issues to strange noises and unpleasant smells, we’ll guide you through the steps you need to take to get your vacuum cleaner back in working order. Let’s dive in and solve these perplexing problems together!
1. The Vacuum Cleaner Doesn’t Turn On
If your wet and dry vacuum cleaner doesn’t turn on, there are a few potential issues that could be causing the problem. It can be perplexing since it might be difficult to identify the possible cause without disassembling the vacuum. Here are some possible solutions to try before calling for professional help:
Check the Power Cord: Ensure the power cord is correctly installed and that it is not damaged. Examine both the prongs of the plug and the cord itself for any visible harm. Ensure the circuit breaker has not tripped or a fuse hasn’t blown.
Check the Filters: Make sure that filters are correctly installed and in good condition. Clogged filters can cause the motor to overheat, stopping the vacuum from turning on for safety reasons.
Check the Bag or Dustbin: Check the bag or dustbin to see if it is full or obstructed. If the bag or bin is too full, the vacuum cleaner might be unable to operate correctly due to poor airflow. Empty or replace the full bag or dustbin and check to see if the vacuum starts running.
Examine the Motor: Check the motor and see if it is jammed. If you hear strange noises from the vacuum cleaner, it could signal that the motor is clogged, obstructed, or needs replacement.
Inspect the Switch: The power switch of the machine should be functioning correctly. If the switch is stuck or unresponsive, it might be broken and need to be fixed or substituted.
Remember to unplug the vacuum cleaner before initiating troubleshooting. Attempting to fix the vacuum cleaner while it’s still plugged in may lead to an electric shock or significant injury. It’s best to check the owner’s manual for the device to get more information about the recommended maintenance and repair procedures.
By following these basic tips, you can fix many of the common issues that may be causing your vacuum cleaner not to turn on. If you’ve tried everything and it still won’t turn on, it might be time to contact a specialist who can help diagnose and repair the problem.
2. The Suction Power is Weak
Are you frustrated with your wet and dry vacuum cleaner’s weak suction power? Don’t worry, this is a common problem that can be solved with some simple maintenance tips. Below are some effective solutions to restore your vacuum cleaner’s suction power and optimize its performance.
Possible Cause
Solution
Clogged filter
Check and clean the filter. Depending on the model, you may need to replace the filter periodically. Refer to the user manual for instructions.
Full dustbin or debris in the hose
Empty the dustbin and clear any debris from the hose or attachments. Avoid overloading the dustbin in the future.
Worn out brushroll or belt
Check and replace the brushroll or belt, if necessary. A worn-out brushroll or belt can reduce suction power and impair performance.
Leak in the hose or attachments
Check for any leaks in the hose or attachments. If you find any, replace or repair the affected parts as soon as possible.
Defective Motor
If all the above solutions fail, the problem may be a defective motor. Contact the manufacturer for assistance with diagnostic and repair services.
By following these tips, you can restore your wet and dry vacuum cleaner’s suction power and extend its lifespan. Remember, regular maintenance is key to keeping your vacuum cleaner in good working condition. Don’t hesitate to seek professional help if these solutions don’t work or if you have any doubts about the maintenance process.
3. The Vacuum Cleaner Makes Strange Noises
If your wet and dry vacuum cleaner is making strange noises, it could indicate a problem that needs to be addressed promptly. Here are some reasons why your vacuum cleaner might be making strange noises and what you can do to fix them:
1. Clogged Hose: If your vacuum cleaner is making a high-pitched whistling sound or a wheezing noise, it could be due to a clogged hose. To fix this issue, turn off the vacuum cleaner and unplug it. Remove the hose from the vacuum cleaner and clear the clog. You can use a coat hanger or a long stick to remove any debris that is blocking the hose.
2. Broken Fan Blades: If your vacuum cleaner is making a rattling noise or a grinding noise, it could be due to broken fan blades. Turn off the vacuum cleaner and unplug it. Check the fan blades to see if any of them are broken or damaged. If the fan blades are damaged, you will need to replace them. You can contact the manufacturer for replacement parts or take the vacuum cleaner to a repair shop.
3. Loose Parts: If your vacuum cleaner is making a rattling noise or a clunking noise, it could be due to loose parts. Turn off the vacuum cleaner and unplug it. Check for any loose parts, such as screws or bolts. Tighten any loose parts that you find.
4. Worn Out Belt: If your vacuum cleaner is making a high-pitched squealing noise, it could be due to a worn-out belt. Turn off the vacuum cleaner and unplug it. Check the belt to see if it is worn out. If the belt is worn out, you will need to replace it. You can contact the manufacturer for replacement parts or take the vacuum cleaner to a repair shop.
5. Faulty Motor: If your vacuum cleaner is making a humming noise or a buzzing noise, it could be due to a faulty motor. Turn off the vacuum cleaner and unplug it. Check the motor to see if it is working properly. If the motor is faulty, you will need to replace it. You can contact the manufacturer for replacement parts or take the vacuum cleaner to a repair shop.
It’s always best to address any strange noises your vacuum cleaner is making as soon as possible to prevent any further damage.
4. The Vacuum Cleaner Smells Bad
Have you noticed a foul odor coming from your wet and dry vacuum cleaner? This can be caused by a variety of issues, but don’t worry, they are all easily fixable with a few simple maintenance steps. Here are some possible reasons why your vacuum cleaner smells bad and what you can do about it:
Clogged Filter: A clogged filter can cause bad odors to emanate from your vacuum cleaner. Make sure to clean or replace your filter regularly to prevent this from happening.
Dustbin Overload: When the dustbin is overloaded, it can cause unpleasant smells to emit from the vacuum cleaner. Empty the dustbin regularly and don’t overload it.
Mold Growth: Moisture in the vacuum cleaner can lead to mold growth, which can cause a musty odor. Make sure to thoroughly dry your vacuum cleaner after each use to prevent this from happening.
Dirty Brushroll: If your brushroll is dirty or has hair and debris wrapped around it, it can cause bad smells to come from the vacuum cleaner. Clean the brushroll thoroughly with a designated tool to avoid this issue.
Old or Dirty Bag: If you use a bagged wet and dry vacuum cleaner, a dirty or old bag can cause unpleasant smells to linger. Make sure to change the bag regularly to avoid this issue.
By following these simple maintenance steps, you can get rid of any bad odors coming from your wet and dry vacuum cleaner. Remember, regular maintenance not only improves the lifespan and performance of your vacuum cleaner, but also ensures that your home is clean and fresh-smelling.
Conclusion
After reading this article, you should now have a good understanding of how important it is to properly maintain your wet and dry vacuum cleaner. By following the 10 maintenance tips that we have mentioned, you can extend the lifespan of your vacuum cleaner and prevent any costly repairs or breakdowns.
It’s crucial to empty the dustbin regularly, clean the filter, and check the hoses and attachments. You should also replace worn-out parts, lubricate moving parts, and check and replace belts if required to keep your vacuum cleaner in top working condition.
By avoiding overloading the dustbin, cleaning the brushroll, using the right cleaning agents, and storing the vacuum cleaner properly, you can prevent any further damage to your appliance.
But what happens if you encounter any issues despite following these tips? Don’t worry; we’ve got you covered. Our troubleshooting section addresses common problems such as the vacuum cleaner not turning on, weak suction power, strange noises, and bad smells.
Remember, proper maintenance is the key to extending the life of your wet and dry vacuum cleaner. It not only saves you money in the long run, but it also ensures that your appliance is working efficiently and effectively. So follow these tips and keep your vacuum cleaner in top condition for a long time to come.
Frequently Asked Questions
1. How often should I empty the dustbin of my wet and dry vacuum cleaner?
You should empty the dustbin after every use to prevent clogging and to maintain optimal suction power.
2. Can I clean the filter of my vacuum cleaner with water?
It depends on the type of filter. Some filters can be cleaned with water, while others cannot. Check the manufacturer’s instructions to be sure.
3. How do I know if the hoses and attachments of my vacuum cleaner need to be replaced?
If they are cracked, torn or damaged, they should be replaced. If they are just dirty or clogged, you can clean them instead.
4. How often do I need to replace the worn out parts of my vacuum cleaner?
It depends on how often you use your vacuum cleaner. Check the manufacturer’s instructions for recommended replacement intervals.
5. Can I use any lubricating oil on the moving parts of my vacuum cleaner?
No, you should only use lubricating oil that is specifically recommended by the manufacturer to avoid damaging the parts.
6. How do I know if the belt of my vacuum cleaner needs to be replaced?
If the brushroll is no longer rotating or the belt looks frayed or stretched out, it should be replaced.
7. What happens if I overload the dustbin of my vacuum cleaner?
Overloading the dustbin can cause clogging and damage the motor. It can also reduce suction power and increase the risk of breakdowns.
8. How often should I clean the brushroll of my vacuum cleaner?
You should clean the brushroll after every use to prevent it from getting clogged with debris and hair.
9. Can I use any cleaning agents on my vacuum cleaner?
No, you should only use cleaning agents that are specifically recommended by the manufacturer. Using the wrong cleaning agents can damage the parts.
10. How should I store my vacuum cleaner when not in use?
You should store it in a dry, cool place away from direct sunlight and extreme temperatures. Make sure to wrap the power cord neatly and store the attachments and hoses properly.