Effective Ways to Clean the Brushroll of Your Smart Vacuum Cleaner
Warning: A non-numeric value encountered in /var/www/html/wp-content/themes/generatepress/inc/structure/post-meta.php on line 165
by Dwight Gibson
Are you frustrated with your smart vacuum cleaner not picking up dirt? The issue may lie with a dirty or clogged brushroll. A brushroll is an essential part of a vacuum cleaner, and when it’s not functioning correctly, it can cause a lot of inconvenience. Fortunately, cleaning the brushroll of your smart vacuum cleaner is an easy task if you follow the right steps. In this article, we will take you through the detailed process of cleaning your vacuum cleaner’s brushroll and maintaining it to ensure it remains in excellent working condition. So, let’s dive in and get your vacuum cleaner functioning like new again!
Table of Contents
Reasons why your smart vacuum cleaner brushroll may not be picking up dirt
Are you frustrated that your smart vacuum cleaner brushroll isn’t picking up any dirt? There are several reasons why your high-tech cleaning device may not be working as efficiently as it should be. It’s important to identify the problem so you can fix it and get back to enjoying a clean home. Let’s explore some possible reasons why your smart vacuum cleaner isn’t picking up dirt and how to solve the issue. For more troubleshooting tips for your smart vacuum cleaner, check out our previously published article on smart vacuum troubleshooting tips.
Clogged brushroll
If your smart vacuum cleaner is not picking up dirt, one of the reasons could be a clogged brushroll. Over time, dust, hair, and other debris can accumulate on the brushroll, making it less effective in picking up dirt. If you notice that the brushroll is not spinning or picking up dirt properly, it’s time to give it a good cleaning.
Here are the steps to clean a clogged brushroll:
Step #1: Unplug the vacuum cleaner.
Step #2: Remove the brushroll cover or plate to access the brushroll.
Step #3: Cut tangled hair or debris from the brushroll using scissors or a seam ripper.
Step #4: Use a brush or dry cloth to remove the dirt or dust buildup from the brush bristles.
Step #5: Wash the brushroll and filter with warm soapy water and rinse with cold water (if it is machine washable).
Step #6: Reassemble the brushroll cover or plate and place it back on the vacuum cleaner.
Step #7: Plug in the vacuum cleaner and test if the brushroll is working properly.
It’s important to note that if you ignore a clogged brushroll, it can lead to other problems such as decreased suction power and even damage to your vacuum cleaner. So, make sure to clean the brushroll regularly to prevent this issue from occurring.
If you have already cleaned your brushroll and the problem persists, there could be other reasons for your smart vacuum not picking up dirt: worn-out brush bristles or tangled hair or debris obstructing the suction power. It’s always a good idea to check if you are making any mistakes while vacuuming or to check if the suction power is adequate before thinking about complicated solutions.
Worn-out brush bristles
Over time, the brush bristles on your smart vacuum cleaner can become worn out, which can lead to reduced suction power and a lower performance. This can be caused by repeated use of the vacuum cleaner or exposure to abrasive materials.
One way to check whether your brush bristles are worn out is to inspect them regularly. If they appear frayed, mangled, or any shorter than they initially were, then it may be time to replace them. You can also check your vacuum cleaner’s manual to find out how often the brush bristles should be replaced.
Replacing the brush bristles on your smart vacuum cleaner is relatively easy and doesn’t require professional assistance. Most vacuum cleaners have brushroll replacement parts that are readily available.
Here are some steps to replace the brush bristles on your smart vacuum cleaner:
Unplug the vacuum cleaner to avoid any electrical shock.
Remove the brushroll cover or plate to access the brushroll.
Remove the brushroll to access the brush bristles. This may require unscrewing it from the vacuum cleaner.
Locate the worn-out brush bristles and remove them by loosening the screws that are holding them in place.
Insert new brush bristles of the same model and size into the brushroll. Ensure that they are securely attached in place so that they do not get dislodged during use.
Reassemble the brushroll and brushroll cover or plate before plugging in and testing the vacuum cleaner.
Regularly replacing the brush bristles on your smart vacuum cleaner is important for maintaining optimum performance and ensuring that the vacuum cleaner efficiently picks up dirt and debris.
By following these easy steps, you can easily replace the brush bristles on your smart vacuum cleaner and ensure optimal efficiency. For more cleaning tips and solutions regarding smart vacuums not picking up dirt, you can read our related article here.
Tangled hair or debris
One of the most common reasons why your smart vacuum cleaner brushroll may not be picking up dirt is due to tangled hair or debris. This can cause the brushroll to become jammed, leading to a reduction in suction power and a less effective cleaning experience. To address this issue, follow these steps:
Step #1
Turn off and unplug the vacuum cleaner to avoid any accidents.
Step #2
Locate the brushroll cover or plate and remove it to access the brushroll. Most vacuum cleaners will have a latch or locking mechanism to hold the plate or cover in place.
Step #3
Using scissors or a seam ripper, carefully cut away any tangled hair or debris from the brushroll. Be sure to remove any cut strands from the brushroll before proceeding to the next step.
Step #4
Using a brush or dry cloth, gently wipe the brush bristles to remove any remaining dirt or debris buildup. This will help ensure that the brushroll is able to operate efficiently in the future.
Step #5
If the brushroll is machine washable, wash it and the filter with warm, soapy water and rinse with cold water. Allow them to air dry fully before reassembling.
Step #6
Reassemble the brushroll cover or plate and ensure that it is correctly secured in place before operating the vacuum cleaner.
By following these steps, you can effectively address the issue of tangled hair or debris on your brushroll and improve the performance of your smart vacuum cleaner. Remember to always take proper safety precautions when working with electrical appliances and unplug the vacuum cleaner before servicing it.
To prevent tangled hair or debris in the future and maintain the longevity of your brushroll, it’s important to regularly clean it after each use and to check for any wear and tear on the brush bristles. Additionally, be sure to remove any large objects or obstructions from the area being vacuumed before starting the cleaning process.
Steps to clean the brushroll of your smart vacuum cleaner
You’ve tried running your smart vacuum cleaner over your carpets and floors, but it’s just not picking up as much dirt as it used to. One of the most common reasons for this is that the brushroll may be clogged with debris, tangled hair or worn out bristles. Luckily, cleaning the brushroll of your smart vacuum cleaner is simple and can be done at home. In this section, we will walk you through each step of the cleaning process to restore your vacuum cleaner’s cleaning power. So let’s get started!
Step #1: Unplug the vacuum cleaner
Step #1: Unplug the vacuum cleaner before attempting to clean the brushroll. This is important to prevent any electric shock or injury during the cleaning process.
To unplug your smart vacuum cleaner, locate the power cord and gently pull it from the wall outlet. Make sure to keep the cord away from water or any sharp objects that may cause damage.
It’s also important to allow the vacuum cleaner to cool down before cleaning the brushroll. If you were using the vacuum cleaner recently, give it 5-10 minutes to cool down before unplugging it.
Table:
Step #1
Unplug the vacuum cleaner
Why?
Prevent any electric shock or injury during the cleaning process
How?
Locate the power cord and gently pull it from the wall outlet; keep the cord away from water or any sharp objects that may cause damage
Additional tip:
Allow the vacuum cleaner to cool down before cleaning the brushroll
By following this initial step, you can ensure that you are taking the necessary precautions for your safety and the longevity of your smart vacuum cleaner.
Step #2: Remove the brushroll cover or plate to access the brushroll
One of the major reasons why your smart vacuum cleaner’s brushroll may not be picking up dirt is because it is clogged or obstructed. To fix this issue, you will need to clean the brushroll thoroughly. Here are some steps to help you clean the brushroll of your smart vacuum cleaner.
Step 2: Remove the brushroll cover or plate to access the brushroll.
Before you can clean the brushroll, you need to access it. Typically, the brushroll is located underneath the vacuum cleaner’s base. To access it, you need to remove the brushroll cover or plate. Here’s how to do it:
Step 1:
Unplug your smart vacuum cleaner from the power source to avoid any accidents.
Step 2:
Flip over the vacuum cleaner and locate the brushroll cover or plate. It is usually secured by screws or clips.
Step 3:
Using a screwdriver or pliers, carefully remove the screws or clips that hold the brushroll cover or plate in place. Put them in a safe place so you don’t lose them.
Step 4:
Once you remove the cover or plate, you should be able to see the brushroll.
It’s important to note that different smart vacuum cleaner models may have different designs, so make sure to consult your vacuum cleaner’s manual for specific instructions on removing the brushroll cover or plate.
Step #3: Cut tangled hair or debris from the brushroll using scissors or a seam ripper
When it comes to cleaning the brushroll of your smart vacuum cleaner, it’s crucial to start with removing any tangled hair or debris from it. Here are the steps to follow while performing this task:
Step 1: Unplug the vacuum cleaner
Before you start cleaning the brushroll, it’s important to make sure that the vacuum cleaner is unplugged. This will prevent any accidental start-ups while you are cleaning the brushroll.
Step 2: Access the brushroll
Carefully remove the brushroll cover or plate to access the brushroll. You may need to consult the user manual for instructions, as the method can vary depending on the model of your vacuum cleaner.
Step 3: Identify the tangled hair or debris
Once you have exposed the brushroll, examine it closely to locate any tangled hair or debris that may be causing the blockage. Tangled hair and threads can be untangled by using a seam ripper, while scissors can be used to cut away any debris that is firmly stuck.
Step 4: Cut or untangle the hair or debris
Using the appropriate tool, carefully remove as much of the tangled hair or debris as possible. Make sure to do this step slowly and deliberately to avoid damaging the brush bristles or your tool becoming stuck.
Step 5: Remove any remaining debris or hair using a brush or dry cloth
If any debris or hair remains after cutting, use a dry cloth or brush to carefully remove it without damaging the bristles of the brushroll.
By following these steps and taking the time to remove any tangled hair or debris from the brushroll, you’re increasing the performance and extending the lifespan of your smart vacuum cleaner. Remember to perform regular maintenance checks to keep it working at its best.
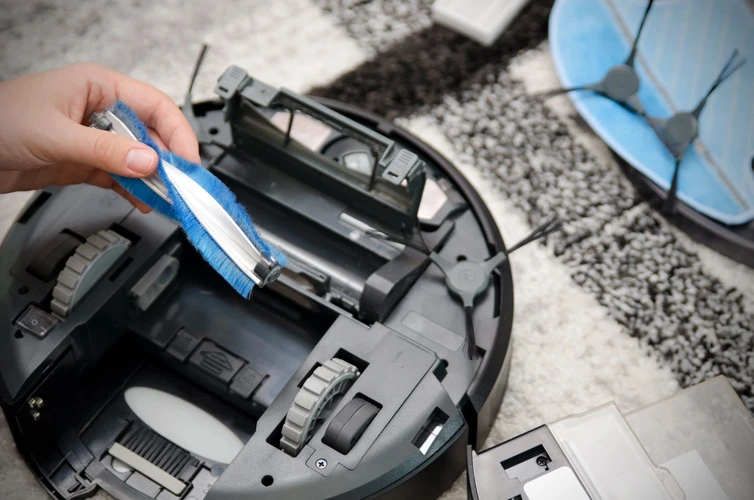
Step #4: Use a brush or dry cloth to remove the dirt or dust buildup from the brush bristles
To properly clean the bristles of your smart vacuum cleaner’s brushroll, you can use either a brush or a dry cloth. This step is essential to remove any dirt or dust buildup that may clog the brushroll, inhibiting its ability to pick up dirt effectively.
Here are some recommended items you can use to clean the brush bristles:
Item
Usage
Cleaning Brush
A cleaning brush is a small tool with bristles that can be used to remove stubborn dirt or dust particles stuck on the bristles. It can be purchased at your local home appliance store.
Dry Cloth
A dry cloth can be used to gently wipe and remove any loose dirt or dust particles from the bristles. It’s a simple method, and it can be done with any clean dry cloth you have on hand.
To start cleaning the brush bristles, first, turn off your smart vacuum cleaner and unplug it. Then, remove the brushroll cover or plate to expose the brushroll. Using either of the items mentioned above, gently scrub and wipe the bristles to remove any dirt or dust buildup.
It’s important to be gentle when cleaning the bristles and not to apply too much pressure. If you press too hard or scrub too vigorously, you could damage the bristles, and the brushroll will not work correctly.
After cleaning the brush bristles, be sure to check the brushroll for any remaining hair or debris. If you notice any, follow step #3 to remove them.
By following these steps, you will have an effectively cleaned brushroll that can pick up and remove dirt and debris from your floors with ease.
Step #5: Wash the brushroll and filter with warm soapy water and rinse with cold water (if it is machine washable)
After cutting tangled hair or debris from the brushroll using scissors or a seam ripper (as described in step #3 of this guide), it’s time to thoroughly wash the brushroll and filter with warm soapy water. This will help to remove any remaining dirt, dust, and debris that may have accumulated over time, ensuring that your smart vacuum cleaner operates efficiently.
Before you begin washing the brushroll and filter, make sure to unplug the vacuum cleaner and remove the brushroll cover or plate (as described in step #2 of this guide). Once you have done this, follow the steps below to wash the brushroll and filter:
Step
Action
Step 1
Fill a sink or basin with warm soapy water
Step 2
Place the brushroll and filter in the sink or basin
Step 3
Gently scrub the brushroll and filter with a soft-bristled brush or sponge to remove any dirt or debris
Step 4
Rinse the brushroll and filter with cold water to remove any soap residue
Step 5
Shake off any excess water from the brushroll and filter, and let them air dry completely before replacing them (or check if they are machine washable and follow manufacturer’s instructions)
It’s important to note that not all brushrolls and filters are machine washable. Be sure to check the manufacturer’s instructions before attempting to wash them in a machine. If the brushroll and filter are not machine washable, follow the hand washing instructions above.
By properly washing the brushroll and filter of your smart vacuum cleaner, you can help extend the life of your vacuum and prevent it from losing suction power. Make sure to repeat this process regularly to keep your smart vacuum cleaner running smoothly.
Step #6: Reassemble the brushroll cover or plate and place it back on the vacuum cleaner
After you have thoroughly cleaned the brushroll of your smart vacuum cleaner, the next step is to reassemble the brushroll cover or plate and place it back on the vacuum cleaner. This step is crucial to ensure that the brushroll is properly secured in its place and works efficiently.
Here are the steps to follow for reassembling and placing the brushroll cover or plate back on your smart vacuum cleaner:
Step 1: Hold the brushroll cover or plate and align it with the vacuum cleaner base where it was removed.
Step 2: Press the cover or plate down towards the vacuum cleaner base until it clicks into place.
Step 3: Make sure that the cover or plate is securely in place and there is no movement or loose parts. This ensures safety and prevents the cover or plate from getting dislodged when cleaning.
Step 4: If the cover or plate requires screws to hold it in place, screw them back to their original position as per the manufacturer’s instructions.
Making sure that the brushroll cover or plate is properly reassembled and securely attached to the vacuum cleaner is very important. This ensures the longevity of your smart vacuum cleaner and helps maintain its efficiency when cleaning.
By following these simple instructions and taking the time to clean your brushroll on a regular basis, you can be confident that your smart vacuum cleaner is working at its best and is picking up dirt and debris effectively.
Step #7: Plug in the vacuum cleaner and test if the brushroll is working properly
Once you have cleaned your smart vacuum cleaner brushroll, it’s important to plug it in and test whether it’s working properly. This final step ensures proper functionality and helps you avoid any mishaps while cleaning your home. Below are some important considerations when testing your vacuum cleaner’s brushroll:
STEP
INSTRUCTIONS
Step 1
Make sure the brushroll cover or plate is securely in place. If it’s not properly attached, the brushroll may not operate as expected.
Step 2
Turn on your vacuum cleaner and select the “Floor” or “Carpet” cleaning mode.
Step 3
Place the vacuum cleaner on the floor, and slowly move it back and forth to check if the brushroll is spinning properly.
Step 4
Listen for any unusual noises or vibrations coming from the brushroll. If you hear anything out of the ordinary, immediately turn off the vacuum cleaner and check for any obstructions or issues with the brushroll.
Step 5
Check for any remaining debris or hair on your cleaned brushroll. If you find any, it may have been missed during the cleaning process, and you should repeat the cleaning steps.
Step 6
Once you have completed these steps, turn off the vacuum cleaner and unplug it from the socket.
By following these steps, you can ensure that your smart vacuum cleaner brushroll is working properly and effectively picking up dirt and debris from your home. It’s important to test your vacuum cleaner after cleaning the brushroll to avoid any further issues with your vacuum cleaner’s performance.
Tips to Maintain the Brushroll of Your Smart Vacuum Cleaner
Once you have cleaned your smart vacuum cleaner brushroll, it’s important to maintain it properly to ensure efficient and long-lasting performance. Here are some tips for maintaining the brushroll of your smart vacuum cleaner so that it continues to pick up dirt and debris effectively. By following these tips, you can increase the lifespan of your vacuum and avoid the need for costly repairs.
Regularly clean the brushroll and filter
Keeping your smart vacuum cleaner’s brushroll and filter clean is crucial to maintaining its performance and effectiveness in picking up dirt, dust, and debris. Here are some tips for regularly cleaning the brushroll and filter:
Step
Action
Step #1
Carefully remove the brushroll cover or plate to access the brushroll.
Step #2
Remove the brushroll from the vacuum cleaner.
Step #3
Using a brush or dry cloth, remove any dirt or dust buildup from the brush bristles. Make sure to remove all dirt and dust that may be caked on the bristles.
Step #4
Check the brush bristles for any signs of wear and tear or damage. If there are any, then you may need to replace the brushroll.
Step #5
If the brushroll is washable, then gently wash it with warm soapy water and rinse it with cold water. Make sure to dry it completely before putting it back into your vacuum cleaner.
Step #6
Clean the filter. Most smart vacuum cleaners have filters that need regular cleaning or replacing. Gently remove the filter and clean it according to the manufacturer’s instructions. If it is disposable, then replace it with a new filter.
Step #7
Reassemble the brushroll and filter, and securely reattach the brushroll cover or plate.
Regularly cleaning the brushroll and filter will help your smart vacuum cleaner to have a longer lifespan and perform more effectively in terms of its suction power, especially if you combine this practice with preventing any obstructions from the brushroll before vacuuming, replacing worn-out brush bristles, and maintaining overall cleanliness in your home.
Check and replace worn-out brush bristles
As you use your smart vacuum cleaner on a regular basis, the brush bristles may become worn-out, leading to reduced cleaning performance. The brush bristles are responsible for agitating the carpet fibers and loosening the dirt, dust, and debris for suction. A worn-out brush roll can result in the vacuum cleaner not picking up dirt, requiring replacement. To check the condition of your vacuum cleaner’s brush bristles, follow these steps:
Step
Action
Step 1:
Turn off and unplug the vacuum cleaner to prevent accidents.
Step 2:
Locate the brushroll cover or plate and remove it to access the brushroll.
Step 3:
Examine the brush bristles for signs of wear, such as frayed or missing bristles.
Step 4:
If the brush bristles appear worn-out, remove the brushroll from the vacuum cleaner.
Step 5:
Replace the brushroll with a new one following the manufacturer’s instructions.
Step 6:
Reinstall the brushroll cover or plate and plug in the vacuum cleaner.
It is essential to check the condition of the brush bristles regularly to maintain the cleaning performance of your smart vacuum cleaner. As a general rule, it is recommended to replace the brushroll every six months to ensure optimal cleaning results. However, the frequency of replacement may vary depending on factors such as usage frequency and the type of flooring in your home. By keeping a close eye on the condition of the brushroll, you can ensure that your vacuum cleaner is working efficiently and effectively, providing a cleaner home environment.
Remove any obstruction from the brushroll before vacuuming
Before starting the vacuum cleaner, it is essential to check the brushroll for any obstructions that may impede its proper functioning. The brushroll may get obstructed due to various reasons such as tangled hair, thread, and other debris that may have accumulated inside the cleaner. If the brushroll is not cleaned, your smart vacuum cleaner may not work efficiently and may even cause damage to the appliance.
Here are some steps to remove any obstruction from the brushroll before vacuuming:
Step 1: Before cleaning the brushroll, unplug the vacuum cleaner from the power source.
Step 2: Turn the vacuum cleaner upside down so that you can access the brushroll.
Step 3: Use scissors, a seam ripper, or any other cutting tool to remove any tangled hair or debris from the brushroll. Be careful not to cut the bristles of the brushroll while removing the obstruction.
Step 4: Use a pair of tweezers or any other tool to remove any remaining obstruction, such as thread or other debris, that may be stuck in the bristles of the brushroll.
Step 5: Use a dry cloth or a soft-bristled brush to remove any excess debris or dust from the brushroll.
Step 6: Reinstall the brushroll in the vacuum cleaner and secure it tightly in place.
Step 7: Plug the vacuum cleaner back into an electrical outlet and test it to see if it’s working correctly.
By following these steps, you can ensure that your smart vacuum cleaner’s brushroll is free from obstructions and is working efficiently. Regularly checking and cleaning the brushroll before vacuuming will keep it functioning correctly and increase its lifespan.
Conclusion
Cleaning the brushroll of your smart vacuum cleaner is an important maintenance task that should not be ignored. Neglecting the brushroll may lead to a loss of suction power and ultimately affect the performance of your vacuum cleaner. By following the simple steps outlined in this article, you can easily clean the brushroll of your smart vacuum cleaner and restore its performance.
Remember to unplug your vacuum cleaner before attempting to clean the brushroll, and always be cautious when handling sharp objects like scissors or a seam ripper. Additionally, it is important to regularly maintain your smart vacuum cleaner by checking and replacing worn-out brush bristles, and remove any obstructions from the brushroll before vacuuming.
Investing a few minutes in cleaning the brushroll can save you time and money in the long run, as it will prolong the life of your smart vacuum cleaner and keep it working at maximum efficiency. So, if you notice that your smart vacuum cleaner is not picking up dirt like it used to, don’t give up on it just yet! Follow the easy steps outlined in this guide and give your vacuum cleaner the TLC it deserves. Trust us, your floors will thank you for it!
Frequently Asked Questions
1. Why is the brushroll of my smart vacuum cleaner not picking up dirt?
There could be several reasons why your brushroll is not picking up dirt, including a clogged brushroll, worn-out brush bristles, or tangled hair or debris.
2. Can I clean the brushroll of my smart vacuum cleaner with a damp cloth?
It’s best to avoid using a damp cloth to clean the brushroll of your smart vacuum cleaner as it can damage the motor. Instead, use a dry cloth or brush to clean the brush bristles.
3. How often should I clean the brushroll of my smart vacuum cleaner?
It’s recommended to clean the brushroll and filter of your smart vacuum cleaner after every use to maintain its performance and prolong its lifespan.
4. What type of soap should I use to wash the brushroll and filter?
You can use a mild soap or detergent to wash the brushroll and filter of your smart vacuum cleaner.
5. How long does it take to clean the brushroll of a smart vacuum cleaner?
The time it takes to clean the brushroll of your smart vacuum cleaner varies depending on the extent of the debris buildup. Typically, it can take 10-15 minutes to clean the brushroll properly.
6. Can I replace the brushroll of my smart vacuum cleaner?
Yes, you can replace the brushroll of your smart vacuum cleaner if it’s worn-out or damaged. Check the manufacturer’s website or user manual for replacement parts.
7. Can I use a vacuum cleaner to clean the brushroll?
No, it’s not recommended to use another vacuum cleaner to clean the brushroll of your smart vacuum cleaner as it can cause clogging and damage the motor.
8. How can I prevent my brushroll from getting clogged?
You can prevent your brushroll from getting clogged by regularly removing large debris or objects from the floor before vacuuming, and by avoiding vacuuming liquids, fine dust, or sand.
9. How do I know if the brush bristles are worn-out?
If the bristles of your brushroll appear frayed or flattened, it’s an indication that they are worn-out and need to be replaced.
10. Can I use my smart vacuum cleaner on all types of floors?
Most smart vacuum cleaners are designed to work on all types of floors, including carpets, rugs, hardwood, and tiles. However, make sure to check the manufacturer’s recommendations before using it on a specific type of floor.