Warning: A non-numeric value encountered in /var/www/html/wp-content/themes/generatepress/inc/structure/post-meta.php on line 165
by Dwight Gibson
You’ve scheduled a cleaning session with your smart vacuum cleaner, eager to come back to a pristine home, only to find out that the device won’t turn on. Frustrating, isn’t it? However, fear not, as there are several reasons why your smart vacuum cleaner might not be turning on, and in this comprehensive guide, we’ll outline five of them. From power source issues to battery and sensor problems, we’ll provide you with a step-by-step approach to troubleshoot and solve the problem. By the end of this article, you’ll be equipped with the knowledge and tools necessary to get your smart vacuum cleaner up and running again!
Table of Contents
Reason 1: Power Source
Feeling frustrated as your smart vacuum cleaner refuses to turn on? You may be wondering what the root of the problem is. One of the most common reasons why smart vacuums fail to power on is due to disruptions in the machine’s power source. There can be many reasons for this, so don’t be too quick to assume the worst. In this segment, we’ll walk you through some of the best ways to troubleshoot power-related issues so that you can get your smart vacuum up and running once again. If you want to learn more about common smart vacuum issues, check out our previous article on smart vacuums not powering on.
Check the Power Outlet
One of the most common reasons why your smart vacuum cleaner may not be turning on is because of an issue with the power source. Before anything else, you should make sure that the power outlet you are using is functional.
To check the power outlet, unplug the smart vacuum cleaner and plug in another device. This could be anything from a lamp to a phone charger. If the alternate device doesn’t work, then you need to check the circuit breaker to make sure that the power is on. On the other hand, if the second device works, then the power outlet isn’t the problem.
If the power outlet isn’t the problem, you should inspect the power cord for any visible damage. Look for any frayed wires, cuts, or breaks. If there is damage to the power cord, you could attempt to repair it, but it’s better to replace it altogether. If you have a spare cord that fits your vacuum cleaner, you may attempt to use it, but make sure it’s compatible first.
If your smart vacuum cleaner has a power button, make sure to check if it’s turned on. In some cases, the button may have been accidentally switched off, leading to the assumption that there’s a bigger issue at play.
By checking the power outlet and power cord, you can get closer to figuring out why your smart vacuum cleaner isn’t turning on. If you still can’t determine the issue, move on to the next potential culprit – the battery.
One of the main reasons why your smart vacuum cleaner may not be turning on is due to problems with the power cord. To inspect the power cord, follow these steps:
Step 1: Check for visible damage. Check the power cord for any visible signs of damage, such as frayed or exposed wires, cuts, or tears. If you notice any damage, do not use the vacuum cleaner and replace the cord immediately.
Step 2: Check the connection. Ensure that the power cord is securely connected to the vacuum cleaner and the power outlet. If the connection is loose, the vacuum cleaner may not turn on.
Step 3: Test the outlet. Try plugging in another device into the same outlet to make sure that the outlet is working. If the outlet is not working, try plugging the vacuum cleaner into a different outlet.
Step 4: Check the fuse. If the vacuum cleaner is still not turning on, check to see if the fuse in the power cord is blown. If the fuse is blown, replace it with a new one of the same rating.
By taking these steps, you can ensure that the power cord is not causing the issue with the vacuum cleaner not turning on. It’s essential to keep the power cord in good condition to avoid any risks of electrical shocks or fire hazards. Additionally, regular cleaning and maintenance of your smart vacuum’s charging dock is critical to prevent any damage to the charging components. Learn more about the importance of cleaning smart vacuum chargers by following this link.
Reason 2: Battery
When you rely on a smart vacuum cleaner to keep your home tidy, discovering that it won’t turn on can be frustrating. One of the reasons why your device may not be functioning correctly is a weak or dead battery. With the battery being a crucial component of your robot cleaner, any malfunction can significantly impact its performance. It’s critical to explore all possible reasons for your device’s failure to start. Let’s dive into the ways to identify and solve battery-related concerns, which could save you time and money in the long run. And, remember to always prioritize safety when dealing with electronic devices – you can find some useful information in our article regarding safety features of smart vacuums.
Check the Battery Life
One of the reasons why your smart vacuum cleaner may not be turning on is due to a dead battery. Here are some simple steps you can take to check the battery life:
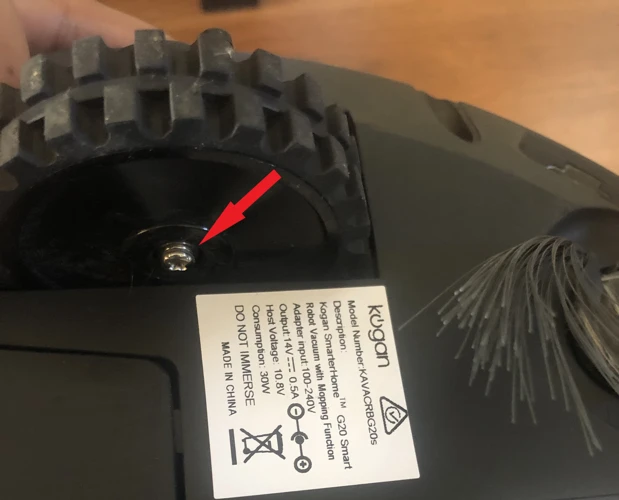
Step 1: Locate the battery compartment on your smart vacuum cleaner. Generally, it is located at the bottom of the device, and you can easily access it by flipping it over.
Step 2: Remove the battery from the compartment and check for any signs of damage or corrosion. If you notice any damage or discoloration, it’s time to get a replacement battery.
Step 3: Now, turn on your multimeter and set it to the DC voltage mode. Connect the red lead to the positive end of the battery and the black lead to the negative end and check the voltage level.
Step 4: If the voltage reads below the rated voltage, then it’s time for a new battery. Most smart vacuum cleaners have a battery voltage range of 12-14 volts. Any voltage reading below this range indicates a dead battery.
If you find that the battery is indeed dead, it’s time to shop for a replacement. Look for a battery with the same voltage and battery chemistry as your old battery, and consider purchasing one that has a higher capacity to extend your vacuum’s run time. It’s important to note that some smart vacuum cleaner batteries are not user-replaceable, so be sure to check with the manufacturer before making any changes.
Inspect the Charging Dock
One of the most common reasons why your smart vacuum cleaner may not be turning on could be due to a faulty charging dock. When your device is not charging correctly, it can lead to battery drain issues and ultimately result in your vacuum cleaner not turning on. To inspect the charging dock, follow these steps:
Step #
Steps to Inspect the Charging Dock
1
Unplug the charging dock from the power outlet.
2
Check the charging pins on both the dock and the vacuum cleaner where they make contact. If they appear dirty or corroded, use a cotton swab to clean them gently.
3
Inspect the power cord for any visible signs of damage or fraying. If there are any issues, it may be necessary to replace the cord or the entire charging dock.
4
Check the LED indicators on the dock. Usually, there will be an LED light that turns on when the device is charging. If the LED light is not on, it could indicate an issue with the power source or the charging dock itself.
5
Plug in the charging dock back into the power outlet and ensure that it is securely connected to the vacuum cleaner.
If after inspecting the charging dock, you still find that your smart vacuum cleaner is not turning on, then it may be time to consider seeking professional help or reaching out to the manufacturer for further assistance.
Reason 3: Sensors
As you try to diagnose why your smart vacuum cleaner is not turning on, one possible culprit that you may not have considered yet could be the sensors. These highly advanced devices work together to guide the vacuum cleaner as it works its way across the room. However, sensors can malfunction or become obstructed, preventing the machine from powering up properly. In this section, we will explore the potential reasons why sensors could be causing your vacuum cleaner to remain inactive and discuss some simple steps to take to rectify the situation.
Clean the Sensors
To get your smart vacuum cleaner back to its cleaning duties, it’s important to clean its sensors. These sensors are responsible for detecting obstacles and guiding the device around the room. Uncleaned sensors can disrupt the device’s ability to move and clean your floors.
Here are some steps to clean your smart vacuum cleaner’s sensors:
Turn off your device: Before starting, make sure that your device is turned off and unplugged. This will ensure that you can clean safely.
Locate the sensors: The sensors are usually situated in front of the device and beneath it. You might need to refer to the device’s manual to locate them.
Remove any debris or dust: Using a soft cloth, remove any debris or dust from around the sensors, including any pet hair or lint. This will prevent false positives when the device senses the ground.
Clean the sensors: Gently clean the sensors with a soft cloth or cotton swab. You can also use a soft-bristled brush to clean the dirt that has accumulated inside the sensors. Ensure that you don’t use any sharp objects.
Reassemble the device: Once you’ve cleaned the sensors properly, carefully reassemble your smart vacuum cleaner and turn it on. It should now be able to detect the obstacles and clean your floors as intended.
By following these steps, you can ensure that your device’s sensors remain clean and functioning properly. This can go a long way in preventing any disruptions in the cleaning process and ensuring that your floors stay spick and span.
Check for Debris
One of the reasons why your smart vacuum cleaner may not be turning on is due to debris on the sensors. Over time, dust and dirt can accumulate on the sensors causing them to malfunction. Here are a few steps you can take to check for debris:
Inspect the Sensors: Take a close look at the sensors on the bottom of the vacuum cleaner. Are they dirty or covered in dust? If so, grab a microfiber cloth and gently wipe them down. This should remove any debris that may be blocking the sensors.
Check the Wheels: The wheels on your smart vacuum cleaner can also get clogged with debris. Inspect the wheels and remove any debris that you find. This should help the vacuum cleaner move more freely and prevent it from getting stuck.
Look for Blockages: Sometimes, debris can get stuck in the vacuum cleaner’s brushes or hoses. This can cause the vacuum cleaner to malfunction. Use a flashlight to inspect the brushes and hoses for any blockages. If you find any, remove them using a pair of tweezers or a small brush.
By checking for debris and removing it, you can help ensure that your smart vacuum cleaner is working at its best. If you continue to experience issues with your vacuum cleaner not turning on, it may be time to contact the manufacturer or a repair technician for further assistance.
Reason 4: Software Update
As technology evolves, smart vacuum cleaners are becoming increasingly advanced. With new features and improved performance, keeping up to date with the latest software updates is crucial for optimal functionality. However, you may find that your smart vacuum cleaner is not turning on, and one possible reason could be outdated software. In this section, we will explore how outdated software can impact your smart vacuum cleaner’s performance and provide solutions on how to update your device effectively.
Check for Updates
One of the most common reasons why your smart vacuum cleaner may not be turning on is the outdated software or firmware. You can easily check for updates by following these steps:
Check the manufacturer’s website or app for updates
Refer to the user manual for instructions on how to update the device
Why should you update your device?
Regular updates can help your smart vacuum cleaner perform optimally and efficiently. Manufacturers often release software updates to fix bugs, improve performance, and add new features to the device.
How to Check for Updates?
Before you start checking for updates, make sure that your smart vacuum cleaner is connected to the internet. Here’s a step-by-step guide on how to check for updates:
Steps
Description
Step 1
Launch the manufacturer’s app on your smartphone or tablet
Step 2
Go to the settings menu and select “Device Settings”
Step 3
Look for an option that says “Check for Updates” or “Software Update”
Step 4
If an update is available, follow the prompts to download and install the update
Updating your smart vacuum cleaner is a quick and easy process that can help improve performance and fix any issues. Make sure to check for updates regularly to ensure that your device is always up to date.
How to Update Your Device
Updating your smart vacuum cleaner’s software is crucial to ensure its optimal performance. Here is a step-by-step guide on how to update your device:
Connect your smart vacuum cleaner to the internet: Make sure your device is connected to the internet. If not, connect it to Wi-Fi or cellular data if available.
Check for available updates: Go to the settings on your smart vacuum cleaner’s app and check for any available updates. If there are updates, proceed with the next step.
Download the update: Download the update and wait for it to finish downloading. This may take some time depending on the size of the update and the speed of your internet connection.
Install the update: Once the download is complete, install the update. Follow the instructions provided by the app to complete the installation process.
Restart your device: After installation, restart your smart vacuum cleaner to ensure that the update has been applied correctly.
By following these simple steps, you can easily update your smart vacuum cleaner’s software and ensure that it’s running smoothly. Regular software updates can not only fix bugs but also improve the device’s performance and add new features, making your cleaning experience even better!
Reason 5: Motor
As you continue to troubleshoot your smart vacuum cleaner for why it is not turning on, there is a possibility that the issue is with the motor. It is one of the essential components of a vacuum cleaner since it is responsible for all the suction power. However, if the motor is broken or clogged, it can cause the device to malfunction. Don’t panic just yet, as there are several ways to diagnose the problem and fix it without having to replace the entire machine. Keep reading to learn more about how to solve motor-related issues with your smart vacuum cleaner.
Cleaning the Motor
To clean the motor of your smart vacuum cleaner, you will need a few tools and a bit of elbow grease. Before beginning, make sure your device is turned off and unplugged.
Step 1: Remove the dustbin or dirt cup from your vacuum cleaner and empty it.
Step 2: Remove any other attachments or accessories from your vacuum cleaner to access the motor.
Step 3: Use a soft-bristled brush or a microfiber cloth to gently clean the exterior of the motor, removing any debris or dust that may have accumulated.
Step 4: Use a crevice tool or small brush attachment to remove any dust or debris that may have accumulated in and around the motor.
Step 5: If your vacuum cleaner has a filter, remove it and clean or replace it as needed.
Step 6: Use a clean, dry cloth to wipe down the interior of the vacuum cleaner and remove any remaining debris or dust.
If cleaning the motor does not solve the issue of your smart vacuum cleaner not turning on, it may be time to consider replacing the motor. Check with the manufacturer to see if replacement parts are available.
Remember, regular maintenance of your smart vacuum cleaner’s motor can help extend its lifespan and ensure it continues to function properly for years to come.
Replacement Parts
When it comes to the motor of your smart vacuum cleaner, sometimes replacement parts may be necessary to get it up and running again. It’s important to first identify which part may need replacing in order to avoid buying the wrong thing.
1. Brushes: The brushes of the motor can wear down over time and may need to be replaced. If you hear a lot of noise or notice decreased suction, this could be a sign that the brushes need to be changed.
2. Belt: The belt of the motor is responsible for powering the brushes and can often become worn or broken. If you notice the motor making strange noises or the brushes not turning at all, it’s likely time to replace the belt.
3. Fan: The fan of the motor can become damaged or clogged with debris, causing decreased suction or a burning smell. If this is the case, the fan will need to be replaced.
4. Motor: In some cases, the entire motor may need to be replaced. This is often the most expensive replacement part and should only be considered if all other options have been ruled out.
Remember to always consult the manufacturer’s instructions before attempting any replacements. If you’re not comfortable doing the replacements yourself, it’s always best to take your smart vacuum cleaner to a professional. Saving a few dollars on the parts could end up costing you more in the long run if you accidentally damage your device.
Keeping your smart vacuum cleaner in good working order is important for maintaining clean floors and saving time on household tasks. By identifying and addressing these common reasons for failure, you’ll be able to get your device back up and running in no time!
Conclusion
In conclusion, troubleshooting your smart vacuum cleaner can be a bit of a challenge, but it doesn’t have to be overwhelming. By following the step-by-step guide above, you can easily diagnose the problem and fix it in no time at all.
Remember, if your device is not turning on, it’s important to first check the power source and the battery level. If those two things are in order, then move on to checking the sensors and whether the device needs a software update. And if none of those fixes work, then it may be time to consider cleaning or replacing the motor.
One important thing to keep in mind when it comes to maintaining your smart vacuum cleaner is that prevention is key. Regular cleaning of the device and its components can help prevent future problems from occurring. Additionally, be sure to keep up with any necessary software updates and replace parts as needed to ensure optimal performance.
Overall, with a little bit of effort and know-how, you can keep your smart vacuum cleaner running smoothly and efficiently for years to come. So, the next time your device isn’t turning on, don’t panic – just follow the steps above and you’ll be back to cleaning in no time!
Frequently Asked Questions
1. Why won’t my vacuum cleaner turn on?
There could be several reasons why your smart vacuum cleaner isn’t turning on. The most common reasons are power source, battery, sensors, software update, or motor.
2. How can I check the power outlet?
You can check the power outlet by plugging in another device to see if it’s working. If the device turns on, then the power outlet is functional.
3. What should I do if my power cord is damaged?
If your power cord is damaged, you should replace it with a new one or contact the manufacturer for assistance.
4. How can I check the battery life?
You can check the battery life by accessing the settings on your smart vacuum cleaner or checking the battery indicator on the device.
5. What should I do if my charging dock is not working?
If your charging dock is not working, you can try resetting it or contacting the manufacturer for assistance.
6. How can I clean the sensors on my vacuum cleaner?
You can clean the sensors on your vacuum cleaner by using a soft cloth and rubbing alcohol to remove any dirt or debris.
7. What should I do if my vacuum cleaner is still not turning on after a software update?
If your vacuum cleaner is still not turning on after a software update, you should contact the manufacturer for assistance as there may be underlying issues with the device.
8. Can I clean the motor on my own?
It’s not recommended to clean the motor on your own as it could be dangerous. It’s best to contact the manufacturer for assistance or take it to a professional.
9. How often should I replace the motor on my vacuum cleaner?
The frequency of motor replacement depends on the brand and model of your vacuum cleaner. You should follow the manufacturer’s recommendations or contact them for further information.
10. How can I prevent my vacuum cleaner from experiencing these issues?
You can prevent your vacuum cleaner from experiencing these issues by regularly cleaning and maintaining the device, following the manufacturer’s recommendations, and avoiding overuse of the device.