Troubleshooting Sensor Issues on Your Smart Vacuum Cleaner
Warning: A non-numeric value encountered in /var/www/html/wp-content/themes/generatepress/inc/structure/post-meta.php on line 165
by Dwight Gibson
Table of Contents
Introduction
Have you ever experienced anti-collision and drop sensor issues with your smart vacuum cleaner, causing it to not perform its duties effectively? It can certainly be frustrating when your device malfunctions, but luckily, there are some steps you can take to troubleshoot and solve these problems. In this article, we will discuss the common sensor issues that may arise and provide you with step-by-step solutions. Whether you’re a new user or veteran of smart vacuums, this guide will help you get the most out of your device. So, let’s dive in and learn about how to troubleshoot your smart vacuum cleaner’s sensors.
What are Smart Vacuum Cleaner Sensors?
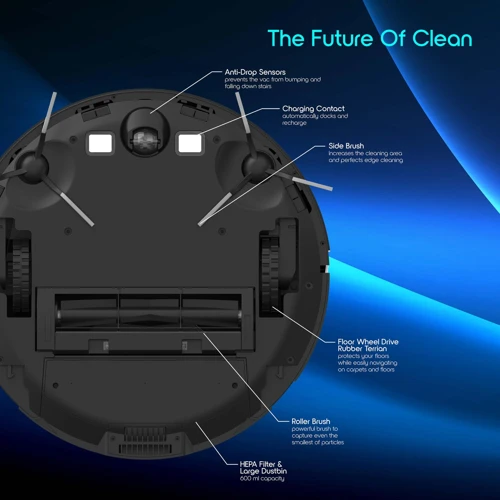
When talking about smart vacuum cleaners, it’s hard to miss the sensors that are integral to them. Smart vacuum cleaner sensors come in all shapes and sizes, each with their specific functions. In this article, we’ll examine the numerous sensors that make up most smart vacuums to better understand how they work and what issues they may encounter.
| Sensor Type | Function |
| ———– | ——– |
| Anti-Collision Sensors | Detecting obstacles or walls to avoid collisions |
| Drop Sensors | Preventing the vacuum from falling off edges or stairs |
| Gyroscope | Helping the vacuum maintain a straight path |
| Infrared Sensors | Detecting and avoiding obstacles and determining the vacuum’s position |
| Radar Sensors | Employing radio waves to map out the room and locate obstacles |
| Optical Sensors | Guiding the vacuum’s movement by detecting surface differences |
Each type of sensor plays an important role in making sure your smart vacuum cleaner functions accurately and autonomously. For example, the anti-collision sensors prevent the vacuum from running into walls, while the drop sensors prevent it from tumbling down a staircase.
To ensure the sensors are working correctly, it’s crucial to clean and calibrate them routinely. In addition, drop sensors need to be checked regularly to guarantee they are functioning correctly. Neglecting to keep the sensors clean, calibrated, and checked can lead to issues with your smart vacuum that could have been avoided.
Understanding how these sensors work and what problems they can face is crucial to maintaining your smart vacuum cleaner. By avoiding mistakes such as not cleaning the sensors, calibrating them and keeping up with routine maintenance, you can enjoy the benefits of an AI-powered cleaning experience with your smart vacuum.
Common Sensor Issues and Solutions
When it comes to smart vacuum cleaners, one of the most important components are the sensors. These sensors help the vacuum navigate around your home, avoid obstacles, and detect when it’s time to come back to its charger. However, as with any technology, issues can arise. In this section, we’ll explore some of the most common sensor issues that you may encounter with your smart vacuum cleaner and provide you with effective solutions to those problems. By the end of this section, you’ll be equipped with the knowledge to troubleshoot common sensor problems and keep your smart vacuum working at optimal performance. And if you want to avoid making common mistakes with your smart vacuum, make sure to check out our previous article on mistakes to avoid. (link to previous article on mistakes to avoid)
Issue #1: Sensors Not Responding
One of the most common issues that smart vacuum cleaner owners face is when the sensors on the device fail to respond. This can be caused by a variety of factors, ranging from electrical malfunctions to software problems. If you’re facing this issue, here are some steps you can follow to troubleshoot the problem:
Check the power source: Before delving too deeply into the problem, make sure that your vacuum cleaner is receiving enough power. Plug it into a different outlet or try using a different power source altogether to rule out electrical issues.
Restart the device: Another basic step you can take is to restart the vacuum cleaner. Press and hold down the power button for several seconds until the device powers off. Wait a few seconds, then press the button again to turn it back on. This process can sometimes resolve minor software glitches that cause sensor problems.
Inspect the sensors: After ensuring the basics are covered, inspect the sensors on your smart vacuum cleaner. Look for any physical damage or signs of wear and tear that may be hindering their operation. If the sensors look good but still aren’t responding, try cleaning them using a soft cloth or a gentle cleaning solution.
Reset the device: If none of the above steps work, try resetting the vacuum cleaner. Typically, there will be a reset button located somewhere on the device. Consult the user manual if you’re unsure of its location. Press and hold the button down for several seconds until the device powers off. Wait for a few seconds before pressing it again to turn it back on. Make sure to reconfigure any settings or preferences if the reset resolves the issue.
Contact customer support: If none of these steps work, it may be time to contact the manufacturer’s customer support. Explain the issue and the steps you’ve taken to troubleshoot the problem. They may ask you to provide additional information or perform other troubleshooting steps over the phone or via email. If your device is still under warranty, they may also offer to replace or repair the vacuum cleaner free of charge.
Remember, when troubleshooting any issue with your smart vacuum cleaner, always follow the manufacturer’s guidelines and consult the user manual for specific instructions. By following these basic steps, you can save yourself a lot of time and frustration when dealing with sensor issues.
Solution: Reset the Vacuum Cleaner
When it comes to troubleshooting anti-collision and drop sensor issues with your smart vacuum cleaner, one of the most common solutions is to simply reset the vacuum cleaner. This will often clear any temporary glitches or bugs with the sensors and get them functioning properly again.
To reset your smart vacuum cleaner, follow these step-by-step instructions:
Steps to Reset Smart Vacuum Cleaner
Step 1: Turn off the vacuum cleaner and unplug it from the wall outlet.
Step 2: Remove the dustbin from the vacuum cleaner.
Step 3: Locate the reset button on your vacuum cleaner. This is usually a small button on the side or bottom of the vacuum cleaner or may be included in the vacuum cleaner’s mobile application or remote control.
Step 4: Use a paperclip or other small tool to press and hold the reset button for at least 15 seconds.
Step 5: Release the reset button and wait for the vacuum cleaner to reboot.
Step 6: Reinstall the dustbin and turn the smart vacuum cleaner back on.
Keep in mind that resetting your smart vacuum cleaner should be considered a first step in troubleshooting and may not necessarily solve all sensor-related issues. If the sensors continue to malfunction, it’s important to explore further troubleshooting options or contact customer support for assistance.
Issue #2: Sensors Triggering Constantly
One of the common issues that users of smart vacuum cleaners face is when the sensors trigger constantly. This can be frustrating, as it means that the vacuum cleaner may not be able to clean properly, or may be stuck in one area of the room. Here are some reasons why sensors may trigger constantly and what can be done about it.
The Sensors are Dirty: Over time, the sensors on a smart vacuum cleaner can become dirty or dusty, which can interfere with their proper functioning. It’s important to clean the sensors regularly to avoid this issue. To do this, use a clean cloth or a soft-bristled brush to gently wipe away any dirt or dust.
Blockages or Obstructions: Another reason why sensors may trigger constantly is due to blockages or obstructions in the vacuum cleaner’s path. Check the vacuum cleaner’s brush and roller for any tangled hair or debris that may be causing the blockage. Also, check for any large objects that may be blocking the sensors, such as pieces of furniture or toys.
Loose or Broken Sensors: It’s possible that the sensors on the vacuum cleaner may have become loose or broken, which can cause them to trigger constantly. Check the sensors to ensure that they are securely attached to the vacuum cleaner. If any sensor is broken, it may be necessary to replace it.
By checking for these common issues, users can troubleshoot why the sensors are triggering constantly and hopefully resolve the issue. A clean vacuum cleaner with properly functioning sensors will not only effectively clean your home, but it will also save you time and stress.
Solution: Check for Blockages or Obstructions
Smart vacuum cleaners are designed to operate with minimal human intervention, thanks to their sensors. However, these sensors can sometimes trigger constantly or not respond at all. If you’re experiencing these issues, one possible cause is blockages or obstructions in the vacuum cleaner’s sensors.
Blockages and obstructions can affect various sensors, including:
Sensor Type
Location
Anti-Collision Sensors
Located on the front of the vacuum cleaner
Drop Sensors
Located on the bottom of the vacuum cleaner
Here are the steps to follow:
1. Turn off the vacuum cleaner and unplug it from the power source.
2. Check the sensors for any visible blockages or obstructions such as dirt, hair, or debris.
3. Clear away any blockages or obstructions with a soft brush or cloth. Avoid using water or other liquids, as they can damage the sensors.
4. Turn the vacuum cleaner back on to see if the issue is resolved. If the problem persists, try the next step.
Additional tips:
– Make sure to clean the sensors regularly to avoid future issues.
– Check for blockages or obstructions on other parts of the vacuum cleaner, such as the brushes and wheels.
– Ensure that the vacuum cleaner has enough space to move around freely without getting stuck.
– If you have pets, consider using a vacuum cleaner with a pet hair tool to prevent excessive hair buildup.
By following these simple steps and keeping your vacuum cleaner’s sensors clean and clear of blockages or obstructions, you can ensure that it works efficiently and effectively.
Issue #3: Sensors Not Detecting Obstacles
When your smart vacuum cleaner sensors don’t detect obstacles, it can cause frustration and make it seem like the vacuum isn’t doing its job. It’s important to address this issue promptly to ensure proper cleaning and prevent any damage to your home or the vacuum itself.
The Cause of the Issue
One probable cause of this issue is that the bumper sensors on the vacuum cleaner may have become dirty or damaged. These sensors are usually located directly behind the bumper and are responsible for detecting obstacles in the path of the vacuum. When these sensors are dirty or damaged, they may fail to detect obstacles, causing your vacuum to bump into things or get stuck.
The Solution to the Issue
To fix this issue, you can try cleaning the bumper sensors on your vacuum cleaner. First, turn off the power and unplug the vacuum cleaner. Then remove the bumper cover and take a clean, damp cloth to wipe away any dirt, hair or debris buildup from the sensors. Once you have cleaned the sensors thoroughly, replace the bumper cover and turn the power back on. Test the vacuum cleaner to confirm that the sensors are now working correctly.
If cleaning the sensors does not solve the issue, it could mean that they are damaged and need to be replaced. Contact the manufacturer of your smart vacuum cleaner to inquire about purchasing new sensors or to take advantage of any warranty or repair services that may be available.
Prevention of Future Issues
Preventing this issue from happening again in the future is actually quite simple. Regularly checking and cleaning the bumper sensors on your smart vacuum cleaner is the key to ensuring that they continue to work effectively. You can also regularly inspect the vacuum’s bumper for any significant damage that might cause the sensors to malfunction.
Summary
If your smart vacuum cleaner is having trouble detecting obstacles, it may be due to dirty or damaged bumper sensors. Cleaning the sensors should be your first step in troubleshooting the problem, followed by contacting the manufacturer for replacement parts or further assistance. To prevent this issue from happening again, make sure to regularly clean and inspect the sensors and bumper on your vacuum cleaner.
Solution: Clean the Sensors or Replace the Bumper Sensors
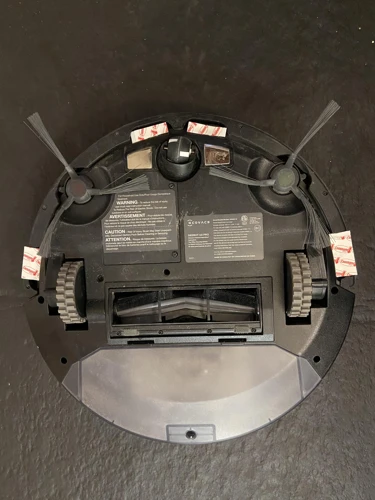
If you are having trouble with your smart vacuum cleaner’s sensors not detecting obstacles, you may need to clean or replace the bumper sensors. These sensors are located underneath the vacuum cleaner and are responsible for detecting obstacles and preventing collisions. If they are dirty or damaged, they may not function properly, resulting in your vacuum cleaner colliding with furniture or other objects in your home.
Cleaning the Sensors
Cleaning your bumper sensors is a straightforward process that can be done without any technical expertise. Here are the steps to follow:
Step
Action
Step 1
Turn off the vacuum cleaner and unplug it from the power source.
Step 2
Flip the vacuum cleaner over and locate the bumper sensors.
Step 3
Use a clean, dry cloth to remove any dust or debris from the sensors.
Step 4
Use a soft-bristled brush to remove any stubborn dirt or debris.
Step 5
Once the sensors are clean, flip the vacuum cleaner back over and test the sensors to see if they are functioning properly.
Replacing the Bumper Sensors
If cleaning the bumper sensors does not resolve the issue, you may need to replace them. This process will require some technical expertise and tools. You will need to refer to your vacuum cleaner’s user manual for detailed instructions on how to replace the bumper sensors.
Before replacing the bumper sensors, make sure to turn off and unplug your vacuum cleaner from the power source. Then, locate the bumper sensors and carefully remove them from the vacuum cleaner. Replace them with new sensors that are compatible with your vacuum cleaner model. Once the new sensors are installed, test the sensors to ensure they are functioning properly.
If you are experiencing issues with your smart vacuum cleaner’s sensors not detecting obstacles, you can try cleaning the bumper sensors first. If that doesn’t work, you may need to replace the sensors entirely. Always consult the user manual for your vacuum cleaner and follow the manufacturer’s instructions for best results.
Advanced Troubleshooting
As smart vacuum cleaners become more advanced, so do their sensors. Unfortunately, with increased technological sophistication come more complex problems. When basic troubleshooting methods fall short, it’s time to turn to advanced troubleshooting measures. These aren’t for the faint-hearted, but with a bit of perseverance, you can get your vacuum cleaner back on track. Without further ado, let’s dive into the realm of advanced sensor troubleshooting.
Issue #4: Sensors Not Working in Low Light
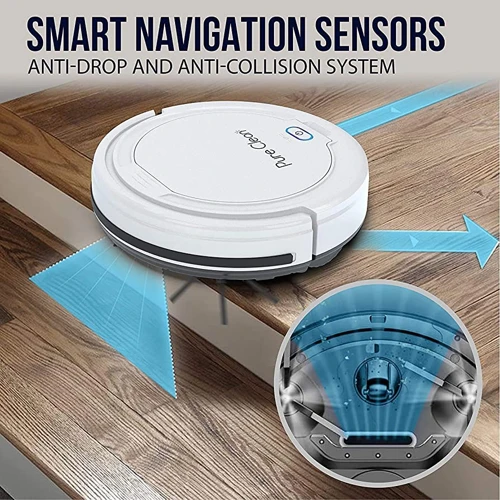
Smart vacuum cleaners rely heavily on sensors for detecting and navigating around obstacles in the cleaning area. However, the sensors might not work as intended when exposed to low light environments, leading to poor cleaning performance.
Here are some possible reasons why your vacuum cleaner’s sensors aren’t working in low light:
The vacuum cleaner’s sensors might not be sensitive enough to detect obstacles in low light situations.
Low light environment might make it difficult for sensors to distinguish between dust and other materials.
The sensor’s light receptors might have malfunctioned or gotten dirty, leading to inaccurate readings.
There might also be a problem with the environmental lighting, such as flickering or low-intensity light.
Here are some ways you can troubleshoot this issue:
First, check if the vacuum cleaner’s sensitivity settings can be adjusted. Increasing the sensitivity might help to detect obstacles in low light situations.
If the sensitivity settings cannot be adjusted, try cleaning the sensors with a soft cloth. This can improve the accuracy of the sensors.
If cleaning the sensors doesn’t work, try to increase the environmental lighting. Adding lamps or light fixtures to the room can provide enough light for the sensors to accurately detect obstacles.
If none of the above work, it might be time to call customer support or replace the sensors altogether.
Remember that low light environments can be particularly challenging for smart vacuum cleaners, but cleaning the sensors and increasing environmental lighting can lead to improved sensor performance.
Solution: Check the Environmental Lighting and Sensors’ Sensitivity
If you are facing the issue of sensors not working properly in low light, you must check the environmental lighting and sensitivity of your smart vacuum cleaner’s sensors. Here are the steps you can take:
1. Check the environmental lighting: Start by checking the lighting conditions in the room. Make sure the room is sufficiently lit for the smart vacuum cleaner to operate effectively. If the lighting in the room is low, consider turning on additional lights or opening the curtains to allow natural light to enter the room.
2. Adjust sensors’ sensitivity: Every smart vacuum cleaner has an option to adjust the sensors’ sensitivity manually. Check your device’s manual to find out how to adjust the sensitivity of your sensors. By increasing or decreasing the sensitivity, you can find the optimal setting that works best for your cleaning needs.
3. Clean the sensors: Finally, ensure that the sensors are clean from any dust, debris, or dirt that may be affecting the sensor’s performance. Use a soft brush or cloth to clean the sensors to ensure they are functioning accurately.
By taking these simple steps, you can fix the issue of faulty sensors and ensure your smart vacuum cleaner performs efficiently even in low light conditions.
Issue #5: Sensors Not Communicating with the Vacuum Cleaner’s CPU
One of the most frustrating issues that you can encounter with your smart vacuum cleaner is when the anti-collision and drop sensors fail to communicate with the vacuum cleaner’s CPU. This can cause the robot to behave erratically and malfunction, making it impossible for it to clean your floors effectively.
In this section, we’ll look at some of the possible causes of this issue and explore the steps you can take to troubleshoot and resolve it.
Possible Causes of Sensor Communication Issues
There are several reasons why the sensors on your smart vacuum cleaner may stop communicating with the CPU. Some of the most common causes include:
Loose connections or damaged wiring
Outdated firmware or software
Interference from other devices
Physical damage to the sensors or the vacuum cleaner
Troubleshooting Sensor Communication Issues
If you’re experiencing issues with the sensors on your smart vacuum cleaner not communicating with the CPU, there are several steps you can take to troubleshoot and address the problem. Here are some possible solutions to consider:
Possible Solution
Description
Check Connections and Wiring
Make sure that all connections between the sensors and the vacuum cleaner’s CPU are secure and not loose or damaged. Check the wiring for any signs of wear and tear or damage.
Update Firmware and Software
If your vacuum cleaner has outdated firmware or software, it may be causing communication issues. Check the manufacturer’s website for firmware and software updates and install them.
Turn off Interfering Devices
If there are other devices in the vicinity that could be causing interference, turn them off or move them to another room to see if it resolves the issue.
Inspect and Clean the Sensors
Inspect the sensors for any physical damage or debris that may be obstructing their function. Clean them carefully with a soft, dry cloth to remove any dust or grime.
Contact Customer Support
If none of the solutions above work, contact the manufacturer’s customer support team for further assistance. They may be able to diagnose and resolve the issue or arrange for repair or replacement of the sensors or vacuum cleaner.
Conclusion
When the sensors on your smart vacuum cleaner fail to communicate with the CPU, it can be frustrating and inconvenient. However, by following the steps outlined above, you may be able to troubleshoot and resolve the issue and enjoy the benefits of a clean, dust-free home once again. Remember to take care of your vacuum cleaner’s sensors on a regular basis to ensure that they function properly and provide optimal cleaning performance.
Solution: Check the Wiring and Connection Between the Sensors and CPU
One of the more frustrating issues that can plague your smart vacuum cleaner is when the sensors aren’t communicating with the CPU. This can cause your vacuum to behave erratically, moving in unpredictable patterns or failing to avoid obstacles.
If you’re dealing with this issue, the first step is to carefully check the wiring and connections between the sensors and the CPU. Here’s a table to help you troubleshoot:
Potential Issue
Solution
Loose connections
Check all of the wires and connections between the sensors and the CPU, making sure that they’re securely plugged in and that there’s no damage to the wires.
Worn or damaged cables
Inspect the cables for signs of wear or damage, such as frayed wiring or nicks in the protective covering.
Compromised connection points
Examine the connection points between the sensors and the CPU. If there is any rust or other visible damage, clean the connection point with a dry cloth or compressed air.
Faulty sensors or CPU
If all of the connections appear to be working properly and there is no visible damage, the issue may be with the sensors or the CPU. Contact customer support for further assistance.
By carefully examining the wiring and connections, you can hopefully identify any issues and take the necessary steps to resolve them. If you’re unable to solve the problem on your own, don’t hesitate to reach out to customer support for help. Remember, a well-functioning smart vacuum cleaner can save you time and hassle in your cleaning routine, so it’s worth taking the time to troubleshoot any issues that arise.
Issue #6: Sensor Malfunctions After Extended Use
As with any electronic device, smart vacuum cleaners with anti-collision and drop sensors may experience malfunctions after extended use. This can be frustrating, especially if you rely on your vacuum cleaner to keep your home clean. Here are some possible reasons why your vacuum’s sensors may be malfunctioning after extended use, and what you can do to fix them:
Possible Causes:
The sensors may have reached their lifespan limit
The sensors’ sensitivity may have decreased over time
Parts of the vacuum cleaner may have worn out or become damaged from prolonged use
The vacuum cleaner’s software may be outdated or corrupted
Solutions:
Replace the sensors. If you suspect that the sensors have reached their lifespan limit or have become too worn out, it may be time to replace them. Check your vacuum cleaner’s user manual to see if there are recommended replacement parts or contact the manufacturer for assistance.
Adjust the sensors’ sensitivity. Over time, the sensors’ sensitivity may decrease, causing them to malfunction. If your vacuum cleaner has a sensitivity adjustment feature, try adjusting it to see if this helps.
Check for wear and tear on other parts of the vacuum cleaner. Inspect your vacuum cleaner for any worn-out or damaged parts. This can include the wheels, brushes, and other mechanical parts that may contribute to sensor malfunctions. If you find any damaged parts, replace them as needed.
Update the software. If your vacuum cleaner’s software is outdated or corrupted, this could be causing sensor malfunctions. Check for any available updates or patches for your vacuum cleaner. If you’re not sure how to do this, contact the manufacturer or refer to the user manual.
By addressing these possible causes and solutions, you can help extend the lifespan of your vacuum cleaner’s sensors and keep them working properly for years to come. Remember, routine maintenance and care can go a long way in preventing malfunctions and issues with your smart vacuum cleaner’s sensors.
Solution: Replace Sensors or Contact Customer Support
When all else fails and you have exhausted all possible solutions, it may be time to consider replacing the sensors or contacting customer support. Sensor malfunctions that persist even after following all the troubleshooting steps may indicate that the sensors are beyond repair.
Replacing Sensors: If you have experience with DIY repairs and are confident in your ability to take apart your vacuum cleaner and replace the sensors, you can purchase replacement sensors from the manufacturer or a third-party seller. These sensors can vary in price depending on the make and model of your vacuum cleaner.
Contacting Customer Support: If you are not comfortable with DIY repairs or if your vacuum cleaner is still under warranty, it may be best to contact customer support. They can guide you through the troubleshooting process and help you determine if the sensors need to be replaced. If the vacuum cleaner is still under warranty, they may be able to send a technician to repair or replace the sensors for you.
It is important to note that tampering with your vacuum cleaner can void your warranty, so make sure to check the warranty information before attempting any repairs yourself. Additionally, if you do decide to replace the sensors yourself, make sure to follow the manufacturer’s instructions carefully and take the necessary safety precautions.
In the end, troubleshooting anti-collision and drop sensor issues for your smart vacuum cleaner can be frustrating, but it is important to stay patient and persistent. By following the steps outlined in this article, you can help ensure that your vacuum cleaner is running at its best and prolong its lifespan.
Conclusion
In conclusion, troubleshooting anti-collision and drop sensor issues for your smart vacuum cleaner is important to ensure the proper functioning and longevity of the device. By following the steps outlined in this article, you can solve common sensor issues such as sensor not responding, triggering constantly, and not detecting obstacles.
It’s essential to remember that these issues may require advanced troubleshooting, including checking the environmental lighting and sensor sensitivity, wiring and connection problems, and sensor malfunctions after extended use. If the solutions to these problems are not effective, it’s best to contact customer support or replace the sensors.
Maintaining your smart vacuum cleaner regularly, such as cleaning the sensors and checking for blockages or obstructions, can help prevent sensor issues from arising in the first place. Additionally, ensuring that the bumpers are in good condition and not damaged can help the sensors detect obstacles accurately.
In short, understanding and troubleshooting anti-collision and drop sensor issues as early as possible can save you time, money, and frustration in the long run. Your smart vacuum cleaner is an investment, and it should perform optimally to meet your cleaning needs, so take care of it with care and attention to detail.
Frequently Asked Questions
1. How do I know if my smart vacuum cleaner’s sensors are not responding?
You may notice that your smart vacuum cleaner is not detecting obstacles or is constantly bumping into furniture.
2. Can I fix sensor issues on my own?
Yes, some sensor issues can be fixed with basic troubleshooting steps. However, if the issue persists, it is best to contact customer support for assistance.
3. What should I do if my smart vacuum cleaner’s sensors trigger constantly?
Check for any obstructions or blockages in the vacuum cleaner’s path. Remove any large or heavy objects that may be obstructing the vacuum cleaner’s sensors.
4. How often should I clean my smart vacuum cleaner’s sensors?
You should clean your vacuum cleaner’s sensors after several uses, or as often as recommended in the manufacturer’s instructions.
5. Can I replace the sensors myself?
It depends on the model of your smart vacuum cleaner. Refer to the manufacturer’s instructions for guidance on replacing sensors, or contact customer support for assistance.
6. How can I increase my smart vacuum cleaner’s sensitivity to obstacles?
You may be able to adjust the sensitivity of your vacuum cleaner’s sensors in the settings menu. Refer to the manufacturer’s instructions for guidance on adjusting sensor settings.
7. Can I use my smart vacuum cleaner in low-light environments?
Most smart vacuum cleaners have sensors that can work in low-light environments, but it is best to check the manufacturer’s instructions for information on your specific model.
8. How can I troubleshoot if my smart vacuum cleaner’s sensors are not communicating with the CPU?
Check the wiring and connection between the sensors and the CPU. Make sure all connections are secure and there are no loose or damaged wires.
9. What should I do if my smart vacuum cleaner’s sensors malfunction after extended use?
Try replacing the sensors, or contact customer support for assistance with repairs or replacements.
10. Can I use my smart vacuum cleaner on high-pile carpets?
It depends on the model of your smart vacuum cleaner. Refer to the manufacturer’s instructions for guidance on suitable surfaces for your vacuum cleaner.