Warning: A non-numeric value encountered in /var/www/html/wp-content/themes/generatepress/inc/structure/post-meta.php on line 165
by Dwight Gibson
As you try to start your trusty smart vacuum cleaner and find that it’s not turning on, panic sets in. You start to wonder if it’s finally given up the ghost or if it’s just experiencing a minor glitch. These things can be complicated, and it’s easy to feel overwhelmed. But don’t worry, because we’ve got you covered. In this article, we’ll comprehensively explore how to troubleshoot a smart vacuum cleaner with no power, going through a series of easy-to-follow steps. With a bit of patience and application, your cleaner will be back in action in no time!
Table of Contents
Step 1: Checking the Power Source
It can be frustrating to have a smart vacuum cleaner that won’t turn on, especially when you need it the most. However, before you start panicking and thinking it’s broken, there are a few troubleshooting steps that you can take to resolve the issue. The first step is to check the power source, as there could be a problem with the outlet, power cord, or adapter. This step is crucial in getting your vacuum up and running efficiently. Let’s dive deeper into some ways to identify the root of the problem. If you want to learn more about the importance of cleaning smart vacuum chargers, follow the link.
1.1: Make Sure the Outlet Works
Before delving into more complicated solutions, it’s important to ensure that the outlet the smart vacuum cleaner is plugged into is actually working. This may sound obvious, but it’s an easy oversight that can lead to unnecessary frustration. First, unplug the vacuum cleaner and plug in another device, such as a lamp or phone charger, to make sure the outlet is functioning properly. If the other device works, then the outlet isn’t the issue.
If you discover that the outlet isn’t the problem, try another outlet in a different room to eliminate the possibility of a power outage or tripped circuit breaker. If the vacuum cleaner still doesn’t turn on, then it’s time to consider other potential solutions.
If the outlet does not work:
If the outlet works:
Step 1: Check the circuit breakers or fuse box
Step 2: Check the power cord and adapter
Step 2: Use an extension cord and plug vacuum into a working outlet
Step 3: Check the battery
Step 4: Check the dustbin and filter
Step 5: Check the brush roll and wheels
While a malfunctioning outlet may seem like a small issue, it can be frustrating and time-consuming to troubleshoot. By ruling out this simple solution first, you can save yourself the hassle of more involved repairs and get back to having a clean home in no time. If you want to know more about safety measures to consider when using a smart vacuum cleaner, please read our article on smart vacuum safety.
1.2: Check the Power Cord and Adapter
After making sure that the outlet is functioning properly, the next thing to check is the power cord and adapter. The power cord is responsible for transferring power from the outlet to the vacuum cleaner, and the adapter is responsible for converting the electrical current into a usable form for the vacuum. Here are some steps to follow when checking the power cord and adapter:
Step 1: Unplug the vacuum cleaner from the outlet.
Step 2: Inspect the entire length of the power cord for any signs of damage, such as cuts, frayed wires, or exposed wires. If there is any damage to the cord, do not attempt to use the vacuum cleaner as it could cause electrical shock. Instead, replace the power cord with a new one.
Step 3: Check the prongs of the power cord to make sure they are not bent or damaged. If the prongs are bent, straighten them carefully with pliers. If they are damaged, replace the power cord.
Step 4: Inspect the adapter for any damage, such as cracks or dents. If the adapter is damaged, use caution when handling it as it could pose a safety hazard. Replace the adapter with a new one.
Step 5: Ensure that the power cord is securely plugged into the vacuum cleaner and the adapter is firmly plugged into the outlet. If the cord or adapter is loose, the vacuum cleaner may not receive enough power to turn on.
It’s important not to overlook the power cord and adapter when troubleshooting a smart vacuum cleaner with no power. These components can easily become damaged or loose over time, especially if they are not taken care of properly. By regularly inspecting and maintaining the power cord and adapter, owners can avoid a potentially frustrating situation of a vacuum cleaner not turning on.
Step 2: Checking the Battery
As frustrating as it may be when your smart vacuum cleaner doesn’t turn on, there are ways to troubleshoot the issue. Before assuming that your smart vacuum cleaner is a lost cause, it is important to check the battery. The battery is the heart of any cordless smart vacuum cleaner, and if it’s not operating properly, then the whole machine may have trouble. In this section, we’ll go through the steps to check the battery and get your smart vacuum cleaner up and running again. If you want to learn more about the importance of cleaning smart vacuum chargers, or find tips on how to extend your smart vacuum battery life, follow the relevant links.
2.1: Recharge the Battery
If your smart vacuum cleaner is not turning on, the first thing to check is the battery. Without enough power, your vacuum won’t be able to function. Here’s what you can do to try and fix the problem:
1. Check if the battery is low
The first step is to check if the battery is low on charge. Most smart vacuums today come with a battery level indicator that will tell you if the battery is getting low. If you see the battery level is low, connect your vacuum to its charging dock, and allow it to charge fully. Once it’s charged, try turning on the vacuum again to see if it fixes the issue.
2. Check if the charging dock is working properly
If the vacuum is not charging even after being connected to the charging dock, you need to check if the dock is working properly. Make sure that the dock is connected to a power source and that there is no damage to the cord or adapter. If you still can’t identify the issue, try plugging the dock into a different outlet to see if the problem is with the power source.
3. Check the battery for damage
If your vacuum cleaner still does not turn on even after charging it fully, it is possible that the battery is damaged. In this case, you will need to replace the battery. However, before replacing the battery, make sure that you have tried all other troubleshooting steps.
Remember, for a long-lasting battery life, it is crucial to properly clean the charging dock and ensure that the vacuum is connected to a steady power source. Keeping your charging dock clean and dust-free can prevent damage to the battery and keep your vacuum running smoothly for longer periods of time. You can learn more about the importance of cleaning smart vacuum chargers here.
2.2: Replace the Battery
When it comes to troubleshooting a smart vacuum cleaner that has no power, one of the things that you can check is the battery. If the battery is dead, the vacuum cleaner will not turn on. In this case, you can replace the battery to get the vacuum cleaner up and running again. Follow these steps to replace the battery:
Before starting, make sure that the new battery is compatible with your smart vacuum cleaner.
Turn the vacuum cleaner off and unplug it from the power source.
Locate the battery compartment on your vacuum cleaner. This is usually located on the bottom or back of the vacuum cleaner.
Remove the cover of the battery compartment. In most cases, you will need a screwdriver to do this.
Identify the old battery inside the compartment. Carefully remove the battery from the vacuum cleaner. Be mindful of any clips or connectors that may be holding the battery in place.
Insert the new battery into the compartment. Make sure that it fits snugly into the compartment and that any clips or connectors are properly connected.
Replace the cover of the battery compartment and secure it in place with the screws.
Plug the vacuum cleaner back into the power source and turn it on to check if the battery replacement solved the problem.
As we move forward with troubleshooting the power issues of your smart vacuum cleaner, it is essential to check the dustbin and filter. These components play a crucial role in ensuring your vacuum cleaner operates optimally, and any damage or obstructions may hinder its performance. It might seem like a no-brainer, but many people overlook this step, leading to frustration and costly repairs. So, grab your gloves and let’s dive in!
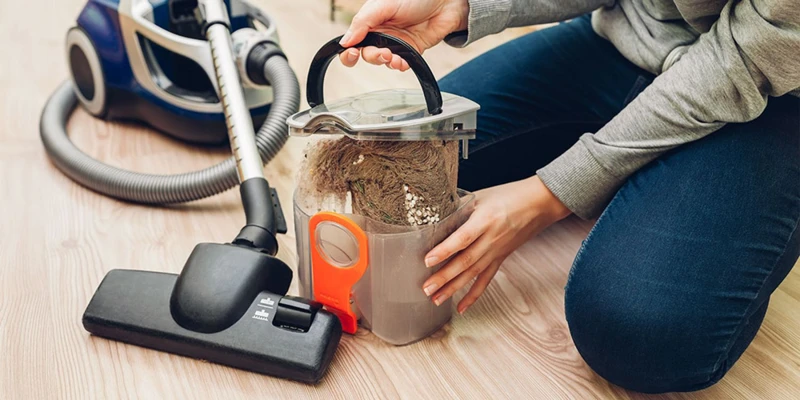
3.1: Empty the Dustbin and Clean the Filter
One of the most common reasons why your smart vacuum cleaner may not be turning on is due to a dirty dustbin or clogged filter. It’s important to check and clean them regularly to keep your vacuum in excellent condition. Here’s what you need to do:
Turn off the vacuum cleaner: Before you start cleaning the dustbin and filter, make sure that the vacuum cleaner is turned off and unplugged from the power source. This will prevent any accidents from happening.
Remove the dustbin: Locate the dustbin on your vacuum cleaner and remove it from the machine. Most dustbins can be easily detached by pressing a release button or pulling a latch. You may also need to remove any additional parts, such as the filter or cover, to access the dustbin.
Empty the dustbin: Once you have removed the dustbin, empty it into a trash can or bin. You may need to use your hands or a cleaning tool to remove any stubborn dirt or dust that is stuck inside the dustbin. Make sure to dispose of the contents properly.
Clean the filter: After emptying the dustbin, inspect the filter and remove it from the vacuum cleaner if necessary. Most filters are washable or can be cleaned with a brush or cloth. Refer to your user manual to determine the appropriate cleaning method for your specific vacuum cleaner model.
Allow the filter to dry: Once you have cleaned the filter, make sure to allow it to dry completely before reattaching it to the vacuum cleaner. This will ensure that no excess moisture remains on the filter, which could damage the vacuum cleaner or lead to the growth of mold or bacteria.
Reattach the dustbin and filter: Once the dustbin and filter are clean and dry, reattach them to the vacuum cleaner. Make sure that all parts are securely fastened and in their proper place.
By following these simple steps, you can troubleshoot any power issues with your smart vacuum cleaner that may be caused by a dirty dustbin or clogged filter. However, if your vacuum cleaner still doesn’t turn on even after cleaning, refer to the other troubleshooting steps in this guide.
3.2: Replace the Filter
When it comes to troubleshooting a smart vacuum cleaner with no power, one common issue could be a clogged filter. If you have already cleaned the filter and it still is not working, then it is time to replace it.
Step 1: First, locate the filter on your vacuum cleaner. Typically, it is located near the dustbin.
Step 2: Depending on the model of your smart vacuum, there may be different types of filters that correspond to different types of cleaning needs. Check your manual to determine which filter you need to replace with.
Step 3: Once you have identified the correct filter, you can now remove the old filter from the vacuum cleaner. In some models, the filter may slide out easily while in others, you may need to twist or unlock the filter in place.
Step 4: Once the old filter is removed, clean the filter compartment to ensure that there are no lingering debris or dust.
Step 5: Place the new filter into the filter compartment, making sure it sits snugly in place.
Step 6: If necessary, lock or twist the filter back into its correct position.
This simple process of replacing a filter on a smart vacuum cleaner can dramatically improve the power and functionality of your device. Remember to regularly replace your filters to ensure optimal performance. You can refer to the table below to see the different types of filters that correspond to different types of cleaning needs:
Filter Type
Best for
HEPA Filter
Allergies and pet owners
Foam Filter
Larger debris and pet hair
Cloth Filter
General cleaning
Carbon Filter
Odor elimination
Step 4: Checking the Brush Roll and Wheels
As we delve deeper into troubleshooting your smart vacuum cleaner, it’s time to take a look at the brush roll and wheels. These integral components of the vacuum help it navigate and clean effectively. However, there are times when things can go wrong and the brush roll and wheels can become blocked or damaged, impacting the vacuum’s ability to function. Don’t worry, though – with a few simple steps, you can quickly address any issues and get your vacuum running smoothly once again. So, let’s roll up our sleeves and get started!
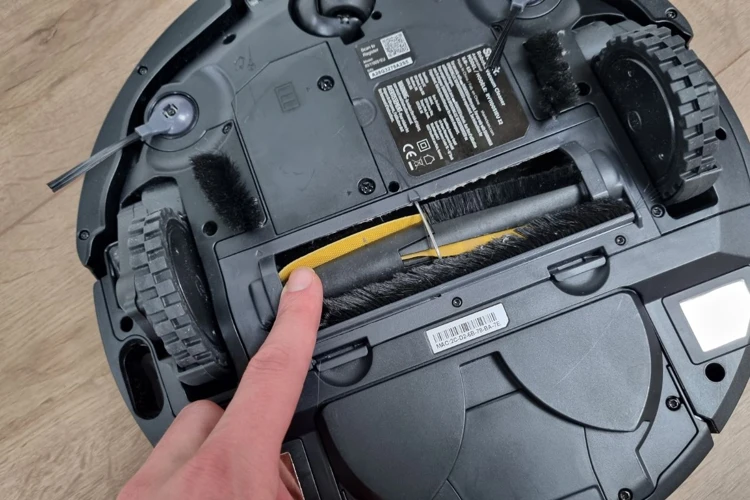
4.1: Clear Any Obstacles from the Brush Roll and Wheels
When your smart vacuum cleaner stops working, it can be frustrating and inconvenient. However, there are several steps you can take to troubleshoot the issue and get your vacuum working again. One common reason for a smart vacuum cleaner not working is an obstruction in the brush roll or wheels. Here’s how to address this issue:
Step
Action
Step 4.1:
Clear Any Obstacles from the Brush Roll and Wheels
4.1.1: Turn off the vacuum cleaner and unplug it from the power source.
4.1.2: Flip the vacuum cleaner over and inspect the brush roll and wheels.
4.1.3: Remove any hair, string, or other debris tangled around the brush roll.
4.1.4: Check for debris that may be stuck in the wheels or axles of the vacuum cleaner.
4.1.5: Use a clean cloth or soft-bristled brush to gently remove any debris from the brush roll and wheels.
4.1.6: Once you’ve removed any obstructions, flip the vacuum cleaner right side up and plug it back in.
4.1.7: Turn on the vacuum cleaner and test it to ensure that it’s working properly.
If you’ve checked the brush roll and wheels and the vacuum cleaner is still not working, you may need to consider replacing these parts. By following these troubleshooting steps, you can help ensure that your smart vacuum cleaner is functioning properly and keeping your home clean.
4.2: Replace the Brush Roll or Wheels
If clearing obstacles from the brush roll and wheels does not resolve the issue of your smart vacuum cleaner not having power, it may be time to replace them. Here are the steps you should follow to replace the brush roll or wheels:
Identify the Problem: Before you start replacing any parts, make sure you have identified whether the brush roll or wheels are the cause of the problem. Check for any physical damage or wear and tear that could be preventing them from functioning correctly.
Order Replacement Parts: You can order replacement brush rolls and wheels from the manufacturer of your smart vacuum cleaner or from third-party suppliers. Make sure you order the correct parts for your specific model.
Turn off and Unplug the Vacuum: As with any electrical appliance, you should always turn off and unplug your smart vacuum cleaner before attempting to replace any parts.
Remove the Old Parts: For the brush roll, you may need to unscrew it from the base of the vacuum cleaner and lift it out. The wheels may be attached with clips or screws. Follow the manufacturer’s instructions to safely remove the old parts.
Install the New Parts: Install the new brush roll or wheels in the same place where you removed the old part. Make sure they are securely in place and will not come loose during use.
Test the Vacuum Cleaner: Once you have installed the new brush roll or wheels, plug the vacuum cleaner back in and turn it on. Test it to make sure the power has been restored and the cleaning functionality has been restored as well.
With these steps, you should be able to successfully replace the brush roll or wheels of your smart vacuum cleaner and get it back up and running again. Remember to always follow the manufacturer’s instructions for safe and proper replacement of any parts.
Conclusion
In conclusion, troubleshooting a smart vacuum cleaner with no power can be a frustrating experience, but it is important not to panic. By following the steps outlined in this guide, you can easily diagnose and fix the problem.
Firstly, always check the power source when your vacuum cleaner is not working. Check the outlet and power cord to ensure they are functioning properly. If they are not, your vacuum cleaner will not turn on.
Secondly, if your vacuum cleaner is battery-powered, it is possible that the battery may be dead. Recharge the battery or replace it if it is not holding a charge.
Thirdly, a full dustbin or clogged filter can prevent your vacuum cleaner from turning on. Be sure to regularly empty the dustbin and clean or replace the filter if necessary.
Finally, the brush roll and wheels can also contribute to power issues. Check for any obstructions or damage and clear any debris to help your vacuum cleaner run smoothly.
By taking these steps, you can resolve most common issues with a smart vacuum cleaner that has no power. Don’t hesitate to contact the manufacturer or a professional if you are unable to identify or fix the problem on your own. With a little patience and persistence, your vacuum will be back in working order in no time.
Frequently Asked Questions
1. How do I know if my smart vacuum cleaner has no power?
If your smart vacuum cleaner does not turn on, it is most likely experiencing a power issue.
2. Can a faulty outlet affect my smart vacuum cleaner’s power?
Yes, a faulty outlet can prevent your smart vacuum cleaner from receiving the necessary power supply.
3. How can I check if my power cord or adapter is faulty?
You can check the power cord or adapter by inspecting for any signs of damage or by using a multimeter to test for continuity.
4. Why do I need to recharge the battery?
If your smart vacuum cleaner runs on a rechargeable battery, recharging the battery is essential in restoring its power level.
5. How can I replace the battery?
Follow the manufacturer’s instructions for your specific smart vacuum cleaner model. Replacement batteries can be ordered from the manufacturer’s website or authorized dealers.
6. How often should I empty the dustbin and clean the filter?
We recommend emptying the dustbin and cleaning the filter after each use or at least once every few weeks. This will ensure maximum cleaning efficiency for your smart vacuum cleaner.
7. Can I wash my smart vacuum cleaner’s filter?
This will depend on your specific smart vacuum cleaner model. Always check the manufacturer’s instructions before attempting to wash the filter.
8. Why do I need to clear any obstacles from the brush roll and wheels?
Obstacles such as hair and large debris can damage the brush roll and wheels, which can negatively impact your smart vacuum cleaner’s ability to clean effectively.
9. Can I replace the brush roll or wheels on my own?
Replacing the brush roll or wheels will depend on your specific smart vacuum cleaner model. Refer to the manufacturer’s instructions for guidance or seek assistance from an authorized dealer.
10. Do I need professional help if I have exhausted all troubleshooting options?
If you have exhausted all the troubleshooting options and your smart vacuum cleaner still does not work, it is best to seek help from a professional. An authorized dealer or customer service representative can provide further assistance.