Have you ever encountered error messages when using your smart vacuum cleaner? It can be frustrating to deal with these issues, especially when you’re not sure what’s causing them. However, taking proactive measures to prevent these errors can save you time and energy in the long run. In this article, we’ll explore some of the reasons why your vacuum cleaner may be displaying error messages and provide you with preventive measures to avoid them. Additionally, we’ll share some troubleshooting tips that can help you quickly resolve any issues that do arise. So, let’s dive in and learn how to keep your home clean and your vacuum cleaner error-free!
Reasons for Error Messages
Have you ever encountered error messages while using your smart vacuum cleaner? It can be frustrating when your device stops working when you need it the most. These error messages can have multiple reasons, and it’s essential to identify the cause to prevent them from happening in the future. Sensor blockages, low battery, software malfunctions, and mechanical problems are some of the most common causes of error messages. In the following sections, we’ll discuss these reasons in detail and provide preventive measures to avoid smart vacuum error messages. Additionally, we’ll provide helpful troubleshooting tips if you’re ever caught in a situation where your device stops working due to errors.
Sensor Blockages
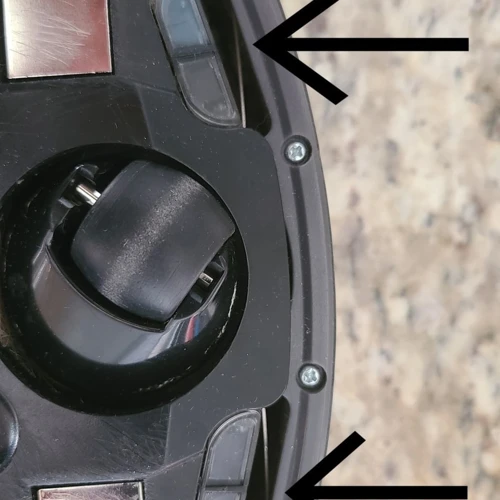
One common cause of error messages in smart vacuum cleaners is sensor blockages. Sensors are responsible for detecting obstacles and navigating the vacuum around the room. If sensors get blocked, the vacuum may misinterpret its surroundings or become unable to navigate, resulting in error messages.
To prevent sensor blockages, it’s important to clean the sensors regularly. This means removing any dirt, dust, or debris that may have accumulated on the sensors. The table below lists the most common types of sensors found in smart vacuum cleaners and tips for cleaning them.
| Type of Sensor | Cleaning Method |
|---|---|
| Infrared Sensors | Clean with a soft cloth or cotton swab |
| Laser Sensors | Clean with a soft cloth or cotton swab |
| Bumper Sensors | Clean with a soft cloth or cotton swab |
| Drop Sensors | Clean with a soft cloth or cotton swab |
Regular cleaning of sensors can help prevent sensor-related error messages, such as “Obstacle Detected” or “Side Brush Blocked”. If the vacuum still displays error messages after cleaning the sensors, there may be another underlying issue.
For troubleshooting tips related to smart vacuum errors, check out our article on common smart vacuum error messages. If you need help fixing an issue, our guide on fixing error messages may also be helpful.
Low Battery
One of the most common reasons why smart vacuum cleaners display error messages is due to low battery. This is a prevalent issue among many types of devices that run on batteries.
To prevent such errors from occurring, it is essential to keep the vacuum cleaner’s battery fully charged. This will ensure that the device can run uninterrupted for the intended duration without running out of power. It is often recommended to charge the vacuum for a minimum of 4 hours before use.
Here’s a summary of what you can do to avoid low battery error messages:
| Preventive Measure | Description |
|---|---|
| Charge fully before use | Make sure to charge the vacuum cleaner’s battery fully before using it. This helps avoid running out of battery and encountering low battery error messages. |
| Use the charger provided | Always use the charger provided by the manufacturer. Using third-party chargers may damage the battery and cause it to wear out more quickly, leading to more low battery errors. |
| Replace the battery | If the vacuum cleaner’s battery is old and worn-out, consider replacing it. Over time, batteries lose their capacity to hold a charge, leading to more frequent low battery errors. |
It is crucial to note that some smart vacuum cleaners also come with a low battery indicator that alerts users when the battery is about to run out of charge. This is a helpful feature that can help prevent the vacuum from stopping abruptly during cleaning sessions.
Low battery errors are preventable, and taking simple preventive measures can help avoid them. Charging the battery fully before using the device, using the charger provided by the manufacturer, and replacing the battery when necessary are all effective ways to prevent low battery errors. If you encounter low battery errors even after taking preventive measures, follow the troubleshooting tips outlined in the article, or refer to the relevant link here.
Software Malfunctions
Smart vacuum cleaners are designed to operate using software programs that execute various commands to clean the room efficiently. However, software malfunctions can cause errors, which may affect the functioning of the vacuum cleaner. The following table highlights some common software malfunctions that could cause error messages to appear on your smart vacuum cleaner.
| Software Malfunction | Cause | Solution |
|---|---|---|
| Connection Error | Loss of Wi-Fi connectivity between the vacuum cleaner and the app |
|
| App Compatibility Issue | The app may require an update or may not be compatible with your device |
|
| Navigation Error | The vacuum cleaner may encounter obstacles or struggle to navigate certain areas of the room |
|
| Battery Error | The vacuum cleaner may have difficulty charging, or the battery may be defective |
|
If you encounter any of these software malfunctions, it is essential to address them promptly to prevent further errors and ensure the proper functioning of your smart vacuum cleaner. In addition to the preventive measures mentioned earlier, regularly checking for software updates and cleaning the sensors can help mitigate the risk of software malfunctions. If these solutions do not work, you may need to consult with customer support or contact the manufacturer for additional assistance.
Mechanical Issues
When it comes to smart vacuum cleaner errors, mechanical issues can also be a culprit. These issues could be as minor as a loose screw, or as major as a broken internal component. To deal with mechanical issues, you need to have a basic know-how of the inner workings of your device.
Here are some common mechanical issues that trigger error messages in smart vacuum cleaners:
| Issue | Symptoms | Solution |
|---|---|---|
| Brush Roll Not Spinning | Reduced suction power, debris remains on floor | Check for debris wrapped around the brush roll, clean or replace the brush roll if needed. |
| Wheels Not Turning | Vacuum gets stuck, unable to move around | Check for debris clogging the wheels or wheel sensors, clean the wheels or replace them if necessary. |
| Overheating | Vacuum stops working or shuts down mid-cleaning | Check for clogged filters, remove and clean them, allow the vacuum to cool down before resuming cleaning. |
| Unwanted Noise | Loud or unusual noises during operation | Check for loose screws, debris or damage in internal components. Tighten screws, remove debris, or replace broken parts as necessary. |
It’s essential to stay alert for any unusual sounds or behaviors in your smart vacuum cleaner, regularly clean and maintain it, and follow the manufacturer’s instructions. Failure to do so may cause mechanical issues that result in error messages and may even damage your device permanently.
Preventive Measures
When it comes to smart vacuum cleaners, prevention is the key to avoiding frustrating error messages. By taking some simple and proactive steps, you can ensure that your machine runs smoothly and without any glitches. In this section, we’ll highlight some essential preventive measures you can take to keep your smart vacuum cleaner in tip-top shape. These measures can help you keep your vacuum cleaner free from malfunctions and ensure that it continues to function efficiently for years to come.
Clean Sensors Regularly
Maintaining clean sensors is crucial to avoid errors in smart vacuum cleaners. To prevent sensor blockages, the following preventive measures can be taken:
- Regular cleaning: It is recommended to clean the sensors regularly to prevent any build-up of dust or debris that may cause blockages. Care should be taken to ensure that the sensors are thoroughly cleaned without damaging them. A soft brush or a microfiber cloth can be used to clean the sensors gently.
- Clean the charging contacts: Charging contacts can often get dirty and prevent the smart vacuum cleaner from charging properly. These contacts should be cleaned regularly to ensure proper charging.
- Regular maintenance: Regular maintenance of the vacuum cleaner is also important. It is recommended to check the sensors during maintenance and clean them if necessary.
By taking these preventive measures, the sensors of the smart vacuum cleaner can be kept clean and free from blockages, thus preventing error messages. Remember to always follow the manufacturer’s instructions when cleaning the sensors or any other part of the vacuum cleaner.
Charge the Battery Fully
One of the most common reasons for error messages in smart vacuum cleaners is a low battery. To prevent this from happening, it is important to charge the battery fully before using the vacuum cleaner. Here are some tips and tricks to help you optimize your vacuum cleaner’s battery life:
| Tip | Description |
|---|---|
| Use the right charger: | Make sure you use the charger that came with your vacuum cleaner. Using a different charger may not only affect the charging time but also damage the battery, which could lead to error messages or even permanent damage. |
| Don’t overcharge: | Once the battery is fully charged, unplug the charger. Overcharging can negatively impact the battery’s lifespan, which may lead to error messages or even a damaged battery. |
| Store the vacuum properly: | Do not store the vacuum cleaner with an empty battery or a full battery for extended periods. Instead, try to store it with a partially charged battery, ideally around 50%. |
| Use the right power mode: | Using the highest power mode will drain the battery more quickly, while using the lowest power mode may not provide the necessary suction. Find the right balance between power and battery life to optimize both. |
By following these tips, you can make sure your vacuum cleaner battery is in top condition and avoid error messages due to low battery. Remember, a properly charged battery not only prevents error messages but also maximizes the vacuum cleaner’s efficiency and cleaning performance.
Keep Software Up-to-Date
To ensure that your smart vacuum cleaner is functioning efficiently, it’s important to keep the software up-to-date. This can help prevent errors caused by outdated or incompatible software. To keep your software updated, follow these tips:
| Tip | Description |
|---|---|
| 1 | Check for available updates |
| 2 | Enable auto-updates |
| 3 | Download updates regularly |
Firstly, you’ll need to check if there are any updates available for your smart vacuum cleaner’s software. This can be done by accessing the manufacturer’s website or app. If there are updates available, be sure to download and install them as soon as possible.
It is also recommended to enable the auto-update feature on your smart vacuum cleaner. This will ensure that the software is always up-to-date without any manual intervention. This can be done by accessing the settings of your smart vacuum cleaner and selecting the option to enable automatic updates.
Be sure to download software updates regularly. This is important as outdated software can cause errors and malfunctions in your smart vacuum cleaner. By downloading software updates regularly, you can ensure that your smart vacuum cleaner is running smoothly and efficiently.
By keeping the software up-to-date, you can prevent errors caused by outdated software and ensure that your smart vacuum cleaner is functioning at its best. Remember to always follow the manufacturer’s instructions for software updates and other maintenance tasks.
Check and Replace Parts
Regular maintenance of the smart vacuum cleaner is essential for its optimal performance. Checking and replacing the parts is one of the key preventive measures that can help avoid error messages. Here are some parts that are critical to the functioning of the vacuum cleaner, and should be checked and replaced as required:
- Brush rollers: The brush rollers are responsible for removing dirt and debris from the floor. Over time, these rollers can become entangled with hair and other materials, reducing their effectiveness. It’s important to inspect the rollers regularly and clean or replace them as required.
- Filters: Filters are responsible for trapping dust, dirt, and other particles, preventing them from entering the motor and damaging the vacuum cleaner. Dirty filters reduce the suction power of the vacuum cleaner and can lead to error messages. Check the filters at regular intervals and replace them if they are dirty.
- Battery: If the vacuum cleaner is not charging properly, it could be due to a faulty battery. Check the battery connections and ensure that they are clean and firmly attached. If the battery is old or damaged, consider replacing it with a new one.
- Sensors: Sensors are crucial for the smooth functioning of the vacuum cleaner. They detect obstacles and help the vacuum navigate around them. A buildup of dirt or debris on the sensors can cause the vacuum to malfunction. Clean the sensors regularly to avoid errors.
- Charging dock: The charging dock is where the vacuum cleaner goes to recharge its battery. If the charging dock is not working properly, the vacuum cleaner may fail to charge or not navigate back to the dock. Check the charging dock regularly and ensure that it is clean and free from any obstructions.
Regularly checking and replacing these parts can go a long way in keeping your smart vacuum cleaner error-free and functioning at its best. Remember to follow the manufacturer’s instructions for proper maintenance and replacement of parts.
Follow Manufacturer’s Instructions
It is essential to follow the manufacturer’s instructions when it comes to using and maintaining your smart vacuum cleaner. The manufacturer’s instructions will provide you with all the necessary information about the proper use and maintenance of the device. It will also inform you about the limits and restrictions, so you do not push the device beyond its capabilities.
Below is a table outlining the critical areas you should take note of when following the manufacturer’s instructions.
| Instruction | Explanation |
|---|---|
| Use the right power source | Make sure that you are using the correct power source that corresponds to the voltage indicated on your device. Using an incompatible power source may damage your vacuum and cause errors. |
| Don’t place the vacuum in water | It is crucial to avoid exposing your smart vacuum cleaner to water, as water can cause significant damage to your device. Keep your device away from damp places, and avoid direct contact with water. |
| Empty the vacuum’s dustbin regularly | Your smart vacuum cleaner is designed to function optimally when the dustbin is empty. Empty the dustbin after every cleaning cycle, and make sure to clean it thoroughly. An overloaded dustbin could cause errors or malfunction. |
| Clean the vacuum regularly | Make sure to perform regular cleaning of the sensors, brushes, and other parts of your smart vacuum cleaner to ensure it remains in good working condition. The build-up of debris can disrupt the sensors; thus, cleaning them is essential. |
| Avoid overusing the vacuum | Overusing the vacuum can cause problems such as overheating or damage to the device. It is best to avoid running the vacuum for extended hours, especially when it is not necessary. |
By following the manufacturer’s instructions, you can take preventive measures that could reduce the occurrence of errors while using your smart vacuum cleaner. Additionally, it will help you maintain your device its best and ensure its longevity.
Troubleshooting Tips
As frustrating as it may be, encountering error messages with your smart vacuum cleaner is a relatively common occurrence. Fortunately, some of the most common issues can often be resolved with a bit of troubleshooting. Here are some tips to help you get your smart vacuum cleaner back up and running smoothly.
Restart the Vacuum
Restarting the vacuum is often an effective solution to resolving error messages. This simple step can help clear any temporary software glitches or system errors.
To restart the vacuum, follow these steps:
| Step 1: | Turn off the vacuum using the power button or by unplugging it from the power source. |
| Step 2: | Wait for 30 seconds to 1 minute before turning the vacuum back on. |
| Step 3: | Check if the error message still shows up. If not, the problem could have been resolved by the restart. |
It is important to note that restarting the vacuum may not always be the solution. If the error message persists, try other troubleshooting tips or consult with customer support.
Sometimes the root cause of the error message could be more complex, requiring a more thorough investigation. In such cases, it is best to get professional help instead of attempting to fix the issue on your own.
By following preventive measures and troubleshooting tips, you can minimize the chances of encountering error messages in your smart vacuum cleaner. Restarting the vacuum is just one of the many steps you can take to ensure the smooth functioning of your device.
Check for Wi-Fi Connectivity
One of the most common reasons why smart vacuum cleaners encounter error messages is due to poor Wi-Fi connectivity. When your vacuum is unable to connect to the internet, it may not be able to receive updates or instructions from the mobile app, which can lead to various technical issues. Thus, it’s crucial to ensure that your vacuum is always connected to a stable Wi-Fi network.
To check for Wi-Fi connectivity, follow these steps:
| Step | Action |
|---|---|
| Step 1 | Open the mobile app that controls your smart vacuum cleaner. |
| Step 2 | Check if you are logged into your account. If not, log in using your credentials. |
| Step 3 | Look for the Wi-Fi icon on the app. If the icon is grayed out or has an “X” mark, it means that your vacuum is not connected to Wi-Fi. |
| Step 4 | Check if your mobile device is connected to a stable Wi-Fi network. If not, connect to one and try to reconnect your vacuum to Wi-Fi. |
| Step 5 | If you have already connected your vacuum to Wi-Fi, but it’s still not working, try resetting your Wi-Fi router and your vacuum before attempting to connect again. |
By checking your vacuum’s Wi-Fi connectivity regularly, you can prevent many error messages from occurring. It’s also important to remember that if you live in a large house, certain areas may have lower Wi-Fi connectivity, which can affect your vacuum’s performance. In these cases, you may want to consider investing in a Wi-Fi extender to ensure that your vacuum is always connected to a strong signal.
Reset the App
One of the potential solutions to troubleshooting smart vacuum cleaner error messages is resetting the app. This may seem like a simple step, but it can often solve connectivity and app-related issues. Here is how to reset the app:
- Close the app completely and force stop it if necessary.
- Go to your phone or tablet’s settings and select “Apps.”
- Find the app for your smart vacuum cleaner and select it.
- Select “Storage” and then “Clear Data.”
- Confirm that you want to clear the app’s data.
- Once cleared, reopen the app and sign in again.
This method will erase any saved preferences or settings on the app, so be prepared to reset any desired settings after completing the process.
By resetting the app, you are essentially starting fresh and clearing any potential glitches or errors within the app. If the issue persists, then it may be time to contact customer support for additional assistance.
Consult with Customer Support
When all else fails, it may be necessary to consult with customer support. They can provide expert guidance on how to address more complex issues with your smart vacuum cleaner. Here are some key things to keep in mind when reaching out to customer support:
| Step | Description |
|---|---|
| 1 | Before reaching out, be sure to gather all relevant information about the error message you are encountering. This could include the specific error code, any troubleshooting steps you have taken so far, and a detailed description of the problem. |
| 2 | Check the manufacturer’s website for any known issues or updates related to your specific model of smart vacuum cleaner. This can help you narrow down the root cause of the problem before you contact customer support. |
| 3 | When you reach out to customer support, be sure to clearly and concisely describe the issue you are experiencing. Include any relevant information about your smart vacuum cleaner, such as the model number and serial number. |
| 4 | Follow any instructions or recommendations provided by the customer support representative to troubleshoot the issue. Be sure to ask for clarification if you do not understand any of the steps. |
| 5 | If the issue cannot be resolved over the phone or via email, customer support may schedule a repair or replacement for your smart vacuum cleaner. Be sure to follow any instructions provided regarding shipping or returning your device. |
Remember, reaching out to customer support should be a last resort after exhausting all other troubleshooting options. However, they can provide valuable insights and solutions to more complex error messages that may be beyond the scope of the average user.
Conclusion
In conclusion, taking preventive measures to avoid smart vacuum cleaner error messages is essential for maintaining the optimal performance of your device. By ensuring that your sensors are clean, your battery is fully charged, your software is up-to-date, and your parts are checked and replaced as needed, you can significantly reduce the likelihood of encountering error messages.
However, it is also essential to remember that sometimes despite taking all the preventive measures, error messages may still occur. In such cases, troubleshooting tips like restarting the vacuum, checking for Wi-Fi connectivity, resetting the app, or seeking help from a customer support team can be beneficial.
When it comes to choosing a smart vacuum cleaner, it is recommended to go for a reliable and trusted brand that provides excellent customer service and support. Following the manufacturer’s instructions and guidelines can also go a long way in avoiding error messages and keeping your smart vacuum cleaner functioning optimally.
In conclusion, smart vacuum cleaners are a valuable addition to any household, but understanding how to prevent and troubleshoot error messages is crucial to get the most out of them. By following the preventive measures and tips outlined in this article, you can enjoy a seamless cleaning experience without any surprises or hiccups.
Frequently Asked Questions
How often should I clean the sensors on my smart vacuum cleaner?
You should clean the sensors on your smart vacuum cleaner at least once a week to prevent error messages and ensure efficient performance.
What should I use to clean the sensors?
You can use a soft, dry cloth or a mild cleaning solution specifically designed for electronics to clean the sensors on your smart vacuum cleaner.
How long should I charge the battery on my smart vacuum cleaner?
You should charge the battery on your smart vacuum cleaner fully before using it, and then charge it again after each use to avoid low battery error messages. Charging time will vary depending on the model.
Can I use any cleaning solution on my smart vacuum cleaner?
No, you should only use cleaning solutions that are specifically designed for smart electronics to avoid damaging the sensors and internal components of your smart vacuum cleaner.
Why is it important to keep the software up-to-date on my smart vacuum cleaner?
Keeping the software up-to-date on your smart vacuum cleaner ensures that it is running smoothly and efficiently, and reduces the risk of software malfunction error messages.
How often should I replace parts on my smart vacuum cleaner?
You should follow the manufacturer’s guidelines for replacement of parts on your smart vacuum cleaner, and check for any signs of wear or damage regularly to avoid mechanical error messages.
What happens if I don’t follow the manufacturer’s instructions?
If you don’t follow the manufacturer’s instructions for use and maintenance of your smart vacuum cleaner, you may experience error messages and potentially damage the internal components, voiding any warranty.
What should I do if my smart vacuum cleaner won’t restart?
You can try resetting the device and checking for any sensor blockages. If the problem persists, contact customer support for further assistance.
How can I check for Wi-Fi connectivity issues on my smart vacuum cleaner?
You can check your Wi-Fi connectivity by verifying that you are on the correct network and that your signal strength is strong. You can also try resetting both your smart vacuum cleaner and router.
What should I do if none of the troubleshooting tips work?
If none of the troubleshooting tips resolve the error message on your smart vacuum cleaner, contact the manufacturer’s customer support for further assistance.
