Smart Ways to Know When Your Vacuum Cleaner’s Dustbin is Full
Warning: A non-numeric value encountered in /var/www/html/wp-content/themes/generatepress/inc/structure/post-meta.php on line 165
by Dwight Gibson
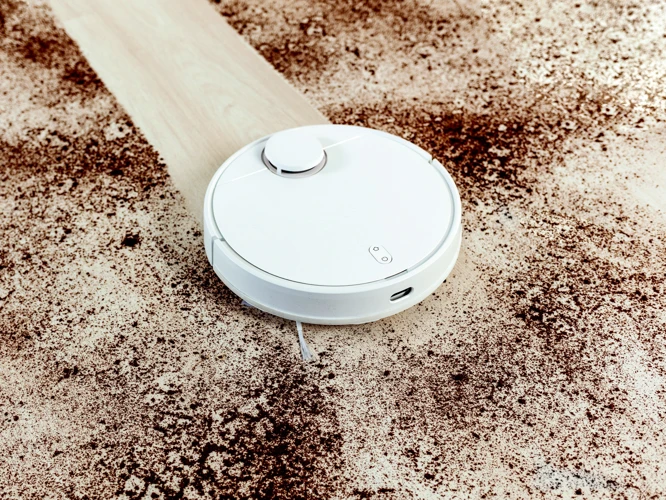
Have you ever noticed your smart vacuum cleaner making strange noises or not cleaning as effectively as before? It’s possible that the dustbin is full and needs to be emptied. Cleaning your vacuum’s dustbin is important not just for maintaining its performance, but also for improving the air quality in your home. But how do you know when it’s time to empty the dustbin? In this article, we’ll explore the signs that indicate a full dustbin and guide you through the step-by-step process of emptying it. Additionally, we’ll share some helpful tips on how to maintain your vacuum’s dustbin for optimal performance. So, let’s dive in and learn how to keep your smart vacuum cleaner running smoothly!
Table of Contents
Why is it important to clean your vacuum’s dustbin?
Maintaining a clean dustbin in your smart vacuum cleaner is crucial for ensuring its efficient performance and longevity. Regularly cleaning the dustbin and filters not only prevents clogging and reduces noise, but also significantly improves indoor air quality. The benefits of cleaning the dustbin go beyond the convenience of a cleaner home. It is important to be aware of the various signs indicating that your smart vacuum cleaner’s dustbin needs attention. In the following sections, we will discuss these signs in detail and provide step-by-step instructions on how to clean your smart vacuum cleaner’s dustbin. Additionally, we will offer helpful tips for maintaining the dustbin to prolong the life of your smart vacuum cleaner. For more information, check out our Smart Vacuum Dustbin Guide.
Improves efficiency and suction power
Regularly emptying the dustbin of your smart vacuum cleaner can significantly improve its efficiency and suction power. When the dustbin is full or clogged, the vacuum’s suction power may be reduced, making it less effective at picking up dirt and debris. This can result in longer cleaning times and subpar cleaning performance. Additionally, a full dustbin can cause the vacuum’s motor to work harder than necessary, which can shorten the lifespan of this expensive appliance.
Cleaning the dustbin regularly ensures that the vacuum operates at maximum capacity, making cleaning tasks more efficient and effective. Keeping the dustbin empty and free of debris helps prevent clogging and reduces the risk of damage to the vacuum.
Emptying the dustbin as recommended by the manufacturer is a simple yet effective way to improve your smart vacuum’s suction power and overall efficiency. Follow the steps here to make sure you’re doing it properly.
Following smart vacuum dos and don’ts, such as regular cleaning and proper maintenance, can further enhance the performance of your device. Check out this article to learn more about taking care of your smart vacuum.
A full dustbin in your smart vacuum cleaner can lead to clogging and damage. This can happen if the dustbin gets too full, preventing air from flowing through the vacuum. As a result, the suction power decreases, and the risk of damage to the vacuum’s motor increases.
One of the benefits of smart vacuum cleaners is that they often come equipped with sensors that can detect when the dustbin is full. This feature helps prevent clogging and damage. However, it’s still important to manually check the dustbin regularly.
Clogging: Clogging is a common problem with vacuums when the dustbin is full. Dirt, hair, and debris clog the vacuum’s filters, reducing the airflow and suction power. When this happens, your vacuum cleaner will not pick up debris as effectively, and you may need to clean out the filter or replace it.
Damage: A full dustbin can cause damage to the vacuum cleaner as well. When the dustbin is full, it can put pressure on the motor, causing it to overheat and eventually burn out. Additionally, debris can scratch or damage the interior of the vacuum cleaner, particularly if sharp objects are sucked up.
To avoid both clogging and damage, it’s important to empty the dustbin regularly, particularly after each cleaning cycle. This will allow for proper airflow and suction power and prevent the risk of damage to the vacuum’s motor.
For more information on maintaining your smart vacuum cleaner’s dustbin, check out our article on smart vacuum cleaner dustbin tips. Additionally, if you are experiencing issues with your smart vacuum cleaner’s dustbin, troubleshoot the problem with our guide smart vacuum dustbin troubleshooting.
Improves indoor air quality
One of the important reasons to keep your smart vacuum cleaner’s dustbin empty is that it improves indoor air quality. When a dustbin is full, it can lead to the circulation of dust, pollen, and other allergens in the air. This can be especially problematic for those with allergies or respiratory problems.
To understand the impact of a full dustbin on indoor air quality, consider the following comparison table:
Full Dustbin
Empty Dustbin
Dust circulation in the air
Increased
Reduced
Pollen and other allergens circulation in the air
Increased
Reduced
Presence of bad odor
More likely
Less likely
As the table shows, a full dustbin not only increases the circulation of dust and allergens but also makes it more likely to have bad odor in the room. On the other hand, an empty dustbin helps reduce the circulation of allergens and dust, leading to a cleaner and fresher indoor environment.
Keeping the dustbin empty is especially important for those who have pets at home. Pet dander and hair can accumulate quickly in a full dustbin, leading to increased allergens in the air.
It’s important to keep your smart vacuum cleaner’s dustbin empty to ensure optimal cleaning performance. But how do you know when it’s time to empty the dustbin? Luckily, there are several indicators that can help you determine when the dustbin is full and in need of emptying. By paying attention to these signs, you can help extend the life of your vacuum while also improving indoor air quality. Let’s take a look at some common signs that your vacuum’s dustbin needs to be emptied.
Increased noise level
One sign that your smart vacuum cleaner’s dustbin is full is an increase in noise level during operation. This noise can be described as a grinding or whirring sound, which may indicate that the motor is working harder than usual to suction debris.
The following table outlines potential causes and solutions for increased noise level in your vacuum cleaner:
Possible Cause
Solution
The dustbin is full or clogged with debris
Empty the dustbin and check for any clogs in the suction pathway. Clear any obstructions and reattach the dustbin.
The vacuum’s filter is dirty or clogged
Remove and clean the filter according to the manufacturer’s instructions. Make sure it is completely dry before reattaching it to the vacuum.
The vacuum’s brush roll is tangled or obstructed
Turn off the vacuum and unplug it from the power source. Remove any debris or tangles from the brush roll and reattach it to the vacuum.
The vacuum’s motor is damaged or malfunctioning
Consult the manufacturer’s warranty or customer service for assistance with repair or replacement of the vacuum’s motor.
It is important to address increased noise level in your smart vacuum cleaner as it can lead to further complications such as reduced suction power or damage to the vacuum’s motor.
Reduced suction power
One key sign that your smart vacuum cleaner’s dustbin may be full is a reduced suction power. If you feel like your vacuum is not picking up debris as effectively as before, it could be a sign that its dustbin needs to be emptied.
When the dustbin is full, it decreases airflow in the vacuum cleaner, making it harder for the machine to suck up dirt and debris from your floors. This reduction in suction power can be frustrating and can mean that you need to go over the same spot multiple times to get it clean.
To avoid this issue, it’s important to regularly check your vacuum’s dustbin and empty it as necessary. The table below shows some additional signs to look out for and steps to take to keep your vacuum running at peak efficiency.
Signs the Dustbin is Full
Steps to Take
Reduced suction power
Empty the dustbin and clean filters
Increased noise level
Empty the dustbin and clean filters
Visible debris in the dustbin
Empty the dustbin and clean filters
Short cleaning cycles
Empty the dustbin and clean filters
Indicator light on the vacuum
Check the user manual for instructions
Smartphone app notification
Check the app for instructions
Remember, a full dustbin not only reduces suction power, but it can also cause damage to your vacuum cleaner. To keep your machine running smoothly, make sure to regularly check the dustbin and clean filters as needed.
Visible debris in the dustbin
One of the most obvious signs that your smart vacuum cleaner’s dustbin is full is when you see visible debris in the dustbin. As the vacuum cleaner picks up dirt and debris from your floors, the dustbin will start to fill up. Over time, it may become so full that you can see debris at the top of the bin, indicating that it needs to be emptied.
You might also notice that the vacuum cleaner is not picking up as much dirt as it used to, even though it is running properly. This is often due to the fact that the dustbin is too full to allow the vacuum to perform at its best. When the dustbin is full, the suction power of the vacuum is reduced and bits of dirt are left behind.
Another indication that your dustbin is full is that the vacuum cleaner is producing more noise than usual. This happens because the vacuum cleaner has to work harder to pick up dirt and debris when the dustbin is full, which puts more strain on its motor. This can cause the motor to make louder noises that are much more noticeable than when the dustbin is empty.
If you notice that your vacuum cleaner’s cleaning cycles have become shorter than usual, that too can signal that the dustbin is full. The vacuum will spend less time cleaning if the dustbin is full because it will get filled up more quickly.
Sometimes, your smart vacuum cleaner might also have an indicator light that lets you know when it is time to empty the dustbin. If the light is on, it means the dustbin is full and needs to be emptied before the vacuum cleaner can be used again.
Finally, some smart vacuums come with smartphone apps that alert you when the dustbin needs to be emptied. These apps can be particularly helpful if you want to stay on top of cleaning your vacuum regularly.
Short cleaning cycles
If you notice that your smart vacuum cleaner’s cleaning cycles are getting shorter than usual, it could be a sign that the dustbin is full. This happens because the vacuum’s suction power decreases as the dustbin fills up. The vacuum has to work harder to pick up the same amount of dirt, which means that it uses more battery and takes longer to clean a room.
To check if the dustbin is the cause of the shortened cleaning cycles, run a test by emptying the dustbin and restarting the vacuum. If the vacuum is now able to clean for longer, then the dustbin was indeed full.
If you find that short cleaning cycles are a recurring problem, it may be a good idea to check the dustbin more frequently during cleaning sessions so that you can empty it before it becomes too full. You can also set a reminder on your phone or the vacuum’s app to alert you when it’s time to empty the dustbin.
By keeping the dustbin empty, you can ensure that your smart vacuum cleaner is working efficiently and effectively. This means you get more cleaning time between charges, and the vacuum can easily pick up dirt and debris from your floors.
Indicator light on the vacuum
One of the easiest ways to know if your smart vacuum cleaner’s dustbin is full is by checking the indicator light on the vacuum. The indicator light is a useful feature that alerts you when the dustbin needs to be emptied. Here are some ways to check for the indicator light:
Consult your vacuum’s user manual to see if it has an indicator light for the dustbin.
If your vacuum has an indicator light, it will likely be located near the power switch or on the top of the vacuum.
When the dustbin is full, the indicator light will turn red, indicating that it’s time to empty the dustbin.
You may also see the indicator light flash or blink when the dustbin is close to being full, but not yet completely filled.
It’s important to pay attention to the indicator light on your vacuum, as it can help prevent damage to the machine and ensure that it’s working at its best. If you continue to use your vacuum when the dustbin is full, it can lead to reduced suction power and put extra strain on the motor. Additionally, leaving debris in the dustbin for too long can create unpleasant odors and affect the air quality in your home.
Other signs that your dustbin may be full include an increased noise level, reduced suction power, visible debris in the dustbin, and shorter cleaning cycles. By checking these indicators regularly and emptying the dustbin when necessary, you can keep your vacuum working at its best and ensure that your home remains clean and healthy.
Smartphone app notification
One of the most convenient ways to know when your smart vacuum cleaner’s dustbin is full is through a smartphone app notification. This feature is available on many modern smart vacuums, which come equipped with complementary mobile apps that enable you to control the device from your phone.
When the dustbin is full, the app will send you a notification on your smartphone indicating that it’s time to empty the dustbin. These notifications can be customized to suit your preferences, allowing you to set reminders at specific intervals or adjust the alert tone to a sound that suits you.
With this feature, you can easily keep track of the status of your smart vacuum cleaner’s dustbin without having to physically check it every time. You can also monitor its capacity remotely and schedule regular cleanings based on your usage patterns.
However, keep in mind that the smartphone app notification feature may not be available on all smart vacuums, and it may only work if your device is connected to Wi-Fi or the Internet. It’s essential to check your vacuum’s compatibility with the mobile app and review the app settings to ensure that notifications are enabled.
Smartphone app notifications are a helpful and user-friendly way to know when it’s time to empty your smart vacuum cleaner’s dustbin. It replaces the need to constantly check on the dustbin manually, and it helps prevent clogging or damage to your device caused by overflowing dustbins. So, make sure to take advantage of this feature when available and never miss a full dustbin notification again!
How to empty your vacuum’s dustbin?
Handling the dustbin of your smart vacuum cleaner can be a perplexing task, especially if you are new to the world of smart home technology. Nevertheless, learning how to empty and clean the dustbin of your vacuum cleaner is a crucial step that ensures your device’s longevity and efficiency. Fortunately, you don’t need to be worried or intimidated as the process is quick and straightforward. Below, we’ve outlined the necessary steps for dustbin cleaning and some tips to maintain your vacuum cleaner’s dustbin, ensuring its optimal performance.
Power off the vacuum
Before emptying your smart vacuum cleaner’s dustbin, it’s important to power off the device to avoid any potential accidents or malfunctions. Following this step-by-step process can ensure that you safely and effectively empty the dustbin without causing any harm to yourself or to the vacuum cleaner.
Step 1: Locate the “power” button or switch on your smart vacuum cleaner. This button is typically located on the body of the device or on the vacuum’s handle.
Step 2: Press or toggle the “power” button to turn off your vacuum cleaner. Once the device is off, unplug it from the electrical socket to ensure maximum safety.
Step 3: Switch off the vacuum’s wireless features if the device has them. For example, if your vacuum cleaner has Wi-Fi connectivity or a remote control feature, make sure to turn these features off as well.
To further emphasize the importance of powering off your smart vacuum cleaner, consider this scenario: you’re emptying the dustbin and accidentally push the “on” button, causing the vacuum to start unexpectedly. This could lead to the vacuum falling off of the table you’re using, potentially resulting in damage to the vacuum or even injury to yourself.
By taking the time to power off your smart vacuum cleaner before emptying its dustbin, you can ensure that the device remains safe and in good working condition.
Remove the dustbin according to the instructions
Removing the dustbin from your smart vacuum cleaner is a straightforward process, but it’s important to follow the manufacturer’s instructions to avoid damaging any components. Here are the typical steps to remove the dustbin:
Step 1:
Power off the vacuum cleaner
Step 2:
Locate the dustbin release button or latch
Step 3:
Press the release button or release the latch
Step 4:
Gently pull the dustbin out of the vacuum cleaner
Before removing the dustbin, make sure that the vacuum cleaner is powered off to avoid any accidents. The location of the dustbin release button or latch may vary depending on the model of your vacuum cleaner, so refer to your manufacturer’s instructions for the specific location.
Once you have located the release button or latch, press it or release it according to the instructions. This will release the dustbin from the vacuum cleaner, allowing you to remove it.
It’s essential to be gentle when pulling the dustbin out to avoid any damages. Hold the dustbin with both hands and gently pull it out of the vacuum cleaner. It should come out smoothly without any force.
Now that you have removed the dustbin, you can empty it over a trash can and clean it along with the filters. Refer to the manufacturer’s instructions for specific cleaning and maintenance guidelines.
Remember to reattach the dustbin carefully once it’s clean and dry. Make sure it clicks into place and is secured before resuming cleaning.
Empty the dustbin over a trash can
When it’s time to empty out the dustbin of your smart vacuum cleaner, the first step is to find a trash can to dump the dirt and debris into. Here are some important steps to keep in mind while emptying the dustbin over a trash can:
Step 1:
Power off the vacuum before attempting to remove the dustbin. This will prevent any accidental turning on of the vacuum which may cause the dustbin contents to spill onto the floor.
Step 2:
Locate the release button or latch that opens the dustbin. This will vary between models, so consult your vacuum’s manual or instructions to find the specific location.
Step 3:
Press the release button or unlatch the dustbin according to the manufacturer’s instructions. Carefully remove the dustbin from the vacuum.
Step 4:
Hold the dustbin over a trash can with one hand while using your other hand to release the latch or button to open the bottom of the bin. Empty the contents of the dustbin into the trash can.
Step 5:
Tap the sides of the dustbin gently to ensure all the debris has fallen out. If necessary, use a tool such as a brush or rubber spatula to dislodge any stubborn clumps of dirt or hair.
After you have emptied out the contents of the dustbin over the trash can, take some time to clean the dustbin thoroughly. This can include wiping it down with a damp cloth and washing with soap and water as needed. Ensure that the dustbin and filters are completely dry before reattaching the dustbin and resuming cleaning.
By following these steps and taking care to properly empty out and clean the dustbin of your smart vacuum cleaner, you can ensure that your vacuum works efficiently and effectively for a longer period of time.
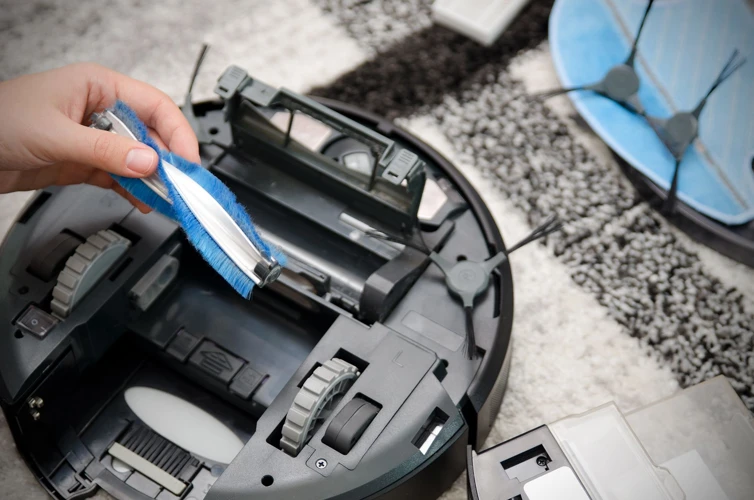
Clean the dustbin and filters
To ensure that your smart vacuum cleaner continues to perform at its peak efficiency, and to prolong its lifespan, it is important to clean the dustbin and filters regularly. Here’s how to do it in a few simple steps:
Step 1: Power off the vacuum and unplug it from the power source to avoid any potential accidents.
Step 2: Remove the dustbin according to the instructions provided by the manufacturer. In some models, you may need to press a button or a latch to release the dustbin.
Step 3: Empty the dustbin over a trash can to dispose of dirt, debris, and dust. It is important to empty the dustbin completely to prevent it from getting clogged.
Step 4: Using a soft cloth, wipe the inside of the dustbin to remove any remaining dust or debris. Running water can also be used to rinse it out, but ensure that it is completely dry before reattaching the dustbin to the vacuum.
Step 5: Remove the filters from the dustbin and clean them thoroughly. Depending on the type of filter your vacuum uses, you may be able to wash it with water or use a soft brush to remove any dirt or debris from it. Be sure to follow the manufacturer’s instructions when cleaning the filters.
Step 6: After cleaning the filters, allow them to air-dry completely before reattaching them to the dustbin. This will reduce the risk of mold or mildew growth inside the filters and dustbin.
Step 7: Finally, reattach the dustbin to the vacuum cleaner, following the manufacturer’s instructions, and resume cleaning your home.
By following these simple steps to clean your vacuum cleaner’s dustbin and filters, you’ll help to improve its suction power, prevent clogging, and prolong its lifespan. Remember to clean the dustbin and filters after every use, or as often as recommended by the manufacturer. Following these maintenance tips will keep your smart vacuum cleaner in top condition, and ensure that it keeps your home clean and free from dust and debris.
Reattach the dustbin and resume cleaning
After emptying the dustbin and cleaning the filters, it’s time to reattach the dustbin to the smart vacuum cleaner and resume cleaning.
Step
Action
Step 1
Make sure the dustbin is completely dry before reattaching it to the vacuum cleaner. Any moisture left can damage the system, so take the time to ensure everything is dry and in good condition.
Step 2
Align the dustbin correctly with the vacuum cleaner. There should be an audible click with a secure fit. If the dustbin does not click into place, remove it and reattach it according to the instructions.
Step 3
Double-check that the dustbin is properly secured before resuming cleaning tasks. A loose dustbin can cause debris and dirt to leak and lower the overall efficiency of the vacuum cleaner.
Step 4
Power on the smart vacuum cleaner and start cleaning. As you begin cleaning, you may want to monitor the dustbin and its fullness to ensure the system is working properly.
Following these simple steps will ensure that your smart vacuum cleaner is functioning properly and helping to keep your home or office clean. It is important to maintain and take care of the vacuum to ensure its longevity and optimal performance.
Tips for maintaining your vacuum’s dustbin
Maintaining your smart vacuum’s dustbin is key to a long-lasting and efficient cleaning experience. Regular cleaning of the dustbin and filters ensures that the suction power remains strong and the device is always ready to tackle any mess. In this section, we’ll explore some helpful tips for maintaining your vacuum’s dustbin, which will make sure it continues to function at an optimal level.
Empty the dustbin after every cleaning cycle
It is highly recommended to empty the dustbin after every cleaning cycle. Leaving debris in the dustbin for too long can lead to reduced suction power, clogging, and damage to the vacuum. To ensure efficient performance and extend the lifespan of your smart vacuum cleaner, follow these steps:
Power off the vacuum: Before emptying the dustbin, make sure the vacuum is powered off and unplugged.
Remove the dustbin: Follow the manufacturer’s instructions to remove the dustbin from the vacuum.
Empty the dustbin: Carefully empty the dustbin over a trash can, making sure to remove all debris.
Clean the dustbin and filters: Use a clean, dry cloth to wipe down the dustbin and filters. For a deeper clean, wash the dustbin and filters with water as recommended by the manufacturer.
Reattach the dustbin: Once the dustbin and filters are completely dry, reattach the dustbin according to the manufacturer’s instructions.
Resume cleaning: With the dustbin properly attached, you can resume using your smart vacuum cleaner.
By emptying the dustbin after every cleaning cycle and properly cleaning the dustbin and filters, you can ensure that your smart vacuum cleaner continues to operate at peak performance. This simple maintenance routine can help prevent future problems and save you money in the long run.
Regularly wash the dustbin and filters with water
As you use your smart vacuum cleaner more frequently, the dustbin and filters can gradually become clogged with dirt and debris. This can affect the vacuum’s suction power, reducing its overall efficiency. To prevent this from happening, it’s crucial that you regularly wash the dustbin and filters with water.
Here are the steps to properly wash the dustbin and filters:
Power off the vacuum and unplug it from the power source to prevent any potential accidents from happening.
Refer to the manufacturer’s instructions on how to remove the dustbin and filters from the vacuum.
Remove the dustbin from the vacuum and discard any debris that’s been collected.
Next, remove the filters from the dustbin by either twisting them off or unhinging the clips that hold them in place.
Rinse the dustbin and filters thoroughly with running water. Be sure to remove any remaining dirt or debris that might be stuck to the components.
Using a mild detergent or soap, wash the dustbin and filters in a sink or tub. Make sure to avoid using hot water, as it can damage the filters.
Rinse the dustbin and filters once again with water to ensure that all soap suds have been removed.
Allow the components to air dry completely before reattaching them to the vacuum. Avoid using heat or direct sunlight to dry them, as it can damage the filters and affect their performance.
By regularly washing the dustbin and filters, you’ll not only improve the suction power of the vacuum, but also prevent clogging and damage to the machine. Additionally, washing the components can help to improve the overall indoor air quality of your home, as you’re effectively removing the dirt and dust that the vacuum has collected. Make sure to follow the manufacturer’s recommendations on how frequently to wash the components and replace the filters, as this can vary depending on the model and usage.
Allow the dustbin and filters to dry completely before reattaching
Ensuring that the dustbin and filters are completely dry before reattaching them is a crucial step to maintain the longevity of your smart vacuum cleaner. Here are some tips to ensure the dustbin and filters are dry before reattaching them:
Air Dry: To air dry the dustbin and filters, gently shake off any excess water and place them in a dry and well-ventilated area. Allow them to air dry completely before reattaching.
Fan Dry: Use a fan to speed up the drying process. Place the dustbin and filters in front of a fan and allow the air to circulate around them until they are completely dry.
Dehumidifier dry: If the humidity level is high, you can use a dehumidifier to dry the dustbin and filters. This will help to absorb moisture in the air, resulting in faster drying times.
It’s essential to ensure that the dustbin and filters are completely dry before reattaching them to prevent moisture build-up. Moisture can cause mold and mildew to grow, creating an unhealthy environment for your vacuum cleaner. By following the above tips, you can ensure that your vacuum cleaner is clean, hygienic, and functioning optimally to keep your home clean and healthy.
Replace filters as recommended by the manufacturer
Maintaining your smart vacuum cleaner’s dustbin is essential for its optimal performance. Along with emptying the dustbin after every use and cleaning it, you also need to replace the filters as recommended by the manufacturer. The filters are the unsung heroes of your vacuum cleaner and need to be replaced periodically to ensure that the vacuum is not only picking up the dirt but also removing the harmful particles from the air.
Here are some reasons why you need to replace the filters regularly:
1. Maintains the suction power: Vacuum filters can get clogged with dust and debris over time. This can restrict the airflow and affect the suction power of the vacuum cleaner. Replacing the filters regularly ensures that the air flows freely through the vacuum, maintaining optimal suction power and cleaning ability.
2. Improves indoor air quality: Replacing the filters prevents the dust and allergens from escaping back into the air. This is especially important if you or any member of your family has allergies or respiratory problems. The filters trap the harmful particles and prevent them from spreading, making the air cleaner and healthier.
3. Extends the life of the vacuum: A clogged filter puts extra strain on the vacuum’s motor which can lead to burnout and reduce the lifespan of the machine. Replacing the filters as recommended by the manufacturer ensures that the vacuum’s motor is functioning optimally and reduces the chances of any damage.
4. Saves money in the long run: While it might seem like an added expense to replace the filters regularly, it actually saves you money in the long run. A clogged filter reduces the efficiency of the vacuum cleaner, which means you need to run it for longer to achieve the same cleaning result. This not only increases your electricity bill, but it also increases the wear and tear on the vacuum, leading to costly repairs or replacement.
To ensure that you replace the filters when required, check the manual or the manufacturer’s website for the recommended replacement schedule. Some vacuum cleaners have a filter replacement indicator that alerts you when the filter needs to be changed. Make sure to only use filters that are compatible with your vacuum cleaner model.
Replacing the filters might seem like a daunting task, but it is a simple and quick process. Just follow the manufacturer’s instructions, and you’ll be able to replace the filters in no time. Remember that proper maintenance of your vacuum cleaner, including regular filter replacements, can prolong its life and provide optimal cleaning results.
Avoid picking up large or sharp objects that can damage the dustbin or vacuum
It is important to note that while your smart vacuum cleaner may have powerful suction capabilities, it’s not invincible! To prevent damage to both the dustbin and vacuum, it’s important to avoid picking up large or sharp objects. Here are some examples of items that should be avoided:
Rocks or pebbles: These hard objects can scratch or crack the dustbin, causing it to become less effective at capturing debris.
Loose screws or nails: If these items get sucked up, they can cause serious damage to the vacuum’s internal components, resulting in costly repairs or even replacement.
Glass or ceramic shards: These sharp objects can not only damage the dustbin but also pose a safety hazard if they come in contact with skin.
Large toys or objects: These items can become lodged in the vacuum or create a blockage in the dustbin or filter, reducing the vacuum’s efficiency.
By being mindful of what your smart vacuum cleaner is picking up, you can help ensure its longevity and effectiveness. Always be sure to thoroughly inspect the area to be cleaned before starting the vacuum, and manually remove any large or potentially damaging objects. Remember, prevention is key when it comes to smart vacuum cleaners!
Conclusion
In conclusion, keeping your smart vacuum cleaner’s dustbin clean and maintained is essential for ensuring its optimum performance and longevity. Not only does it improve suction power and efficiency, but it also prevents clogging and damage to the vacuum as well as improves indoor air quality.
To know when the dustbin is full, look out for signs such as increased noise level, reduced suction power, visible debris in the dustbin, short cleaning cycles, indicator light on the vacuum or even smartphone app notifications.
To empty the dustbin, always ensure that the vacuum is powered off then remove the dustbin according to the instructions, empty it over a trash can, clean the dustbin and filters, and reattach the dustbin before resuming cleaning.
For maintaining the vacuum’s dustbin, always empty it after every cleaning cycle, wash it and the filters with water regularly, allow them to dry completely before reattaching, replace filters as recommended by the manufacturer, and avoid picking up large or sharp objects that can damage the dustbin or vacuum.
By following these simple steps, you can prolong the lifespan of your smart vacuum cleaner’s dustbin and keep it performing at its best. Remember, a clean dustbin ensures a clean and healthy home.
Frequently Asked Questions
How often should I empty my vacuum’s dustbin?
It is recommended to empty the dustbin after every cleaning cycle to maintain optimal performance.
What should I do if I accidentally vacuum something I shouldn’t have?
Immediately power off the vacuum and remove the item from the dustbin to prevent damage to the dustbin or vacuum.
Can I wash the dustbin and filters?
Yes, you can wash the dustbin and filters with water, but make sure to let them dry completely before reattaching.
How do I know when to replace the filters?
Refer to the manufacturer’s recommendations for how often to replace the filters. It can vary based on usage and model.
Can I reuse disposable filters?
No, disposable filters are meant for one-time use and should be replaced with new ones.
What should I do if the dustbin won’t come off the vacuum?
Refer to the manufacturer’s instructions for removing the dustbin. If it still won’t come off, check for any debris or obstructions that may be preventing it from detaching.
Can I use compressed air to clean the dustbin and filters?
Avoid using compressed air as it can damage the filters or push debris deeper inside the vacuum, reducing suction power.
Why is it important to let the dustbin and filters dry completely before reattaching?
Letting the dustbin and filters dry completely can prevent mold or mildew growth and maintain optimal performance.
What should I do if the indicator light does not turn off after emptying the dustbin?
Refer to the manufacturer’s instructions for resetting the indicator light or contact customer support for assistance.
Can I use my smart vacuum cleaner without a dustbin?
No, a dustbin is essential for the vacuum’s cleaning function. Do not attempt to use the vacuum without the dustbin.