Properly Emptying the Dustbin on Your Smart Vacuum Cleaner
Warning: A non-numeric value encountered in /var/www/html/wp-content/themes/generatepress/inc/structure/post-meta.php on line 165
by Dwight Gibson
Have you ever wondered why your smart vacuum cleaner is not cleaning as efficiently as it used to? The reason may be simpler than you think – a full dustbin. Emptying the dustbin on your smart vacuum cleaner is one of the most important maintenance tasks that you should regularly perform. In this article, we will guide you through the process of how to properly empty the dustbin on your smart vacuum cleaner, the importance of doing so, and share tips to make sure you are doing it correctly. So, let’s dive in and ensure your smart vacuum cleaner is running at full capacity!
Table of Contents
Why Emptying the Dustbin is Important
As a smart vacuum cleaner owner, it is crucial to understand how to properly maintain your device. One important aspect of maintenance is emptying the dustbin. Failure to do so can lead to a myriad of issues that can cause your device to malfunction, reduce performance, and even pose health risks to you and your family. In this section of the article, we will discuss the importance of emptying the dustbin on your smart vacuum cleaner and how to do it properly step by step. But before we dive in, let’s take a look at some of the reasons why it is essential to empty the dustbin regularly.
Maintain Cleanliness
Over time, a full dustbin can lead to a buildup of dirt, hair, and other debris, making your smart vacuum cleaner less effective at cleaning your home. It can cause the device to leave behind dirt, crumbs, and other debris, thus not providing the clean environment you desire.
Prevent Malfunction
A full dustbin can cause your smart vacuum cleaner to malfunction. Since your vacuum relies on its dustbin to pick up dirt and debris, a full bin can cause the device to slow down or stop working altogether. If this happens, you may need to look for smart vacuum automatic disposal troubleshooting information or even hire a technician to fix the issue.
Improve Functionality
By regularly emptying the dustbin, you help to maintain the functionality and performance of your smart vacuum cleaner. It ensures that the device is working correctly, providing optimal cleaning efficiency, making sure it doesn’t get clogged, and prolonging the longevity of the device.
Now that we understand why it is essential to empty the dustbin let’s take a look at how to do it properly in the following section.
Maintain Cleanliness
Maintaining cleanliness is one of the primary benefits of regularly emptying the dustbin on your smart vacuum cleaner. Dust and debris accumulate over time, which can lead to unpleasant odors and potential health hazards. Leaving the dustbin full can reduce the suction power of your smart vacuum, making it less effective at cleaning your floors.
An accumulation of dust and debris can also damage your vacuum cleaner system, causing unnecessary wear and tear on the motor and other components. Regularly emptying the dustbin not only maintains cleanliness but can prevent malfunction and reduce the amount of debris that enters the motor, extending the life of your smart vacuum.
It is recommended that you empty the dustbin after every use, particularly if you have pets or live in a dusty area. By doing so, not only will you maintain cleanliness, but you’ll also improve the efficiency of your smart vacuum cleaner.
To effectively maintain your smart vacuum, it is also recommended that you clean and replace the filters, clean the brushes, and maintain the sensors. Investing in top smart vacuum accessories can help keep your vacuum cleaner in good condition. By keeping the components in good working order, you will extend the life of your machine and ensure that it maintains its maximum cleaning power.
If you’re experiencing any issues with your smart vacuum’s automatic disposal function, check out our article on smart vacuum automatic disposal troubleshooting for tips and solutions.
Remember, regularly emptying the dustbin is an essential part of maintaining the cleanliness and functionality of your smart vacuum cleaner. For more information on smart vacuum maintenance, read our article on the benefits of smart vacuum maintenance or our article on bagless vs. bagged smart vacuum disposal.
Prevent Malfunction
Properly emptying the dustbin on your smart vacuum cleaner is crucial in preventing malfunction. When the dustbin becomes full, it can cause the vacuum to lose suction, which will affect its performance. If the dustbin is not emptied regularly, it can cause damage to the vacuum cleaner, leading to costly repairs or even replacement.
Here are some of the ways in which failure to empty the dustbin can cause malfunction:
If the dustbin becomes too full, it can cause the filter to clog up, thereby reducing the suction power of the vacuum.
The vacuum cleaner may suffer from overheating issues, which can lead to damage to its internal components.
If the dustbin is not emptied regularly, it can become a breeding ground for bacteria and mold, which can cause an unpleasant odor to emanate from the vacuum cleaner.
Debris that is left in the dustbin for an extended period can cause damage to the dustbin’s walls, leading to cracks or deformations that could cause dust to leak out or prevent the bin from being securely locked into the vacuum cleaner.
Regularly emptying the dustbin on your smart vacuum cleaner can extend its lifespan and improve its performance. If you experience any issues with your smart vacuum cleaner, troubleshooting can help you identify the issue and correct it. For more information on smart vacuum maintenance, please visit /benefits-smart-vacuum-maintenance/.
Improve Functionality
Improving the functionality of your smart vacuum cleaner is another reason why emptying the dustbin is important. When you properly empty the dustbin, you prevent dirt and debris from building up inside the vacuum, which can bog down the motor and cause it to work harder. This can lead to your vacuum cleaner using more energy, reducing its overall performance, and shortening its lifespan. By emptying the dustbin regularly, you help maintain the suction power of your vacuum, which ensures it picks up dirt and debris efficiently every time you use it.
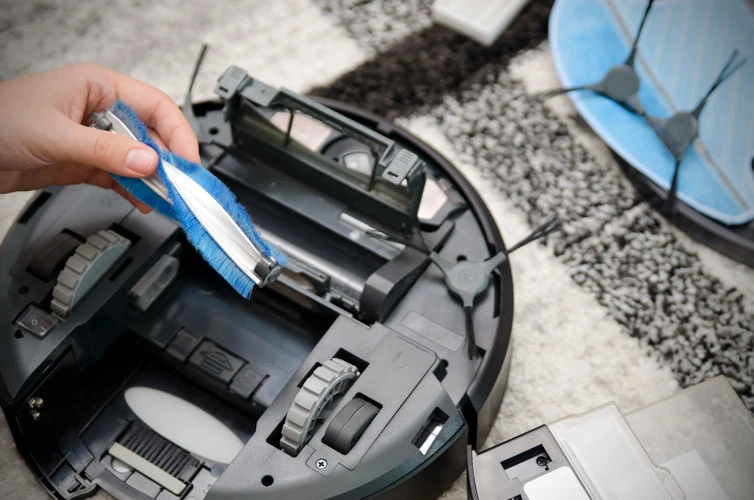
In addition to emptying the dustbin, there are other steps you can take to maximize the functionality of your smart vacuum cleaner. For instance, regularly cleaning and replacing filters will help keep your vacuum working efficiently. Likewise, keeping the brushes free of hair and debris will help ensure they continue to spin smoothly. You can also invest in top smart vacuum accessories like protective bumpers or additional cleaning tools to help your vacuum better clean your space.
Another important factor in maintaining the functionality of your smart vacuum cleaner is properly cleaning and maintaining the sensors. These sensors are responsible for helping your vacuum navigate your space and avoid obstacles. Over time, they can become dirty or covered with dust, which can reduce their effectiveness. By regularly cleaning and maintaining the sensors, you help ensure they continue working properly.
Improving the functionality of your smart vacuum cleaner requires regular maintenance and upkeep. By properly emptying the dustbin, cleaning or replacing filters, clearing brushes, and maintaining sensors, you can help ensure that your vacuum cleaner works properly and efficiently for longer. For more information on how to maintain your smart vacuum, check out our article on cleaning and replacing filters for your smart vacuum cleaner.
How to Empty the Dustbin on Your Smart Vacuum Cleaner
Trying to keep our homes clean can be a challenging task, especially when it comes to dust and debris that accumulates over time. Fortunately, with a smart vacuum cleaner, cleaning your house can be a breeze. However, to make sure that your smart vacuum cleaner continues to work efficiently, it’s essential to know how to empty its dustbin properly. In this section, we will guide you on how to achieve that. Follow these steps carefully, and you will have an immaculately clean and fully functional smart vacuum cleaner. If you encounter any trouble with your smart vacuum cleaner, consider checking out our troubleshooting guide on smart vacuum automatic disposal for more insights.
Step 1: Turn off the Vacuum Cleaner
The first step to properly emptying the dustbin on your smart vacuum cleaner is crucial to ensure safety and prevent any damages to the device. Before anything else, it’s important to make sure that the vacuum cleaner is turned off to avoid injury and accidents while handling the dustbin.
Turning off the vacuum cleaner also allows the device to cool down, so you won’t risk burning your hands accidentally. This step applies to all types of smart vacuum cleaners, regardless if it’s corded or cordless.
To ensure that the vacuum cleaner is turned off, look for the power button on the device, and press it to shut it down. Wait a few seconds to make sure that the device has completely turned off before proceeding to the next step.
Remember, safety should always come first when handling any kind of appliance. Never attempt to empty the dustbin while the vacuum cleaner is still on. Doing so may cause severe accidents that may lead to injuries such as cuts or burns.
After you have turned off the smart vacuum cleaner, you can now proceed to locate the dustbin. For more information on proper vacuum maintenance and accessories, check out our guide on Top Smart Vacuum Accessories or on cleaning the brushes, check out our article on How to Clean Smart Vacuum Brushes.
Step 2: Locate the Dustbin
When it comes time to empty the dustbin of your smart vacuum cleaner, the first step is to locate the dustbin. This may seem like an obvious task, but the location of the dustbin can vary depending on the make and model of your vacuum. Here are some tips to help you locate the dustbin:
Refer to the user manual: The user manual will often have a diagram or description of where the dustbin is located on your particular vacuum cleaner.
Look for a latch or release button: Most vacuum cleaners have some type of latch or release button that you need to press or slide in order to remove the dustbin.
Check for indicators: Some smart vacuums have indicators that will alert you when the dustbin is full, and where it is located on the device.
It’s important to take the time to locate the dustbin properly, as it can be hidden or difficult to access on some models. Once you’ve found the dustbin, you can move on to the next step of the process. If you’re having trouble locating the dustbin, refer to the user manual or contact the manufacturer for assistance.
Pro tip: While you’re locating the dustbin, take the opportunity to inspect the vacuum cleaner for any damage or wear and tear. It’s also a good time to check the filter and sensors to ensure that they are working properly. For more information on cleaning and maintaining sensors on smart vacuum cleaners, check out our article on how to clean and maintain smart vacuum sensors, or read up on the differences between bagless and bagged smart vacuum disposal in our article on smart vacuum disposal.
Step 3: Remove the Dustbin
To remove the dustbin from your smart vacuum cleaner, follow these steps:
Step 1
Turn off the vacuum cleaner by pressing the power button.
Step 2
Locate the dustbin on your smart vacuum cleaner. It’s usually at the back of the device and has a release button.
Step 3
Press the release button to detach the dustbin from the vacuum cleaner. Be careful not to spill the contents of the dustbin.
Removing the dustbin is a crucial step in emptying it properly. Make sure you handle it with care to avoid damaging it or the vacuum cleaner. If you’re unsure about the location of the dustbin or release button, consult the user manual.
Once you’ve removed the dustbin, you can move on to the next step of emptying it.
Step 4: Empty the Dustbin
When it comes to emptying the dustbin on your smart vacuum cleaner, it is important to do so properly to ensure maximum effectiveness of your device. Follow these steps to empty your dustbin correctly:
Step 1: Find an appropriate location to empty the dustbin. It is best to do this over a trash can or outside to avoid creating a mess inside your home.
Step 2: Press the release button or lever that is holding the dustbin in place to remove it from the vacuum cleaner. Be sure to handle the dustbin gently to avoid any spills.
Step 3: Once the dustbin is removed, hold it over the trash can and carefully empty the contents into the trash. Shake the dustbin gently to ensure everything is emptied out.
Step 4: Use a small brush or cloth to wipe away any remaining debris from the dustbin. This will help ensure that the next cleaning session is as hygienic as possible.
Step 5: Rinse the dustbin with water to remove any remaining dirt or debris. Be sure to let the dustbin dry completely before reattaching it to the vacuum cleaner.
By following these simple steps, you can ensure that your smart vacuum cleaner is working at its maximum capacity. Emptying the dustbin can be a simple and easy process if done correctly. Remember to handle with care and take your time to ensure a clean and hygienic environment in your home.
Step 5: Clean the Dustbin
Once the dustbin has been emptied, it’s important to give it a thorough cleaning to ensure that it’s free of any dust or debris that may have accumulated inside. Follow the steps below to properly clean the dustbin of your smart vacuum cleaner:
Materials Needed:
Instructions:
Clean cloths
Use a clean and dry cloth to wipe the inside of the dustbin.
Cotton swabs
Use cotton swabs to clean any tight or hard-to-reach areas of the dustbin.
Mild soap and water solution
Make a mild soap and water solution and use it to clean the dustbin if it’s excessively dirty or smelly.
Allow the dustbin to dry completely before reattaching it to the vacuum cleaner.
Make sure that the dustbin is completely dry before reattaching it to the vacuum cleaner. Any moisture left inside could damage the machine or reduce its suction power.
Remember to always refer to the user manual for specific instructions on how to clean and maintain your smart vacuum cleaner. Regular cleaning and maintenance of your smart vacuum cleaner’s dustbin will ensure that it performs at its best and helps keep your home clean and tidy.
Step 6: Reattach the Dustbin
Once you have emptied and cleaned the dustbin on your smart vacuum cleaner, it’s time to reattach it properly. Follow these simple steps:
Inspect the dustbin: Before reattaching the dustbin, double-check to make sure that it is clean and free of any remaining debris or dirt. If you notice any leftover residue, use a clean cloth or brush to remove it.
Align the dustbin: Take a moment to properly align the dustbin with the vacuum cleaner. Look for any grooves or notches on the dustbin that should align with the corresponding parts of the vacuum cleaner. Proper alignment will ensure that the dustbin fits securely in place.
Reinsert the dustbin: Once the dustbin is properly aligned, gently reinsert it back into the vacuum cleaner. Make sure that it slides smoothly into place and that you hear a secure click or snap indicating that it is locked in place.
Secure the dustbin: Depending on your vacuum cleaner model, you may need to secure the dustbin in place using additional locking mechanisms or latches. Refer to the user manual or manufacturer’s guidelines for specific instructions on how to do this.
Test the dustbin: Once you have reattached the dustbin, turn on the vacuum cleaner and run it for a minute or two. Listen for any unusual noises or rattling that might indicate a loose or improperly attached dustbin. If everything sounds normal, your dustbin is properly reattached and ready to use.
Properly reattaching the dustbin on your smart vacuum cleaner is an important step in maintaining the functionality and durability of your device. Follow these simple steps to ensure that the dustbin is securely locked in place and ready to capture dirt and debris during your next cleaning session.
Tips for Properly Emptying the Dustbin
As mentioned in the previous section, emptying the dustbin is an essential task to maintain the efficiency and functionality of your smart vacuum cleaner. However, it’s not just about removing the dirt and debris from the bin. To do it correctly, a few tips should be followed, which can make the process seamless and less stressful. So, to help you level up your vacuuming game, here are some useful tips that will come in handy when emptying the dustbin of your smart vacuum cleaner.
Empty the Dustbin Regularly
Regularly emptying the dustbin of your smart vacuum cleaner is crucial to maintaining its optimal performance. To ensure the longevity and efficiency of your machine, you should aim to empty the dustbin after every use. Here are some tips to help you stay on top of regular emptying:
Set a reminder: If you have trouble remembering to empty the dustbin, try setting a reminder on your phone or calendar. This will help you stay on track and prevent a buildup of debris that can hinder the vacuum’s performance.
Monitor the dustbin: Keep an eye on the level of debris in the dustbin during use. If the container seems to be filling up quickly, it’s time to empty it.
Establish a schedule: Depending on how frequently you use your smart vacuum cleaner, you may need to empty the dustbin every day, every other day, or once a week. Setting a schedule will help you stay consistent and avoid letting the bin become too full.
Consider your space: If you have pets or live in a particularly dusty environment, you may need to empty the dustbin more frequently than someone who lives alone in a relatively clean apartment.
Remember, the more frequently you empty the dustbin, the better your smart vacuum cleaner will perform. Regular emptying ensures that the vacuum can continue to pick up dirt and debris effectively, preventing clogs and damage to the machine. So make sure you stay on top of it!
Use a Trash Bag
A crucial step in properly emptying the dustbin on your smart vacuum cleaner is using a trash bag. This not only makes the process more hygienic but also helps to prevent the spread of dust and dirt particles.
Why is using a trash bag important?
Simply removing the dustbin and dumping its contents into the garbage can cause a big mess. Dust and debris can scatter everywhere, leaving you with a bigger mess to clean up than when you started. Using a trash bag ensures that all the dirt and debris are contained and can be easily disposed of in one go.
How do you use a trash bag when emptying the dustbin?
It’s quite simple. First, turn off the vacuum cleaner and ensure that the dustbin is cool to the touch. Then, locate the release button or lever to remove the dustbin. Once the dustbin is removed, carefully tilt it over your trash bag and empty the contents inside. If your dustbin has a lid or filter, take this opportunity to clean or replace these as well.
Tips for using a trash bag when emptying the dustbin:
Tip
Description
1
Make sure the trash bag is big enough to hold the contents of the dustbin
2
Hold the trash bag open with one hand while emptying the dustbin with the other
3
Try not to shake or tip the dustbin too much to avoid creating a dust cloud
4
If your vacuum cleaner uses disposable dustbin bags, be sure to replace them regularly and dispose of them properly
By using a trash bag when emptying the dustbin on your smart vacuum cleaner, you can ensure a clean and hassle-free process. Remember to dispose of the trash bag responsibly and replace it with a new one to be ready for the next time you need to empty the dustbin.
Wear Gloves
Keeping your smart vacuum cleaner clean is not only important for its optimal performance but also for your own health. Dust and debris in the dustbin can contain allergens and other harmful particles that can cause irritation and health problems if they come into contact with your skin. It is important to take precautions and wear gloves while emptying the dustbin on your smart vacuum cleaner.
Wearing gloves provides a barrier between the debris in the dustbin and your skin, preventing any direct contact. This can reduce the risk of skin irritation and other health problems that may arise from coming into contact with harmful particles. Additionally, wearing gloves can also help keep your hands clean and prevent the spread of germs during the cleaning process.
When selecting gloves for this task, make sure to choose a pair that fits well and is made of a durable material, such as latex or nitrile. These materials provide a good barrier against dust and debris in the dustbin.
Here are some key points to keep in mind when wearing gloves while emptying the dustbin:
Point
Explanation
Use disposable gloves
Disposable gloves are a convenient option as they can be discarded after use, preventing the spread of any harmful particles.
Check for tears or holes
Before using your gloves, make sure to inspect them for any tears or holes that may compromise their effectiveness as a barrier.
Don’t touch your face
Avoid touching your face while wearing gloves, as this can transfer any harmful particles to your skin or mouth.
Dispose of gloves properly
After use, dispose of your gloves in a waste bin and wash your hands thoroughly.
By wearing gloves and following these key points, you can ensure proper hygiene and protect your skin while emptying the dustbin of your smart vacuum cleaner.
Inspect the Dustbin for Damage
After emptying the dustbin, it’s important to inspect it for any damage. This step is crucial because any cracks or holes in the dustbin can lead to decreased suction power or even cause your smart vacuum cleaner to malfunction altogether. Here are some things to look out for during your inspection:
Cracks: Check the dustbin for any cracks. Even small ones can cause suction issues and hinder the performance of your vacuum cleaner.
Holes: If you find any holes in the dustbin, they will need to be repaired or replaced. Holes can cause debris to escape from the dustbin and onto your floors, making cleaning less effective.
Loose parts: Sometimes, the dustbin can develop loose parts over time. Make sure the dustbin is securely attached and that all parts are in their proper place.
Worn out seals: The seals on the dustbin are important for keeping debris inside the bin. Look for any signs of wear or tear on the seals and replace them if necessary.
Inspecting the dustbin for damage doesn’t take much time but can make a big difference in the performance of your smart vacuum cleaner. If you do find any damage, it’s important to address it right away to avoid any issues with your vacuum cleaner’s functionality. By taking care of your vacuum cleaner and performing regular inspections, you can ensure that it will keep your floors clean for years to come.
Check the Filter
After emptying the dustbin on your smart vacuum cleaner, you should also check the filter. The filter is responsible for capturing fine dust and allergens, and if it is clogged, it will negatively impact the performance of your vacuum cleaner. Here are some steps to check and clean the filter:
First, consult your vacuum cleaner’s instruction manual to identify the type of filter you have. Some filters can be washed and reused, while others need to be replaced regularly.
If your filter is reusable:
Step 1:
Remove the filter from the vacuum cleaner according to the instructions given in the user manual.
Step 2:
Tap the filter gently to remove dust or use a soft brush to clean it off.
Step 3:
If the filter is very dirty, rinse it with water and let it dry completely before replacing it in the vacuum cleaner.
If your filter needs to be replaced:
Step 1:
Identify the type of filter you need to replace and purchase a new one from an authorized dealer or online retailer.
Step 2:
Remove the old filter from the vacuum cleaner according to the instructions given in the user manual.
Step 3:
Insert the new filter into the vacuum cleaner, following the instructions for doing so in the user manual.
By regularly checking and cleaning or replacing the filter, you can ensure that your vacuum cleaner is performing at its best and capturing dust and allergens effectively. Plus, a clean filter means cleaner air in your home!
Conclusion
In conclusion, emptying the dustbin on your smart vacuum cleaner is an essential task that needs to be done regularly. It helps maintain cleanliness in your home, prevents malfunctions, and improves the functionality of the vacuum cleaner.
If you want your smart vacuum cleaner to continue working efficiently, you should follow the proper steps for emptying the dustbin. Turn off the vacuum cleaner, locate the dustbin, remove it, and then empty it carefully. Clean the dustbin and reattach it properly to the vacuum cleaner.
To make sure you are properly emptying the dustbin, keep in mind a few tips. Empty the dustbin regularly, preferably after every use. Use a trash bag to contain the dust and debris, wear gloves to protect your hands, inspect the dustbin for damage or wear and tear, and check the filter regularly.
By properly emptying the dustbin on your smart vacuum cleaner, you can prolong its lifespan and keep your home fresh and clean. Remember to follow the instructions provided by the manufacturer and always double-check the manual, if in doubt.
Don’t neglect this important task for the sake of your home’s hygiene, your vacuum cleaner’s longevity, and your own peace of mind. By taking a few extra steps, you can ensure that your smart vacuum cleaner continues to work as it was intended, keeping your floors tidy and your family healthy.
Frequently Asked Questions
What happens if I don’t empty the dustbin on my smart vacuum cleaner?
If you don’t empty the dustbin on your smart vacuum cleaner regularly, it can lead to reduced suction power, malfunction, and even damage to the machine.
How often should I empty the dustbin on my smart vacuum cleaner?
It is recommended to empty the dustbin on your smart vacuum cleaner after each use, or at least once a week if you use it frequently.
Can I use water to clean the dustbin?
No, you should not use water to clean the dustbin on your smart vacuum cleaner as it can damage the machine. Use a dry cloth or brush instead.
What should I do if the dustbin is damaged?
If the dustbin on your smart vacuum cleaner is damaged, you should replace it with a new one to ensure proper functionality.
Do I need to wear gloves when emptying the dustbin?
It is recommended to wear gloves when emptying the dustbin on your smart vacuum cleaner to prevent contact with dust and debris.
Can I reuse the dustbin after emptying it?
Yes, you can reuse the dustbin after emptying it, but make sure to clean it thoroughly before reattaching it to the smart vacuum cleaner.
How do I check the filter?
To check the filter on your smart vacuum cleaner, refer to the user manual for specific instructions.
What should I do if the filter is clogged?
If the filter on your smart vacuum cleaner is clogged, you should clean or replace it to ensure proper suction power and functionality.
Can I dispose of the dustbin contents in the regular trash?
Yes, you can dispose of the dustbin contents in the regular trash, but make sure to double-check with your local waste management regulations.
Do I need to disconnect the charger before emptying the dustbin?
No, it is not necessary to disconnect the charger before emptying the dustbin on your smart vacuum cleaner.