Why Regular Drop Sensor Calibration is Vital for Your Smart Vacuum Cleaner
Warning: A non-numeric value encountered in /var/www/html/wp-content/themes/generatepress/inc/structure/post-meta.php on line 165
by Dwight Gibson
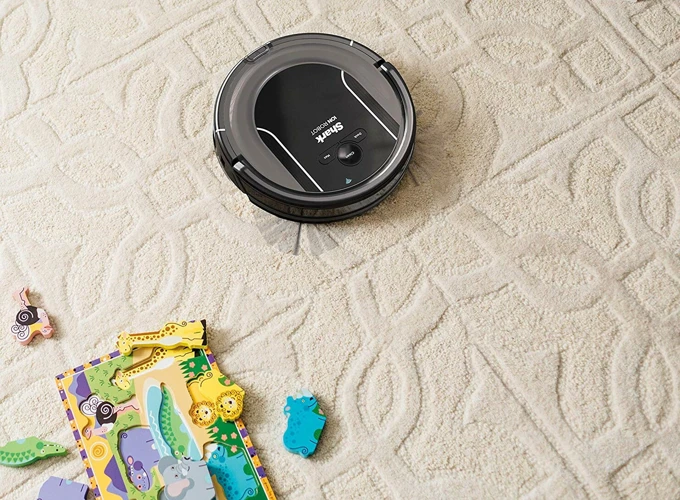
Have you ever noticed your smart vacuum cleaner missing spots or barely cleaning a section of your floor? While the convenience of these devices is not up for debate, their efficiency hinges primarily on the condition of their drop sensors. Yes, the small plastic nodules on the bottom of your device have a significant impact on its cleaning performance. Regular Drop Sensor Calibration is the solution to avoid damage to your machine and ensure its longevity, as well as improve its efficiency in cleaning. But for those who don’t understand what drop sensors are or how to calibrate them, it can be a daunting task. In this article, we’ll detail the importance of regularly checking and calibrating drop sensors on your smart vacuum cleaner, step-by-step.
Table of Contents
Understanding Drop Sensors on Smart Vacuum Cleaners
As smart home technology advances, more and more tasks become automated, including cleaning. Smart vacuum cleaners with advanced features such as anti-collision sensors and AI-powered cleaning are becoming increasingly popular. To ensure your smart vacuum cleaner is functioning optimally, it is important to understand its drop sensors. In this section, we will delve into what drop sensors are and how they work, so you can better understand how to properly maintain and calibrate your smart vacuum cleaner’s sensors, avoiding costly mistakes you may have to fix later by reading our article on smart vacuum troubleshooting.
What are Drop Sensors?
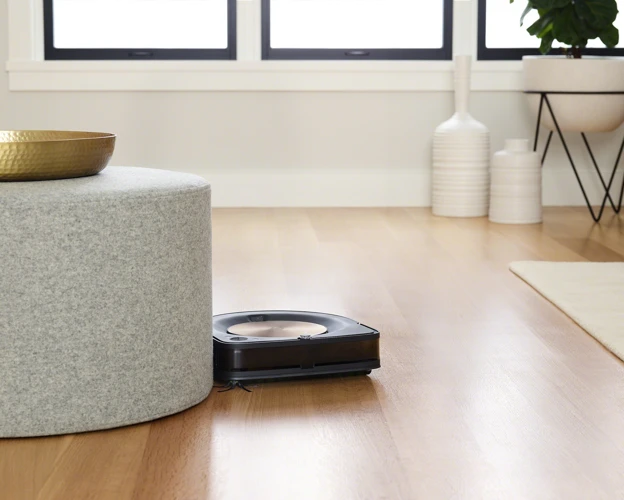
One of the key features of smart vacuum cleaners is their use of drop sensors. They are essential for preventing the device from falling down onto stairs or off ledges.
Drop sensors refer to an array of sensors on the underside of the vacuum cleaner that detect a lack of ground beneath the device, alerting it to stop moving forward and potentially falling off a ledge. These sensors work together to create a map of the vacuum cleaner’s surroundings, allowing it to know when it is approaching an edge.
There are generally four types of drop sensors used in smart vacuums: infrared sensors, acoustic and structural vibration sensors, optical sensors, and capacitive sensors. Each type works in a slightly different way, but all aim to achieve the same goal of keeping the vacuum safely on solid ground.
To avoid mistakes when using a smart vacuum cleaner, it is important to properly understand the function of the drop sensors. By doing so, you can ensure that they are functioning properly and calibrated regularly to avoid any cleaning mishaps. For more tips on smart vacuum cleaner usage, check out our article on Smart Vacuum Mistakes to Avoid.
Type of Drop Sensor
Description
Infrared Sensors
These sensors emit beams of infrared light and detect when the light is reflected back. They are commonly used in smart vacuum cleaners and other autonomous robots.
Acoustic and Structural Vibration Sensors
These sensors use microphones and vibration detectors to detect changes in sound or vibration in the device’s surroundings. They are sometimes used in conjunction with infrared sensors for added safety.
Optical Sensors
These sensors are typically used in cameras and work by analyzing differences in lighting to create a depth map of the surrounding area. However, they are less commonly used in smart vacuums.
Capacitive Sensors
These sensors use the electrical charge between the device and the ground to detect proximity to an object. They are not as commonly used in smart vacuums but are still a popular choice for obstacle detection in robotics.
Understanding the function of the different types of drop sensors can help to troubleshoot any issues with your smart vacuum cleaner. By recognizing which type of sensors your device uses, you will be better equipped to identify and fix any problems that may arise.
How Do Drop Sensors Work?
Drop sensors on smart vacuum cleaners work using an infrared light sensor that is located at the bottom of the device. This sensor measures the distance between the vacuum cleaner and the ground. Here are the steps of how drop sensors work:
The infrared sensor emits a beam of light towards the ground.
The beam of light bounces back from the ground and is detected by the sensor.
The sensor measures the amount of time it took for the light to bounce back.
Based on the time measurement, the device calculates the distance between the vacuum cleaner and the ground.
It is important to note that device manufacturers set a specific threshold for the distance between the vacuum cleaner and the ground. If the distance is too great, the device assumes that it is about to fall off an edge and prompts it to change direction.
This is why regularly checking and calibrating drop sensors on your smart vacuum cleaner is crucial. Over time, the sensors may become dirty, damaged, or even come out of alignment. This can lead to the device not detecting drops accurately, leading to poor cleaning performance, device damage, and potentially costly repairs.
The Risks of Non-Calendarized Drop Sensor Calibration
It’s easy to get caught up in the excitement of having a smart vacuum cleaner that does all the work for you. But with advanced technology comes increased responsibility – especially when it comes to maintenance. One crucial component that requires regular attention is the drop sensor. Neglecting to calibrate this sensor on a regular basis could be disastrous. From poor cleaning performance to device damage, the risks of disregarding drop sensor calibration can pose a serious problem. To avoid any confusion, let’s dive deeper into the importance of scheduled drop sensor calibration.
Poor Cleaning Performance
When your smart vacuum cleaner’s drop sensors are not properly calibrated, it can result in poor cleaning performance that leaves your floors looking unclean and unsanitary. The lack of calibration can cause the vacuum cleaner to overlook spots that it should have cleaned or to spend more time on areas that are already clean.
This leads to inconsistent cleaning results and a subpar overall performance, which can be frustrating for homeowners who depend on their vacuum cleaner to keep their floors clean. Some parts of your home may appear clean, while others may still be covered in dirt and debris, leaving your home looking and feeling unclean.
Calibrating your smart vacuum cleaner’s drop sensors is vital to ensuring that your cleaning device is functioning at optimal levels. This simple calibration process takes only a few minutes, but can make a significant impact on the cleanliness of your floors. By having properly calibrated sensors, your vacuum cleaner can effectively detect and clean every spot of your home, ensuring that no debris or dirt is left behind.
To help avoid poor cleaning performance, make sure to regularly calendarize drop sensor calibration for your smart vacuum cleaner, depending on the manufacturer’s recommendations. Use a calendar or reminder app to help you track these dates, and set your system to remind you regularly.
Proper calibration ensures that your smart vacuum cleaner is picking up all the dirt and dust, leaving your floors looking clean and polished. Not only does this enhance the aesthetics of your home, but it also has a positive impact on your health and well-being by reducing allergens, dust, and other harmful particles that can accumulate over time.
Poor cleaning performance due to non-calibrated drop sensors
Leaves some spots unclean
Spends too much time on already clean areas
Inconsistent cleaning results
Increases the amount of debris left on the floor
Device Damage
Non-calendarized drop sensor calibration not only affects the cleaning performance of smart vacuum cleaners but can also lead to device damage. Without regular calibration, the drop sensors may become less sensitive or stop working altogether, putting the device at risk of falling off edges or down stairs.
Here are some possible ways that non-calibrated drop sensors can cause device damage:
Unexpected falls: When the drop sensors are not calibrated, they may not detect edges and drop-offs, leading to the device falling down stairs or off ledges. This can cause physical damage to the device and potentially render it useless.
Battery drainage: If the device falls down a staircase, it may continue to run until the battery dies, potentially causing the motors or other components to overheat or malfunction.
Reduced suction power: If the device falls down and hits something hard, the internal components may become loose or damaged, leading to reduced suction power and therefore poor cleaning performance.
To prevent device damage caused by non-calibrated drop sensors, it’s crucial to follow the manufacturer’s recommendations for regular calibration. This will ensure that the device is always in top working condition and is safe to use, thus reducing the risk of costly repairs or device replacement.
Calibrating Drop Sensors on Your Smart Vacuum Cleaner
Ensuring proper calibration of drop sensors on your smart vacuum cleaner is an essential task that should not be overlooked. Failure to calibrate these sensors can result in poor cleaning performance, device damage, and ultimately, additional costs. Many people may feel perplexed about how to calibrate the sensors, but with the appropriate information and tools, it can be a simple process. In the following sections, we will guide you through the steps you need to take to calibrate your smart vacuum cleaner’s drop sensors.
Checking Your Device Instructions
Before conducting any calibration on your smart vacuum cleaner’s drop sensors, it is essential to check the device instructions provided by the manufacturer. This step is crucial as different devices may have unique calibration procedures and guidelines specific to their model.
To ensure that you are doing the right procedure for your smart vacuum’s drop sensor calibration, take note of the following instructions:
Step
Instructions
1
Read and understand your device manual thoroughly. Make sure to check for any precautionary measures, which may require you to wear appropriate safety gear while calibrating the device.
2
Find the specific section related to drop sensor calibration or testing in the device manual. Make sure to follow the instructions strictly, and do not deviate from the correct procedures.
3
Identify any additional materials or tools needed for the calibration. These might include a particular type of tape, a level, or any other equipment that might not come with the vacuum cleaner itself.
4
Take note of the recommended schedule for drop sensor calibration. Some manufacturers may suggest monthly or bi-monthly calibration, depending on usage.
By following the manufacturer’s instructions, you can ensure that you are using the appropriate tools and procedures for your smart vacuum cleaner’s drop sensor calibration. This step is essential to prevent any damage to your device and ensure that it performs at its best.
Basic Setup for Calibration
Calibrating the drop sensors on your smart vacuum cleaner is a straightforward process that you can perform yourself. The first step in this calibration process is the basic setup.
The basic setup includes:
Step
Description
Step 1
Turn off the power switch on the vacuum cleaner
Step 2
Remove any dust or dirt that may be present on the sensors
Step 3
Locate the calibration button, typically located near the underside of the vacuum
Step 4
Press and hold the calibration button for 3-5 seconds or until you hear a beep
Step 5
Release the calibration button and wait for the vacuum cleaner to complete the calibration process
Step 6
Turn the power switch back on and resume normal vacuuming
Following this basic setup for calibration, you can be sure that your smart vacuum cleaner is picking up dirt and debris optimally, and its drop sensors are accurately functioning. Remember to also regularly test your vacuum cleaner’s drop sensors, as it can save you significant costs in repairs in the long run.
Advanced Calibration
Performing advanced calibration for your smart vacuum cleaner’s drop sensors involves additional steps that can help fine-tune the device’s detection capabilities. Here are some advanced calibration techniques that you can try:
Clean the sensors: Over time, dust and debris can accumulate on the sensors, leading to inaccurate readings. Use a soft cloth or Q-tip to gently clean the sensors, being careful not to damage them.
Adjust the sensitivity: Most smart vacuum cleaners allow you to adjust the sensitivity of the drop sensors. Experiment with different sensitivity settings to find the optimal level for your device.
Reset the sensors: If your device is still not performing as expected, you may need to reset the sensors. Consult your device’s manual or contact the manufacturer for specific instructions on how to do this.
It’s important to note that advanced calibration should only be attempted by experienced users, as improper calibration can cause damage to the device or result in poor cleaning performance. If you’re unsure about how to perform advanced calibration, it’s best to consult a professional. By calibrating your drop sensors regularly and performing advanced calibration when necessary, you can ensure that your smart vacuum cleaner is working at its best and delivering top-notch cleaning performance.
How to Test Your Smart Vacuum Cleaner’s Drop Sensors
Once you’ve calibrated the drop sensors on your smart vacuum cleaner, it’s important to confirm that they are functioning properly. But how do you test them? This might seem like a daunting task, but we’ve got you covered. With a few simple tests and tricks, you can easily ensure that your device’s drop sensors are in top condition, allowing for seamless cleaning experiences. Let’s dive in and explore some effective methods for testing your smart vacuum cleaner’s drop sensors.
A Simple Test with Obstacles
When it comes to testing your smart vacuum cleaner’s drop sensors, one of the easiest methods is to perform a simple test with obstacles. This test involves placing various objects in the device’s cleaning path to see if it can detect them and avoid them.
To perform the simple test with obstacles, follow these steps:
Step 1:
Clear the area of any small objects that could be picked up by your vacuum cleaner.
Step 2:
Place various objects in the robot’s cleaning path, such as shoes, books, or a small stool.
Step 3:
Start the vacuum cleaner in the cleaning mode, and monitor its progress as it navigates around the objects.
Step 4:
If the device successfully circumnavigates around the objects, it is a sign that its drop sensors are functioning correctly.
Step 5:
If it fails to avoid the objects, it is likely that the drop sensors are not calibrated or there is an issue with the device.
Performing this test on a regular basis will ensure that your smart vacuum cleaner’s drop sensors are always functioning correctly. Not only can this test help you determine if there’s an issue with the device, but it can also prevent damage and preserve the device’s longevity.
It’s recommended to perform this simple test with obstacles at least once a week to guarantee that the device is functioning correctly and any potential issues are identified and resolved quickly.
Using Simulated Drops
When it comes to testing the drop sensors on your smart vacuum cleaner, another effective method is using simulated drops. Simulated drops involve mimicking the effect of a drop sensor triggering a stop in the vacuum cleaner’s movement. Here’s how you can use simulated drops to test your smart vacuum cleaner’s drop sensors:
Gather the necessary materials: You’ll need some kind of platform or object to use as a simulated drop, such as a small block of wood or a book.
Prepare the testing area: Make sure the floor is clear of any obstacles and that you have enough space to place the simulated drop in different locations.
Place the simulated drop: Place the platform or object in the path of the vacuum cleaner’s movement. Ensure that it’s the right height to trigger the drop sensor.
Start the vacuum cleaner: Turn on the vacuum cleaner and let it run until it encounters the simulated drop.
Observe the vacuum cleaner’s behavior: Pay attention to what the vacuum cleaner does when it encounters the simulated drop. Does it stop? Does it change direction? Does it continue moving?
Repeat in different locations: Move the simulated drop to different locations on the floor and repeat the previous steps. This will help you identify any blind spots in the vacuum cleaner’s drop sensor coverage.
Using simulated drops to test your smart vacuum cleaner’s drop sensors is a simple and effective way to check their accuracy. By identifying any blind spots in the vacuum cleaner’s coverage, you can ensure that it’s picking up every bit of dirt and debris on your floors, whether you’re at home or away. By regularly testing your drop sensors using both obstacles and simulated drops, you can maintain your device’s peak performance and extend its lifespan.
The Benefits of Regular Drop Sensor Calibration
Properly maintaining your smart vacuum cleaner is essential for ensuring its optimal performance and longevity. One critical aspect of maintenance is regularly checking and calibrating drop sensors. By doing this, you can avoid potential risks and enjoy the benefits of improved cleaning performance, increased device longevity, and lower repair costs. In the following section, we will discuss the advantages of ensuring that your drop sensors are properly calibrated and how it can positively impact your overall experience with your smart vacuum cleaner.
Improved Cleaning Performance
Properly calibrated drop sensors on a smart vacuum cleaner allow it to navigate various surfaces and objects around your home without getting stuck or falling off stairs. As a result, improved cleaning performance is one of the major benefits of regularly checking and calibrating these sensors.
Let’s imagine that you have a smart vacuum cleaner with poorly calibrated drop sensors. As it navigates your home, it might perceive an obstacle or drop-off when there actually isn’t one. This could cause the vacuum to make sudden turns or stop its cleaning cycle altogether, ultimately leaving sections of your floors uncleaned or only partially cleaned.
On the other hand, drop sensors that are properly calibrated allow your smart vacuum cleaner to move effortlessly around your home, cleaning every nook and cranny without interruption. This improves the vacuum’s ability to pick up dirt, dust, and other debris, ultimately resulting in a cleaner living space for you and your family.
To give you a better idea of just how much of an impact properly calibrated drop sensors can have on cleaning performance, take a look at the following table:
Smart Vacuum Cleaner
Poorly Calibrated Drop Sensors
Properly Calibrated Drop Sensors
Device A
Leaves 20% of debris behind due to frequent stops and turns caused by faulty drop sensors.
Cleans 100% of debris with no interruptions thanks to precise and accurate drop sensors.
Device B
Misses 15% of overall surface area due to frequent pauses and resets caused by inaccurate drop sensors.
Cleans 100% of surface area in a single cycle with properly calibrated drop sensors.
Device C
Struggles to navigate around corners and tight spaces, sometimes missing entire rooms or sections of floors.
Navigates smoothly and efficiently, cleaning every inch of your home and leaving no spots untouched.
As you can see, the difference in cleaning performance between a smart vacuum cleaner with poorly calibrated drop sensors and one with properly calibrated sensors is significant. By taking the time to regularly check and calibrate your vacuum’s sensors, you can ensure that it is operating at peak efficiency and keeping your home as clean as possible.
Increased Device Longevity
Regularly checking and calibrating drop sensors on your smart vacuum cleaner not only improves its cleaning performance but also increases its device longevity. A well-maintained vacuum cleaner can last for several years, but neglecting its sensors and failing to calibrate them regularly can significantly reduce its lifespan.
Here are some of the ways that regular drop sensor calibration can improve the longevity of your smart vacuum cleaner:
1. Prevents Damage to Internal Components: Dropping off stairs or ledges can cause serious damage to the internal components of your vacuum cleaner. When the drop sensors are not calibrated, the device may not detect the drop and continue to operate as usual, causing damage to its internal components. Regular calibration ensures that the drop sensors are working correctly and can prevent such damages from occurring.
2. Reduces Wear and Tear: Non-calibrated drop sensors can put additional strain on the vacuum motor and other mechanical parts of the device, leading to increased wear and tear. By calibrating the drop sensors regularly, you can ensure that the vacuum motor and other mechanical parts are not subjected to unnecessary stress and strain.
3. Prevents Accidents: A malfunctioning drop sensor can pose a safety hazard to your family and pets. If your vacuum cleaner falls down a flight of stairs, it could potentially cause serious injury or damage. Regular calibration ensures that your vacuum cleaner is operating safely and effectively and can help prevent such accidents from happening.
4. Saves Money on Repairs: Without proper maintenance, drop sensors can fail, leading to costly repairs. Regular calibration can help detect potential problems early on, which can prevent more serious damage and reduce the need for costly repairs.
5. Increases Device Longevity: Regularly checking and calibrating drop sensors on your smart vacuum cleaner can significantly increase its device longevity. When your device is well-maintained and operating optimally, it can provide you with several years of reliable use, keeping your home or office clean and tidy, and saving you money in the long run.
Lower Repair Costs
One of the main benefits of regularly checking and calibrating drop sensors on your smart vacuum cleaner is the potential to save money on repair costs in the long run. By keeping your device well-maintained, you minimize the risk of it malfunctioning unexpectedly and needing costly repairs.
Here are a few ways in which regular drop sensor calibration can help lower repair costs:
Prevents damage to internal components – If your smart vacuum cleaner’s drop sensors are not calibrated correctly, your device may be at risk of colliding with obstacles and damaging internal components such as the motor or the cleaning brushes. Regular calibration helps ensure that your device is functioning properly and minimizing the risk of unexpected breakdowns.
Extends the lifespan of components – By regularly calibrating drop sensors, you also help prevent premature wear and tear on certain components, such as the wheels or cleaning brushes. This means they will remain functional for longer, and you won’t need to replace them as often.
Saves money on replacement parts – If your device malfunctions due to lack of calibration, you may need to replace certain components, such as the motor or the sensors themselves, which can be expensive. By keeping your device well-maintained, you can avoid having to replace these costly parts.
In short, taking the time to regularly check and calibrate your smart vacuum cleaner’s drop sensors can help prevent damage to internal components, extend the lifespan of certain parts, and ultimately save you money on repair costs. So, don’t neglect this important aspect of your device’s maintenance routine!
Conclusion
After reading this article, it should be clear that regularly checking and calibrating drop sensors on your smart vacuum cleaner is a crucial part of maintaining its performance and lifespan. By understanding what drop sensors are, how they work, and the risks associated with not calibrating them, you can take the necessary steps to keep your device in top condition.
The calibration process may seem daunting at first, but it’s essential to follow the instructions provided by the manufacturer for the best results. Basic calibration involves resetting the device, but advanced calibration may require additional tools or software. In either case, it’s important to test the drop sensors after calibration to ensure they’re working correctly.
Regular calibration offers several benefits, such as improved cleaning performance, higher device longevity, and lower repair costs. Without proper calibration, the device may miss spots or fall down stairs, potentially causing damage to itself or surrounding objects.
To get the most out of your smart vacuum cleaner, don’t neglect its drop sensors. By keeping them calibrated and functioning correctly, you can ensure that your device cleans effectively and lasts for years to come.
Frequently Asked Questions
1. How often should I calibrate the drop sensors on my smart vacuum cleaner?
It is recommended to calibrate the drop sensors on your smart vacuum cleaner once every 3-6 months or as indicated by the manufacturer’s instructions.
2. What happens if I do not calibrate the drop sensors on my smart vacuum cleaner?
If you do not calibrate the drop sensors, your smart vacuum cleaner may not be able to detect drop-offs such as steps or ledges, which can result in poor cleaning performance or device damage.
3. Can I calibrate the drop sensors on my smart vacuum cleaner myself?
Yes, you can calibrate the drop sensors on your smart vacuum cleaner yourself by following the manufacturer’s instructions or guidelines.
4. What is the basic setup for calibrating drop sensors on my smart vacuum cleaner?
The basic setup involves placing the device on a flat surface and initiating the calibration mode. The device will automatically adjust the sensitivity of its drop sensors based on the surface it is on.
5. What is advanced calibration for drop sensors on my smart vacuum cleaner?
Advanced calibration allows you to adjust the sensitivity of the drop sensors manually to fine-tune their detection capabilities for different environments or cleaning scenarios.
6. How do I know if the drop sensors on my smart vacuum cleaner need calibration?
You may notice poor cleaning performance, erroneous cleaning patterns or stopped cleaning in the middle of a task. These can all be indications that your drop sensors need calibration.
7. How can I test the drop sensors on my smart vacuum cleaner?
You can test the drop sensors by placing obstacles or simulated drops in front of the device and observing its response.
8. What are some benefits of regularly calibrating my smart vacuum cleaner’s drop sensors?
Some benefits include improved cleaning performance, increased device longevity, and lower repair costs.
9. Is there anything I should avoid doing during the drop sensor calibration process?
Avoid operating your smart vacuum cleaner or moving it around when it is in calibration mode. This may interfere with the calibration process and cause inaccurate or incomplete results.
10. Are there any safety tips I should keep in mind when checking or calibrating the drop sensors on my smart vacuum cleaner?
Always make sure the device is turned off and unplugged before checking or calibrating the drop sensors. Avoid touching any electronic components or wires and follow the manufacturer’s instructions or guidelines closely.