Tips for Cleaning Your Smart Vacuum Cleaner’s Anti-Collision Sensors
Warning: A non-numeric value encountered in /var/www/html/wp-content/themes/generatepress/inc/structure/post-meta.php on line 165
by Dwight Gibson
Have you ever wondered why your smart vacuum cleaner seems to struggle at times, bumping into objects or missing spots altogether? It may not be the machine’s fault but rather the anti-collision sensors that help it maneuver around your home. Over time, these sensors can become dirty and fail to function properly, leading to less effective cleaning and potential damage to your beloved appliances. But don’t fret, with just a bit of effort and some basic supplies, you can learn how to clean anti-collision sensors on your own. Follow this step-by-step guide to make sure your vacuum cleaner is always able to navigate around your home with ease.
Table of Contents
Why Clean Anti-Collision Sensors?
Keeping your smart vacuum cleaner’s anti-collision sensors clean is a crucial aspect of maintaining the optimal performance of your device. These sensors help your vacuum cleaner navigate and prevent collisions with furniture, walls, and other household objects. However, dirt and dust can accumulate on the sensors over time, which can lead to faulty readings or even complete malfunctioning. It’s important to regularly check and clean the anti-collision sensors to avoid potential issues. In this guide, we will take you through a step-by-step process of cleaning the anti-collision sensors on your smart vacuum cleaner. But first, let’s understand the importance of maintaining clean sensors. For more information on avoiding common smart vacuum mistakes, check out our article on smart vacuum mistakes to avoid.
Preventing Potential Issues
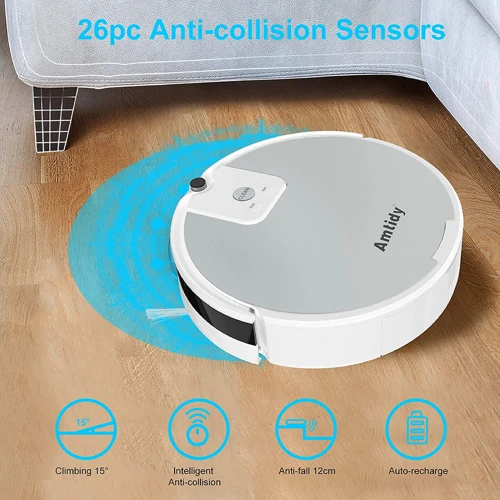
Keeping the anti-collision sensors of your smart vacuum cleaner clean is essential to ensure it’s cleaning optimally and avoiding potential issues. Dirt, dust, and debris can accumulate on the sensors, causing them to malfunction and potentially collide with furniture, walls, or other obstacles in your home.
To avoid these issues, it’s recommended to clean your smart vacuum cleaner’s anti-collision sensors regularly. This will help the sensors to accurately detect obstacles and avoid collisions, allowing for a more efficient cleaning process and extending the life of your vacuum cleaner.
In addition to preventing collisions and improving performance, keeping the sensors clean can also help to prolong the lifespan of your smart vacuum cleaner. Over time, dirt and debris can damage the sensors and cause them to fail, which may result in costly repairs or the need to replace the vacuum cleaner altogether.
Regular sensor maintenance is essential for proper functioning of your smart vacuum cleaner. However, if you suspect that your vacuum cleaner’s sensors are not working correctly, troubleshoot them to identify the problem. Regularly checking and cleaning anti-collision, drop sensors ensures optimal performance of your AI smart vacuum cleaner. It is important to check and calibrate your sensors on a regular basis to keep your smart vacuum cleaner running smoothly.
Materials You Will Need
Before you get started with cleaning your anti-collision sensors on your smart vacuum cleaner, it’s important to make sure you have the proper materials. Here are the items you’ll need:
A soft, lint-free cloth: This will be used to clean the sensors. A microfiber cloth works great for this task as it won’t scratch or damage the sensors.
A small screwdriver: You may need to take the vacuum cleaner apart to get to the sensors. A small screwdriver will come in handy.
Cotton swabs: You may need these to clean hard-to-reach areas around the sensors.
Rubbing alcohol: This is optional but can be helpful in removing stubborn dirt and grime on the sensors.
It’s important to note that you should avoid using water or any harsh cleaning chemicals on the sensors as this can damage them. Stick to the materials listed above to ensure that your anti-collision sensors are cleaned properly and safely. Once you have all the necessary materials, you can move on to the next step of the cleaning process.
Step-by-Step Guide to Cleaning Anti-Collision Sensors
If you’re wondering how to effectively clean the anti-collision sensors on your smart vacuum cleaner, then look no further. We’ve put together a step-by-step guide to help you through the process. It’s crucial to keep these sensors clean to ensure your vacuum cleaner can navigate through your home with ease, reducing the risk of damage and improving its performance. Follow these simple steps and keep your vacuum cleaner in top condition.
Step 1: Power off the Smart Vacuum Cleaner
Before we start cleaning the anti-collision sensors, it’s essential to put safety first. We don’t want any accidents to happen while cleaning, and so we need to power off the smart vacuum cleaner before proceeding.
To power off the smart vacuum cleaner, follow these steps:
Step 1a:
Locate the power button on the smart vacuum cleaner. It’s usually on the top or the side of the device.
Step 1b:
Press and hold the power button until the device turns off completely. This may take a few seconds.
Step 1c:
Unplug the smart vacuum cleaner from the power source. This step is optional but recommended for added safety.
Once you have completed this step, you can proceed with the cleaning process. Remember to keep the smart vacuum cleaner unplugged from the power source while cleaning the anti-collision sensors to avoid any mishaps.
Step 2: Locate the Anti-Collision Sensors
Step 2:Locating the Anti-Collision Sensors
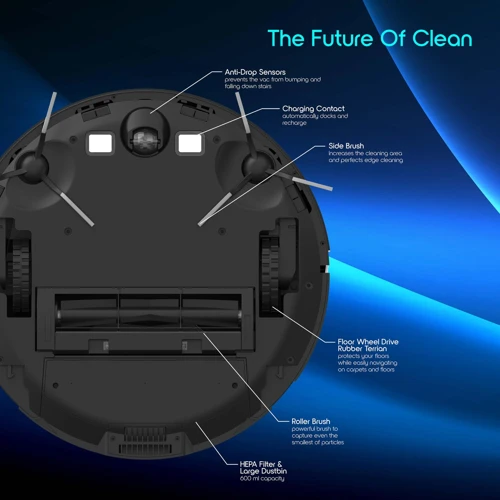
Before you begin the cleaning process, it’s important to locate the anti-collision sensors on your smart vacuum cleaner. These sensors are usually located on the front and sides of the device and are designed to detect obstacles in their path.
To help you easily locate the anti-collision sensors, we have provided a table below that lists popular smart vacuum cleaner models and the location of their sensors.
Device Model
Location of Sensors
iRobot Roomba
Front bumper and sides
Xiaomi Mi Robot Vacuum
Front bumper and sides
Shark Ion Robot
Front bumper and sides
Ecovacs Deebot
Front bumper and sides
Eufy RoboVac
Front bumper and sides
Once you have identified the location of the anti-collision sensors on your device, make sure to inspect them for any dust or debris that may interfere with their function. Dust and dirt can easily accumulate on the sensors over time, causing them to malfunction and potentially damage your smart vacuum cleaner.
In the next step, we will go over the process of gently cleaning the sensors to ensure they are in optimal working condition.
Step 3: Gently Clean the Sensors with a Soft Cloth
When it comes to cleaning the anti-collision sensors on your smart vacuum cleaner, it’s important to handle them with care. Some cleaning methods may damage the sensors and shorten their lifespan, so it’s best to opt for gentle cleaning techniques.
Here is a step-by-step guide for cleaning the sensors using a soft cloth:
Step 1: Dampen a soft cloth with water or a mild cleaning solution that is safe to use on electronic devices. Avoid using harsh chemicals or abrasive materials as these could scratch or damage the sensors.
Step 2: Gently wipe the surface of the sensors to remove any dirt, dust, or debris that may have accumulated on them. Be sure to clean around the edges and corners of the sensors to get rid of any hidden grime.
Step 3: If you notice any stubborn stains or smudges on the sensors, use a gentle rubbing motion to remove them. Avoid pressing too hard or using excessive force as this may damage the sensors.
Step 4: Once the sensors are clean, use a dry cloth to gently wipe away any excess moisture or cleaning solution. Make sure the sensors are completely dry before reassembling the vacuum cleaner.
Remember to be patient and take your time when cleaning the sensors. Rushing the process or using aggressive cleaning techniques could lead to irreversible damage. Once you have cleaned the sensors, you can be confident that your smart vacuum cleaner will function optimally and avoid any unnecessary collisions.
Step 4: Reassemble the Smart Vacuum Cleaner
After you have successfully cleaned the anti-collision sensors of your smart vacuum cleaner, it’s time to put it back together. Follow this step-by-step guide to effectively reassemble your device:
Step 1: Take the soft cloth and gently wipe down the exterior of the vacuum cleaner to remove any dirt or debris that may have accumulated.
Step 2: Reattach any components that were removed during the cleaning process, such as the dustbin or filters.
Step 3: Ensure that all the components are properly secured and free of any dust, dirt or debris. Check the suction inlet, brush roll, and wheels as well for any clogs or obstructions.
Step 4: Power up the smart vacuum cleaner and check if it is working properly. Run a short demonstration cleaning cycle to see if there are any issues.
It’s important to make sure that all components are properly secured and that there are no loose parts. In the event of any malfunction or if the vacuum cleaner does not turn on, double-check that all the parts were reassembled correctly. If you encounter any issues, refer to the user manual or contact the manufacturer for further assistance.
Additional Tips
As you continue to maintain your smart vacuum cleaner, there are a few additional tips that can help to ensure that your device continues to function at an optimal level. Taking extra measures to protect your anti-collision sensors can help to extend the lifespan of your vacuum cleaner and prevent unnecessary repairs or replacements. Let’s take a look at some useful tips that can help you take your maintenance routine to the next level.
How Often Should You Clean the Sensors?
Keeping your anti-collision sensors clean is vital to ensuring that your smart vacuum cleaner performs at its best. But how do you know how often to clean them? Below, we’ve listed some factors that can influence how often you should clean the sensors:
Type of Flooring: If you have hard flooring, you may not need to clean the sensors as often. However, if you have rugs, the sensors can pick up debris more frequently, so you may need to clean them more often.
Pet Hair: If you have pets that shed a lot of hair, you’ll likely need to clean the sensors more often. Pet hair can get tangled in the sensors, which can cause problems with navigation.
Frequency of Use: If you use your smart vacuum cleaner frequently, you should clean the sensors more often. The more you use your robot vacuum, the more dirt and debris can accumulate on the sensors.
Environmental Factors: If you live in an area with high levels of dust or pollen, you may need to clean the sensors more often. These particles can stick to the sensors and interfere with their performance.
Ultimately, it’s best to inspect your smart vacuum cleaner’s anti-collision sensors periodically and clean them as needed. As a general rule of thumb, plan to clean the sensors at least once a month. However, if you notice that your vacuum isn’t navigating as well as it used to, or if you’re experiencing issues with collisions, it’s time to give the sensors a thorough cleaning.
What to Do if the Sensors are Damaged?
It’s essential to take good care of your smart vacuum cleaner’s anti-collision sensors. But despite your best efforts, sometimes accidents happen, and the sensors get damaged. Don’t worry; all hope is not lost. There are still a few things you can do to salvage the situation. Here are some possible ways to fix damaged sensors:
Solution
Description
Contact the Manufacturer
If your vacuum cleaner is still under warranty or if you purchased an extended warranty, the best thing to do is to contact the manufacturer. They will be able to guide you on how to fix or replace the sensors free of charge. Make sure you have all the required warranty information and proof of purchase ready.
Replace the Sensor Yourself
If you’re a DIY enthusiast and comfortable with electronics, you can try to replace the sensor yourself. You can purchase a replacement sensor online or from a home appliance store. Make sure you follow the manufacturer’s instructions carefully, or you might end up damaging your vacuum cleaner further.
Get Professional Help
If you’re not confident about fixing the sensor yourself, it’s best to seek professional help. You can take the vacuum cleaner to a service center or call a technician to your home. They’ll have the required tools and expertise to fix or replace the damaged sensors.
Remember, damaged anti-collision sensors can create more problems than just hindering your vacuum’s movement. If left unattended for too long, it could cause your vacuum to lose its ability to detect and avoid obstacles, leading to collisions and damage to your furniture, floors, and the vacuum cleaner itself. So, it’s best to act promptly and seek assistance if necessary.
Conclusion
In conclusion, cleaning the anti-collision sensors on your smart vacuum cleaner is an essential task that should not be overlooked. Your vacuum cleaner’s ability to navigate around obstacles in your home is heavily dependent on the functionality of these sensors.
By following the simple steps outlined in this article, you can maintain the optimal performance of your vacuum cleaner and prevent any potential issues. Remember to power off your vacuum cleaner before attempting to clean the sensors and locate them properly. Use a soft cloth to gently clean the sensors and reassemble the vacuum cleaner once you are done.
Additionally, it’s important to clean the sensors regularly, ideally once a month, to keep them functioning optimally. Neglecting to clean them may affect their performance and ultimately damage your vacuum cleaner.
If you notice that your sensors are damaged or not functioning properly despite cleaning them, it’s important to seek professional assistance. This will help prevent further damage that may be irreversible if left unaddressed.
Ultimately, cleaning your vacuum cleaner’s anti-collision sensors is a simple yet important task that requires little effort but yields great rewards. By doing so, you can ensure your vacuum cleaner remains efficient and effective in keeping your home clean and tidy.
Frequently Asked Questions
1. Can dirty anti-collision sensors cause issues with my smart vacuum cleaner?
Yes, dirty anti-collision sensors can interfere with the smart vacuum cleaner’s ability to detect obstacles and navigate around them properly.
2. Can I use any type of cloth to clean the sensors?
No, it’s best to use a soft, microfiber cloth to clean the sensors to avoid any potential damage.
3. How often should I clean the anti-collision sensors on my smart vacuum cleaner?
It’s recommended to clean the sensors at least once a month to ensure optimal performance.
4. Can I use cleaning chemicals on the sensors?
No, it’s not recommended to use cleaning chemicals on the sensors, as they could potentially damage them.
5. Should I turn off the vacuum cleaner before cleaning the sensors?
Yes, it’s important to turn off and unplug the vacuum cleaner before cleaning the anti-collision sensors to avoid any potential accidents.
6. How do I know if the sensors are damaged and need to be replaced?
If the vacuum cleaner is unable to detect obstacles or is frequently bumping into objects, it could be a sign that the sensors are damaged and need to be replaced.
7. Can I clean the sensors with water?
No, it’s not recommended to clean the sensors with water, as it could potentially damage them.
8. What should I do if I accidentally damage the sensors during cleaning?
If the sensors are accidentally damaged during cleaning, it’s best to contact the manufacturer for repair or replacement options.
9. Will cleaning the sensors improve the smart vacuum cleaner’s battery life?
No, cleaning the anti-collision sensors won’t have an impact on the smart vacuum cleaner’s battery life, but it will help maintain its performance.
10. How can I prevent the sensors from getting dirty in the first place?
Avoid using the smart vacuum cleaner in very dusty environments and regularly cleaning the room where it operates can help prevent build-up on the anti-collision sensors.