How to Optimize the Laser Mapping Feature of Your Smart Vacuum Cleaner
Warning: A non-numeric value encountered in /var/www/html/wp-content/themes/generatepress/inc/structure/post-meta.php on line 165
by Dwight Gibson
Table of Contents
Introduction
As technology advances, household chores become easier to accomplish with the help of smart devices. One of the most notable innovations in home cleaning gadgets is the smart vacuum cleaner, which can effectively clean floors without human intervention. However, not all smart vacuums are created equal. Some models come with advanced features, such as laser mapping, which utilizes a laser scanner to map out the room’s layout for efficient and thorough cleaning. If you own a smart vacuum with laser mapping capability, optimizing this feature can further enhance your cleaning experience. In this article, we’ll guide you on how to optimize the laser mapping feature of your smart vacuum cleaner, step-by-step.
What is Laser Mapping?
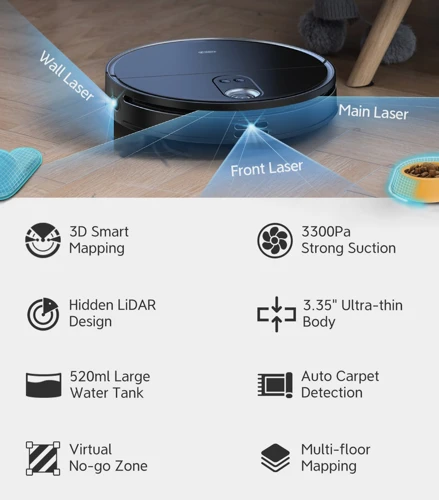
Laser Mapping is a feature that has been introduced in the recent times in smart vacuums. It utilizes an advanced laser technology and a camera to maps out the interior of the house. With the help of the lasers, the vacuum scans the entire area, creating a detailed virtual map of the room. This map is then used by the vacuum to plan its route and navigate around the obstacles.
Why is Laser Mapping Important?
The ability to create an accurate map of the room has revolutionized the way smart vacuums work. The laser mapping vacuum has proved to be more efficient when compared to other traditional robotic vacuums.
Here are some reasons why laser mapping is important:
Improved navigation: With laser mapping, the cleaner can navigate around obstacles with great ease as it has a better understanding of the room layout. This way, it can save time and complete the cleaning job more efficiently.
Battery life: Laser mapping allows the vacuum cleaner to create a more efficient cleaning route, which in turn reduces the amount of time it will spend cleaning the space. This results in the vacuum cleaner using less battery and running for a longer period.
Versatility: Smart vacuums with laser mapping can adapt to changes in the environment, which makes them versatile in any living situation. For instance, furniture rearrangement or moving can occur, but the smart vacuum can instantaneously adjust to the new changes.
Laser mapping has transformed the way smart vacuums clean as the vacuum industry has undergone a modernization conversion. Although many laser mapping tech smart vacuums may have variances to what mentioned above, the power of their laser mapping feature is something to appreciate. So, if you are looking for a vacuum cleaner that will make your cleaning routine easier and smarter, then consider laser mapping smart vacuums they won’t disappoint you.
Why is it Important?
One of the most important features of a smart vacuum cleaner is the laser mapping technology. This feature allows the vacuum to scan and map out the entire room, creating a detailed floor plan for optimized cleaning. Here are some reasons why this feature is essential for a thorough cleaning:
Reasons
Explanation
Accuracy
The laser mapping technology allows the vacuum to accurately navigate around the room without missing any spots. It scans the room using lasers and creates a precise map, ensuring every inch of the room gets cleaned.
Efficiency
With the help of the laser mapping technology, the smart vacuum can clean the room in a more efficient manner. It can follow a specific cleaning pattern to avoid covering any areas twice, saving time and energy.
Convenience
Having a smart vacuum with laser mapping technology can make your life easier. You can schedule the cleaning process and let the vacuum do its job while you focus on other tasks.
Precision
The laser mapping feature allows the vacuum to avoid obstacles and navigate around furniture and other items in the room. This helps prevent accidental bumps and collisions with objects in the room.
The laser mapping technology is an essential feature of a smart vacuum cleaner. It provides accuracy, efficiency, convenience and precision to ensure a thorough cleaning. To learn more about smart vacuum cleaners equipped with this feature, check out our article on the topic.
Preparation
Before diving into optimizing the laser mapping feature of your smart vacuum cleaner, it is crucial to prepare the environment properly. By taking some necessary precautions, you can ensure that your device functions optimally and achieves the best results. In this section, we will discuss some essential steps that you should take to prepare for an optimal cleaning experience. So, let’s get started and set the stage for successful laser mapping!
Clear the Floor
Before you begin using the Laser Mapping feature of your Smart Vacuum Cleaner, it is important to clear the floor of any obstacles that may prevent the vacuum from mapping the area correctly. Clearing the floor is essential for the laser mapping feature to work efficiently and effectively.
Here are some steps to follow to ensure your floor is clear:
Step
Description
1
Remove small objects: such as toys, shoes, or clothes from the floor. These objects can interfere with the vacuum’s sensors and mapping capabilities.
2
Clear cords and cables: ensure that any cords or cables, such as those from lamps or electronic devices, are tucked away and out of reach of the vacuum. This can prevent tangling or damage to the cords.
3
Clear the threshold: If you have a transition threshold between rooms, ensure that it is as flat as possible. If there is a significant height difference, the vacuum may not be able to pass over it and may require assistance.
4
Check upholstery: If your vacuum has the ability to climb onto sofas or chairs, ensure that they are clear of any items that may interfere with the vacuum’s mapping sensors, such as blankets or pillows.
5
Clear rugs or mats: If there are any mats, area rugs, or carpets on the floor, ensure that they are secured and flat on the floor. Any folds, bumps, or ripples can cause the vacuum to have difficulty navigating and mapping the space.
By following these steps and ensuring that the floor is completely clear, you can help to optimize the laser mapping feature of your Smart Vacuum Cleaner and ensure efficient and effective cleaning.
Check the Battery
Before using the laser mapping feature on your smart vacuum cleaner, it is essential to check the battery level. Inadequate battery levels can lead to incomplete mapping and cleaning, leaving your floors dirty and your device inefficient. To ensure that the battery is charged, follow the steps below in the table:
Step
Action
Step 1
Place the vacuum cleaner on the charging dock
Step 2
Ensure that it is properly connected to the dock and the charging light is on
Step 3
Wait until the battery is fully charged before using the laser mapping feature
It is crucial to follow these steps to avoid damaging the device or the battery. Depending on the model of the vacuum cleaner, charging times may vary, so refer to the user manual for more details. Once the battery is fully charged, you can proceed with the calibration and optimization process for the laser mapping feature.
Turn on the Lights
Before using the laser mapping feature of your smart vacuum cleaner, it is essential to make sure that the room is well-lit. Turning on the lights ensures that the vacuum cleaner can detect obstacles and properly map out the room. Here are some tips to follow when turning on the lights:
Action
Description
Open curtains/blinds
Allow natural light into the room by opening curtains or blinds. This can help the vacuum cleaner create a more accurate map of the room.
Turn on ceiling lights
Switch on the ceiling lights to provide ample light for the vacuum cleaner to detect obstacles and boundaries in the room.
Avoid dim lighting
Make sure the lighting in the room is not too dim as this can negatively affect the laser mapping feature of the vacuum cleaner, causing it to miss obstacles and inaccurate mapping.
By turning on the lights and following the above tips, you can optimize the performance of the laser mapping feature of your smart vacuum cleaner, ensuring that it is functioning at peak efficiency.
Calibration
Getting the most out of your smart vacuum cleaner’s laser mapping feature requires accurate calibration. This step is critical for ensuring that your device can accurately map the layout of your home and navigate through it effectively. Without proper calibration, your vacuum may miss spots or become confused about its location. So, to make sure your machine is on point, take a deep breath and follow the steps below with patience and precision. You’ll be surprised at how much more efficient your smart vacuum cleaner can be with proper calibration.
Place the Vacuum in the Center
To properly calibrate the laser mapping feature of your smart vacuum cleaner, the first step is to place the device in the center of the room. This is an essential part of the process to ensure that the vacuum cleaner can accurately detect and map the entire room. Here’s how to do it:
Step 1: Find the exact center of the room by using a measuring tape. Measure the length and width of the room and mark the center point with a small sticker or tape.
Step 2: Carefully move the vacuum cleaner to the center of the room. Make sure to place it exactly on the marked point. The device must be placed on a flat surface to ensure accurate calibration.
Step 3: Once the vacuum cleaner is in position, make sure that it is not obstructed by any furniture or objects. Ensure that there are no obstacles within a 2-meter radius of the device.
Step 4: Double-check the device’s battery to ensure that it has enough power to complete the calibration process. If the battery is low, charge the device before proceeding.
Step 5: Before starting the calibration process, turn off any background noise, such as music or TV. This will prevent any interference with the vacuum cleaner’s sensors.
Step 6: Once everything is set, you can proceed with the calibration process by pressing the calibration button on the device.
Calibrating the laser mapping feature of your smart vacuum cleaner is a crucial step to ensure accurate and efficient cleaning of your home. So take your time in placing the vacuum in the center and follow the steps closely to ensure successful calibration.
Press the Calibration Button
Once you have placed your vacuum in the center of the room, it’s time to move on to the calibration process. This step will ensure that your laser mapping feature is accurate and precise, allowing your vacuum cleaner to clean your house with ease.
The following steps will guide you through the calibration process:
Locate the calibration button on your smart vacuum cleaner. This button may be labeled differently depending on the brand and model, so be sure to refer to your user manual.
Press the calibration button to activate the laser mapping feature. You should hear a beep or see a visual cue to let you know that the vacuum cleaner has started the calibration process.
Keep the vacuum cleaner in the center of the room and allow it to move around in a 360-degree circle. It will use its laser mapping sensors to determine the boundaries and layout of the room.
Avoid obstructing the vacuum cleaner’s path during the calibration process, as this may cause inaccuracies in the laser mapping feature.
Wait for the calibration process to finish. This should take anywhere from 1 to 5 minutes, depending on your vacuum cleaner’s performance.
It’s important to note that you should only perform calibration when setting up your vacuum cleaner for the first time or when you move it to a new room with different dimensions. Over-calibrating your vacuum cleaner can cause it to malfunction and may lead to inaccurate cleaning routes. Now that you have completed the calibration process, you can move on to the optimization step and get the most out of your laser mapping feature.
Wait for the Calibration Process to Finish
After pressing the calibration button, the Smart Vacuum Cleaner will begin the calibration process. This process is critical in ensuring that the laser mapping feature can accurately identify the layout of your home.
Be patient and wait for the calibration process to finish. It may take a few minutes to complete, depending on the size of your home. During this time, the Smart Vacuum Cleaner will map out the various obstacles and features of your home, which will allow it to navigate more efficiently in the future.
It’s important not to interrupt the calibration process, as doing so can cause the Smart Vacuum Cleaner to lose its progress and have to start over. While the calibration is in progress, avoid moving any furniture or other items in the room. This will help the Smart Vacuum Cleaner create a more accurate map of the space.
Once the calibration process is complete, the Smart Vacuum Cleaner will be ready to start cleaning. Make sure to double-check that all of the preparation steps have been completed before letting it loose in your home.
Optimization
Now that you’ve completed the calibration process, it’s time to optimize the laser mapping feature of your smart vacuum cleaner. By doing so, you can ensure that your vacuum is operating at its full potential and getting the most out of its advanced technology. Fortunately, optimizing your smart vacuum cleaner is a straightforward process that can yield significant improvements in performance. In this section, we’ll cover several key steps that you can take to take full advantage of your vacuum’s laser mapping capabilities. So, let’s dive in and learn how to optimize your smart vacuum cleaner like a pro!
Check the Foundation
One of the essential steps to optimizing the laser mapping feature of your smart vacuum cleaner is to check the foundation. It may seem insignificant, but the stability of your vacuum cleaner plays a significant role in the accuracy of its mapping capabilities. Even a minor wobble can cause inaccurate data.
To ensure that your vacuum cleaner has a steady and stable foundation, you can follow some simple steps. Use the following table as a guide:
Steps
Description
1.
Check for Uneven Floors: Before setting up the vacuum cleaner, check the floor’s evenness. If the floor has any significant slopes or bumps, it can cause the vacuum cleaner to lose balance, causing inaccurate data. If the floor is uneven, you may need to place your vacuum cleaner on top of a solid object to level it.
2.
Ensure the Wheels are on the Ground: Make sure that all the vacuum cleaner wheels are in contact with the ground. If any of the wheels are slightly off the ground or not making proper contact, it can cause a slight wobble that can affect mapping accuracy. Adjust the wheels if necessary.
3.
Check the Vacuum Cleaner’s Weight: The vacuum cleaner’s weight can also cause imbalances; ensure that it is evenly distributed. Avoid keeping any heavy objects on top of the vacuum cleaner as it can compromise its stability, which can reduce mapping accuracy.
By taking care of the vacuum cleaner’s foundation, you can ensure that it remains stable during the cleaning process, providing accurate laser mapping data.
Update the Firmware
Updating the firmware of your smart vacuum cleaner is an essential step to optimize the laser mapping feature. Firmware updates provide bug fixes, performance improvements, and new features that can enhance the overall functionality of your device. To update your vacuum’s firmware, follow these steps:
Connect to Wi-Fi: To update your vacuum’s firmware, you need to ensure that it’s connected to Wi-Fi. Check your device’s settings to connect it to a nearby network.
Check for updates: Once your vacuum is connected to Wi-Fi, check for available firmware updates. You can do this through the accompanying app or by navigating to the device’s settings.
Download the update: If an update is available, download it. This may take some time depending on the size of the update and your internet speed.
Install the update: Once the update is downloaded, install it. Your device will automatically begin the installation process, during which the device will restart.
It’s crucial to keep your vacuum’s firmware up to date to ensure it runs as efficiently as possible. New features may be added, such as more effective laser mapping capabilities, improved battery management, and even voice recognition compatibility. By updating the firmware, you can also ensure that any known bugs or glitches are fixed, reducing the likelihood of encountering issues while using your vacuum. So, whenever an update is available, make sure to download and install it to optimize your smart vacuum cleaner.
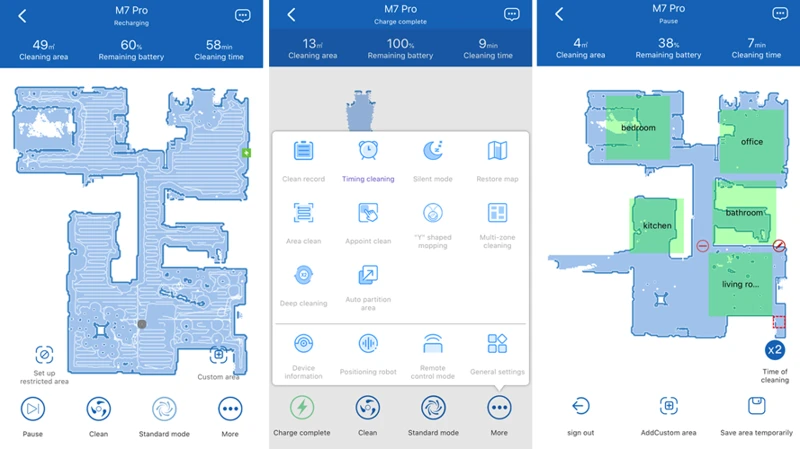
Set Virtual Boundaries
One of the most useful features of a laser mapping smart vacuum cleaner is setting virtual boundaries. Setting virtual boundaries allows you to limit the cleaning area of your vacuum cleaner to specific rooms in your home.
Step 1: Start by opening the mobile app that comes with your smart vacuum cleaner.
Step 2: Look for the virtual boundaries feature within the app. It is often found under settings or customization options.
Step 3: Use your finger to draw a boundary around the area you want the vacuum cleaner to clean. You can draw multiple boundaries if needed.
Step 4: Once you have outlined the area, save the settings to ensure the vacuum cleaner remembers the boundaries for future cleaning sessions.
Setting virtual boundaries can save you time and energy in the long run. Rather than allowing your vacuum cleaner to roam around your entire home, you can set it to clean only the areas that need it most. This feature is especially beneficial for those who live in larger homes with multiple rooms.
Remember to adjust the virtual boundaries as needed. If you adjust your furniture, for example, you might need to redraw the boundaries to ensure the vacuum cleaner continues to clean only the desired area.
By setting virtual boundaries, you can optimize the cleaning process of your smart vacuum cleaner and ensure it only cleans the areas you want it to.
Regular Maintenance
When it comes to the proper functioning of your smart vacuum cleaner, regular maintenance plays a vital role. By regularly cleaning and checking the sensors and dustbin, you can ensure that the device performs optimally and efficiently. In this section, we will discuss the necessary steps you need to take for maintaining your laser mapping feature in top condition. So, let’s dive into the details and learn about the different aspects of regular maintenance to keep your smart vacuum cleaner in good shape.
Clean the Sensors and Camera
To ensure the proper functioning of your smart vacuum cleaner’s laser mapping feature, it is important to keep the sensors and camera clean. Over time, these components can become dirty and obstructed, leading to reduced accuracy and performance. Cleaning these parts is a crucial step in maintaining your smart vacuum cleaner.
How to Clean the Sensors and Camera
Cleaning the sensors and camera is a simple process that can be done with a few basic tools. Here’s what you need to do:
Step 1
Turn off the vacuum cleaner and unplug it from the power source.
Step 2
Locate the sensors and camera. These are usually located on the top of the vacuum cleaner.
Step 3
Use a clean, dry cloth to gently wipe the sensors and camera. Be sure to remove any dirt, dust, or debris that may have accumulated on these parts.
Step 4
If necessary, use a small brush to remove any stubborn debris from the sensors and camera.
Step 5
After cleaning, check the sensors and camera to ensure that they are free of any debris or obstructions.
Step 6
Plug the vacuum cleaner back in and turn it on. Check to make sure that the laser mapping feature is working properly.
Why Cleaning the Sensors and Camera is Important
Cleaning the sensors and camera of your smart vacuum cleaner is important for a variety of reasons. First, it ensures that the laser mapping feature is accurate and can properly navigate your home. Obstructed sensors and cameras can lead to incorrect mapping and cause the vacuum to miss spots or get stuck.
Second, cleaning the sensors and camera can improve the longevity of your vacuum cleaner. Dirty components can overwork the motor and cause the vacuum to break down more quickly.
How Often Should You Clean the Sensors and Camera?
It is recommended to clean the sensors and camera of your smart vacuum cleaner every one to two weeks, depending on usage. If you notice that the laser mapping feature is not working properly or if the sensors and camera are visibly dirty, it may be necessary to clean them more frequently. By regularly maintaining your smart vacuum cleaner’s sensors and camera, you can ensure that it continues to operate at peak performance and provide you with a clean home.
Empty the Dustbin
Regularly emptying the dustbin is a crucial step in maintaining the optimal functioning of your smart vacuum cleaner. Here are some tips on how to empty the dustbin of your vacuum cleaner:
Step 1: Turn off the vacuum cleaner and unplug it from the charging dock to avoid any accidents.
Step 2: Locate the dustbin compartment, which is usually located at the top or bottom of the vacuum cleaner.
Step 3: Press the release button or unlock the latch to open the dustbin compartment.
Step 4: Carefully remove the dustbin from the compartment and hold it over a trash can or garbage bag.
Step 5: Open the lid of the dustbin and empty the contents into the trash can or garbage bag.
Step 6: Use a soft brush or cloth to wipe away any remaining dust or debris from the dustbin and its surrounding area.
Step 7: Close the lid of the dustbin and re-insert it back into the compartment of the vacuum cleaner.
Remember to empty the dustbin after each cleaning session or when it reaches the maximum capacity. Overloading the dustbin not only affects the performance but can also result in dust and debris entering different parts of the vacuum cleaner, which can cause further malfunctions.
Taking good care of your smart vacuum cleaner is a must to ensure that it will continue to provide excellent cleaning results. By following these simple steps, you can keep your vacuum cleaner in pristine condition and enjoy a cleaner and healthier home environment.
Troubleshooting
As with any technological device, sometimes things can go wrong with your smart vacuum cleaner’s laser mapping feature. It can be frustrating when your device is not working as it should, but fortunately, most issues can be resolved easily with a few troubleshooting tips. In this section, we’ll explore some common problems that users may encounter and how to troubleshoot them effectively. Let’s dive in and get your smart vacuum cleaner back on track!
Check for Obstructions
It’s important to regularly check your smart vacuum cleaner for any obstructions that may interfere with its laser mapping feature. Obstructions could prevent the vacuum from cleaning your home thoroughly, or even cause damage to the device.
To check for obstructions, follow these steps:
Step
Action
Step 1
Turn off the device and unplug it from the charging station
Step 2
Turn the device over and examine the underside
Step 3
Look for any debris, such as hair, strings, or dust, stuck in the brush roll, wheels, or other parts of the vacuum
Step 4
If there is any debris, use a pair of tweezers or scissors to carefully remove it
Step 5
Inspect the sensors and camera for any smudges or debris, and wipe them clean with a soft cloth
Step 6
Flip the device upright, and check the top of the vacuum for any obstacles, such as furniture or cords
Step 7
Remove any objects that may obstruct the vacuum’s movement
Step 8
Turn the device back on, and resume cleaning as usual
By regularly checking for obstructions, you can ensure that your smart vacuum cleaner is operating at its optimal level and keeping your home clean. If you encounter any issues that you cannot resolve, refer to the troubleshooting section of your device’s user manual or contact the manufacturer for assistance.
Reset the Device
When your smart vacuum cleaner’s Laser Mapping feature suddenly malfunctions, resetting the device can be an effective solution. A simple reset can resolve most technical glitches and restore the device’s functionality. Here’s how you can reset your smart vacuum cleaner:
Step 1:
Turn off the device
Step 2:
Unplug it from its docking station
Step 3:
Wait for about 30 seconds to a minute to ensure all processes have stopped and the device’s memory has been wiped clean
Step 4:
Plug the device back in and turn it on
It’s important to note that resetting your smart vacuum cleaner will erase all scheduled cleaning tasks and virtual boundaries, so it’s recommended that you take note of these settings before proceeding with the reset.
If the reset procedure doesn’t work, it’s advisable to check for obstructions, such as tangled cables or objects blocking the device’s sensors. It’s also recommended that you contact customer support for further troubleshooting assistance.
By following these simple steps, you can easily reset your smart vacuum cleaner and have it performing at its best once again.
Conclusion
In conclusion, optimizing the laser mapping feature of your smart vacuum cleaner is a simple yet effective way to ensure that your cleaning tool can navigate your home with precision and efficiency. By following the steps outlined in this article, you can take full advantage of the technology that your smart vacuum has to offer.
Remember to: clear the floor of any objects or clutter, check the battery level before using the device, and turn on lights to help the vacuum cleaner’s camera and sensors to detect obstacles and navigate smoothly.
Don’t forget to: calibrate the device, and make sure that it’s placed at the center of the room to ensure a proper calibration process. Update the firmware of the smart vacuum cleaner, set virtual boundaries to prevent the device from entering areas where it shouldn’t go, and clean its sensors and camera regularly.
If you encounter any problems, be sure to: check for obstructions or reset the device to resolve the issue.
Overall, optimizing the laser mapping feature of your smart vacuum cleaner can enhance your cleaning efficiency and supplement your home’s personal cleaning routine. So take the time to prepare and maintain your device properly for optimal performance.
Frequently Asked Questions
1. Can laser mapping work in the dark?
No, laser mapping relies on detecting objects and creating a map of the room through laser blips that bounce off objects. Without sufficient light, it cannot create an accurate map.
2. How often should I calibrate my smart vacuum cleaner?
You should calibrate your smart vacuum cleaner once a month or as needed if you notice any inaccuracies in the map it creates.
3. What if my smart vacuum cleaner gets stuck under furniture?
You can set virtual boundaries to prevent the vacuum cleaner from going under furniture that it cannot fit under. You can also move the furniture to make more space or use the remote control to manually guide the vacuum cleaner out.
4. What kind of flooring is laser mapping suitable for?
Laser mapping can be used on a variety of flooring types, including carpet, hardwood, and tile.
5. Can I control my smart vacuum cleaner with my phone?
Yes, many smart vacuum cleaners come with a companion app that allows you to control the device remotely through your phone.
6. How long does it take for the vacuum cleaner to create a map of the room?
It can take anywhere from a few minutes to 20 minutes depending on the size of the room and the complexity of the layout.
7. What happens if my smart vacuum cleaner’s battery dies mid-cleaning?
The vacuum cleaner will return to its dock and recharge before resuming its cleaning cycle from where it left off.
8. Can I use my smart vacuum cleaner on multiple floors?
Yes, you can use the vacuum cleaner on multiple floors, but you will need to recalibrate it for each floor to ensure accurate mapping.
9. How do I update the firmware on my smart vacuum cleaner?
You can usually update the firmware through the companion app or by visiting the manufacturer’s website and downloading the latest software onto a USB drive. Then, plug the USB drive into the vacuum cleaner and follow the instructions to update.
10. What should I do if my smart vacuum cleaner malfunctions?
Try resetting the device or contacting the manufacturer’s customer support for assistance.