Maintaining and Cleaning UV Sterilization Function in Smart Vacuum Cleaners
Warning: A non-numeric value encountered in /var/www/html/wp-content/themes/generatepress/inc/structure/post-meta.php on line 165
by Dwight Gibson
As we strive for a healthier and more hygienic lifestyle, incorporating a UV sterilization function in our smart vacuum cleaners has become a popular choice. With the ability to kill 99.9% of germs and bacteria, it’s a feature that gives us peace of mind. However, it’s important to remember that this function requires maintenance and cleaning to ensure optimal performance. In this article, we’ll explore why it’s necessary to clean UV sterilization function and provide step-by-step instructions on how to do it. So let’s dive into the world of UV technology and keep our smart vacuum cleaners functioning at their best.
Table of Contents
Why Clean UV Sterilization Function?
As much as we rely on our smart vacuum cleaners to keep our floors dust-free, it’s important to remember that their UV sterilization function needs to be well-maintained to ensure optimal performance. Cleaning this function regularly provides numerous health benefits that cannot be obtained through regular vacuuming. In this section, we’ll take a closer look at why it’s necessary to clean your smart vacuum cleaner’s UV sterilization function, including avoiding bacteria and viruses, achieving clog-free performance, and extending your vacuum’s lifespan. To learn more about the benefits and features of UV sterilization in smart vacuums, check out our guide.
1. Avoid Bacteria and Viruses
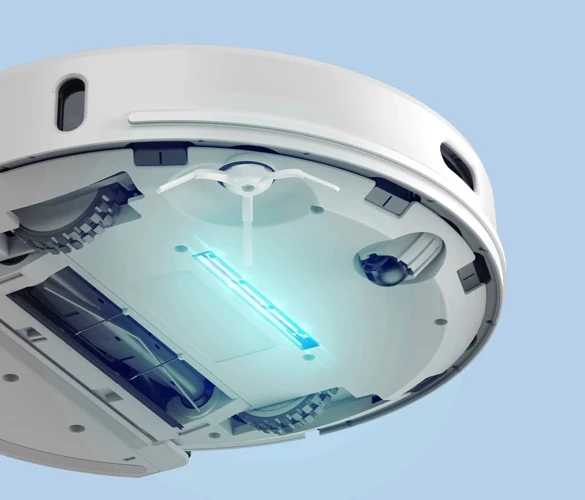
Keeping your smart vacuum cleaner’s UV sterilization function clean is important in avoiding the growth and spread of harmful bacteria and viruses in your home. As the vacuum cleaner moves around the house, it can accumulate bacteria and viruses on its surfaces. UV sterilization function helps eliminate these microorganisms by emitting UV-C light, which damages the DNA and RNA of bacteria and viruses, inactivating their reproductive process.
Regular cleaning of your smart vacuum’s UV sterilization function is essential in ensuring it functions properly, as accumulated dust and debris can limit its effectiveness. It’s crucial to clean and maintain your UV sterilization function periodically to avoid the accumulation of bacteria and viruses in your home.
Here are some reasons why cleaning your smart vacuum’s UV sterilization function is critical:
Preventing Health Issues: Bacteria and viruses can cause serious health issues, including respiratory problems, infections, and even death. Regular cleaning and maintenance of your smart vacuum’s UV sterilization function assure you the best protection from these harmful microorganisms. To learn more about the health benefits of UV sterilization in smart vacuum cleaners, you can read this article.
Improved Efficiency: When your UV sterilization function is clean, it functions more efficiently, and can easily eliminate bacteria and viruses. However, accumulated dust and debris can reduce its effectiveness and clog your smart vacuum cleaner’s filter. More on this can be found in our guide to UV sterilization vs vacuuming.
Extended Lifespan: By regularly cleaning your smart vacuum’s UV sterilization function, you extend its lifespan. Accumulated dust and debris can cause damage to the system, leading to costly repairs or replacement. To learn more about maintaining your smart vacuum cleaner’s UV sterilization function, you can check out our UV sterilization smart vacuum guide.
By keeping your smart vacuum cleaner’s UV sterilization function clean, you can enjoy the peace of mind that comes with knowing that your home is free from harmful microorganisms. Cleaning the UV sterilization function doesn’t have to be difficult. In the next section, we’ll discuss some easy steps you can take to maintain and clean this critical function of your smart vacuum cleaner.
2. Clog-Free Performance
One of the main reasons why it is important to clean the UV sterilization function in your smart vacuum regularly is to ensure clog-free performance. Over time, dust, dirt, and debris can build up in the filter and other parts of the vacuum, causing it to become clogged and less effective.
To avoid this issue and ensure that your smart vacuum is operating at peak performance, it is important to clean the UV sterilization function on a regular basis. This will help to remove any buildup or debris before it has a chance to cause clogs or other issues.
Cleaning the UV sterilization function is a relatively simple process and can be done in just a few steps. First, you will need to unplug and disassemble the vacuum. Next, you will need to remove and rinse the filter to remove any buildup or debris that has accumulated. After cleaning the filter, it is important to clean the UV lamp with a soft cloth to ensure that it is working properly.
Once these steps have been completed, you can reassemble the vacuum and test it to ensure that it is working as expected. By following this process on a regular basis, you can help to ensure that your smart vacuum is always working at peak performance and that your home remains clean and free of dirt, dust, and other contaminants.
In addition to regular cleaning, there are a few other steps you can take to help maintain the UV sterilization function in your smart vacuum. These include keeping the power source consistent, storing the vacuum properly when not in use, and replacing the UV lamp on a regular basis to ensure that it is always working at peak performance.
By following these tips and maintaining your smart vacuum properly, you can enjoy the benefits of UV sterilization and keep your home clean and free of contaminants. With the increasing popularity of UV sterilization in smart vacuums, it’s clear that the future of cleaning is here and homeowners can reap the benefits today.
3. Extended Lifespan
The UV sterilization function is one of the key features of smart vacuum cleaners. It not only helps to eliminate bacteria and viruses but also prolongs the lifespan of the device. By cleaning the UV sterilization function regularly, you can prevent damage to the device and ensure that it continues to function properly.
Here are some ways in which the UV sterilization function contributes to the extended lifespan of your smart vacuum cleaner:
Better Airflow
Less Strain on the Device
Prevents Blockages
The UV sterilization function helps to maintain better airflow, which means that the vacuum cleaner can function at peak efficiency. This reduces the strain on the device, preventing it from overheating and breaking down prematurely.
When the UV sterilization function is dirty or clogged, it puts extra strain on the device as it tries to work harder to achieve optimal performance. This can cause the device to wear out faster and eventually break down.
If the UV sterilization function is not regularly cleaned, it can become clogged with dirt, dust and debris. This can cause blockages in the flow of air, reducing the efficiency of the device and putting more strain on it. Regular cleaning of the UV sterilization function can prevent this from happening, extending the lifespan of your device.
In addition to regular cleaning of the UV sterilization function, there are other steps you can take to maintain the lifespan of your smart vacuum cleaner. This includes keeping the power source consistent, storing the device properly, and replacing the UV lamp regularly. By following these tips, you can ensure that your device lasts for as long as possible and continues to function at its best.
How to Clean UV Sterilization Function
You may have purchased a smart vacuum cleaner with UV sterilization function to keep your home clean and free from harmful bacteria and viruses. However, over time, the UV function can become less effective if the device is not maintained properly. This is why it’s important to know how to clean the UV sterilization function of your smart vacuum cleaner. In this section, we’ll guide you through the step-by-step process of cleaning the UV sterilization function to ensure that it continues to perform optimally.
1. Unplug and Disassemble
Before you start cleaning the UV sterilization function on your smart vacuum cleaner, it’s important to ensure your safety. Unplug the vacuum cleaner from the electrical outlet to avoid any accidents.
Next, disassemble the UV sterilization function from the vacuum cleaner. Refer to the manual or manufacturer’s instructions to know how to do this properly. It’s important to follow the instructions carefully to avoid damaging the vacuum cleaner.
Once you have disassembled the UV sterilization function, you can begin cleaning it. It’s important to clean each component of the sterilization function carefully to avoid any damage to the device. You can do this by following these next steps.
2. Remove and Rinse Filter
When it comes to cleaning the UV sterilization function in your smart vacuum cleaner, removing and rinsing the filter is an important step. Here is a step-by-step guide on how to do it:
Turn off the Vacuum Cleaner: Before you start cleaning the filter, make sure your smart vacuum cleaner is unplugged from the power outlet. It’s important to ensure that the vacuum cleaner is not connected to any power source while you are cleaning it.
Locate the Filter: The filter is usually located in the dustbin or on the side of the vacuum cleaner. Look for the filter and remove it from its housing. Depending on the model of your vacuum cleaner, the filter may be a replaceable or washable type.
Examine the Filter: Before you rinse the filter, check for any visible dirt or debris. If you notice any excessive buildup, take a soft brush and gently remove any dirt that has accumulated on the filter. Once you’ve cleaned it, you can go ahead to rinse the filter.
Rinse the Filter: Take the filter to the sink and run it under water. For washable filters, rinse it until water runs clear. If the filter has any hard-to-remove stains, you can use mild soap to clean it. However, it’s important to avoid harsh detergents that can damage the filter. Check the manufacturer’s recommendations on how often to wash the filter if you’re not sure.
Dry the Filter: After rinsing the filter, shake off any excess water and leave it to air dry. It’s important to ensure that the filter is thoroughly dry before you reassemble it back into your vacuum cleaner. Any remaining moisture can damage the filter or cause mold growth.
Removing and rinsing the filter is a critical step in maintaining the UV sterilization function in your smart vacuum cleaner. By keeping the filter clean, you ensure that your vacuum cleaner operates efficiently, and that the UV sterilization function is not compromised.
3. Clean UV Lamp with Soft Cloth
When it comes to cleaning the UV lamp in your smart vacuum cleaner, it’s important to take proper precautions to ensure that you don’t damage the delicate bulb. Here are the steps you should follow to clean the UV lamp with a soft cloth:
Step 1: Turn Off and Unplug the Device
Before you begin cleaning the UV lamp, make sure the vacuum cleaner is turned off and unplugged from the power source. This will prevent any electrical shocks and ensure your safety.
Step 2: Access the UV Lamp
Once the vacuum cleaner is disconnected from the power, locate the UV lamp inside the device. Use the instruction manual provided with your vacuum cleaner to find the exact location of the UV lamp.
Step 3: Remove the UV Lamp
Remove the UV lamp carefully by following the instructions provided in the manual. In most cases, you’ll need to unscrew the cover or simply slide out the lamp from its compartment.
Step 4: Assess the Condition of the UV Lamp
Before cleaning the lamp, assess its condition. If the bulb is broken, cracked or faulty, replace it with a new one.
Step 5: Clean the UV Lamp
Using a soft cloth or microfiber towel, gently wipe the surface of the UV lamp. Be careful not to apply too much pressure or use any chemicals or abrasive materials that can scratch or damage the bulb.
Step 6: Reinsert the UV Lamp
Once the UV lamp is clean, insert it back into the vacuum cleaner and ensure it is securely fixed in place.
Step 7: Reassemble and Test
After cleaning the UV lamp, reassemble the device and test it to make sure it’s working properly. Turn on the vacuum cleaner and check if the UV lamp is emitting light. If everything is functioning as expected, you’re good to go.
Remember, cleaning the UV lamp in your smart vacuum cleaner is an essential part of maintaining its performance and durability. By following these guidelines, you can ensure your device stays in top condition and continues to provide optimal cleaning results.
4. Reassemble and Test
After cleaning the UV sterilization function, it is time to reassemble the pieces and test the device to ensure everything is functioning correctly. Here are the steps for reassembling and testing your smart vacuum cleaner:
Step 1: Take the cleaned filter and place it back into its compartment. Make sure it is secured back into place so that it will not come loose during cleaning.
Step 2: Reattach any additional components that may have been removed, such as the dustbin or brush roll.
Step 3: Once everything is in place, it is time to turn on the vacuum cleaner and test the UV sterilization function. Turn the power on and activate the UV sterilization function. Check that the UV light turns on and off as it should.
Step 4: To test the suction, place your hand near the vacuum cleaner’s suction port to ensure that there is strong airflow coming out.
Step 5: If everything is functioning correctly, congratulations! Your UV sterilization function is now clean and ready to use. If something is not right, try to troubleshoot the issue. Double-check that everything is reassembled correctly and that the power source is consistent. If the problem persists, consult the user manual or contact the manufacturer for assistance.
Reassembling and testing your smart vacuum cleaner is an essential step in ensuring that the UV sterilization function is functioning correctly. Proper maintenance and cleaning will extend the lifespan of your device, and keep your home free from bacteria and viruses.
How Often to Clean UV Sterilization Function
Maintaining your smart vacuum cleaner’s UV sterilization function is crucial for efficient and effective cleaning. However, the question still arises: how often should you clean the UV sterilization function? The answer mainly depends on how frequently you use your vacuum cleaner and what you are vacuuming. In this section, we will discuss when and why you should clean your UV sterilization function and provide some practical tips on maintaining it to prolong its lifespan. So, let’s dive right into it!
1. Weekly
1. Set a Weekly Schedule
Setting a weekly schedule to clean the UV sterilization function of your smart vacuum cleaner is crucial in maintaining its effectiveness. Here are the steps to follow:
Turn off and unplug your smart vacuum cleaner.
Disassemble the UV sterilization function by following the manufacturer’s instructions.
Remove and rinse the filter under running water. Allow it to air dry before putting it back in place.
Clean the UV lamp using a soft, damp cloth. Be careful not to scratch or damage the lamp while cleaning it.
Reassemble the UV sterilization function and test it to make sure it’s working correctly.
By doing this every week, you’ll ensure that your smart vacuum cleaner’s UV sterilization function is always working at full capacity, keeping your home free from bacteria and viruses.
In addition to a weekly cleaning, there are other times when you should clean the UV sterilization function.
2. After Sucking Up Fine Dust
If you’re vacuuming up a lot of fine dust, it can quickly clog up the UV sterilization function. Make sure to clean it after use, even if it’s not part of your weekly cleaning schedule.
3. After Sterilizing Pet Hair
Pet hair can also clog up the UV sterilization function, making it less effective. If you have pets, make sure to clean the UV sterilization function every time you’ve used your smart vacuum cleaner to pick up pet hair.
By following these tips and setting a weekly schedule to clean your smart vacuum cleaner’s UV sterilization function, you’ll ensure that it’s always working effectively and keeping your home clean and healthy.
2. After Sucking Up Fine Dust
Fine dust is the bane of any vacuum cleaner’s existence. It tends to clog up filters and shorten the lifespan of any cleaning device. However, with a smart vacuum cleaner that has a UV sterilization function, cleaning up fine dust can be even more crucial. Here are some steps to take after sucking up fine dust:
Step 1: Unplug the vacuum cleaner to avoid any electrical hazards while cleaning.
Step 2: Carefully disassemble the vacuum cleaner to access the filter and UV sterilization function.
Step 3: Remove the filter and rinse it under running water until all the fine dust particles have been cleared out.
Step 4: Use a soft cloth to gently clean the UV lamp to prevent any microscopic particles from blocking the UV light from sterilizing surfaces.
Step 5: Reassemble the vacuum cleaner and run a test cycle to ensure that the UV sterilization function is working as intended.
It’s essential to clean the UV sterilization function after sucking up fine dust since the device would need to rid itself of any dangerous bacteria or viruses it may have encountered. Not cleaning the sterilization lamp could potentially cause it to wear down and become less effective over time. Additionally, fine dust can clog up the filter and reduce the suction power of the vacuum cleaner, leading to a less efficient cleaning process.
By taking the time to clean the UV sterilization function and filter after cleaning up fine dust, you can ensure that your smart vacuum cleaner maintains optimal performance and lifespan. As always, regularly maintaining your cleaning device will lead to better cleaning results and a healthier home environment.
3. After Sterilizing Pet Hair
If you are a pet owner, you must be aware of the challenges that come with keeping your home clean and free from allergens. Using a smart vacuum cleaner with UV sterilization function can be a great way to maintain a hygienic environment. However, after sterilizing pet hair, the UV sterilization function needs special attention to keep performing efficiently.
Why is it important to clean the UV sterilization function after sterilizing pet hair?
Pet hair, dander, and other debris can accumulate on the filter and UV lamp, reducing their effectiveness. Pet hair can carry harmful bacteria that can linger on surfaces, increasing the risk of infections. It is essential to clean the UV sterilization function after every use to prevent the spread of bacteria and viruses.
How to clean the UV sterilization function after sterilizing pet hair?
Here is a step-by-step guide on how to clean the UV sterilization function after sterilizing pet hair:
Step
Instructions
Step 1
Turn off and unplug the smart vacuum cleaner from the power source.
Step 2
Remove the dustbin or dirt container and empty it into a trash can.
Step 3
Open the filter cover and gently remove the filter from the holder.
Step 4
Wash the filter with lukewarm water and mild detergent. Rinse it thoroughly and allow it to air dry.
Step 5
Using a soft, dry cloth, wipe the UV lamp gently to remove any debris or pet hair.
Step 6
Replace the filter and the dustbin or dirt container, making sure they are properly secured in place.
Step 7
Turn on the smart vacuum cleaner and run it for a few minutes to ensure that everything is working correctly.
Conclusion
Using a smart vacuum cleaner with a UV sterilization function is an excellent way to keep your home free from bacteria and viruses while controlling pet hair and dander. However, regular maintenance is essential to ensure that the UV sterilization function continues to perform efficiently. By following these simple steps, you can keep your smart vacuum cleaner functioning at its best and prolong its lifespan.
Maintaining UV Sterilization Function
Keeping your smart vacuum cleaner in tip-top shape is essential for optimal performance and longevity. When it comes to maintaining the UV sterilization function of your vacuum, there are a few key aspects to consider. By implementing a few simple hacks, you can ensure that your UV sterilization function consistently delivers effective cleaning results every time. In this section, we’ll explore some vital tips to help you maintain this function to ensure your vacuum operates at its best.
1. Keep Power Source Consistent
Consistency in power source is key to maintaining the UV sterilization function in your smart vacuum cleaner. To ensure that your device performs optimally, it is important to keep its power source consistent. Here are some tips to help you keep the power source consistent:
Use Stable Power Source: Smart vacuum cleaners need a stable power source to function optimally. Use a stable power source to avoid power surges and power outages which can damage the device.
Use Recommended Voltage: Check the user manual to know the recommended voltage for your smart vacuum cleaner. Using the recommended voltage helps to protect the device and ensures it operates at optimal efficiency.
Use Unbroken Cords: Broken cords can lead to power outages and damage your device. Always check the power cord for cuts or breaks before plugging it into a power source. If you notice any damage, replace it immediately.
Unplug When Not in Use: When you are not using your smart vacuum cleaner, unplug it from the power source. This will prevent power surges and protect your device from damage.
Don’t Connect Other Devices: Do not connect other devices to the same power source as your smart vacuum cleaner. This can lead to power surges, which can damage your device.
By following these tips, you can ensure that your smart vacuum cleaner’s UV sterilization function remains effective for a longer period of time. Consistency in power source is critical, and these tips will help you maintain consistent power supply, reducing the likelihood of damage to your device.
2. Store Properly
Storing your smart vacuum cleaner properly is crucial for maintaining the efficiency of its UV sterilization function. Here are some tips on how to store your vacuum cleaner to avoid any damage:
Keep it in a dry place: moisture can lead to the growth of mold or mildew, which can damage your vacuum cleaner and its UV sterilization function. Make sure to store it in a dry place with good ventilation.
Avoid direct sunlight: exposing your vacuum cleaner to direct sunlight for prolonged periods of time can cause discoloration and damage to its components.
Don’t wrap the cord around the vacuum cleaner: wrapping the cord tightly around the vacuum cleaner can damage the cord and affect the power supply to the UV sterilization function. Instead, loosely coil the cord and store it separately.
Clean the dustbin: before storing your vacuum cleaner, make sure to empty and clean the dustbin to avoid any foul odors or deterioration of the bin’s materials.
Use a dust cover: using a dust cover can protect your vacuum cleaner from dust and debris when not in use. Make sure the vacuum cleaner is completely dry before covering it to avoid moisture buildup.
By following these tips for proper storage, you can help ensure that your smart vacuum cleaner’s UV sterilization function will continue to function properly and effectively for a longer period of time.
3. Replace UV Lamp Regularly
Regularly replacing the UV lamp is crucial for the optimal performance of the UV sterilization function in smart vacuum cleaners. Here are some steps to follow for an easy and hassle-free replacement process:
Step 1: Begin by unplugging the vacuum cleaner and locating the UV lamp. It is usually found near the brush roll or dustbin.
Step 2: Carefully remove the old UV lamp from its socket. Be sure not to damage any other parts during the removal process.
Step 3: Clean the socket with a soft cloth or brush to remove any debris that may have collected.
Step 4: Gently insert the new UV lamp into its socket, making sure it is properly seated and secured.
Step 5: Once the replacement is complete, reassemble the vacuum cleaner and test the UV sterilization function to ensure it is working optimally.
It is important to note that the frequency of UV lamp replacement will depend on the manufacturer’s recommendations as well as the frequency of use. Most manufacturers recommend replacing the UV lamp every six months to ensure optimal performance.
Investing in a high-quality UV lamp is also important to ensure longevity and effectiveness of the UV sterilization function. Regularly replacing the UV lamp will not only extend the lifespan of the smart vacuum cleaner, but it will also provide efficient and effective cleaning for a healthier and safer living environment.
Conclusion
Maintaining and cleaning the UV sterilization function in smart vacuum cleaners is essential for optimal performance and longevity. Regular cleaning prevents bacteria and viruses from spreading, ensures clog-free suction, and extends the lifespan of the vacuum cleaner. Following a few simple steps can keep your vacuum cleaner in tip-top shape.
Firstly, make sure to unplug and disassemble the vacuum cleaner before cleaning the UV sterilization function. This ensures that no accidents occur and makes cleaning easier. Secondly, remove and rinse the filter thoroughly to remove any dust or debris. The third step is to clean the UV lamp with a soft cloth, being careful not to damage it. Finally, reassemble the vacuum cleaner and test it to ensure that everything is working correctly.
It is recommended to clean the UV sterilization function weekly, especially if it has been used frequently. Additionally, if you have sucked up fine dust or sterilized pet hair, it is best to clean the UV sterilization function after use.
Maintaining the UV sterilization function in your vacuum cleaner is vital for its longevity. Keeping the power source consistent and storing it properly are two essential steps in maintaining the vacuum cleaner. Furthermore, replacing the UV lamp regularly ensures the sterilization function is working as expected.
In conclusion, maintaining and cleaning the UV sterilization function is crucial for keeping your home clean and healthy. Taking the time to clean it regularly and following proper maintenance procedures will keep your smart vacuum cleaner in top condition for years to come.
Frequently Asked Questions
What is a UV sterilization function in a smart vacuum cleaner?
A UV sterilization function is a feature in some smart vacuum cleaners that uses UV-C light to kill bacteria, viruses, and other microorganisms on the surfaces the vacuum cleaner comes in contact with.
What are the benefits of using UV sterilization function in a smart vacuum cleaner?
The benefits of using UV sterilization function in a smart vacuum cleaner include avoiding bacteria and viruses, clog-free performance and an extended lifespan of the machine.
How do I clean the UV sterilization function in my smart vacuum cleaner?
To clean the UV sterilization function in your smart vacuum cleaner, you need to unplug and disassemble the unit, remove and rinse the filter, clean the UV lamp with a soft cloth, reassemble and test the unit.
How often should I clean the UV sterilization function in my smart vacuum cleaner?
You should clean the UV sterilization function in your smart vacuum cleaner weekly, after sucking up fine dust, and after sterilizing pet hair.
Is it safe to clean the UV sterilization function in my smart vacuum cleaner?
Yes, it is safe to clean the UV sterilization function in your smart vacuum cleaner as long as you follow the manufacturer’s instructions.
What type of cloth should I use to clean the UV sterilization function?
You should use a soft cloth to clean the UV sterilization function in your smart vacuum cleaner. Avoid using abrasive materials that could scratch the surface of the lamp.
Can I replace the UV lamp in my smart vacuum cleaner?
Yes, you can replace the UV lamp in your smart vacuum cleaner. Check the manufacturer’s instructions to ensure you use the right type of lamp for your machine.
What happens if I don’t clean the UV sterilization function in my smart vacuum cleaner?
If you don’t clean the UV sterilization function in your smart vacuum cleaner, it will become less effective over time and may eventually stop working altogether.
What is the best way to store my smart vacuum cleaner with a UV sterilization function?
The best way to store your smart vacuum cleaner with a UV sterilization function is in a cool, dry place away from direct sunlight and moisture. Store it upright to prevent damage to the machine and keep it out of reach of children.
Can UV-C light harm people or pets?
UV-C light can harm people and pets if they are exposed to it directly for extended periods of time. However, the UV sterilization function in smart vacuum cleaners is designed to only activate when the machine is in use and comes into contact with surfaces, so the risk of exposure is very low.