Troubleshooting Tips to Diagnose Charger and Vacuum Issues
Warning: A non-numeric value encountered in /var/www/html/wp-content/themes/generatepress/inc/structure/post-meta.php on line 165
by Dwight Gibson
Have you ever plugged in your smart vacuum to charge, only to find that it’s not charging or not holding a charge? Or, have you ever plugged in your charger, only to notice that it’s taking longer than usual or not charging your device at all? These frustration-inducing situations can leave you wondering if your charger or vacuum is defective. But how can you tell for sure? In this article, we’ll provide you with a detailed guide on how to identify if your charger or smart vacuum is defective, step-by-step.
Table of Contents
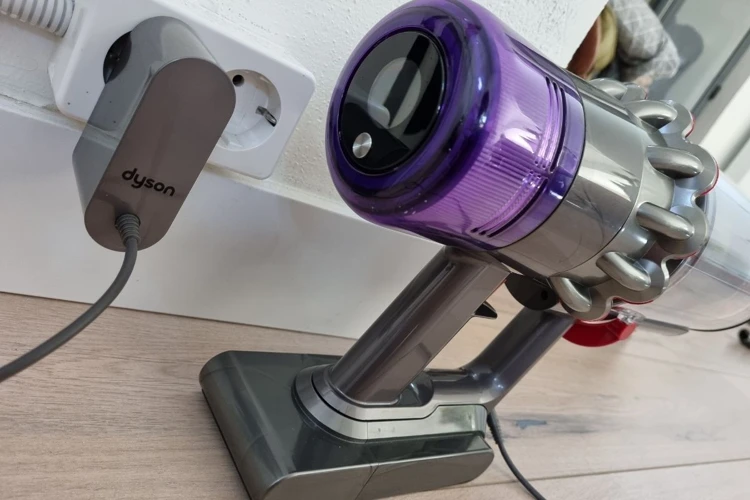
Step 1: Check the Charger
As technology advances, more and more devices are being developed to make our lives easier. One such device that has become increasingly popular is the smart vacuum. If you own a smart vacuum, it’s important to know how to identify if it is defective, starting with the charger. The charger is a crucial component of the vacuum and if it is not functioning properly, it could lead to various issues like charging problems or battery life. In this section, we will go through the steps to check the charger of your smart vacuum and troubleshoot the issue if required. So, let’s dive in and find out if your smart vacuum’s charger is working perfectly or not.
Physical Inspection
When conducting a physical inspection to identify if your charger or smart vacuum is defective, there are several key factors to keep in mind. We will take a closer look at these factors in the following table:
Physical Inspection
What to Look For
Charger
Check for any physical damage or wear and tear on the charger, such as fraying or exposed wires.
Inspect the charging ports for any debris, dust or damages that may affect the charging process.
Check for any discoloration on or around the charging ports or cables, which could indicate overheating.
Vacuum
Check for any physical damage or wear and tear on the vacuum’s charging port and battery compartment.
Inspect the battery connections for any debris or damages that may interfere with charging.
Look for any indications that the vacuum has been exposed to moisture or water damage.
It is important to note that physical inspection alone may not provide a complete picture of the issue with your charger or smart vacuum. In some cases, other steps may be necessary to fully identify the issue. For example, if you have issues with your smart vacuum not charging, you may also want to refer to our article on smart vacuum charging issues for additional troubleshooting tips.
Test the Charger
Testing the charger is an important step in identifying if it’s the culprit for the defective smart vacuum. Here are several steps that you can do to ensure if the charger is working correctly:
Check the voltage output: Use a voltage meter to ensure the voltage output of the charger matches the numbers printed on the label. Most chargers output 5V, but some smart vacuums work with 15V or higher.
Check the connectors: Make sure the charging connectors are free of dirt or debris, which could harm the connection between the charger and the vacuum. Additionally, check for any signs of damage or wear and tear on the connectors.
Check the cable: Inspect the cable for any exposed wires or physical damage such as cuts or dents.
Check the LED light: Check the LED light on the charger when plugged into an outlet. The LED light should come on when it’s charging the vacuum.
Check the charging time: Compatible smart vacuums will have a known charging time. Leave the vacuum to charge for the appropriate amount of time and check if it has fully charged or not.
It’s essential to use the original charger issued by the manufacturer. Using a different charger could damage the vacuum or cause an electrical fire. If there are charging issues with your smart vacuum and none of the above steps has resolved the issue, further investigation may be required. However, before you contact the manufacturer, try checking if there is an updated version of the charger or the vacuum’s firmware. You can check the manufacturer’s website for any updates or contact their customer support to get the latest information on this issue.
Remember, a faulty charger may cause severe problems and could be the cause of the problem with your smart vacuum. Test the charger to assess if it’s working correctly before jumping to other conclusions that may lead to time and money wasted. If you need more information on smart vacuum charging issues, check out our article.
Step 2: Inspect the Vacuum
Now that you have inspected the charger in Step 1, it’s time to turn your attention to the smart vacuum. A malfunctioning smart vacuum can cause frustration and waste both time and money, so it’s essential to identify any potential issues as soon as possible. In this step, we will guide you through the process of inspecting the vacuum to determine if it is defective. We will cover physical inspection of the device, checking the battery and connections, and provide tips on how to prolong the battery life. By the end of this step, you’ll be equipped with the knowledge to determine the status of your smart vacuum. If you want to learn more about smart vacuum battery life tips or the impact of room temperature on smart vacuum charging, take a look at our articles on smart vacuum battery life tips and impact of room temperature on smart vacuum charging.
Physical Inspection
When conducting a physical inspection, here are some things to look out for when trying to identify if your charger or smart vacuum is defective:
Damaged Charger or Vacuum – Check for any visible signs of physical damage to the charger or vacuum. If there is any damage, do not use the charger or vacuum.
Cleanliness of Charger Ports and Vacuum Input – Make sure the charger ports and vacuum input are clean. Dust or debris can prevent them from properly connecting which can cause charging issues.
Loose Cables – Check if the cables are loosely connected. Sometimes, the cable that runs from the charger to an electrical socket can be loose or disconnected. Make sure everything is firmly connected.
Charger Light Indicator – Look at the charger light indicator to ensure the charger is receiving power. If the light is not on, plug the charger into a different outlet or try a different charger.
Charging Time – Refer to the owner’s manual for the estimated charging time. If your smart vacuum takes significantly longer than that time to charge, it could indicate that there’s an issue with the charger or vacuum battery. You can learn more about smart vacuum charging cycles in our previous article.
It is important to note that you should never conduct a physical inspection with a wet or damp hand to avoid the risk of electrocution. You can learn more about safety measures during the charging of smart vacuums in our previous article.
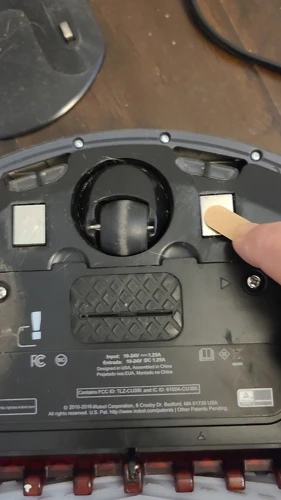
Check Battery and Connections
It’s important to check both the battery and connections of your smart vacuum to identify any defects. Here’s how you can do it:
Firstly, turn off your vacuum and unplug it from the charger. Then, remove the bin or dust cup and inspect the battery. It should be clean and free of any debris or corrosion. If you notice any problems with the battery, it’s time to replace it.
Next, check the connections of your vacuum. Make sure they are clean and not clogged with debris. If you notice any buildup, gently clean the contacts with a dry cloth. Be careful not to use water or any liquid cleaning agents as these may cause damage to the vacuum.
You can also use a multimeter to check if the battery is charging correctly. Set the multimeter to the DC voltage setting and test the battery’s voltage. If the voltage is less than the battery’s capacity, it may indicate a problem with the battery or the charging process. Similarly, you can check the voltage output of the charger to ensure that it’s providing the correct amount of power to the vacuum.
By checking the battery and connections, you can determine if there are any issues with the vacuum’s components. If you can’t identify any problems, you should move on to the final steps before contacting the manufacturer. follow these steps to ensure that you exhaust all possible solutions before reaching out for assistance.
Step 3: Final Checks Before Contacting Manufacturer
As frustrating as it may be, encountering charging issues with electronic devices is not uncommon. But before giving up and contacting the manufacturer, take some time to troubleshoot the issue. In this section, we will go over a few final checks that can be done before resorting to contacting the manufacturer. Follow these steps diligently to ensure that you have exhausted all possible solutions.
Try a Different Outlet and Charger
When you suspect that your charger or smart vacuum is defective, it’s crucial to troubleshoot the issue before contacting the manufacturer for repair or replacement. One of the essential steps to identify if your charger or smart vacuum is defective is to try a different outlet and charger.
Using a Different Outlet
Sometimes, the issue may not be with your charger or smart vacuum, but rather with the power source. Electrical outlets are prone to faults, such as voltage fluctuations that can damage electronic devices. It’s always a good idea to try a different outlet to see if it solves the problem.
To do this, follow these simple steps:
Locate another outlet in a different room or area.
Unplug the charger from the current outlet and plug it into the new outlet.
Turn on your smart vacuum and check to see if it charges correctly.
If it starts charging successfully, then the issue was with the previous outlet. However, if it still shows signs of defects, then the problem is likely with the charger or the vacuum itself.
Using a Different Charger
Another simple test that you can do to identify if your charger or smart vacuum is defective is to try a different charger. Sometimes the charger may have an issue, such as a short-circuit, which prevents it from charging the vacuum properly.
To test this, follow these steps:
Find a working charger that is compatible with your smart vacuum. If you do not have one, purchase it from a reliable source.
Plug the charger into a power source and connect it to your smart vacuum.
Turn on the vacuum and see if it charges. If it does, then there was an issue with your charger, and you’ll need to have it replaced.
However, if it still doesn’t charge, then the issue is likely with the vacuum.
Trying out these simple tests will save you time and money. It’s essential to try out all the possible solutions before contacting the manufacturer or a professional repairman. In some cases, the issue may be a minor one that does not require you to spend money on professional repairs.
Clean the Charging Contacts
Keeping the charging contacts clean is crucial in ensuring that your charger and smart vacuum work efficiently. Over time, dirt, dust, and debris may accumulate on the charging contacts, which disrupts the flow of electricity.
To clean the charging contacts, you will need a clean, dry, and non-abrasive material such as a microfiber cloth. Avoid using liquids or solvents as they may damage the charging contacts.
Here are the steps to clean the charging contacts:
Step
Instruction
Step 1
Unplug your smart vacuum and charger from the power source.
Step 2
Gently wipe the charging contacts on the battery and the charger with the microfiber cloth to remove any dust, dirt, or debris.
Step 3
Inspect the charging contacts for any signs of damage, such as corrosion or rust. If you notice any damage, do not use the charger or the vacuum and contact the manufacturer for assistance.
Step 4
Reconnect your smart vacuum and charger to the power source and see if the charging problem is resolved. If not, proceed to the next step.
Cleaning the charging contacts is a simple and effective way to solve charging issues with your smart vacuum. By following these steps, you can reduce the chances of your charger or smart vacuum being defective and extend the lifespan of your devices.
Conclusion
After following the aforementioned steps, you should have a better idea of whether your charger or smart vacuum is defective or not. By physically inspecting the charger and the vacuum, testing the charger, and checking the battery and connections, you may be able to identify the source of the problem.
If you have ruled out these potential issues, there are still a few final steps you can take before contacting the manufacturer. First, try plugging the charger into a different outlet or using a different charger altogether. If the vacuum still doesn’t charge, clean the charging contacts to ensure a proper connection.
However, if you have tried all of these steps and your charger or vacuum still isn’t working properly, it may be time to contact the manufacturer for additional support. Check the manufacturer’s website or the documentation that came with your device for their contact information.
Remember, it’s important to properly identify the source of the issue before taking any further steps. Attempting to repair or replace parts without knowing the root cause can potentially damage your device further or void any warranty you may have.
In conclusion, by following these steps, you can potentially identify and address any issues with your charger or smart vacuum. If you’re still experiencing issues, don’t hesitate to reach out to the manufacturer for additional support.
Frequently Asked Questions
What are some signs that my charger or smart vacuum might be defective?
Some signs that your charger or smart vacuum might be defective include not charging properly or quickly, not turning on, overheating, or battery drain relatively fast.
Can a defective charger or vacuum be dangerous?
Yes, a defective charger or vacuum can be potentially dangerous, especially if it is overheating or has electrical issues. This can lead to injuries or damage to your home.
How do I physically inspect my charger or vacuum?
You can visually inspect your charger or vacuum for any physical damage, such as cracks or dents. Also, check for loose connections and corrosion on the charging contacts.
What is the best way to test my charger?
The best way to test your charger is to use a voltmeter to measure the voltage output. If the voltage matches the charger’s specifications, then it is working correctly.
Can a dirty vacuum filter cause charging problems?
Yes, a dirty vacuum filter can cause charging problems as it can cause the battery to overheat or drain too quickly. It is important to clean or replace your vacuum filter regularly.
What should I do if my vacuum is not holding a charge?
If your vacuum is not holding a charge, try inspecting the battery and connections. If these are not the issue, then try using a different charger or cleaning the charging contacts. If the problem persists, contact the manufacturer.
How often should I clean the charging contacts on my vacuum and charger?
You should clean the charging contacts on your vacuum and charger at least once a month to ensure proper charging and prevent any buildup or corrosion.
What should I do if my vacuum is overheating?
If your vacuum is overheating, turn it off immediately and unplug it. Check for any blockages or clogs in the hose or brush roll, and clean these if necessary. If the issue persists, contact the manufacturer.
Is it safe to use a third-party charger with my smart vacuum?
No, it is not recommended to use a third-party charger with your smart vacuum as it can cause potential damage to the vacuum or even harm to you.
What is the best way to contact the manufacturer about a defective vacuum or charger?
The best way to contact the manufacturer about a defective vacuum or charger is to visit their website and find their support or contact page. From there, you can submit a support ticket or call their customer service number for assistance.