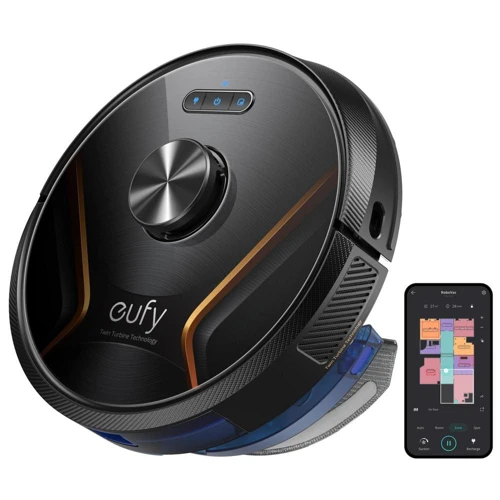
5 Tips for Maintaining Smart Vacuum Wi-Fi Connectivity
Warning: A non-numeric value encountered in /var/www/html/wp-content/themes/generatepress/inc/structure/post-meta.php on line 165
by Dwight Gibson
Have you ever experienced frustration when your smart vacuum cleaner’s Wi-Fi connectivity suddenly drops? You’re not alone! Many users encounter this issue, but the good news is that there are various tips and tricks you can use to extend the lifespan of your vacuum’s Wi-Fi connectivity feature. In this article, we’ll share five useful tips to help you achieve a stable and reliable connection. From optimizing your router placement and securing your Wi-Fi network, to keeping your device software updated and maintaining proper cleaning schedules, we’ve got you covered. So sit back, relax, and discover how to achieve optimal performance from your smart vacuum cleaner.
Table of Contents
Tip 1: Place your router in a central location
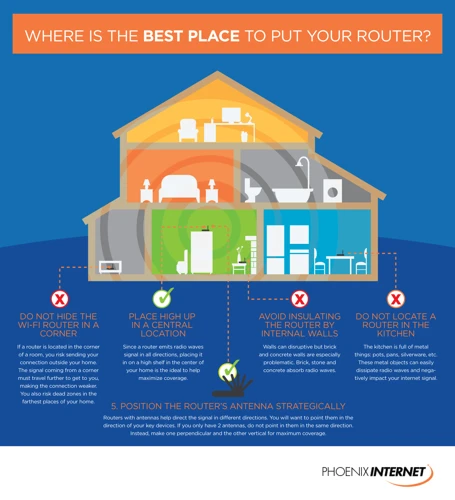
Are you frustrated with your smart vacuum cleaner’s Wi-Fi functionality dropping out unexpectedly? Connectivity issues can be caused by various factors, including signal interference or a weak signal. However, one remedy for restoring proper connectivity is placing your router in a central location. By using this smart vacuum cleaner WiFi tip, you can potentially resolve any connection problems with your device. In the following sub-sections, we’ll cover the best practices for router placement and tips for improving signal strength. And if you’re experiencing persistent connectivity issues, we have a helpful troubleshooting guide to assist you. Just follow the link to troubleshoot your smart vacuum’s Wi-Fi.
1.1 Elevate your router
One effective way to extend the lifespan of your smart vacuum cleaner’s Wi-Fi connectivity feature is by elevating your router. This can greatly improve the Wi-Fi signal strength and reach, which can lead to less disruption in your smart vacuum’s connectivity. Here are some tips on how to elevate your router:
Find the optimal location: Look for a central location in your home where the router can be placed. Avoid putting it in a corner or tucked away behind other electronics.
Mount it on the wall: Using brackets, mount your router on the wall to avoid interference from other devices and to gain a better line of sight.
Use a shelf: Place your router on a tall shelf to avoid any furniture or appliances from blocking the signal.
Use a stand: Elevate your router using a stand that will keep it high above the ground and provide better signal reception.
By following these tips, you can ensure that your router is in the optimal location for providing a strong Wi-Fi signal to your smart vacuum cleaner. This can help your smart vacuum cleaner connect to your Wi-Fi network with ease, allowing you to take full advantage of its features without any connectivity issues.
In order to extend the lifespan of your smart vacuum cleaner’s Wi-Fi connectivity feature, it is important to not only place your router in a central location, but also to minimize obstructions that can negatively impact the strength and quality of the wireless signal. Here are some tips on how to minimize obstructions in your home:
Position your router properly: Make sure your router is elevated off the ground and positioned in a central location in your home. This will help to reduce the number of walls and obstacles the signal has to pass through.
Remove physical obstructions: If possible, remove physical obstructions that can interfere with the Wi-Fi signal, such as large pieces of furniture, metal objects, or electronic devices that emit electromagnetic interference.
Adjust antennas: If your router has external antennas, adjust them so they are parallel to the ground and pointed in different directions, to help broadcast the signal more efficiently.
Use a Wi-Fi signal booster: If you have an area in your home with poor Wi-Fi signal, consider installing a Wi-Fi signal booster, also known as a repeater or extender. This device can boost the wireless signal and extend the range of your network.
By minimizing obstructions, you can ensure that your smart vacuum cleaner is able to connect and communicate with your Wi-Fi network reliably and consistently. This can improve the performance, reliability and lifespan of your device.
1.3 Install a Wi-Fi Range Extender if needed
We all know that the placement of your router is crucial for a strong and consistent Wi-Fi signal to keep your smart vacuum cleaner connected. However, sometimes the location of the router may be limited due to various reasons like apartment size, furniture placement or layout restrictions. In such cases, installing a Wi-Fi range extender can help to amplify the signal strength and improve the Wi-Fi coverage in your home.
Before installing a Wi-Fi range extender, it is important to check if your router supports the extender functionality. Also, make sure to choose an extender that is compatible with your router.
Here are some popular Wi-Fi range extenders that you can consider:
Wi-Fi Range Extender
Brand
Range Coverage
Price
TP-Link AC750
TP-Link
Up to 1200 sq ft
$27.99
Netgear Nighthawk AC1900
Netgear
Up to 2000 sq ft
$149.99
Linksys RE7000
Linksys
Up to 10,000 sq ft
$99.99
Wavlink AC1200
Wavlink
Up to 1292 sq ft
$39.99
Once you have chosen the right Wi-Fi range extender for your home, you can follow these simple steps to set it up:
Place the range extender in a location where it can receive a strong Wi-Fi signal from your router.
Connect the range extender to your router using an Ethernet cable or WPS (Wi-Fi Protected Setup) button.
Access the range extender’s web-based setup page and follow the instructions to complete the setup process.
Once the range extender is set up, connect your smart vacuum cleaner to the new extended Wi-Fi network.
With a Wi-Fi range extender in place, you can enjoy a stronger and more reliable Wi-Fi signal throughout your home, making it easier for your smart vacuum cleaner to stay connected without any interruptions.
Tip 2: Secure your Wi-Fi network
As we rely more on Wi-Fi to power our smart devices, it’s important to take steps to ensure our networks are secure. Strong security measures prevent outsiders from accessing your network and compromising the data transmitted by your devices. With IoT technology, such as smart vacuum cleaners, becoming more widely used, it’s vital to secure your Wi-Fi network to protect your privacy and your device. In this section, we’ll cover some useful tips for securing your home Wi-Fi network and keeping your smart vacuum cleaner’s Wi-Fi connectivity feature in good health.
2.1 Change default Wi-Fi name and password
One of the easiest and most important steps you can take to secure your Wi-Fi network is to change the default Wi-Fi name and password. When you use default login credentials, it makes it much easier for hackers to gain access to your network.
So, here are some steps you can follow to change your default Wi-Fi name and password:
Access your router settings: To change your Wi-Fi name and password, you need to access your router’s settings. Open your web browser and type your router’s IP address into the address bar. You can usually find this in the user manual or on a sticker on the router itself.
Login with admin credentials: Once you’ve entered the IP address into your browser, you will be prompted to enter your username and password. Use the default login credentials that came with your router to log in. If you’ve changed your login credentials in the past and forgot them, you will need to reset your router to its default settings.
Navigate to Wi-Fi settings: Once you’ve logged in, navigate to the Wi-Fi settings page. The exact location of this page will vary depending on your router model, but it should be easy to find.
Change your Wi-Fi name: Look for the field labeled “Network Name” or “SSID” and enter a new name for your Wi-Fi network. Be sure to choose a unique name that cannot be easily guessed. Avoid using personal information in your network name.
Change your Wi-Fi password: Look for the field labeled “Password” or “Passphrase” and enter a new password for your Wi-Fi network. Choose a strong password that is at least eight characters long and includes a mix of uppercase letters, lowercase letters, numbers, and symbols.
Save your changes: Once you’ve made your changes, be sure to save them by clicking the “Save” or “Apply” button. Your router will reboot and your new Wi-Fi network name and password will take effect.
By following these simple steps, you can take a crucial step in securing your Wi-Fi network and protecting your smart vacuum cleaner’s Wi-Fi connectivity feature.
2.2 Enable WPA2 encryption
Keeping your Wi-Fi network secure is vital not only for your smart vacuum cleaner’s connectivity but also for your personal information. One way to secure your network is to enable WPA2 encryption. WPA2 is a security protocol that provides a more advanced level of encryption than its predecessor, WEP.
To enable WPA2 encryption, you need to access your router’s settings. This process may differ depending on your router’s brand and model, but generally, you can access the settings by entering your router’s IP address in a web browser. To find the IP address, refer to your router’s manual or check the bottom of the router for a sticker with the information.
Once you access the settings, navigate to the wireless security section and select WPA2 as the encryption type. Then, create a strong password featuring a combination of uppercase and lowercase letters, numbers, and symbols. Avoid using easily guessable phrases or personal information that hackers can easily obtain.
Table: Tips for enabling WPA2 encryption
DO
DON’T
Choose WPA2 as the encryption type
Choose WEP or no encryption
Create a strong password with a combination of uppercase and lowercase letters, numbers, and symbols
Use easily guessable phrases or personal information as a password
Regularly update your password
Use the same password for multiple devices or accounts
Enabling WPA2 encryption is a simple yet effective way to protect your smart vacuum cleaner’s Wi-Fi connectivity and your personal information from potential security risks. By following the tips listed above, you can ensure that your network remains secure and your smart vacuum cleaner runs smoothly.
2.3 Update Router Firmware
One important aspect of securing your Wi-Fi network is to update your router firmware regularly. Firmware is the software code that runs on your router and keeps it up-to-date with the latest security patches and bug fixes. Outdated firmware can leave your network vulnerable to cyber threats, which can not only affect your smart vacuum cleaner’s Wi-Fi connectivity but also compromise your personal data.
Here are a few steps to update your router firmware and keep your network secure:
Evaluate your current firmware version: Check your router’s current firmware version to see if a newer version is available. You can typically find this information in the router’s settings or on the manufacturer’s website.
Backup your router configuration: It’s essential to back up your router configuration settings before updating the firmware. This way, you can quickly restore your settings if anything goes wrong during the firmware update process.
Download the latest firmware version: Once you’ve backed up your router settings, visit the manufacturer’s website to download the latest firmware version for your router model.
Install the firmware update: Follow the manufacturer’s instructions to install the firmware update. The process usually involves logging into your router’s settings, locating the firmware update section, and uploading the downloaded file.
Restart your router: Once the firmware update is complete, restart your router. This step helps to ensure that the new firmware is fully installed and operational.
By keeping your router firmware up-to-date, you ensure that your network connection and devices, including your smart vacuum cleaner, are protected from potential cyber threats. Regular firmware updates can also improve the performance and functionality of your Wi-Fi network, providing a more seamless and reliable experience.
Tip 3: Keep Your Smart Vacuum Cleaner Software Updated
One important factor in extending the lifespan of your smart vacuum cleaner’s Wi-Fi connectivity is regularly updating its software. The software serves as the brain of your device, enabling it to perform efficiently and effectively. Without regular updates, your device may experience glitches or malfunctions that can have a negative impact on its Wi-Fi connectivity. In this section, we will discuss some important steps you can take to ensure that your smart vacuum cleaner’s software stays updated and functioning optimally.
3.1 Update the Operating System on your device
Having the latest operating system installed on your smart vacuum cleaner is crucial for maintaining its Wi-Fi connectivity feature. Up-to-date software ensures that your vacuum cleaner is running smoothly, without any bugs or glitches that could impact its Wi-Fi connectivity.
Updating the Operating System on your device is a relatively easy process that can make a big difference in extending the lifespan of your smart vacuum cleaner’s Wi-Fi connectivity. To update your device’s operating system, follow these simple steps:
Step
Action
1
Check for updates
2
If an update is available, download and install it
3
Restart your device
By updating your operating system, you can ensure that your smart vacuum cleaner runs smoothly and efficiently, which can help extend the lifespan of its Wi-Fi connectivity feature. Additionally, updating your operating system can also provide you with new features, bug fixes and performance improvements.
Remember that the process for updating your vacuum cleaner’s operating system may vary depending on the manufacturer and model. Refer to the manufacturer’s instructions or the user manual for specific guidance on how to update the operating system on your device.
Either way, don’t forget to regularly check for updates and keep your smart vacuum cleaner’s software up-to-date to enjoy its Wi-Fi connectivity feature to the fullest.
3.2 Update the Vacuum Cleaner App
Updating the vacuum cleaner app is an essential tip to extend the lifespan of the Wi-Fi connectivity feature of your smart vacuum cleaner. The app is what you use to control your device and check for updates. Here are some steps to follow in updating your vacuum cleaner app:
Step 1:
Open the App Store or Google Play Store on your smartphone or tablet.
Step 2:
Search for the app of the vacuum cleaner brand you are using.
Step 3:
Check if there are any available updates for the app.
Step 4:
If there are updates available, click on the “Update” button.
Step 5:
Wait for the update to finish installing.
Step 6:
Open the updated app and ensure the performance and compatibility improvement mentioned by the developer.
Updating the vacuum cleaner app will provide you with access to the latest features and improvements. Some updates also improve the performance and compatibility of your device. By updating your vacuum cleaner app, you can ensure that your smart vacuum cleaner’s Wi-Fi connectivity feature is well-maintained, keeping it up-to-date, and helping it work seamlessly.
3.3 Check for Firmware updates
It’s important to stay on top of firmware updates for your smart vacuum cleaner. Firmware updates provide improvements and bug fixes that can enhance your vacuum’s Wi-Fi connectivity and overall performance. Here are some steps to check for firmware updates:
Step 1: Check your vacuum cleaner’s app: Typically, the app for your smart vacuum cleaner will notify you if a firmware update is available. Open the app and look for any notifications regarding firmware updates.
Step 2: Visit the manufacturer’s website: If no firmware update notification is available on the app, head to the manufacturer’s website. Look for the specific model of your vacuum cleaner and navigate to the support section. This is where you’ll find information about any updates available for your device.
Step 3: Follow the manufacturer’s instructions: After you’ve found that a firmware update is available, follow the manufacturer’s instructions to install it. This process can vary depending on the brand and vacuum cleaner model you own. Follow the instructions to ensure a smooth installation and avoid any potential issues.
Keeping your smart vacuum cleaner up-to-date with the latest firmware updates is crucial to maintaining a good Wi-Fi connection. By regularly performing updates, you can help to ensure that your vacuum cleaner stays connected to your Wi-Fi network and remains operating at peak performance.
Tip 4: Keep your cleaning schedule in check
Keeping your smart vacuum cleaner’s Wi-Fi connectivity feature working smoothly is essential for seamless cleaning sessions. While ensuring the stability of your Wi-Fi connection is important, it’s also critical to keep your cleaning schedule in check. However, this is easier said than done, as sometimes you might forget to charge the device or clean the filters regularly. By following the tips below, you can help extend the lifespan of your smart vacuum cleaner’s Wi-Fi connectivity feature and ensure your device is always ready to clean when you need it. Let’s dive in!
4.1 Plan cleaning schedules during off-peak Wi-Fi hours
When it comes to extending the lifespan of your smart vacuum cleaner’s Wi-Fi connectivity feature, planning cleaning schedules during off-peak Wi-Fi hours can be surprisingly effective. This is because, during peak usage hours, your Wi-Fi network can become bogged down and slower than usual due to the high amount of traffic. By scheduling your cleaning during off-peak hours, you can help ensure a stable network connection, reducing the chances of disconnection or interruptions during the cleaning process.
Table:
Peak Wi-Fi Hours
Off-Peak Wi-Fi Hours
Weekdays, 7am-9am and 5pm-10pm
Weekdays, 10am-4pm and 10pm-7am Weekends, all day
To determine the best time to schedule your smart vacuum cleaner’s cleaning, you can refer to the table above. You’ll notice that the off-peak hours during the weekdays are from 10am-4pm and 10pm-7am, while weekends are off-peak all day. By avoiding peak hours, you can help your smart vacuum cleaner maintain a stable Wi-Fi connection, allowing it to work at peak efficiency.
In addition to scheduling cleaning during off-peak hours, it’s important to keep your vacuum cleaner battery charged to help avoid any interruptions in the cleaning process. Regularly cleaning filters and brushes can also help ensure maximum suction power and prevent any malfunctions that may cause disruptions in the Wi-Fi connection.
By following these tips, you can help ensure that your smart vacuum cleaner remains smoothly connected to your Wi-Fi network, extending its lifespan and making cleaning your home an effortless experience.
4.2 Keep your vacuum cleaner battery charged
As with any smart home device, keeping your vacuum cleaner battery charged is crucial to ensuring that it operates at peak performance. A poorly charged battery can lead to lost connectivity or reduced cleaning efficacy. Here are some tips to help keep your vacuum cleaner battery charged and ready to clean.
Tip
Description
1
Always keep your charging dock plugged in and ready to charge your vacuum cleaner when it’s not in use.
2
Make sure that your vacuum cleaner is properly seated on the charging dock to ensure that it’s charging properly.
3
Check that the charging contacts on the vacuum cleaner and dock are clean and free of debris that could interfere with charging.
4
Use only the charger provided by the manufacturer to ensure that you don’t damage the battery.
5
Avoid charging your vacuum cleaner in a location with extreme temperatures, as it can damage the battery and decrease its lifespan.
By following these tips, you can ensure that your vacuum cleaner’s battery is charged and ready to use at all times. A properly charged battery will not only help extend the lifespan of your vacuum cleaner, but also ensure that it’s connected to your Wi-Fi network and cleaning your floors as efficiently as possible.
4.3 Clean filters and brushes regularly
Cleaning the filters and brushes regularly is an essential factor in ensuring that your smart vacuum cleaner’s Wi-Fi connectivity feature lasts longer. Dust and debris accumulating on the filters can obstruct the airflow, making the device work harder and consume more power. This accumulation can also lead to clogging and even cause the device to stop working altogether. So, maintain a regular cleaning schedule that includes the following tasks:
Clean Filters: Gently remove the filters and wash them with warm water and mild detergent solution. Allow them to air dry completely before reinserting them back into the device. Don’t forget to keep spare filters on hand.
Clean Brushes: Remove the brushes and clean them with the help of scissors, tweezers or a brush comb. This will help remove hair, dirt and dust that may stick to them. Check the user manual of your vacuum cleaner for specific instructions on how to remove and clean the brushes.
Clean Sensors: Use a soft cloth to wipe the sensors of your vacuum cleaner. Make sure there are no obstructions or dirt particles on the sensors.
Regular cleaning of filters and brushes will not only make your smart vacuum cleaner more effective but will also prolong its lifespan, ensuring that you enjoy the full benefits of its Wi-Fi connectivity features for a longer time. So, make sure to add this to your checklist and schedule regular maintenance for your device.
Tip 5: Contact customer support for assistance
Encountering Wi-Fi connectivity issues with your smart vacuum cleaner can be frustrating, especially if you have tried all the previous tips we have provided. But don’t give up just yet! Before you throw in the towel, consider contacting customer support for further assistance. Reaching out to customer support can provide helpful insights and solutions that you may not have thought of. So, let’s dive into the fifth and final tip for extending the lifespan of your smart vacuum cleaner’s Wi-Fi connectivity feature – seeking expert help from customer support.
5.1 Troubleshoot your device
When your smart vacuum cleaner’s Wi-Fi connectivity feature isn’t working as it should, don’t worry – there are easy troubleshooting solutions you can try. Here are some steps to take that can help resolve connectivity problems*:
Step
Action
Step 1
Check your Wi-Fi network: Ensure your Wi-Fi is working and that your vacuum cleaner is connected to your network. You can check this by opening the Wi-Fi settings on your device and selecting your network. If the connection is weak, try moving the cleaner to an area closer to the wireless router or move the router closer to the vacuum cleaner.
Step 2
Restart the device: Sometimes, the simplest solution can be the most effective. Try turning off your vacuum cleaner’s Wi-Fi connectivity feature by switching the device off, wait for some time, then switch it back on. This can help reset the vacuum cleaner’s internal systems and re-establish a better connection to the Wi-Fi network.
Step 3
Reset the Wi-Fi connection: In some cases, a factory reset might be needed. To do this, you’ll have to refer to your vacuum cleaner’s instructions manual to see how to reset the Wi-Fi connection. This option will erase all settings and data, so make sure you have your Wi-Fi information and settings handy before proceeding.
Step 4
Contact customer support: If none of the above steps work, it’s time to reach out to customer support. Vacuum cleaner manufacturers often have dedicated teams to help you resolve connectivity issues. They can guide you through more advanced troubleshooting steps or schedule a physical checkup of the device to identify any hardware faults.
Remember, regular maintenance is the key to keeping your smart vacuum cleaner’s Wi-Fi connectivity feature operational. By taking a few steps to ensure your device is clean and updated, you’ll avoid unnecessary technical difficulties and get the most out of your device’s Wi-Fi functionality.
*Results may vary depending on the model and brand of your device.
5.2 Check your warranty status
It’s always frustrating when a device stops working properly, especially if it’s relatively new. If you’re experiencing issues with the Wi-Fi connectivity feature on your smart vacuum cleaner, it’s essential to check your warranty status. That way, you can determine if your device is still covered under warranty and if you can receive a replacement or have it repaired for free.
To check your warranty status, follow these steps:
Locate your vacuum cleaner’s paperwork: Whether you kept the original receipt or registered your device online, it’s important to find the paperwork that proves when you purchased your smart vacuum cleaner.
Contact the manufacturer: Once you have your paperwork in hand, contact the manufacturer to ask about your warranty status. Be sure to have your device’s serial number and any other relevant information available. They will inform you about the availability of the warranty and how to make a claim in case your device is eligible for replacement or repair.
Understand the warranty terms: Before sending your device to the manufacturer, it’s important to understand the warranty’s terms and conditions. Some warranties only cover certain types of repairs or replacements, and some may require you to pay a deductible. Additionally, some warranties may become void if you try to repair the device on your own or if the damage was caused by user error or improper use.
Checking your warranty status can give you peace of mind and save you money in the long run. By following these steps, you can determine if your smart vacuum cleaner’s Wi-Fi connectivity issue is covered under warranty, and if so, take action to have it repaired or replaced.
5.3 Speak with an expert for further assistance
When all else fails, speaking with an expert can be incredibly beneficial for resolving any issues with your smart vacuum cleaner’s Wi-Fi connectivity feature. The manufacturer’s customer support team is available to assist you in resolving any issues you may be experiencing. They can also provide you with additional tips and tricks to help extend the lifespan of your smart vacuum cleaner’s Wi-Fi connectivity feature.
Here are some reasons why you should consider speaking with an expert:
Reason
Explanation
Advanced Troubleshooting
If your smart vacuum cleaner’s Wi-Fi connectivity feature is still not working after following all the tips mentioned above, an expert can help you with advanced troubleshooting. They can identify and fix the root cause of the issue.
Technical Assistance
Smart vacuum cleaners can be complex devices, and sometimes, you may need technical assistance from an expert. They can provide you with information on how to use and troubleshoot your smart vacuum cleaner’s Wi-Fi connectivity feature.
Warranty Information
If you are experiencing issues with your smart vacuum cleaner’s Wi-Fi connectivity feature, an expert can help you determine whether the issue is covered under warranty. They can also provide you with information on how to file claims and get your device repaired or replaced.
Speaking with an expert can help you save time and money, and ensure that your smart vacuum cleaner’s Wi-Fi connectivity feature is working properly. Don’t hesitate to reach out to customer support for further assistance.
Conclusion
In conclusion, extending the lifespan of your smart vacuum cleaner’s Wi-Fi connectivity feature is crucial for maintaining its efficiency and convenience in your daily cleaning routine. By following these five useful tips, you can ensure your smart vacuum cleaner remains connected to your Wi-Fi network and performs optimally.
Tip 1: Placing your router in a central location and elevating it can significantly improve your Wi-Fi signal’s strength while minimizing obstructions and installing a Wi-Fi range extender where needed can help eliminate dead zones.
Tip 2: Securing your Wi-Fi network by changing the default Wi-Fi name and password, enabling WPA2 encryption, and updating router firmware can prevent unauthorized access and ensure your connection remains stable.
Tip 3: Keeping your smart vacuum cleaner’s software updated through regularly checking for operating system updates, vacuum cleaner app updates, and firmware updates can provide the latest features and bug fixes that improve its performance.
Tip 4: Maintaining your cleaning schedule during off-peak Wi-Fi hours, keeping the vacuum cleaner battery charged, and cleaning filters and brushes regularly can prolong the life of the device and prevent connectivity issues.
Tip 5: In case of any connectivity issues, reaching out to customer support for assistance may help troubleshoot the issue or identify any potential warranty claims.
By implementing these tips, you can ensure that your smart vacuum cleaner’s Wi-Fi connectivity remains at its best, providing you with seamless cleaning experiences while enhancing your living space’s cleanliness.
Frequently Asked Questions
What can I do if my smart vacuum cleaner’s connection drops frequently?
You can try placing your router in a central location, elevating it, minimizing obstructions, and installing a Wi-Fi range extender if needed.
How can I secure my Wi-Fi network?
You can change the default Wi-Fi name and password, enable WPA2 encryption, and update your router’s firmware.
Why is it important to keep my smart vacuum cleaner’s software updated?
Updating the operating system on your device, the vacuum cleaner app, and checking for firmware updates can improve its performance, fix bugs, and enhance its features.
How often should I clean my filters and brushes?
You should clean them regularly, ideally after every use, to prevent dust and debris buildup and ensure optimal cleaning performance.
Can I schedule cleaning during off-peak Wi-Fi hours?
Yes, you can plan your cleaning schedules during times when there is less Wi-Fi congestion, such as early morning or late evening.
What should I do if my vacuum cleaner’s battery runs out of charge?
You should recharge it to ensure that it has enough power to complete the cleaning tasks and maintain a stable Wi-Fi connection.
How do I troubleshoot my smart vacuum cleaner if it’s not working properly?
You can refer to the user manual, perform a reset, or contact customer support for assistance.
What if my vacuum cleaner is no longer under warranty?
You can still contact customer support for advice, but you may need to pay for repairs or replacement parts.
What additional features should I look for when purchasing a smart vacuum cleaner?
You should consider its battery life, cleaning modes, navigation systems, and compatibility with other smart home devices.
Can I use my smart vacuum cleaner without Wi-Fi connectivity?
Yes, you can still use it manually or with a remote control, but you won’t be able to access its smart features, such as remote scheduling and status monitoring.