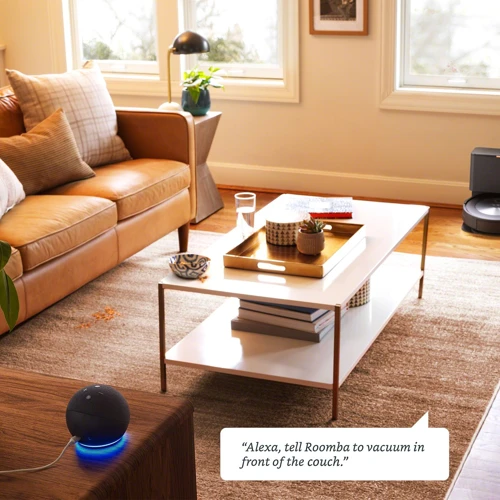
Have you ever wished to have your house cleaned without lifting a finger? Well, now it’s possible with smart vacuum cleaners! And the best part? You can even control them with your voice through Amazon Alexa. But where do you even begin with setting it up? If you’re feeling perplexed, no worries! This step-by-step guide will take you through the process of setting up your smart vacuum cleaner with Amazon Alexa. From checking compatibility to creating routines, we’ve got you covered. So, grab your device, your Alexa app, and let’s get started!
Table of Contents
Step 1: Check compatibility
If you’re eager to set up your smart vacuum cleaner with Amazon Alexa, the first step is to check compatibility. It’s essential to ensure that your device is compatible with Alexa to guarantee a seamless integration between the two products. The good news is that many smart vacuum cleaners are compatible with Alexa, but it’s crucial to check the compatibility of your specific device to avoid any issues down the line. In this article, we’ll discuss the supported devices and how to check if your device is compatible with Alexa. To learn more about the benefits of integrating your smart vacuum cleaner with Amazon Alexa, check out our article on /smart-vacuum-alexa-benefits/.
Supported devices
When it comes to integrating your smart vacuum cleaner with Amazon Alexa, it’s important to make sure that your device is compatible. Not all smart vacuum cleaners are designed to work with Alexa, so it’s crucial to check beforehand. Here are some of the supported devices for this integration:
Roomba: Roomba is one of the most popular and widely known brands of smart vacuum cleaners. Many of their models are compatible with Amazon Alexa, allowing for seamless voice control and integration.
Shark: Shark is another brand that offers Alexa compatibility for some of their models. This allows you to start, stop, and control your vacuum using only your voice.
Eufy: Eufy offers several models that are compatible with Alexa. This allows for easy integration into your smart home system, allowing for voice commands and routines.
Neato: Neato is another company that offers Alexa integration for their smart vacuums. With this feature, you can easily control your vacuum with voice commands.
iLife: iLife offers several models that are compatible with Amazon Alexa, allowing for control through your smart home system. This is a great way to make your cleaning routine even more convenient and hands-free.
While these brands are some of the most common to offer Alexa compatibility, it’s important to note that not every model within each brand is compatible. Be sure to check the specific model you have to ensure that it can be integrated with Alexa before proceeding.
For more information on compatibility issues and troubleshooting tips for smart vacuum cleaner integration with Alexa, check out our article on compatibility issues with smart vacuum and Alexa.
How to check if your device is compatible
How to check if your device is compatible
Before setting up your smart vacuum cleaner with Amazon Alexa, it is important to check if your device is compatible. Not all vacuum cleaners work with Alexa, so it is important to do your research before purchasing a device.
To check if your device is compatible with Alexa, you can visit the Amazon Alexa Smart Home Vacuum webpage. There, you will find a list of supported devices that are compatible with Alexa. If your device is not listed, it may not be compatible with Alexa.
Another way to check compatibility is to look for compatibility information on the device’s product page or packaging. Look for logos or information about Alexa compatibility. If you are unsure, you can also contact the device manufacturer for more information.
Below is a table of some popular smart vacuum cleaners and their compatibility with Alexa:
Smart Vacuum Cleaner
Compatibility with Alexa
iRobot Roomba 980
Compatible with Alexa
Eufy RoboVac 11S
Not Compatible with Alexa
Ecovacs Deebot N79S
Compatible with Alexa
Shark Ion Robot 750
Compatible with Alexa
Always double-check to make sure your device is compatible before purchasing or setting up with Alexa. If you have any further compatibility questions or concerns, don’t hesitate to reach out to the device manufacturer for assistance.
Now that you have confirmed your device’s compatibility with Alexa, you can move on to the next step in setting up your smart vacuum cleaner with Alexa.
Step 2: Download the Alexa app
As you delve deeper into the world of smart home devices, one of the essential steps to get the most out of your smart vacuum cleaner is to download the Alexa app. Alexa app is a powerful tool that enables you to pair your smart vacuum cleaner with Amazon Alexa and interface it with other smart home devices such as thermostats, lights, and doorbells. Connecting your vacuum cleaner in this way can help you create a seamless, automated cleaning experience that adapts to your lifestyle and needs. In this section, we’ll take an in-depth look at how to download and set up the Alexa app to work with your smart vacuum cleaner.
Setting up an Amazon account
When it comes to setting up your Amazon Alexa account, there are a few steps you need to follow. Here’s a breakdown of the process:
Step 1: Go to Amazon’s website and click on the “Account & Lists” button on the upper right-hand side of the page.
Step 2: Click on “Create Amazon account” and follow the prompts to set up a new account. Make sure to use a valid email address and choose a strong password.
Step 3: Once you’ve created your account, download the Amazon Alexa app on your smartphone or tablet. You can find it in either the App Store or Google Play Store.
Step 4: Open the Alexa app and follow the prompts to sign in with your Amazon account credentials.
Step 5: Once you’ve signed in, you’ll be prompted to set up your Echo device. Follow the instructions on the app to connect your Echo to your Wi-Fi network.
Step 6: Once your Echo is connected to the internet, you’ll be able to start using Amazon Alexa to control your smart vacuum cleaner.
Setting up your Amazon account is a crucial step in the process of setting up your smart vacuum cleaner with Amazon Alexa. Without an Amazon account, you won’t be able to access the Alexa app and connect your Echo to your Wi-Fi network. Make sure to follow the steps above carefully to ensure a successful setup process.
If you need more information on how to set up your smart vacuum cleaner with Amazon Alexa, check out our article on advanced Alexa smart vacuum integration. And if you run into any problems along the way, don’t worry. We’ve got you covered with our guide to smart vacuum Alexa troubleshooting.
Pairing the device with the Alexa app
Pairing your device with the Amazon Alexa app is an important step in making your cleaning routine more convenient and efficient. Here’s how to do it:
Download and open the Alexa app: If you haven’t already, download the Alexa app from the App Store or Google Play store. Once downloaded, open the app and sign in using your Amazon account credentials.
Tap on the menu: In the upper left-hand corner of the app, you will see a menu icon represented by three horizontal lines. Tap on it to access the app’s settings.
Select “Add Device”: From the settings menu, select “Add Device.” This will bring up a list of devices that are compatible with Amazon Alexa.
Choose your smart vacuum cleaner: Scroll through the list of devices until you find your smart vacuum cleaner model. Tap on it to start the pairing process.
Follow the on-screen instructions: Once you’ve selected your device, the Alexa app will guide you through the pairing process. This may include turning on your device, selecting your Wi-Fi network, and entering your network’s password.
Test the connection: Once the pairing process is complete, use the Alexa app to test that your device is connected by giving a simple voice command like “Alexa, ask [device name] to start cleaning.”
It’s important to note that not all vacuum cleaners are compatible with Amazon Alexa. Before attempting to pair your device, make sure to check that your vacuum cleaner is capable of being integrated with smart home systems. If it is not, you may need to consider upgrading to a newer model that is compatible.
Once you have successfully paired your vacuum cleaner with Alexa, you can enjoy the convenience of using voice commands to start and stop cleaning sessions. Be sure to also explore other features of the Alexa app, such as creating groups and routines for your smart home devices, as well as troubleshooting tips for any issues you may encounter during integration. For more information and tips on maximizing your smart home and Alexa vacuum integration, check out our article on Maximizing Smart Home and Alexa Vacuum Integration.
Step 3: Enable smart home skills
Now that your Amazon Alexa app is ready, it’s time to give it some smart home skills. This will allow Alexa to communicate with your smart vacuum cleaner and give you hands-free control over the cleaning process. With just a few simple steps, you’ll be able to set up Alexa to control and manage your smart home devices effortlessly. Let’s dive into the details and see how you can enable smart home skills for your device. But before that, if you want to learn more about the benefits of using Amazon Alexa with smart vacuum cleaning, check out this informative article here.
Navigating the Skills & Games section
When setting up your smart vacuum cleaner with Amazon Alexa, one of the crucial steps is enabling smart home skills for the device on the Alexa app. To do this, you will need to navigate to the Skills & Games section.
The Skills & Games section is where you can find and enable new skills for your Alexa device, including smart home skills for your smart vacuum cleaner. To get to this section, open the Alexa app and tap on the three horizontal lines in the upper left corner. From the menu, select “Skills & Games.”
Once you’re in the Skills & Games section, you’ll see a search bar where you can look for specific skills. Alternatively, you can browse different categories such as “Smart Home,” “Food & Drink,” and “Productivity.” To find the smart home skills for your device, tap on “Smart Home.”
In the Smart Home category, you’ll find a list of different brands and devices that are compatible with Alexa. Look for your smart vacuum cleaner’s brand and select it to see the available skills.
Enabling smart home skills for your device is as easy as tapping the “Enable” button next to the skill you want to use. Once you’ve enabled the skill, you’ll be prompted to log in to your account for that device and authorize Alexa to access it. Make sure to follow the specific instructions given to you on the app, as they vary depending on the brand and device.
Enabling smart home skills for your smart vacuum cleaner is crucial for being able to control it using Alexa voice commands. It also adds a new level of convenience to your cleaning routine. For more information on the benefits of using Alexa with your smart vacuum cleaner, check out our article on voice commands for smart vacuum cleaners and Alexa.
Enabling smart home skills for your device
To enable smart home skills for your smart vacuum cleaner, follow these simple steps:
Step 1: Open the Alexa app on your smartphone or tablet.
Step 2: Tap on the “Menu” button in the top left corner of the app.
Step 3: Select the “Skills & Games” option from the list.
Step 4: In the search bar, type in the name of the manufacturer of your smart vacuum cleaner, such as “iRobot” or “Ecovacs.”
Step 5: Select the skill that matches your smart vacuum cleaner from the list of results.
Step 6: Tap on the “Enable” button to enable the skill.
Step 7: Follow the prompts to link your Amazon account with the smart vacuum cleaner’s app, if necessary.
Enabling smart home skills for your device allows you to voice control your smart vacuum cleaner with Alexa. Once the skill is enabled, you can say something like, “Alexa, ask iRobot to start cleaning,” and your smart vacuum cleaner will start cleaning your home.
It’s important to note that not all smart vacuum cleaners are compatible with Alexa. Be sure to check your device’s compatibility before attempting to enable smart home skills. You can also read more about the differences between smart vacuums and Alexa cleaning in our article: “Smart Vacuum Cleaners vs Alexa Cleaning: Which One Should You Choose?”
Step 4: Discover devices
As you eagerly prepare to control your smart vacuum cleaner with Alexa, you’re halfway there! After setting up the necessary prerequisites, it’s time to discover your device within the Alexa app. With a few taps on your smartphone or tablet, you can have your smart vacuum cleaner up and running in no time. Keep reading to learn how to discover your device and start vacuuming with voice commands.
Navigating to the Devices section
To navigate to the Devices section, follow these steps:
Open the Amazon Alexa app on your smartphone or tablet.
On the bottom navigation bar, tap on the Devices icon in the middle.
At the top right of the screen, tap the + button to add a new device.
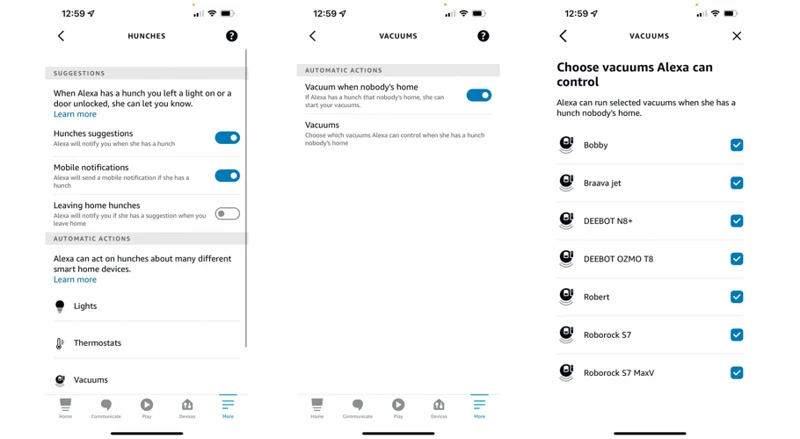
Select your device category, in this case Vacuum.
Choose the brand of your smart vacuum cleaner from the list of options.
If your brand is not listed, you can also use the search bar to find it.
Enter your account information for the smart vacuum cleaner device and follow any additional prompts to connect it to the Alexa app.
Once your device is successfully connected to the Alexa app, you can then control it using voice commands through your Amazon Echo or other Alexa-enabled device. To make sure Alexa recognizes your specific vacuum cleaner name, it’s a good idea to give it a unique name during setup that you’ll easily recognize later. As always, remember to follow any specific instructions and safety guidelines provided by the manufacturer.
Discovering your smart vacuum cleaner
To discover your smart vacuum cleaner, follow these steps:
Open the Alexa app on your phone or tablet.
Navigate to the Devices section by selecting the three lines in the upper left corner and choosing “Devices” from the menu.
Press the plus sign in the upper right corner to add a new device.
Select “Add Device” from the options presented.
Choose the type of device you want to add, in this case, a smart vacuum cleaner.
Follow the on-screen instructions to put your vacuum cleaner in pairing mode.
Once your vacuum cleaner is in pairing mode, it should appear in the list of discovered devices.
If your device does not appear, try resetting it and putting it back into pairing mode.
Note: Make sure that your vacuum cleaner is compatible with Amazon Alexa before attempting to pair it. If you are unsure, refer to the manufacturer’s website or user manual.
Once your smart vacuum cleaner is discovered, you can control it using voice commands through Alexa. For example, you can say “Alexa, ask (device name) to start cleaning” or “Alexa, tell (device name) to return to its charging station.” With the Alexa app, you can also create routines and group your devices together for easier control.
Discovering your smart vacuum cleaner is a simple process that is essential for integrating it with Alexa and enjoying hands-free control.
Step 5: Create groups and routines
As you get used to controlling your smart vacuum cleaner with Alexa, you may find that setting up groups and routines can make the experience even more seamless and convenient. With groups, you can control multiple devices with a single command, while routines allow you to automate specific actions and schedules. In this section, we will dive into the steps required to create groups and routines, making your smart home system even smarter.
Creating a group for your smart vacuum cleaner
To create a group for your smart vacuum cleaner, follow these steps:
Open the Alexa app on your device and navigate to the “Devices” tab.
Select the “All Devices” section and locate your smart vacuum cleaner.
Tap and hold on the vacuum cleaner’s name to select it.
Click on the “Create Group” option that appears on the screen.
Once you have created your smart vacuum cleaner group, you can give it a name of your choice, such as “My Smart Vacuum.” By doing so, you can control all the relevant devices at once by using a single voice command.
For instance, with a simple voice prompt like “Alexa, vacuum my living room,” you can instruct both your smart vacuum cleaner and any other devices in your group to perform the desired action without having to control each device separately.
Using groups can help you save time and make your smart home experience more efficient. So, make sure to take advantage of this feature to streamline your experience.
Remember to give your groups easily understandable names so that they can be quickly pulled up when required. This can help prevent confusion and make operation of your smart home devices much simpler.
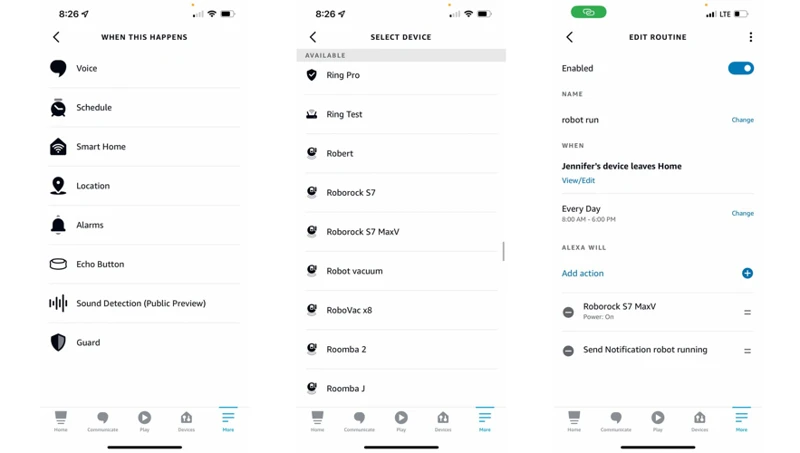
Setting up a routine for your device
Once your smart vacuum cleaner is connected to Alexa, you can set up routines to make cleaning even more convenient. Here’s how to set up a routine for your device:
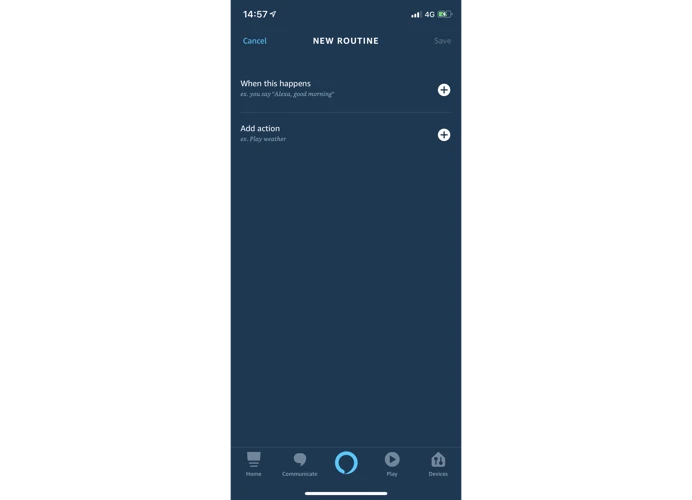
Open the Alexa app: Launch the Alexa app on your smartphone and navigate to the “Routines” section.
Create a routine: Tap on the “Create a Routine” button.
Choose a trigger phrase: Decide on a phrase that will activate your routine, such as “Alexa, clean the living room.”
Select the action: Select the “Smart Home” option and choose your smart vacuum cleaner from the list of devices.
Select the clean mode: Choose the clean mode you want your vacuum cleaner to use when the routine is triggered.
Save your routine: Tap on the “Create” button to save your routine.
Once you have set up the routine, you can activate it by saying the trigger phrase to Alexa. For example, if you chose “Alexa, clean the living room” as your trigger phrase, saying that phrase to Alexa will activate the routine and start your smart vacuum cleaner.
Setting up routines for your smart vacuum cleaner can save you time and make cleaning your home much more convenient. Plus, with Alexa’s voice control, you can clean your home without ever having to lift a finger.
Troubleshooting
Even with the most careful setup, sometimes technical difficulties can arise. When it comes to integrating your smart vacuum cleaner with Alexa, it’s important to be prepared for any potential issues that can crop up. Fear not! There are solutions to many common problems you may encounter along the way. In this section, we will explore some of the most common issues users face and provide solutions so you can enjoy a smooth and easy experience.
Common issues and how to fix them
It’s not uncommon to run into issues when setting up your smart vacuum cleaner with Amazon Alexa. But don’t worry, we’ve got you covered with some common issues and how to fix them:
Issue 1: Alexa can’t discover your smart vacuum cleaner.
One solution is to ensure that your vacuum cleaner is properly set up and connected to Wi-Fi. Try resetting the device and checking for firmware updates. You can also try disabling and re-enabling the skill in the Alexa app.
Issue 2: Alexa misunderstands or can’t recognize your commands.
Make sure you’re using the correct wake word and speaking clearly. Check that there’s no background noise or interference. You can also try renaming your device to something easier to say.
Issue 3: Your smart vacuum cleaner isn’t responding to commands.
Check that the device is properly connected to Wi-Fi and is in range. Make sure it’s not in the middle of a cleaning cycle or charging. Also, double-check your command to ensure it’s formatted correctly and matches the name of your device in the Alexa app.
Issue 4: Your routine isn’t working.
Make sure that your routine is properly set up and that all the devices and actions are included. Check that the routine is enabled and that the correct trigger is set. You can also try disabling and re-enabling the routine.
By keeping these common issues and their solutions in mind, you’ll be better prepared to troubleshoot any problems that may arise during the setup process, and enjoy the convenience of controlling your smart vacuum cleaner with Amazon Alexa.
Conclusion
After following the step-by-step guide to set up your smart vacuum cleaner with Amazon Alexa, you should now be enjoying the convenience and ease of controlling your device with just your voice.
By using the power of Alexa and smart home technology, you can have a clean and tidy home without ever lifting a finger. The ability to create groups and routines also makes it easy to customize your cleaning schedule and preferences to fit your lifestyle.
However, if you do encounter any issues during the setup process, don’t worry. The troubleshooting section provides helpful tips and solutions to common problems that may arise.
Overall, setting up your smart vacuum cleaner with Amazon Alexa may seem like a daunting task at first, but it is actually quite simple with the right instructions. By taking the time to go through each step carefully, you can enjoy the benefits of a clean home without the hassle of manually operating your device.
So go ahead, give it a try and see for yourself how Alexa can make your life easier and more efficient. Your home (and your sore back) will thank you!
Frequently Asked Questions
1. Can I use any smart vacuum cleaner with Amazon Alexa?
Not all smart vacuum cleaners are compatible with Amazon Alexa. You’ll need to check your device’s compatibility before proceeding with the setup.
2. What do I need to set up my smart vacuum cleaner with Amazon Alexa?
You’ll need a smart vacuum cleaner that’s compatible with Amazon Alexa, the Alexa app, and an Amazon account.
3. Do I need to have an Amazon Echo device to use Alexa with my vacuum cleaner?
No, you don’t need an Amazon Echo device to use Alexa with your smart vacuum cleaner. You can use the Alexa app on your smartphone or tablet.
4. How do I enable smart home skills for my device in the Alexa app?
You can enable smart home skills for your device by navigating to the Skills & Games section in the Alexa app, searching for your device’s brand or name, and enabling the skill for your specific device.
5. What can I do once my smart vacuum cleaner is set up with Alexa?
You can use voice commands to control your smart vacuum cleaner, create routines to automate cleaning, and group your device with other smart home devices for even greater control.
6. Can I use Alexa to schedule my smart vacuum cleaner to clean at a certain time?
Yes, you can create routines in the Alexa app to schedule when your smart vacuum cleaner should clean.
7. Why isn’t my smart vacuum cleaner connecting with Alexa?
There could be many reasons why your smart vacuum cleaner isn’t connecting with Alexa. Try resetting your device, restarting your Alexa-enabled device, and checking your Wi-Fi connection.
8. How can I troubleshoot issues with my smart vacuum cleaner and Alexa?
You can troubleshoot issues by checking for updates on both your smart vacuum cleaner and the Alexa app, ensuring that both are connected to the same Wi-Fi network, and checking that you’re using the correct voice commands.
9. Can I use Alexa to control my smart vacuum cleaner if I’m not at home?
Yes, as long as your Alexa-enabled device is connected to the internet, you can use voice commands to control your smart vacuum cleaner from anywhere.
10. What other smart home devices can I group with my smart vacuum cleaner in the Alexa app?
You can group your smart vacuum cleaner with other compatible devices, such as smart lights and smart plugs, to create custom routines and control multiple devices with a single voice command.