Connect Your Smart Vacuum Cleaner with Google Home
Warning: A non-numeric value encountered in /var/www/html/wp-content/themes/generatepress/inc/structure/post-meta.php on line 165
by Dwight Gibson
Are you tired of manually vacuuming your floors? Do you own a smart vacuum cleaner and a Google Home device? If you answered yes to both of these questions, then you’re in luck! Combining these two devices can make your life a whole lot easier. In this comprehensive guide, we will walk you through the step-by-step process of setting up and connecting your smart vacuum cleaner to Google Home, allowing you to control it with just your voice. So, let’s dive in and make your cleaning routine a breeze.
Table of Contents
Step 1: Check for Compatibility
Before setting up your smart vacuum cleaner with Google Home, it’s important to ensure that your devices are compatible with each other. Compatibility is key to enjoying the full benefits of a smart home system. This step will also help avoid any unnecessary troubleshooting down the line. In this section, we will guide you through the process of checking for compatibility and what you’ll need for a seamless connection. If you want to learn more about the advantages of Google Home integration, click here. If you already know your device is compatible and ready to go, skip ahead to Step 2: Download the Google Home App. If you’re having trouble with the setup, our troubleshooting tips may be of help.
What You Need
Before setting up your smart vacuum cleaner with Google Home, you need to make sure you have the necessary items. Here’s a list of what you need to get started:
A compatible smart vacuum cleaner: Not all smart vacuum cleaners are compatible with Google Home, so it’s important to check if your device is compatible before proceeding.
A Google Home device: You’ll need a Google Home device to connect and control your smart vacuum cleaner using voice commands.
A stable Wi-Fi connection: You’ll need a stable and strong Wi-Fi connection to ensure your devices can communicate with each other properly.
The Google Home app: You’ll need to download the Google Home app on your smartphone or tablet to set up the connection between your smart vacuum cleaner and Google Home.
Once you have all the necessary items, you’re ready to move onto the next step and download the Google Home app. If you’re unsure about whether your smart vacuum cleaner is compatible with Google Home, you can check our guide on how to control your smart vacuum cleaner with Google Home by clicking the following link: How to Control Your Smart Vacuum Cleaner With Google Home.
How to Check Compatibility
Before you get started with the process of setting up your smart vacuum cleaner with Google Home, it’s important to first ensure that your devices are compatible. Here’s how to check for compatibility:
Smart Vacuum Cleaner Model
Compatible with Google Home?
Xiaomi Mi Robot Vacuum
Yes
Ecovacs Deebot N79S
Yes
iRobot Roomba 690
Yes
Shark ION R85
Yes
Neato Botvac D7 Connected
Yes
Eufy BoostIQ RoboVac 11S MAX
Yes
ILIFE A4s
No
As you can see from the table above, some smart vacuum cleaner models are compatible with Google Home while others are not. It’s important to note that this is not an exhaustive list and you should always check the manufacturer’s website to confirm compatibility with Google Home.
If your smart vacuum cleaner model is not listed or you’re not sure if it’s compatible with Google Home, you can always try contacting the manufacturer’s customer support for assistance. It’s better to be safe than sorry when it comes to compatibility, so take the time to check before proceeding with the setup process.
Step 2: Download the Google Home App
One of the most important steps in setting up your smart vacuum cleaner with Google Home is downloading the Google Home app. This app will act as a central hub for all your smart home devices and allow you to easily control and manage them. But with so many apps available in the app store, you may be wondering how to find and download the Google Home app. Don’t worry, we’ve got you covered. In this section, we’ll walk you through the process step-by-step to ensure that you have the app downloaded and ready to go.
How to Download the App
Downloading the Google Home app is a critical step you need to take before setting up your smart vacuum cleaner with Google Home. Here’s how you can download the app in a few simple steps:
Make sure your mobile device is connected to Wi-Fi or mobile data.
Go to the Google Play Store for Android devices or the App Store for iOS devices.
Once you are on the home screen of your respective store, type “Google Home” in the search bar to navigate to the app.
Click on the “Install” or “Get” button to start the download and installation process of the app to your mobile device.
Wait for the download process to finish, which should only take a few minutes, depending on the speed of your internet connection.
Once the app has downloaded and installed, open the Google Home app from your mobile device’s home screen.
By following these simple steps, you can quickly download the Google Home app and start setting up your smart vacuum cleaner with Google home.
Step 3: Connect Your Smart Vacuum Cleaner to Wi-Fi
Now that you have checked for compatibility and downloaded the Google Home app, it’s time to connect your smart vacuum cleaner to Wi-Fi. This step is crucial as it allows your vacuum cleaner to communicate with your Google Home device and respond to your voice commands. Connecting your vacuum to Wi-Fi is a straightforward process, but if you’re unsure how to go about it, don’t worry. In the following section, we’ll guide you through the process step by step. Grab your smartphone and let’s get started!
How to Connect to Wi-Fi
Connecting your smart vacuum cleaner to Wi-Fi is essential for it to work with the Google Home app. Here are the steps to follow:
Prepare your Wi-Fi network credentials: Before connecting your smart vacuum cleaner, make sure you have the necessary information, such as your Wi-Fi network name and password. You can usually find it at the back of your router or in the manual that came with it.
Turn on your smart vacuum cleaner: Plug in your smart vacuum cleaner to a power source and turn it on.
Put your smart vacuum cleaner in pairing mode: Check your smart vacuum cleaner manual for instructions on how to enable pairing mode. For most models, press and hold the Wi-Fi button until the light starts flashing.
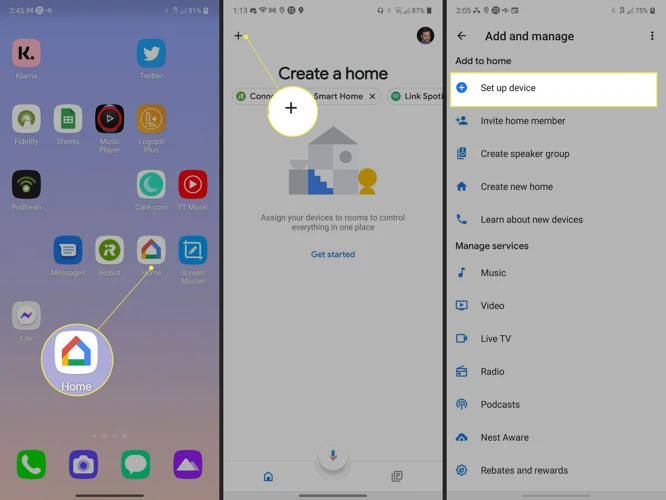
Open the Google Home app: Launch the Google Home app on your device and tap the plus (+) icon in the upper left corner to add a new device.
Select “Set up device”: Choose “Set up device” from the list of options and select “Works with Google” from the list.
Choose your smart vacuum cleaner brand: Select your smart vacuum cleaner brand from the list and follow the on-screen instructions to complete the setup process.
Enter your Wi-Fi credentials: When prompted, enter your Wi-Fi network name and password to connect your smart vacuum cleaner to your Wi-Fi network. Your smart vacuum cleaner will then connect to the internet.
Note: If your smart vacuum cleaner does not connect to your Wi-Fi network on the first try, make sure you are in range of your Wi-Fi network and that you have entered the correct credentials. Try restarting your smart vacuum cleaner and your router, and try again. If you still experience issues, refer to the troubleshooting section of this article.
Step 4: Connect Your Smart Vacuum Cleaner to Google Home
Now that your smart vacuum cleaner is connected to Wi-Fi, it’s time to integrate it with your Google Home. This will allow you to control your vacuum using your voice, as well as through the Google Home app. Connecting your vacuum to your Google Home can seem daunting, but don’t worry – we’ve got you covered. Follow the simple steps below to have your devices working in harmony in no time!
How to Connect to Google Home
To connect your smart vacuum cleaner to Google Home, you’ll need to follow a few simple steps:
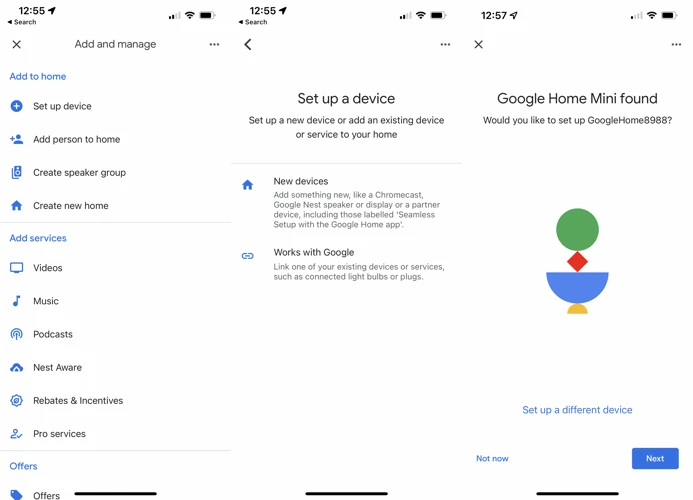
Open the Google Home App: On your smartphone or tablet, open the Google Home App.
Tap the “+” icon: In the top left corner of the app, tap the “+” icon to add a new device to your Google Home system.
Select “Set Up Device”: Select the “Set Up Device” option on the pop-up menu.
Choose your device: Select the type of device you are adding to your Google Home. In this case, select your “smart vacuum cleaner” from the list of options.
Follow the prompts: Google Home will guide you through a series of prompts that will help you connect your smart vacuum cleaner to your Google Home system. Follow the prompts carefully, and be sure to enter the correct information when prompted.
Link your accounts: You may need to link your Google Home and smart vacuum cleaner accounts so that they can communicate with each other. Follow the prompts in the app to link your accounts.
Customize your settings: Once your smart vacuum cleaner is connected to your Google Home, you can customize your settings to get the most out of your new integration. For example, you can set custom voice commands to control your vacuum cleaner, or adjust the timing of your cleaning schedules.
With these simple steps, you’ll be able to connect your smart vacuum cleaner to your Google Home and enjoy the convenience of voice-controlled cleaning.
Step 5: Set Up Voice Commands
As you get comfortable with using Google Home to control your smart vacuum cleaner, you may want to take things to the next level and set up voice commands. This feature allows you to control your vacuum with just the sound of your voice, making the whole cleaning process even more effortless. In this section, we’ll walk you through the simple steps to set up and customize your voice commands using the Google Home app. So, grab your smartphone and let’s get started!
How to Set Up Voice Commands
Once your smart vacuum cleaner is connected to Google Home, you can start using voice commands with it. Follow these steps to set up voice commands:
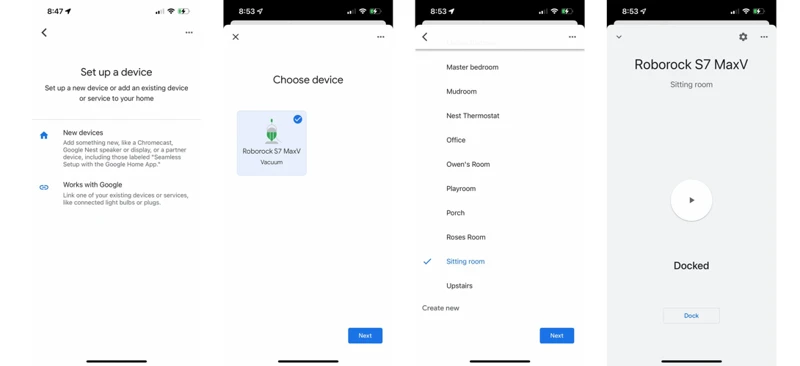
Step 1: Open the Google Home app on your phone.
Step 2: Tap the plus icon in the top left corner and select “Set up device.”
Step 3: Select “Have something already set up?”
Step 4: Look for your smart vacuum cleaner in the list of devices and select it.
Step 5: Sign in to your account for the smart vacuum cleaner if prompted.
Step 6: Choose the room where the smart vacuum cleaner is located and give it a name if you haven’t already done so.
Step 7: Tap “Done.”
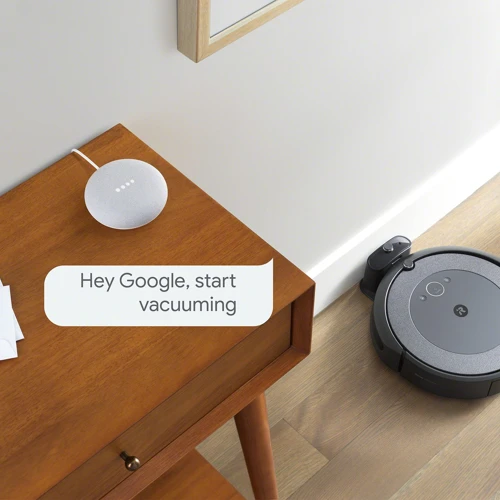
Now you can start giving voice commands. Use phrases like “Hey Google, start vacuuming,” “Hey Google, stop cleaning,” or “Hey Google, tell the vacuum to clean the living room.” Experiment with different commands to see what works best.
It’s important to note that voice commands may not work perfectly every time. If the smart vacuum cleaner doesn’t respond to a command, try rephrasing it or checking that it’s connected to Wi-Fi and connected to Google Home.
By setting up voice commands, you’ll be able to control your smart vacuum cleaner hands-free and make cleaning your home more convenient.
Troubleshooting
After following the steps outlined in the previous sections, you should be able to seamlessly control your smart vacuum cleaner using your Google Home device. However, sometimes things don’t always go as planned. If you’re experiencing issues with connecting your smart vacuum cleaner to Google Home, don’t fret! In this section, we’ll go over some common issues and how to troubleshoot them so you can get back to enjoying the convenience of a voice-activated cleaning routine. Let’s dive in and tackle these problems together.
Issue 1: Smart Vacuum Cleaner Not Connecting to Wi-Fi
If you are having trouble connecting your smart vacuum cleaner to Wi-Fi, don’t worry. This is a common issue that can be frustrating, but there are several steps you can take to resolve the problem.
Step 1: Make sure that your Wi-Fi network is working properly. Check to see if other devices are able to connect to the network.
Step 2: Check the distance between your smart vacuum cleaner and your Wi-Fi router. If the distance is too far, the signal may not be strong enough for the device to connect. Try moving the vacuum cleaner closer to the router.
Step 3: Ensure that your smart vacuum cleaner is compatible with your Wi-Fi network. Check your user manual or the manufacturer’s website to confirm that the device is compatible with your network.
Step 4: Check to see if your Wi-Fi network is running on a 2.4GHz frequency. Some smart devices are only compatible with this frequency, and will not connect to a 5GHz network.
Step 5: Reset your smart vacuum cleaner and try to connect to Wi-Fi again. Sometimes a simple restart can resolve the issue.
Step 6: If none of these steps work, you may need to contact the manufacturer’s customer support for further assistance. They may be able to provide additional troubleshooting steps or advise you on how to resolve the issue.
Remember, it’s important to be patient and persistent when troubleshooting Wi-Fi connectivity issues with smart devices. By following these steps, you should be able to resolve the issue and enjoy the convenience of using your smart vacuum cleaner with Google Home.
Issue 2: Google Home Not Recognizing Device
If you’re having trouble with Google Home not recognizing your smart vacuum cleaner, don’t worry. There are a few potential reasons why this might be happening, and we’ll walk you through some troubleshooting steps.
One possibility is that there’s a problem with the connection between your smart vacuum cleaner and your Wi-Fi network. Check to make sure that your vacuum cleaner is still connected to Wi-Fi and that the signal is strong.
Another possible issue could be that your Google Home app needs an update. If you haven’t updated the app in a while, go ahead and try that.
If neither of those solutions works, you may need to reset your Google Home or smart vacuum cleaner. This will erase all of your previous settings, so be sure to consult your user manual or contact customer support before doing so.
If you’re still having difficulties after trying these troubleshooting steps, it’s possible that there simply isn’t integration between your smart vacuum cleaner and Google Home yet. In that case, be patient and keep an eye out for any updates or new features that could potentially solve the issue.
Here’s a table summarizing the potential issues and solutions for Google Home not recognizing your smart vacuum cleaner:
Possible Issue
Solution
Weak Wi-Fi signal or disconnection
Check Wi-Fi and ensure strong signal
Outdated Google Home app
Update the app
Need to reset Google Home or smart vacuum cleaner
Reset devices (consult manual or customer support first)
No integration between devices
Be patient and wait for updates/new features
By following these troubleshooting steps, you should be able to resolve the issue of Google Home not recognizing your smart vacuum cleaner.
Conclusion
After following these simple steps, you can now easily operate your smart vacuum cleaner using your voice through Google Home. The convenience of being able to control your vacuum simply by speaking has never been easier. No more getting up from the couch or leaving your bed to push a button on the vacuum.
By checking for compatibility first, downloading the Google Home app, connecting to Wi-Fi, connecting to Google Home, and setting up voice commands, you have successfully integrated your smart vacuum cleaner with your Google Home.
Remember that if you encounter any problems while setting up, you can always refer to the troubleshooting section of this article. Don’t hesitate to reach out to customer support if needed.
With this new setup, you can now sit back, relax, and let your smart vacuum cleaner do the work for you. Enjoy the convenience of being able to clean your house hands-free and have more time for the things that matter.
Frequently Asked Questions
1. How do I know if my smart vacuum cleaner is compatible with Google Home?
You can check the list of compatible devices on the Google Home app. If your device is not listed, it may not be compatible.
2. What do I need to connect my smart vacuum cleaner to Google Home?
You will need a compatible smart vacuum cleaner, a Google Home device, a stable Wi-Fi connection, and the Google Home app.
3. Can I control my smart vacuum cleaner with voice commands?
Yes, you can use voice commands to control your smart vacuum cleaner once it is connected to Google Home.
4. Do I need to download a separate app for my smart vacuum cleaner?
It depends on the brand of your smart vacuum cleaner. Some brands may require a separate app, while others can be controlled through the Google Home app.
5. What happens if my smart vacuum cleaner loses Wi-Fi connection?
If your smart vacuum cleaner loses Wi-Fi connection, it will be unable to receive the commands from Google Home until the connection is restored.
6. Can I schedule cleaning tasks through Google Home?
Yes, you can schedule cleaning tasks through Google Home once your smart vacuum cleaner is connected.
7. How do I disconnect my smart vacuum cleaner from Google Home?
You can disconnect your smart vacuum cleaner from Google Home through the device settings on the Google Home app.
8. Can I connect multiple smart vacuum cleaners to one Google Home device?
Yes, you can connect multiple smart vacuum cleaners to one Google Home device if they are compatible.
9. What should I do if my smart vacuum cleaner is not responding to voice commands?
You can try restarting both the smart vacuum cleaner and the Google Home device, and make sure they are connected to the same Wi-Fi network.
10. Does connecting my smart vacuum cleaner to Google Home require any additional fees?
No, connecting your smart vacuum cleaner to Google Home does not require any additional fees. However, you may need to pay for subscriptions or additional features depending on the brand of your smart vacuum cleaner.