Picture this: you’ve had a long day at work and all you want to do is come home to a clean house. But the thought of dragging out the vacuum cleaner and spending an hour cleaning is just too daunting. This is where a smart vacuum cleaner comes in handy! And now, with the help of Google Home, controlling your smart vacuum cleaner has never been easier. But where do you start? Don’t fret, in this article, we’ll guide you through the process of connecting your Google Home to your smart vacuum cleaner, voice commands you can use, and even automation tips to make your life easier. So, sit back, relax, and let’s get started!
Connecting Google Home and Your Smart Vacuum Cleaner
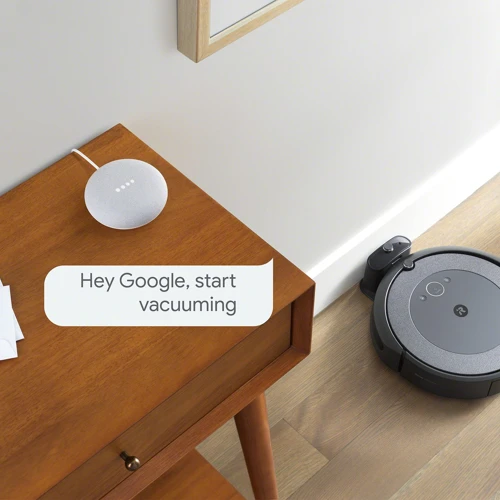
Are you ready to take control of your smart vacuum cleaner with Google Home? Having the ability to control your vacuum cleaner with just your voice is a game changer. However, before you start giving commands, you need to make sure your devices are connected and linked properly. Don’t worry if you’re feeling overwhelmed, just follow these simple steps to connect your Google Home and smart vacuum cleaner. If you need more information about setting up your Google Home or troubleshooting tips, you can check out our guide to setting up Google Home with your smart vacuum cleaner or our article on common troubleshooting tips. And once you have everything set up, you’ll be able to enjoy all the advantages of integrating Google Home with your smart home devices.
Step 1: Check Compatibility
Before you can start controlling your smart vacuum cleaner with Google Home, it is crucial to ensure that the two devices are compatible with one another. Here is a table outlining the smart vacuum cleaners that are currently compatible with Google Home:
| Smart Vacuum Cleaner Brand | Compatible Models |
|---|---|
| iRobot | Roomba i7+, Roomba i7, Roomba s9+, Roomba s9, Roomba 895, Roomba 690, Roomba 675 |
| ECOVACS | Deebot N79S, Deebot N79SE, Deebot Ozmo 930, Deebot 900, Deebot 901, Deebot 711, Deebot 711S, Deebot 710, Deebot 601, Deebot 500, Deebot M80 Pro, Deebot 79, Deebot Ozmo 610 |
| Neato | Botvac D3 Connected, Botvac D4 Connected, Botvac D5 Connected, Botvac D6 Connected, Botvac D7 Connected, Botvac D80, Botvac D85 |
| Shark | ION ROBOT 750, ION ROBOT 720, ION ROBOT 700, ION ROBOT 800, ION ROBOT 850, ION ROBOT 860, ION ROBOT R76, ION ROBOT R85 |
| Roborock | S6, S5, E25, E20, C10 |
It’s important to note that the list of compatible smart vacuum cleaners with Google Home is continuously changing, so it’s always a good idea to check the manufacturer’s website for the most up-to-date list of compatible devices. If your smart vacuum cleaner isn’t currently compatible with Google Home, you may need to wait for a software update or consider purchasing a new device that is compatible.
Step 2: Connect to Wi-Fi
Now that you have determined that your smart vacuum cleaner is compatible with Google Home, it’s time to get it connected to Wi-Fi. This process may vary slightly depending on the model of your vacuum cleaner, but here are the general steps:
- Preparation: Before you begin, make sure that your Wi-Fi network is functioning properly and that you have the Wi-Fi login credentials on hand. You should also ensure that your vacuum cleaner is in range of your Wi-Fi router.
- Put your vacuum cleaner in pairing mode: Refer to your owner’s manual for instructions on how to put your vacuum cleaner in pairing mode. This is usually achieved by pressing and holding a button on the vacuum cleaner for a certain number of seconds until an LED light starts flashing.
- Open the Google Home app: Launch the Google Home app on your smartphone or tablet.
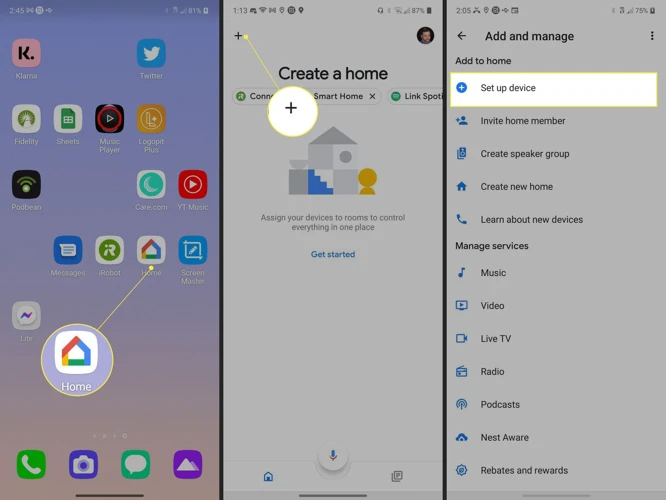
- Add your device: Tap the “+” button on the top-left corner of the screen to add a new device. Follow the on-screen prompts to add your vacuum cleaner to the app.
- Connect to Wi-Fi: After you have added your vacuum cleaner to the Google Home app, select it from the list of devices and tap “Set Up.” Follow the on-screen instructions to connect your vacuum cleaner to your Wi-Fi network.
Once your vacuum cleaner is connected to Wi-Fi, it should automatically sync with your Google Home device. This may take a few minutes, so be patient. Once the devices are synced, you can begin issuing voice commands to your vacuum cleaner using your Google Home.
Note: If you encounter any issues during the Wi-Fi connection process, refer to your owner’s manual for troubleshooting tips. If you are still experiencing difficulties, contact the manufacturer’s customer support for assistance.
Step 3: Link Your Devices
Once you have your smart vacuum cleaner and Google Home connected to Wi-Fi, the final step is to link your devices. Here’s how to do it:
- Open the Google Home app on your phone or tablet.
- Tap the “+” sign to add a new device.
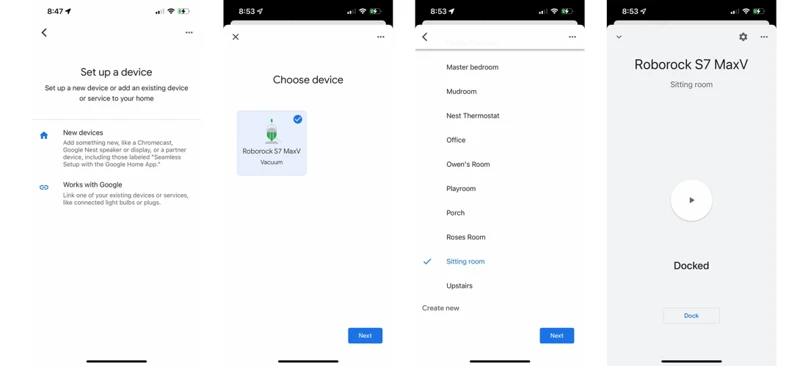
- Choose “Set up device.”
- Follow the prompts to add your smart vacuum cleaner as a new device.
- Log in or create an account for your smart vacuum cleaner’s app using the provided instructions if you haven’t already done so.
- Link your smart vacuum cleaner account with your Google Home account.
It’s important to note that the specific steps to link your devices may vary depending on your smart vacuum cleaner’s model and the Google Home app version.
Once your devices are linked, you can control your smart vacuum cleaner with voice commands via Google Home. It’s important to test out the commands to ensure they are working correctly.
Voice Commands for Your Smart Vacuum Cleaner
Imagine being able to control your vacuum cleaner with just the sound of your voice! With advancements in smart technology, it is now possible to simplify household chores with the help of virtual assistants like Google Home. With a few simple voice commands, you can have your home clean in no time. Let’s explore the different voice commands that can be used to control your smart vacuum cleaner and make cleaning a breeze.
Cleaning Commands
When it comes to controlling your smart vacuum cleaner with Google Home, cleaning commands are one of the most important features that you can use. Here are some of the most common cleaning commands that you can use for your smart vacuum cleaner:
- “Hey Google, start the vacuum.” This command will start the cleaning process with your smart vacuum cleaner. You can also use variations of this command, such as “Hey Google, begin cleaning” or “Hey Google, start the floor cleaner.”
- “Hey Google, stop the vacuum.” This command will stop your smart vacuum cleaner from cleaning. You can also use variations of this command, such as “Hey Google, halt cleaning” or “Hey Google, pause the floor cleaner.”
- “Hey Google, send the vacuum home.” This command will send your smart vacuum cleaner back to its charging station. You can also use variations of this command, such as “Hey Google, return the vacuum” or “Hey Google, dock the floor cleaner.”
- “Hey Google, resume cleaning.” This command will resume the cleaning process after your smart vacuum cleaner has been paused or stopped. You can also use variations of this command, such as “Hey Google, continue cleaning” or “Hey Google, resume the floor cleaner.”
These commands can be very useful if you need to quickly start or stop your smart vacuum cleaner, or if you want to give it specific instructions. By using these voice commands, you can easily control your smart vacuum cleaner without having to manually start or stop it yourself.
Additional Commands
Once you’ve tackled the basic cleaning commands for your smart vacuum cleaner using Google Home, it’s time to explore some of the additional commands that can make cleaning even more convenient.
Below are some additional voice commands you can try with your smart vacuum cleaner:
| Commands | Description |
|---|---|
| “Pause cleaning” | Temporarily pause the current cleaning cycle. |
| “Resume cleaning” | Continue cleaning from where it was paused. |
| “Stop cleaning” | Completely stop the cleaning cycle. |
| “Return to dock” | Send the vacuum cleaner back to its charging dock. |
| “Battery level” | Check the current battery level of the vacuum cleaner. |
Using these additional commands, you can easily control the cleaning process without needing to physically interact with the vacuum cleaner. If you need to pause or stop cleaning for any reason, simply use these commands and your vacuum cleaner will respond accordingly.
Checking the battery level of your vacuum cleaner is important to ensure it has enough charge to complete a cleaning cycle. With the “battery level” command, you can receive an update on your vacuum cleaner’s battery and plan accordingly.
Incorporating these additional voice commands into your cleaning routine can add even more convenience and ease to the process.
Automation Using Google Home and Your Smart Vacuum Cleaner
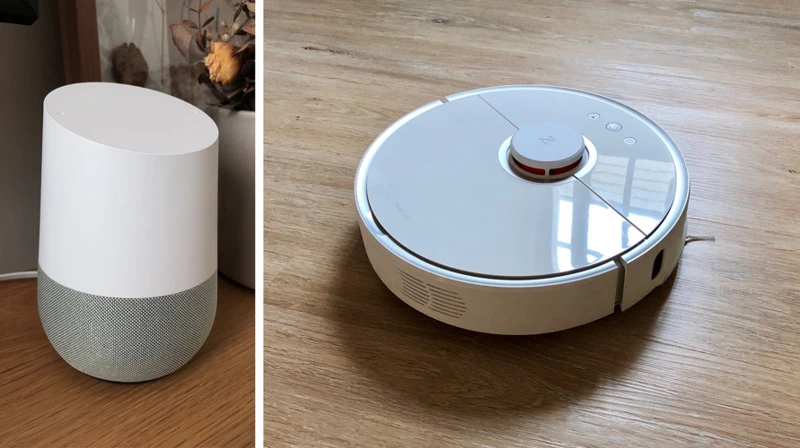
Now that you’ve successfully connected your Google Home with your smart vacuum cleaner, it’s time to take automation to the next level. With the use of routines and scheduling, you can easily ensure that your home stays clean without lifting a finger. Let’s explore how you can automate your cleaning process with the help of Google Home and your smart vacuum cleaner.
Creating Routines
Creating routines with your smart vacuum cleaner and Google Home is a great way to streamline your cleaning experience. With routines, you can control multiple devices with a single command. Here are the steps to create a routine:
- Open the Google Home app: Make sure your Google Home and smart vacuum cleaner are connected to the app and select the “Routines” tab.
- Select “Manage routines”: Here you’ll see existing routines and the option to create a new routine.
- Choose a trigger: The trigger is what initiates the routine. You can choose from preset options such as “Hey Google, good morning” or create a custom command.
- Add actions: This is where you can add commands for your smart vacuum cleaner. Choose “Add action”, select your smart vacuum cleaner and choose the desired action, such as “Start cleaning”.
- Save your routine: Give your routine a name and tap “Save”. Now, when you say your trigger phrase, your smart vacuum cleaner will start cleaning.
Keep in mind that you can add multiple actions to your routine, such as turning off lights or adjusting your thermostat. This makes creating a routine a great way to automate tasks and make your day-to-day life easier.
If you want to make changes or delete a routine, simply select “Manage routines” and choose the routine you want to edit. This will take you back to the routine set up screen, where you can make any necessary changes.
Happy cleaning!
Scheduling Cleaning Times
One of the advantages of having a smart vacuum cleaner is the ability to schedule cleaning times. With Google Home, you can set up a routine that will automatically turn on your vacuum cleaner at a specific time and day. Here’s how to schedule cleaning times for your smart vacuum cleaner.
Step 1: Open the Google Home app
Open the Google Home app on your mobile device and select the device you want to schedule.
Step 2: Access the device settings
Tap the gear icon in the top-right corner to access the device settings.
Step 3: Tap “More settings”
Scroll to the bottom of the settings page and tap “More settings.”
Step 4: Tap “Scheduled.”
Under the “Device Information” section, tap “Scheduled.”
Step 5: Select the day and time
Tap the plus button in the bottom-right corner and select the day and time you want your vacuum cleaner to start cleaning. You can schedule multiple times for each day of the week.
Here’s a table summarizing the steps for scheduling cleaning times for your smart vacuum cleaner:
| Step | Action |
|---|---|
| 1 | Open the Google Home app |
| 2 | Access the device settings |
| 3 | Tap “More settings” |
| 4 | Tap “Scheduled” |
| 5 | Select the day and time |
Once you’ve scheduled your cleaning times, your smart vacuum cleaner will automatically start cleaning at the specified time. You can also use voice commands to start cleaning outside of the scheduled times.
Troubleshooting
Dealing with unexpected issues when using your smart vacuum cleaner with Google Home can be frustrating. However, it’s important to keep in mind that troubleshooting is a common part of technology use. By following a few straightforward steps, you can solve many common issues that arise. In this section, we will explore some of the most frequent problems that users encounter while controlling their smart vacuum cleaner with Google Home, and provide solutions to get your devices working smoothly again.
Common Issues
It’s not uncommon to encounter issues when setting up and using smart home devices, and smart vacuum cleaners are no exception. Here are some common issues that you may run into and how to address them:
| Issue | Possible Solution |
|---|---|
| The vacuum doesn’t respond to voice commands | Ensure that your vacuum is connected to Wi-Fi and linked to your Google Home account. Make sure that the microphone on your Google Home device is not muted and that you’re speaking clearly and using the correct command. |
| The vacuum is not cleaning properly | Check the vacuum’s cleaning preferences in the accompanying app to make sure that it’s set to clean the way that you want it to. Also, make sure that the vacuum’s sensors and brushes are clean and free from obstructions. |
| The vacuum is not charging | Make sure that the charging dock is properly plugged in and that the contacts on the vacuum and dock are clean. Try moving the dock to a different location or resetting the vacuum. |
| The vacuum gets stuck or lost | Remove any obstacles or cords that may be obstructing the vacuum’s path, and ensure that the cleaning area is well-lit and not too cluttered. If the vacuum is still having trouble, you may need to reset it or adjust its cleaning preferences. |
It’s important to keep in mind that smart home devices are still relatively new and can sometimes have glitches or other issues. Fortunately, most problems can be solved by troubleshooting or adjusting settings. If you’re having trouble with your smart vacuum cleaner or any other smart home device, consult the user manual or reach out to customer support for further assistance.
Resetting Your Devices
When dealing with technology, sometimes things don’t always go as planned. If you’re experiencing issues with your smart vacuum cleaner or Google Home, resetting your devices can often solve the problem. Here are the steps to reset your devices:
- Unplug your smart vacuum cleaner and Google Home from the power source.
- Wait for at least 30 seconds before plugging them back in. This ensures that both devices have completely shut down before restarting.
- After plugging them back in, wait for the devices to fully power up and reconnect to your Wi-Fi network. This may take a few minutes.
- If your smart vacuum cleaner requires a factory reset, refer to the manufacturer’s instructions for the specific model. This may involve pressing and holding certain buttons on the device while powering it on.
- Once your devices have been reset, try linking them again and testing the voice commands. If the issue persists, refer to the manufacturer’s troubleshooting guide or contact their customer support.
It’s important to note that resetting your devices should only be done as a last resort, after trying other troubleshooting steps. Make sure to back up any important settings or data before resetting, as it will erase all current settings and data. By following these steps, you can hopefully get your smart vacuum cleaner and Google Home back up and running smoothly.
Conclusion
After following the steps outlined in this guide, you should now be able to control your smart vacuum cleaner with your Google Home device. The convenience of being able to command your vacuum with just your voice cannot be overstated. It frees up your hands to do other tasks while your floors are being cleaned, and it saves you time in the process.
Creating routines and scheduling cleaning times adds another level of automation, making your cleaning tasks even more efficient. You can sit back and relax while your smart vacuum takes care of the dirty work.
In the event that you encounter any issues with connecting your devices or using voice commands, refer to the troubleshooting section. And remember, resetting your devices can often solve common problems.
Controlling your smart vacuum cleaner with Google Home is just one of the many ways that technology can make our lives easier. Embrace the convenience and use this newfound free time to do something else you enjoy!
Frequently Asked Questions
1. Can I control my non-smart vacuum cleaner with Google Home?
No, Google Home is designed to control smart vacuum cleaners that are compatible with it.
2. What should I do if my Google Home doesn’t recognize my smart vacuum cleaner?
Make sure your smart vacuum cleaner is compatible with Google Home and that both devices are connected to the same Wi-Fi network. If the issue persists, try resetting both devices.
3. Can I use Google Home to pause or resume cleaning?
Yes, you can use voice commands to pause or resume cleaning as well as to start or stop cleaning.
4. Can I create cleaning schedules using Google Home?
Yes, you can use Google Home to schedule cleaning times for your smart vacuum cleaner.
5. Does my smart vacuum cleaner need to be charging to use Google Home?
No, as long as your smart vacuum cleaner is connected to the Wi-Fi network, you can control it with Google Home.
6. Can I create a routine that starts my smart vacuum cleaner when I leave the house?
Yes, you can create a routine that starts your smart vacuum cleaner when you leave the house or at a set time.
7. Can I change the cleaning settings with Google Home?
Yes, you can use voice commands to adjust the cleaning settings of your smart vacuum cleaner such as suction power, cleaning mode, and cleaning speed.
8. Does my smart vacuum cleaner need to have a mapping feature to use Google Home?
No, mapping features are not required to use Google Home with a smart vacuum cleaner.
9. Can I use Google Home to find my lost smart vacuum cleaner?
No, as of now Google Home does not have a feature to locate lost devices.
10. Can I use Google Home to control multiple smart vacuum cleaners in my home?
Yes, you can link multiple smart vacuum cleaners to Google Home and control them with voice commands. Just make sure to give them unique names to avoid confusion.
