Essential Tips to Maintain Your Smart Vacuum Cleaner
Warning: A non-numeric value encountered in /var/www/html/wp-content/themes/generatepress/inc/structure/post-meta.php on line 165
by Dwight Gibson
You invested in a smart vacuum cleaner to help keep your floors tidy, but have you noticed a decline in its performance lately? No need to panic! It is common for these devices to lose their efficiency over time, especially if they are not properly maintained. In this article, we will provide you with tips and tricks to keep your smart vacuum cleaner in top shape. From regular cleaning to scheduling cleaning times, and even mastering the app features, we have got you covered. Keep reading to learn how to get the most out of your device and keep your floors clean with ease.
Table of Contents
Tip #1: Keep Your Robot Vacuum Clean
Keeping your robot vacuum in top performance takes more than just pressing the “clean” button. Although robot vacuums are designed to make our lives easier, they still require some maintenance to work efficiently. Neglecting this maintenance can cause damage to your device and affect its lifespan. That’s why it’s essential to keep your smart vacuum clean, which includes regular dustbin and brush roll cleaning, clearing obstacles, and cleaning the sensors and charging contacts. In this section, we’ll provide you with practical tips on how to maintain a clean robot vacuum and explain the importance of it. For more in-depth smart vacuum maintenance tips, you can check out our Smart Vacuum Maintenance Guide.
Regularly Empty the Dustbin and Clean the Brush Roll
One of the most important things you can do to keep your smart vacuum cleaner running smoothly is to regularly empty the dustbin and clean the brush roll. Over time, debris and hair can build up in these areas, which can impact the vacuum’s performance.
Emptying the dustbin: When the dustbin is full, it affects the suction power of the vacuum. Emptying the bin regularly ensures that the vacuum will continue to operate at its optimal level. Depending on the size of the dustbin and the amount of debris in your home, you may need to empty it multiple times per week. Remove the dustbin from the vacuum, dump out the contents into the trash, and use a clean cloth to wipe it out.
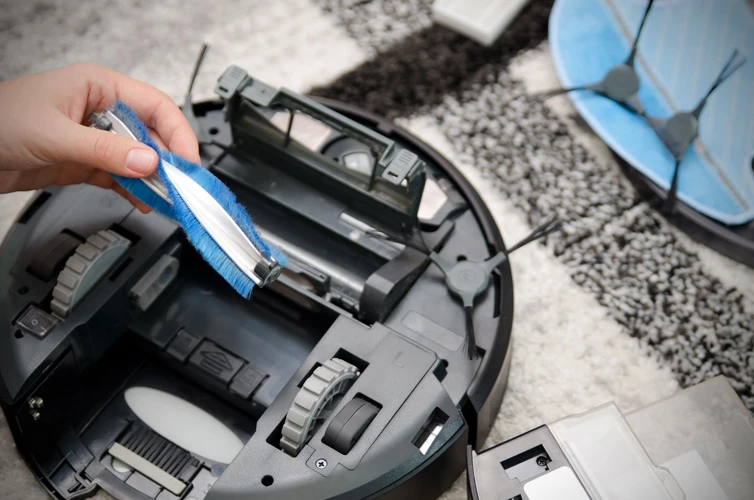
Cleaning the brush roll: The brush roll is responsible for picking up debris and hair from your floors. If it gets clogged or tangled, it can affect the vacuum’s ability to do its job. To clean the brush roll, remove it from the vacuum and cut away any hair or debris that is wrapped around it. You can also use scissors to cut away any stubborn tangles. Once the brush roll is clean, make sure to reattach it securely.
Step
Frequency
Empty the dustbin
After each use, or when full
Clean the brush roll
Once a week
Regularly emptying the dustbin and cleaning the brush roll will not only help keep your vacuum running smoothly, but also extend the vacuum’s lifespan. In addition to these maintenance tasks, there are other steps you can take to ensure your smart vacuum cleaner stays in top performance. For more information on smart vacuum maintenance, check out our smart vacuum maintenance guide.
Clean the Sensors and Charging Contacts
To keep your smart vacuum running at peak performance, it’s important to clean the sensors and charging contacts. Sensors are crucial components that help the vacuum navigate around obstacles and map out your home for efficient cleaning. Meanwhile, charging contacts ensure that the vacuum is getting the power it needs to perform its duties.
Over time, dust and debris can build up on these sensors and charging contacts, which can lead to performance issues. To clean them, start by powering off the vacuum and unplugging it from the charging dock. Then, use a soft, dry cloth to gently wipe down the sensors and charging contacts. Avoid using any harsh chemicals or abrasive materials, as these can damage the components.
It’s also a good idea to check the sensors and charging contacts periodically to make sure they’re free of debris. By doing this, you can help prevent potential issues with your smart vacuum and keep it running smoothly for years to come.
One important tip for keeping your smart vacuum cleaner in top performance is to clear any obstacles from its path. Cleaning a floor full of toys or other objects can damage your vacuum cleaner’s brushes or sensors. To avoid this, try to keep the floor clear of debris or small objects that the robot could pick up.
To help you keep your floors safe for your robot vacuum, we’ve compiled a table of some common obstacles and how to deal with them.
Obstacle
Solution
Cords or cables
Keep cords and cables off the floor or secure them against a wall to prevent tangling or damage.
Small toys or objects
Pick up toys and small objects before cleaning or use a boundary marker to prevent your robot from entering the area.
Furniture legs or low tables
Use a boundary marker to prevent your robot from getting stuck under furniture or hitting table legs.
Rugs or carpets
Secure loose rugs or carpets with a non-slip backing to prevent your robot from getting stuck or damaging the fabric.
By identifying and removing these kinds of obstacles from your robot vacuum’s path, you can help prevent any damage to the vacuum and maintain its top performance.
Tip #2: Properly Place the Charging Dock
When it comes to keeping your smart vacuum cleaner running optimally, there are many factors at play. One of the most critical aspects is the placement of the charging dock. It may seem like a minor detail, but where you place the dock can have a significant impact on the performance of your device. In this section, we will explore some essential factors to keep in mind when placing your robot vacuum charging dock to ensure it functions correctly.
Make Sure it has Enough Space Around it
When placing the charging dock for your smart vacuum cleaner, it’s important to ensure that there is adequate space around it, so that the vacuum can easily find its way back to the dock without getting stuck or caught on anything. Insufficient space can cause the vacuum to miss the dock, which can result in incomplete charging, leading to a shorter run time, and the need for more frequent charging.
To avoid this issue, you should place the dock in an open area without any obstructions. This can be achieved by moving furniture or clearing an area in the room where the vacuum will operate. It’s important to consider the size of your vacuum and its path to the charging dock when deciding on an appropriate location.
Using an html table can help visualize the necessary space requirements based on the size of your vacuum. For instance, a large vacuum cleaner would require a minimum of 3 feet of clear space in front of the dock and 2 feet on either side. On the other hand, a small vacuum cleaner would only need 2 feet of clear space in front and 1.5 feet on either side.
It’s also important to keep in mind any obstacles that may exist in the room, such as furniture or walls. You should allow enough space around the charging dock to ensure that the vacuum can safely navigate around such obstacles.
By providing adequate space around the charging dock, you can ensure that your smart vacuum cleaner will be able to find its way back to the dock easily, recharge fully, and perform at its best.
Place it on a Level Surface
It is crucial to place your smart vacuum cleaner charging dock on a level surface to ensure that it functions properly. A slight tilt or uneven surface can cause the robot vacuum to have difficulty docking and charging.
Why is a level surface important?
When the charging dock is placed on an uneven surface, it can cause the robot vacuum to wobble or tip over. This can lead to an issue with docking, and the robot vacuum may not be able to connect to the charging contacts. This, in turn, can cause the battery to drain more quickly or prevent the robot vacuum from charging, disrupting the cleaning schedule.
How to ensure level placement?
Here are some tips to help you ensure level placement for your smart vacuum cleaner:
Tips
Description
Use a Bubble Level
A bubble level can help you identify whether the surface is level or not. Place the bubble level on the charging dock and adjust it until the bubble is in the center of the level.
Check with a Flat Object
If you don’t have a bubble level, you can place a flat object on the surface next to the charging dock. If the object appears level, you can safely place the charging dock.
Adjust the Surface
If the surface is not level, you can use shims or other materials to adjust it. It’s important not to stack too many shims underneath, as this can cause the dock to become unstable.
By ensuring that the charging dock is placed on a level surface, you will not only ensure optimal performance of your robot vacuum but also extend the lifetime of the battery.
Keep it Away from Direct Sunlight or Drafts
Proper placement of the charging dock is important to keep your smart vacuum cleaner running smoothly. One thing you should keep in mind is to avoid exposing it to direct sunlight or drafts, as this can affect its performance. Here are some additional tips:
Find a shaded area: Look for a spot where your charging dock won’t be hit by direct sunlight. Avoid placing it in front of a window or door that is frequently opened.
Keep it away from vents: Ensure that your charging dock is not placed near an air conditioning vent, heater or any other appliance that produces drafts. This will avoid any disturbances in the robot vacuum’s environment that would interrupt its charging process.
Ensure proper ventilation: While you should avoid placing the charging dock near vents, you still need to ensure that there is enough air circulation in the area to prevent the dock from overheating. You can achieve this by placing the dock in a location with some surface area around it, so it can dissipate any heat it generates.
By following these tips, you can ensure that your charging dock is in an optimal location to protect it from any environmental factors that could affect its performance and longevity.
Tip #3: Schedule Cleaning Times
Are you tired of constantly having to remember to turn on your smart vacuum cleaner and adjust its settings? Do you wish there was a way to automate the cleaning process? Well, the good news is that there is! By scheduling cleaning times for your smart vacuum cleaner, you can ensure that it cleans your floors as often as you need it to, without any extra effort on your part. In this section, we’ll discuss some tips and tricks for scheduling your smart vacuum cleaner’s cleaning times to maximize its efficiency and ensure your floors always stay clean.
Set it to Clean Frequently Used Areas More Often
One of the great features of a smart vacuum cleaner is the ability to schedule cleaning times. But did you know that you can also schedule it to clean certain areas more frequently than others? This is especially helpful for high-traffic areas or spots that tend to accumulate more dirt and debris.
Table: How to Set Custom Cleaning Schedules
Step
Action
1
Open the app and go to the scheduling section
2
Select the area you want to clean more frequently
3
Choose the frequency (e.g. daily, every other day, etc.)
4
Select the time(s) of day you want the vacuum to clean that area
5
Save your custom cleaning schedule
By setting up custom cleaning schedules, you can ensure that your smart vacuum cleaner is tackling the areas that need it the most, while also preserving its battery life by not running unnecessarily. This is also a great way to maintain the cleanliness of frequently used areas, such as the kitchen or living room, without constantly having to manually clean them yourself.
Keep in mind that different models of smart vacuums may have slightly different steps for setting up custom cleaning schedules, so be sure to consult your user manual or the manufacturer’s website for specific instructions.
Scheduling frequent cleanings for high-traffic areas is a simple yet effective way to keep your smart vacuum cleaner in top performance and maintain a cleaner home.
Schedule it to Clean When You’re Not Home
One of the amazing benefits of having a smart vacuum cleaner is the convenience it offers. You don’t have to be present to get your floors cleaned, and it can automatically adhere to your schedule. An important tip to keep your robot vacuum in top performance is to schedule it to clean when you’re not home. This way, you can come home to clean floors without having to worry about the noise.
When scheduling cleaning times for your smart vacuum cleaner, it is essential to factor in your family’s routine. Choose a time when no one is present or when foot traffic is minimal. You don’t want to interrupt your daily activities with the noise generated by the robot vacuum.
Another point to consider when scheduling your robot vacuum’s cleaning times is the size of your home. If your home is large, you may need to schedule it to clean different areas at different times. This way, it can clean the whole house in bits without interfering with your day-to-day activities.
Lastly, before scheduling the cleaning time, it is important to understand the battery life of your robot vacuum cleaner. Most robot vacuums have a battery life of between 60 and 120 minutes. Ensure that you schedule the cleaning time within this duration to ensure that it completes the cleaning session.
The table below summarizes the key considerations for scheduling your robot vacuum cleanings.
| Consideration | What to Consider |
|————————|———————————————————————————————————————————|
| Family’s routine | Choose a time when no one is present or when foot traffic is minimal. |
| Size of your home | Schedule it to clean different areas at different times, especially if your home is large. |
| Battery life of vacuum | Schedule the cleaning time within the vacuum’s battery life, which varies between 60-120 minutes depending on the model. |
Tip #4: Get Familiar with the App Features
As technology continues to advance, smart home devices have become more common in households around the world. One such device is the smart vacuum cleaner, which uses advanced technology to clean your floors with minimal effort from you. However, to truly get the most out of your smart vacuum cleaner, you must familiarize yourself with its accompanying app features. These features can enhance the cleaning experience and make it more efficient. Let’s explore some of the app features that you should be aware of to optimize your smart vacuum cleaner’s performance.
Learn How to Set Up Virtual Boundaries
Setting up virtual boundaries for your smart vacuum cleaner is a useful feature that allows you to control where it should and shouldn’t go. This can save time and prevent unnecessary clean-up of areas that you don’t want to be cleaned. Here are some steps on how to set up virtual boundaries:
Step 1: First, make sure that your robot vacuum is connected to the app. From there, navigate to the “Virtual Boundaries” section.
Step 2: You will now have the option to create a virtual boundary by drawing a line on the map of your home. Use your finger to draw the line where you want your vacuum to stop cleaning.
Step 3: You can also create a “no-go” zone by selecting an area on the map. This means that your vacuum will not clean that area.
Step 4: Once you have created your virtual boundaries, you can save them and name them for future use.
Step 5: You can also adjust the virtual boundaries as needed. For example, if you want to change the size or shape of a virtual boundary, you can do so easily through the app.
Remember, setting up virtual boundaries may take some trial and error to get just right. But with some practice, you should be able to create effective virtual boundaries that help your smart vacuum cleaner perform at its best while avoiding areas you don’t want it to clean.
Customize the Cleaning Modes and Preferences
When it comes to keeping your smart vacuum cleaner performing at its best, customizing the cleaning modes and preferences can make all the difference. Here are some tips for tweaking the settings to get the best results:
Choose the right cleaning mode: Most smart vacuums have several cleaning modes to choose from, including a spot clean mode, a max power mode, and a quiet mode. Experiment with these settings to see which one works best for your home and cleaning needs.
Adjust the suction power: Depending on the mess, you may need stronger or weaker suction power. You can typically adjust this in the app, so you can find the perfect balance between power and noise.
Select specific cleaning areas: If you have a particularly messy room or area, you can define specific cleaning areas or zones in the app. This ensures the smart vacuum concentrates on where the mess is without having to clean the whole house.
Set up virtual boundaries: You can also use the app to set up virtual boundaries to keep the smart vacuum from cleaning certain areas of your home. This is particularly useful if you have stairs or pets that need to be kept separate from the vacuum.
Program a cleaning schedule: Most smart vacuums allow you to program a cleaning schedule, so you can have it clean automatically at specific times on specific days. You can even set it up to clean more frequently in high-traffic areas of your home.
Customizing the cleaning modes and preferences is an important part of getting the most out of your smart vacuum cleaner. Take the time to explore the app settings and find the perfect balance of settings for your home.
Enable Voice Commands and Integrations with Smart Home Devices
It’s amazing how smart vacuum cleaners have come a long way. Now, with advanced features and integrations, keeping your floors clean has never been easier. One of these features is the ability to enable voice commands and integrations with smart home devices. It’s a great way to make your cleaning tasks even more convenient and efficient.
Voice Commands
One of the highlights of enabling voice commands for your smart vacuum cleaner is the convenience it offers. You no longer have to manually control your device or tinker with its settings using an app or remote control. With voice commands, you can simply speak out the necessary commands, and let the device do the rest. By using voice commands, you can multitask while your vacuum cleaner does its job.
Integrations with Smart Home Devices
Smart home devices like Google Home or Amazon Alexa can integrate with your smart vacuum cleaner, thereby enhancing its functionality. With this integration, you can operate the vacuum cleaner using voice commands through the smart home device of your choice. You can also customize the routine cleaning times and patterns of your vacuum cleaner and get notifications about cleaning progress, and many more.
To ensure that your device supports voice commands and has integrations with smart home devices, check the product description or manual. To set it up, it usually requires an app and setting up the device to connect with your smart home device through the internet.
Here’s a table briefly summarizing the benefits of using voice commands and integrations with smart home devices:
Benefits of Voice Commands and Integrations with Smart Home Devices
Convenience of controlling the device using voice commands
Ability to multitask while the device does its job
Customization of cleaning times and patterns
Notifications of cleaning progress and updates on the app or smart home device
Enabling voice commands and integrations with smart home devices can elevate your smart vacuum cleaner experience. So go ahead and check if your device supports this feature and get ready to have an even better cleaning experience.
Tip #5: Regularly Update the Firmware and Apps
As technology continues to advance, it’s important to keep your smart vacuum up to date. Updating the firmware and apps is essential in ensuring that your vacuum cleaner operates at its best. Regular updates can improve performance and security, fix bugs, and introduce new features.
Updating the firmware typically involves downloading the newest version of the software from the manufacturer’s website and then uploading it to your vacuum cleaner. This process can vary depending on your vacuum model, so it’s important to follow the instructions provided carefully. Some smart vacuums can be updated wirelessly, so you can simply check for updates within the app or on the vacuum’s screen.
Updating the app is usually more straightforward. Simply go to the App Store or Google Play Store and check for updates for the app associated with your vacuum cleaner. If there is an update available, download and install it. Updating the app can ensure compatibility with the latest firmware, introduce new features, and fix any bugs or glitches that may be present.
Be sure to check for firmware and app updates on a regular basis. Depending on the manufacturer, updates may be released every few months or even more frequently.
In addition to improving overall performance, updating the firmware and app can also help to keep your vacuum secure. Newer versions of the software may address security vulnerabilities and protect against potential threats. Keeping your vacuum’s software up to date can also prevent it from becoming outdated too quickly, ensuring that it remains at the forefront of the latest technological advancements.
Don’t neglect the importance of updating your smart vacuum cleaner’s firmware and app. Regularly checking for updates can improve performance, introduce new features, fix bugs or glitches, enhance security, and keep your vacuum up to date with the latest technology. So take a few minutes to update your vacuum today and enjoy a cleaner, smarter home.
Conclusion
After the implementation of the tips and tricks discussed in this article, you can expect your smart vacuum cleaner to perform at its optimal level for a long time. Remember to clean the robot on a regular basis, clear obstacles in its path, and place the charging dock in an optimal location. Additionally, take advantage of the advanced features of your robot cleaner app such as scheduling, customization, and voice commands. Lastly, don’t forget to update your firmware and apps for the best performance.
Investing in a smart vacuum cleaner can save a lot of time and effort in keeping your home clean. By following these tips, you can make sure that you get the most out of your investment. A clean home is an essential part of a healthy and happy lifestyle. With the help of a smart vacuum cleaner, you can make sure that your home stays neat and tidy without having to lift a finger.
In conclusion, owning a smart vacuum cleaner is a game-changer in terms of home cleaning. With regular maintenance and proper utilization of its features, you can keep your smart vacuum cleaner functioning perfectly for years to come. So, take care of your vacuum and enjoy the benefits of a clean home without the hassle of manual cleaning.
Frequently Asked Questions
1. How often should I clean my smart vacuum cleaner?
You should regularly empty the dustbin and clean the brush roll after each use for best performance.
2. Can I use my smart vacuum cleaner on all floor types?
Most smart vacuum cleaners can be used on different floor types, but check the manufacturer’s recommendations to be sure.
3. How do I properly place the charging dock?
Make sure it has enough space around it, place it on a level surface, and keep it away from direct sunlight or drafts.
4. How often should I schedule cleaning times?
It depends on your household traffic and routine, but setting it to clean frequently used areas more often is recommended.
5. Can I program my smart vacuum cleaner to clean when I’m not home?
Yes, most smart vacuum cleaners have scheduling features that allow you to set it to clean when you’re away.
6. What are virtual boundaries?
Virtual boundaries are digital barriers that you can set up through the app to keep the smart vacuum cleaner away from areas you don’t want it to clean.
7. Can I customize the cleaning modes and preferences?
Yes, many smart vacuum cleaners have different cleaning modes and preferences that you can customize to fit your specific cleaning needs.
8. Does my smart vacuum cleaner have voice command integration?
Some smart vacuum cleaners do have voice command integration, but check with the manufacturer to make sure.
9. How do I update the firmware and apps on my smart vacuum cleaner?
Check the manufacturer’s instructions on how to update the firmware and apps on your specific smart vacuum cleaner.
10. How long do the batteries last on a smart vacuum cleaner?
It varies depending on the model, but most have a battery life of 60-90 minutes before needing to recharge.