How to Properly Clean the Dustbin of Your Smart Vacuum Cleaner
Warning: A non-numeric value encountered in /var/www/html/wp-content/themes/generatepress/inc/structure/post-meta.php on line 165
by Dwight Gibson
Picture this: you’re sitting at home, enjoying some downtime while your smart vacuum cleaner diligently cleans the floors. But have you ever stopped to think about how important it is to properly clean your smart vacuum cleaner’s dustbin? Well, it’s not just about aesthetics – a clean dustbin is vital for maintaining the health of your home, the longevity of your vacuum, and ensuring it continues to operate smoothly. So, let’s dive into the details on how to properly clean your smart vacuum cleaner’s dustbin in just a few simple steps.
Table of Contents
Why Clean Your Smart Vacuum Cleaner’s Dustbin?
Cleaning your smart vacuum cleaner’s dustbin may seem like a tedious task, but it is crucial for several reasons. Neglecting to clean your smart vacuum cleaner’s dustbin can result in a buildup of dirt, debris, and other harmful particles that can affect the performance of your device. In this section, we will discuss the importance of keeping your smart vacuum cleaner’s dustbin clean and how it can benefit both you and your device. From removing allergens and germs to extending the lifespan of your smart vacuum cleaner, proper maintenance is key. We will also provide you with a step-by-step guide on how to clean your smart vacuum cleaner’s dustbin effectively. So, let’s dive in and discover the benefits of regular maintenance. If you want to learn more about smart vacuum cleaner maintenance, check out our Smart Vacuum Maintenance Guide for more tips and tricks.
Remove Allergens and Germs
Properly cleaning your smart vacuum cleaner’s dustbin is essential to remove allergens and germs from your home. Over time, dirt, dust, and bacteria can accumulate in the dustbin, which can cause allergies or illness. By regularly cleaning and maintaining your vacuum’s dustbin, you can ensure that it’s picking up all harmful particles while keeping your home cleaner and safer.
Here are some benefits of removing allergens and germs from your smart vacuum cleaner:
Reduces the risk of allergies and illness: Dust, pet dander, and other small particles can easily settle into your home, affecting those who have allergies or respiratory problems. By removing these particles with a clean dustbin, you reduce the chances of inhaling harmful toxins and irritants.
Improves air quality: When your smart vacuum cleaner has a clean dustbin, it can effectively pick up even the smallest particles, leaving your air cleaner and fresher.
Enhances overall cleanliness: A properly cleaned dustbin ensures that your smart vacuum cleaner is performing at its best, sucking up the maximum amount of dirt and debris at every pass. This helps keep your home cleaner and free from harmful irritants.
Increases the lifespan of your vacuum: Regular cleaning and maintenance of your smart vacuum cleaner’s dustbin can help prolong its lifespan while keeping it in good condition. By removing dirt and dust buildup, you help prevent damage to the vacuum’s internal mechanism which can be expensive to repair or replace.
It’s essential to keep your smart vacuum cleaner’s dustbin clean and maintained to ensure the best performance for your machine. Neglecting this step can lead to a host of problems, and you can learn more about smart vacuum cleaning tips and tricks or common smart vacuum mistakes in our other articles. Regular maintenance and cleaning of your smart vacuum cleaner’s dustbin are essential to keeping your vacuum functioning properly and keeping your home clean and healthy.
Keep Your Smart Vacuum Cleaner Running Smoothly
Maintaining a clean dustbin is key to the longevity of your smart vacuum cleaner. Neglecting to clean your vacuum’s dustbin can lead to clogs and reduced suction over time. A dusty, dirty dustbin will also contribute to harder work for the smart vacuum cleaner’s motor, which can shorten the lifespan of the machine.
To keep your smart vacuum cleaner running smoothly, it’s recommended to clean the dustbin after every use. This will only take a couple of minutes, and it will ensure that the performance and suction of the vacuum cleaner remains as strong as possible.
In addition to cleaning the dustbin, it’s important to check the vacuum’s filters and brushes regularly. Filters should be replaced or washed according to the manufacturer’s instructions, which will vary depending on the model of your smart vacuum cleaner.
Regular maintenance and cleaning of your smart vacuum cleaner’s dustbin will help prevent costly repairs and replacements in the future. For more tips on smart vacuum maintenance, check out our comprehensive guide on the best practices for keeping your smart vacuum cleaner in top condition. Additionally, make sure you aren’t making common mistakes when using your smart vacuum cleaner by reading our guide on smart vacuum mistakes to avoid.
Extend the Lifespan of Your Smart Vacuum Cleaner
Properly cleaning your smart vacuum cleaner’s dustbin can considerably extend its lifespan. Here are some reasons why:
If the dustbin is not regularly cleaned, the vacuum cleaner’s suction power can be negatively affected, making it less efficient in picking up dirt and debris. Over time, this can put additional strain on other parts of the vacuum, leading to malfunctions or breakdowns. By keeping the dustbin clean, you can ensure that your vacuum cleaner continues to operate at peak performance.
When dust, debris, and pet hair accumulate in the dustbin, they can cause unpleasant odors to develop. More importantly, they can also trigger allergic reactions, especially for people who suffer from asthma or other respiratory conditions. By removing these potential allergens from the dustbin by cleaning it regularly, you can ensure that your home stays clean and healthy.
The dustbin of a smart vacuum cleaner can also become a breeding ground for germs and bacteria if not cleaned properly. This can pose a health risk not only to people in the household but also to the robot vacuum cleaner itself. Bacteria and germs can accumulate and cause corrosion over time, leading to damage and even failure of the vacuum cleaner. By cleaning the dustbin regularly, you can reduce the risk of bacteria accumulation and extend the life of your smart vacuum cleaner.
Remember that taking care of your smart vacuum cleaner through regular maintenance is important to keep it working well for years to come. If you want to learn more about the importance of smart vacuum maintenance, you can check out our article about it here.
Step-by-Step: How to Properly Clean Your Smart Vacuum Cleaner’s Dustbin
Are you wondering how to properly clean your smart vacuum cleaner’s dustbin? Regular cleaning of the dustbin is vital to keep your smart vacuum cleaner running smoothly and efficiently. Over time, dust, dirt, and other debris accumulate in the dustbin, which can lead to poor suction and even damage to the motor. In this section, we’ll take you through a step-by-step guide on how to properly clean your smart vacuum cleaner’s dustbin, so you can keep it working at peak performance. Don’t forget to check out our article on the importance of smart vacuum maintenance to learn more about how to take care of your cleaning device.
Step 1: Power Off Your Smart Vacuum Cleaner
The first and most important step in cleaning your smart vacuum cleaner’s dustbin is to power off the device. This will ensure that there is no risk of injury while you work on it. In order to turn off your smart vacuum cleaner, locate the power button and press it until the device powers down completely.
It is important to note that you should never attempt to clean your smart vacuum cleaner’s dustbin while the device is still powered on. This can be dangerous and may result in injury to yourself or damage to the device. Always make sure the power is completely off before proceeding with any cleaning.
Once the device is powered off, you can begin the process of cleaning the dustbin. This involves removing the dustbin from the device, emptying the contents, and cleaning the bin itself. By following these steps and regularly maintaining your smart vacuum cleaner, you can keep your device running smoothly and extend its lifespan.
Step 2: Locate the Dustbin
When it comes to cleaning your smart vacuum cleaner’s dustbin, the first step is to locate it. This may sound obvious, but the dustbin can be located in different places depending on the model and brand of your smart vacuum cleaner. But don’t worry, it’s usually not hard to find. Here are some tips to help you locate the dustbin on your smart vacuum cleaner:
Check the user manual: The user manual that came with your smart vacuum cleaner should have a section detailing the location of the dustbin. Check it out if you’re not sure where to look.
Look for a latch: Many smart vacuum cleaners have a latch that you need to release in order to remove the dustbin. Look for a latch near the bottom or rear of the unit.
Check the front of the unit: Some smart vacuum cleaners have the dustbin located at the front of the unit, below the brush roll. Look for a compartment that can be easily accessed.
Inspect the back of the unit: On some models, the dustbin is located at the back of the unit, near the motor. Look for a compartment with a handle or latch.
Once you have located the dustbin, it’s time to move on to the next step of the process – removing it.
Step 3: Remove the Dustbin
Step 3: Removing the Dustbin
To properly clean your Smart Vacuum Cleaner’s dustbin, you will need to remove it from the device. Follow the steps below for easy removal.
Step
Action
1
Locate the release button or latch on your Smart Vacuum Cleaner’s dustbin. Refer to the user manual if you need help finding it.
2
Press down on the release button or move the latch to the side to unlock the dustbin from the device.
3
Gently pull the dustbin out of the Smart Vacuum Cleaner. Be careful not to spill any debris or dust while doing so.
Removing the dustbin is a crucial step in properly cleaning your Smart Vacuum Cleaner’s dustbin. By doing so, you will be able to thoroughly clean and wash it, ensuring that your device is running smoothly and effectively.
Step 4: Empty the Dustbin
After locating and removing the dustbin from your smart vacuum cleaner, it’s time to empty its contents. Follow the steps below to ensure you empty the dustbin correctly:
Step 4.1:
Place the dustbin over a trash can or bag. Be sure to hold it securely.
Step 4.2:
Press the button or release mechanism to open the dustbin. You may need to consult your smart vacuum cleaner manual to find the right button or release mechanism.
Step 4.3:
Turn the dustbin upside down and shake it gently to release any dirt, dust or debris that has accumulated in it.
Step 4.4:
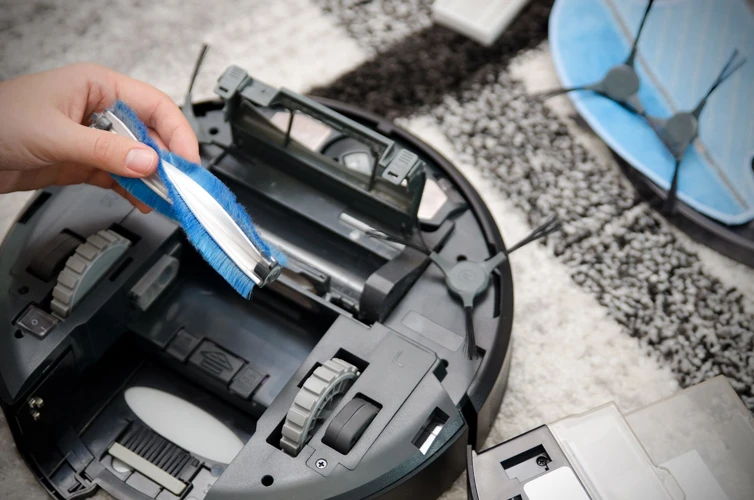
Use a soft bristle brush or a damp cloth to remove any remaining dirt or debris that may be stuck in the dustbin.
Step 4.5:
Inspect the dustbin for any damages or signs of wear and tear. If you see any damage, contact the manufacturer for a replacement part.
Remember to dispose of the dirt and debris in a proper manner, according to your local regulations. Emptying the dustbin regularly will prevent clogging and ensure your smart vacuum cleaner continues to work effectively.
Step 5: Clean the Dustbin
Now that you have emptied the dustbin, it’s time to give it a good clean. Cleaning the dustbin is an important step in maintaining your smart vacuum cleaner and ensuring that it continues to perform at its best. Follow these steps to properly clean your smart vacuum cleaner’s dustbin:
Step 1: Using a soft cloth or brush, remove any remaining debris or dust from the dustbin. Be sure to remove any debris that may be stuck to the sides or bottom of the dustbin.
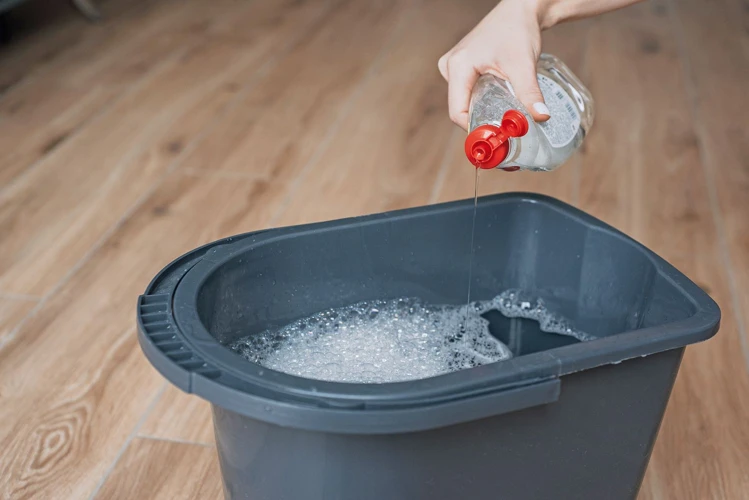
Step 2: Fill a sink with hot water and add a small amount of dish soap. Place the dustbin in the sink and let it soak for a few minutes to help break up any remaining debris.
Step 3: After the dustbin has soaked for a few minutes, use a soft brush or cloth to clean the inside of the dustbin. Be sure to scrub any hard-to-reach areas or crevices in the dustbin to thoroughly clean it.
Step 4: Rinse the dustbin with clean water to remove any soap residue or remaining debris. Make sure to rinse thoroughly to prevent any leftover soap from damaging the vacuum.
Step 5: Dry the dustbin with a soft cloth and let it air dry completely before placing it back into the smart vacuum cleaner. It’s important to make sure that the dustbin is completely dry before using it again to prevent mold or mildew from forming.
By following these steps to clean your smart vacuum cleaner’s dustbin, you can ensure that it operates at its best and continues to pick up dirt and debris efficiently. Don’t forget to clean the dustbin regularly to prevent any build-up that may affect the performance and lifespan of your smart vacuum cleaner.
Step 6: Reattach the Dustbin
After thoroughly cleaning the dustbin of your smart vacuum cleaner, it’s time to reattach it to the device. Reattaching the dustbin is an important step to ensure that your smart vacuum cleaner functions optimally. Here’s a step-by-step guide on how to reattach the dustbin:
Step
Instruction
Step 6.1:
Ensure that the dustbin is clean and free from any debris, dust or dirt.
Step 6.2:
Check the dustbin’s rim for any damage or cracks that may affect its proper operation. If the rim is damaged, it’s advisable to replace the dustbin before reattaching it.
Step 6.3:
Align the dustbin with the vacuum cleaner’s body and push it in until it clicks into place. Ensure that the dustbin is secured properly in position.
Step 6.4:
Check that the dustbin is properly aligned and positioned. A loose or improperly fitted dustbin can lead to poor suction or even damage to the vacuum cleaner.
Step 6.5:
Turn on the power to the vacuum cleaner and let it run for a few minutes to ensure that the dustbin is working correctly. Listen for any unusual noises or vibrations as these can indicate that there may be a problem with the dustbin or the vacuum cleaner.
By following these steps, you can ensure that the dustbin is reattached correctly, and your smart vacuum cleaner will continue to work efficiently. Remember to conduct regular maintenance and cleaning to keep your smart vacuum cleaner in optimum condition.
Tips for Maintaining Your Smart Vacuum Cleaner’s Dustbin
As important as it is to properly clean your smart vacuum cleaner’s dustbin, it’s equally vital to take proper care of it in order to maintain the machine’s performance and longevity. By implementing some basic maintenance tips, you can ensure that your smart vacuum cleaner will continue to function smoothly and efficiently for longer periods of time. In this section, we’ll go over some simple yet effective tips for maintaining your smart vacuum cleaner’s dustbin. So, let’s dive in and learn how to keep your smart vacuum cleaner running like new!
Regular Cleaning
Regular cleaning of your smart vacuum cleaner’s dustbin is crucial to maintaining its efficient operation. It is recommended that you clean the dustbin after every use. Here are a few tips for regular cleaning:
Wipe Down the Dustbin: Use a damp cloth and wipe down the dustbin after emptying it. This will remove any remaining dust or debris and help keep it clean for the next use.
Clean the Filter: If your smart vacuum cleaner has a filter, clean it regularly. Remove the filter, tap it against a hard surface to dislodge any dirt, and rinse it with water. Make sure the filter is completely dry before putting it back in the vacuum.
Check the Dustbin for Damage: Regular cleaning provides an opportunity to check the dustbin for any cracks or other damage. A damaged dustbin can impact the vacuum’s performance or cause it to leak dust and debris, so it’s important to catch any potential issues early.
Empty the Dustbin Completely: After each cleaning, make sure to empty the dustbin completely, and don’t let dirt and debris accumulate. Overfilling the dustbin can cause clogs and damage the vacuum.
By following these tips for regular cleaning, you can help keep your smart vacuum cleaner running smoothly and efficiently for years to come.
Replace Filters Periodically
As you clean your smart vacuum cleaner’s dustbin, it’s important to remember that the filters also need some TLC. Dirty filters reduce your vacuum cleaner’s performance, making it less effective at picking up dirt and debris on your floors. Here’s how to replace filters periodically:
Step 1: Check your smart vacuum cleaner’s user manual to determine which filters need to be replaced and how often. Some vacuum cleaner models have washable filters that need to be cleaned only once a month, while others require regular replacement of disposable filters.
Step 2: Purchase the correct replacement filters for your smart vacuum cleaner. You can find them online, in home improvement stores, or from the manufacturer.
Step 3: Power off your smart vacuum cleaner and locate the filters. Some models have multiple filters, so make sure you know where they are all located.
Step 4: Remove the dirty filters and dispose of them properly. If your filters are washable, follow the instructions in the user manual to properly clean them.
Step 5: Install the new filters according to the instructions in the user manual. Make sure they are securely in place before reattaching the dustbin.
Step 6: Power on your smart vacuum cleaner and run a test to ensure that the new filters work properly.
Tips:
Keep a stock of replacement filters on hand so you’re always prepared when it’s time to replace them.
Wash washable filters with warm water and mild detergent. Allow them to dry completely before reinstalling them.
Disposable filters should be replaced regularly to ensure optimal performance.
Make sure to dispose of old filters properly to avoid spreading dust and allergens.
Replacing your smart vacuum cleaner’s filters periodically is an important step in maintaining the performance and lifespan of your cleaning tool. By following the user manual’s instructions and the tips mentioned above, you can ensure that your vacuum cleaner operates at its best, keeping your floors clean and allergen-free.
Store Smart Vacuum Cleaner in a Dry Place
Keeping your smart vacuum cleaner in a dry place is a crucial step in maintaining its dustbin and maximizing its lifespan. Moisture can damage the internal parts of your vacuum cleaner, leading to malfunction and costly repairs. Here are some tips for storing your smart vacuum cleaner in a dry place:
Choose a Proper Storage Location: Find a storage area that is dry and has good ventilation. Avoid damp basements, humid bathrooms, or other areas that are prone to moisture buildup. Your closet or a covered area in your garage are good options for storing your smart vacuum cleaner.
Keep it Covered: Covering your vacuum cleaner with a dust cover or a cloth can help keep it safe from dust and moisture. Make sure the cloth is clean and dry before placing it over your vacuum cleaner.
Avoid Direct Sunlight: Exposure to sunlight can cause the plastic components of your vacuum cleaner to become brittle and prone to cracking. Avoid storing your vacuum cleaner in direct sunlight, and make sure it is kept in a cool, dry area.
Store Accessories Separately: Storing your vacuum cleaner’s accessories separately can help prevent them from damaging your vacuum cleaner. Make sure to bag or box them properly and store them away from the vacuum cleaner.
By following these easy tips, you can ensure that your smart vacuum cleaner is stored in a dry place, free from moisture and other environmental hazards. Taking these steps to protect your vacuum cleaner can help it last longer and work more efficiently, saving you time and money in the long run.
Conclusion
In conclusion, keeping your smart vacuum cleaner’s dustbin clean is essential to ensure that it is functioning effectively and efficiently. It not only helps to eliminate allergens and germs from your home but also extends the lifespan of your equipment.
To properly clean your smart vacuum cleaner’s dustbin, follow the step-by-step guide, starting with powering off your equipment and locating the dustbin. Then, remove and empty the dustbin, clean it thoroughly with soap and water, and reattach it.
Maintaining your smart vacuum cleaner’s dustbin requires regular cleaning, periodic filter replacements, and proper storage in a dry place. These simple tips will not only keep your equipment functioning at its best, but it will also improve the indoor air quality in your home, making it a safer and healthier place to live.
Take care of your smart vacuum cleaner’s dustbin, and your home will be cleaner and healthier for you and your family. Remember that clean equipment equals a clean home, and it starts with the dustbin.
Frequently Asked Questions
What can happen if you don’t clean your smart vacuum cleaner’s dustbin?
If you don’t clean your smart vacuum cleaner’s dustbin, it can cause poor suction, damage to the vacuum’s motor, and can spread germs and allergens around your home.
How often should you clean your smart vacuum cleaner’s dustbin?
You should clean your smart vacuum cleaner’s dustbin after every use, or at least once a week if you use it frequently.
What should you use to clean your smart vacuum cleaner’s dustbin?
You can use a microfiber cloth, mild soap and water, or specialized cleaning solutions designed for vacuum cleaners.
Can you put your smart vacuum cleaner’s dustbin in the dishwasher?
No, you should never put your smart vacuum cleaner’s dustbin in the dishwasher, as the high heat can damage the plastic or cause the filters to warp or deteriorate.
Can you use harsh chemicals to clean your smart vacuum cleaner’s dustbin?
No, you should avoid using harsh chemicals or bleach to clean your smart vacuum cleaner’s dustbin, as these can damage the plastic and filters.
What happens if you accidentally vacuum up something that shouldn’t be in the dustbin?
If you accidentally vacuum up something that shouldn’t be in the dustbin, turn off the vacuum immediately and carefully remove the object. If the vacuum appears to be damaged or not working correctly, contact the manufacturer for assistance.
Do you need to replace the filters in your smart vacuum cleaner?
Yes, you should replace the filters in your smart vacuum cleaner periodically to ensure proper suction and filtration. Check your vacuum’s manual for specific recommendations and replacement schedules.
Where should you store your smart vacuum cleaner?
You should store your smart vacuum cleaner in a dry, cool place away from direct sunlight and moisture.
What is the best way to maintain your smart vacuum cleaner’s dustbin?
The best way to maintain your smart vacuum cleaner’s dustbin is to keep it clean and empty it regularly, replace the filters periodically, and store it in a dry place.
Can you reuse disposable dustbin bags?
No, disposable dustbin bags should not be reused, as they can tear or become contaminated with germs and allergens.