The Ultimate Smart Vacuum Cleaner Maintenance Guide
Warning: A non-numeric value encountered in /var/www/html/wp-content/themes/generatepress/inc/structure/post-meta.php on line 165
by Dwight Gibson
Table of Contents
Introduction
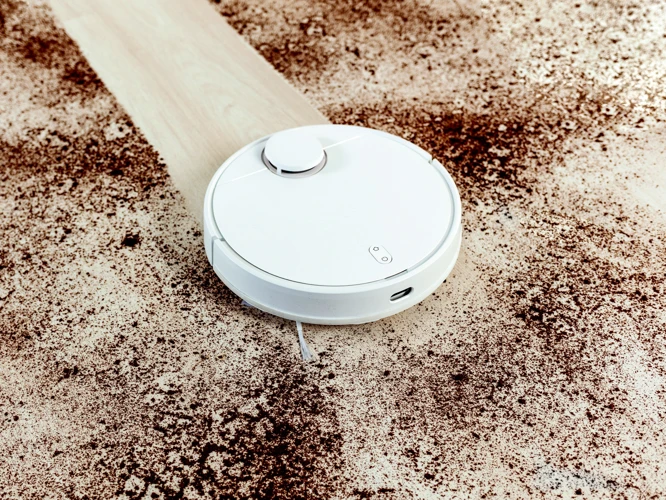
Taking care of your smart vacuum cleaner is essential to keep it running smoothly and performing optimally. However, if you’re unsure where to start or what steps to take, don’t worry! In this section, we’ll guide you through easy-to-follow maintenance tips so you can ensure your smart vacuum cleaner stays in great shape. With regular maintenance, you can maintain its effectiveness in cleaning those dirty floors and carpets, optimize its lifespan, and get the most out of your investment.
Welcome paragraph
Maintaining your smart vacuum cleaner well is crucial if you want to enjoy its optimal performance and increase its lifespan. For those who just bought a smart vacuum cleaner or for those who have been using one for a while, this article provides useful tips and tricks to keep your machine up and running.
Proper maintenance is necessary to keep your smart vacuum cleaner effective in cleaning your floors, carpets, and other surfaces. Neglecting maintenance may cause your device to malfunction, leading to poor cleaning results, and even causing damage to parts such as the motor and sensors.
Before we dive into the cleaning and maintenance tips, let’s take a look at some of the benefits of maintaining your smart vacuum cleaner. Maintaining your vacuum cleaner increases its efficiency, reduces energy costs, and prolongs its lifespan. It also prevents the accumulation of dirt, dust, and debris that can cause allergies and respiratory problems. Regular maintenance can result in cleaner floors, carpets, and surfaces, which is particularly important if you have pets or suffer from allergies.
Choosing the right smart vacuum cleaner is also important if you want to ensure optimal cleaning results. There are many factors to consider such as suction power, battery life, dustbin capacity, and additional features such as Wi-Fi connectivity and mapping technology. Additionally, it’s important to consider the environmental impact of smart vacuum cleaners and choose models that are eco-friendly.
Now that we understand the importance of smart vacuum maintenance, let’s explore some tips and tricks to keep your device performing at its best.
Purpose of article
The purpose of this article is to provide readers with smart vacuum cleaner maintenance tips that will help them keep their device in optimal condition over time. Whether you have just purchased your smart vacuum cleaner or have been using it for months, it is important to know how to properly maintain it so that it continues to work efficiently and effectively. Through a series of step-by-step cleaning and maintenance tips, we will guide you on how to clean various parts of your vacuum cleaner, how to troubleshoot any issues that may arise, and the benefits of regular maintenance. By following these tips, you can ensure that your smart vacuum cleaner continues to provide you with the best cleaning results without any technical issues.
If you’re considering purchasing a smart vacuum cleaner, we recommend reading our article on pros and cons of robot vacuums, as well as our comparison article on handheld vs. stick vacuums to determine which type of vacuum cleaner aligns best with your household’s cleaning needs. If you’re a pet owner, our article on the best smart vacuums for pet hair in 2021 might be interesting to you. Lastly, for insights on the future of smart vacuums and AI-powered vacuums, you can check out our related articles.
We included a section on charging and battery management to ensure that your smart vacuum cleaner stays operational for a long time. By adhering to these charging tips, you can prolong the battery’s lifespan, avoid overcharging, and prevent potential damages to the battery’s circuitry.
This article aims to provide you with a comprehensive guide on how to maintain your smart vacuum cleaner, highlighting the benefits of proper maintenance and the consequences of neglecting the upkeep of your device.
Cleaning and Maintenance Tips
Maintaining your smart vacuum cleaner is crucial to ensure its optimal performance and longevity. Without proper cleaning and maintenance, your vacuum can start to lose suction power, miss spots and even break down. The good news is that maintaining your smart vacuum cleaner is a relatively easy task that you don’t have to do very often. In this section, we’ll give you some valuable tips on how to keep your vacuum cleaner in top condition, from cleaning the dustbin to updating the software. By following these tips, you’ll be able to get the most out of your smart vacuum cleaner for years to come. And if you want to learn more about charging your vacuum, you can check out our article on charging battery management for smart vacuum cleaners.
Clean the Dustbin
One of the key ways to ensure optimal performance of your smart vacuum cleaner is by regularly cleaning its dustbin. A dusty or clogged dustbin can hinder the suction power of the vacuum, hence the need to keep it clean.
To clean the dustbin, follow these steps:
Step 1: Turn off the vacuum cleaner and unplug it from its power source.
Step 2: Locate the dustbin by opening the dustbin cover on the vacuum.
Step 3: Remove the dustbin from the vacuum and empty the contents into a waste bin or trash can.
Step 4: After emptying the dustbin, use a soft-bristled brush to brush away any remaining dust or debris that may be stuck to the inside of the bin.
Step 5: If the dustbin is washable, you can wash it with soap and water and leave it to dry completely before reattaching it to the vacuum cleaner. However, if it’s not washable, wipe it with a dry cloth instead.
Step 6: Once the dustbin is clean and dry, reattach it back to the vacuum cleaner and secure it in place.
By regularly cleaning your vacuum’s dustbin, you will reduce its chances of malfunctioning and ensure it continues to operate at its optimal capacity.
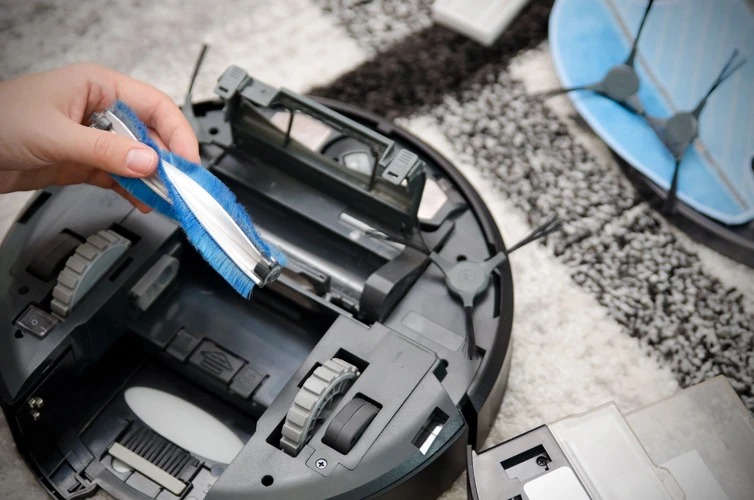
Remove Hair and Debris from the Brush Roll and Wheels
The brush roll and wheels of a smart vacuum cleaner are one of the most important parts that help to effectively clean floors. However, they also tend to be areas where dirt, hair and debris can accumulates easily. It is essential to remove this debris on a regular basis to ensure the vacuum cleaner’s continued optimal performance. Here are some steps to take to remove hair and debris from the brush roll and wheels:
Step 1: Turn off the Vacuum Cleaner – Before starting any cleaning, turn off the vacuum cleaner to avoid any accidents or injury.
Step 2: Remove the Debris from the Wheels – The wheels of the vacuum cleaner tend to gather hair and debris around the edges. Using a dry cloth, gently wipe around the edges of the wheels to remove the debris.
Step 3: Remove the Brush Roll – The brush roll is the main cleaning brush of a vacuum cleaner that sweeps dirt off the floor as it spins. To remove the brush roll, consult the manufacturer’s manual for instructions as this may vary depending on the model.
Step 4: Clean the Brush Roll and its Housing – After removing the brush roll, use a pair of scissors to cut away any hair or other debris that may be entangled in the brush. Clean the brush roll’s housing as well to ensure that all debris is effectively removed.
Step 5: Reassemble the Brush Roll – After cleaning, reassemble the brush roll according to the manufacturer’s instructions.
By following these steps on a regular basis, you can ensure that your smart vacuum cleaner maintains optimal performance, reducing the chances of damage and prolonging its lifespan.
Change the Filter
Smart vacuum cleaners rely on filters to remove dust, hair, and other particles from the air. Over time, vacuum filters can become clogged with dust and debris, reducing the efficiency of the vacuum. It is important to change the filter regularly to ensure optimal performance. Here’s how you can change the filter of your smart vacuum cleaner:
Refer to the User Manual: The user manual should contain instructions on how to change the filter. Refer to this document before attempting to change the filter on your own.
Identify the Filter: Locate the filter compartment on your smart vacuum cleaner. Open the compartment and identify the filter.
Remove the Filter: Depending on the type of filter, you may need to twist, snap, or slide it out of the compartment. Follow the instructions in the user manual to avoid damaging the filter or the vacuum.
Dispose of the Old Filter: Once you have removed the old filter, dispose of it properly. Some filters can be recycled, while others need to be thrown away. Check with your local waste management facility to find out how to properly dispose of the filter.
Install the New Filter: Take the new filter out of its packaging and install it in the filter compartment. Make sure it is securely in place before closing the compartment.
Reset the Filter Indicator: Some smart vacuum cleaners have filter indicator lights that notify you when it’s time to change the filter. After installing a new filter, reset the indicator light according to the instructions in the user manual.
Changing the filter is an important step in smart vacuum cleaner maintenance. A dirty filter can cause the vacuum to lose suction power and become less efficient at removing dirt and debris. By changing the filter regularly, you can ensure that your smart vacuum cleaner will continue to operate at optimal performance.
Clean the Sensors and Camera
– To ensure your smart vacuum cleaner functions properly and is able to navigate your home as efficiently as possible, it’s important to clean the sensors and camera regularly.
– The sensors and camera are responsible for detecting obstacles and mapping out the areas of your home that the vacuum cleaner needs to clean.
– Over time, dust and dirt can accumulate on the sensors and camera, which can interfere with their ability to function correctly.
– To clean the sensors and camera, follow these simple steps:
1. Turn off the vacuum cleaner: Before cleaning any part of the vacuum cleaner, make sure it’s turned off and unplugged from the power supply.
2. Locate the sensors and camera: Depending on the model of your vacuum cleaner, the sensors and camera may be located on different parts of the unit. Refer to the user manual to find where they are located.
3. Wipe with a clean, dry cloth: Gently wipe the sensors and camera with a soft, dry cloth or microfiber cloth to remove any dust or dirt that has accumulated on them. Avoid using water or any cleaning agents as this can damage the sensors and camera.
4. Check for any damage: While cleaning the sensors and camera, check for any signs of damage such as cracks or scratches. If you notice any damage, contact the manufacturer or customer support for assistance.
5. Reassemble the vacuum cleaner: Once you’ve cleaned the sensors and camera, reassemble the vacuum cleaner and turn it back on. Run a cleaning cycle to ensure everything is functioning correctly.
– By taking the time to clean the sensors and camera, you’ll ensure your smart vacuum cleaner is able to navigate your home effectively, which will ultimately improve its cleaning performance. Additionally, regular maintenance helps prolong the life of the vacuum cleaner and save you money in the long run.
Check and Tighten the Vacuum Screws
It’s important to regularly check and tighten the screws on your smart vacuum cleaner to ensure optimal performance. Over time, vibrations and movements can loosen the screws, causing the vacuum to become less effective at cleaning. Follow these simple steps to check and tighten the vacuum screws:
Step 1: Locate the screws on your smart vacuum cleaner. These may be located on the brush roll, side panel, or other areas of the vacuum.
Step 2: Using a screwdriver, gently tighten any loose screws you find. Be careful not to over-tighten or strip the screws, as this can cause damage to the vacuum.
Step 3: After tightening the screws, turn the vacuum on and test it to ensure it is working properly. If you notice any strange noises or vibrations, check the screws again to make sure they are all tightened properly.
Regularly checking and tightening the vacuum screws is a simple task that can help extend the life of your smart vacuum cleaner and ensure it is functioning at its best. By taking the time to perform this maintenance step, you can enjoy a cleaner home with less effort.
Update the Software Regularly
Ensuring that your smart vacuum cleaner’s software is up-to-date is crucial for maintaining optimal performance. Manufacturers often release software updates to fix bugs, enhance features, and improve the device’s overall functionality. These updates can help your vacuum cleaner perform better and even extend its lifespan.
Why should you update the software regularly?
Updating the software of your smart vacuum cleaner regularly provides several benefits, including:
Benefits of Software Updates
Improves performance and functionality
Fixes bugs and solves issues
Enhances efficiency and cleaning results
Increases lifespan of the vacuum cleaner
How to update the software
Updating the software of your smart vacuum cleaner is a simple process that can be done in a few easy steps:
Make sure that your vacuum cleaner is connected to the internet and has a strong Wi-Fi signal.
Open the mobile app that controls your vacuum cleaner.
Go to the settings menu and look for the “Software Update” option.
Click on “Software Update” and wait for the app to connect with the manufacturer’s server.
If there is an available update, click on “Update” and wait for the process to complete.
When to update the software
It is essential to regularly check for software updates and install them to ensure optimal performance. Check for updates at least once every few months or whenever you notice any issues or bugs in the app’s functionality.
Keeping your smart vacuum cleaner’s software up-to-date is vital for ensuring efficient and effective cleaning. Make sure to update it regularly to reap the benefits of improved performance, functionality, and longevity.
Charge the Battery Appropriately
To ensure optimal performance of your smart vacuum cleaner, it’s important to charge the battery appropriately. Here are some tips:
Read the manual: Before charging your vacuum battery, make sure to read the user manual to understand the charging requirements for your particular model.
Avoid overcharging: Overcharging your vacuum battery can damage the battery and reduce its lifespan. Make sure to unplug your vacuum as soon as it’s fully charged.
Charge in a well-ventilated area: Charging your vacuum in a well-ventilated area can prevent overheating and improve battery performance.
Charge before use: It’s best to charge your vacuum battery before using it, rather than after. This ensures that the battery is fully charged and ready to go.
Don’t let the battery die completely: While some batteries need to be completely drained before charging, this is not the case for smart vacuum cleaners. It’s better to charge the battery before it’s completely dead to avoid damaging the battery.
By following these simple tips, you can ensure that your smart vacuum cleaner’s battery lasts longer and performs at its best. Remember to always check the user manual for specific charging requirements for your particular model.
Store the Vacuum Cleaner Appropriately
Proper storage of your smart vacuum cleaner can significantly increase its lifespan and ensure optimal performance. Here are some tips on how to store your vacuum cleaner correctly:
Empty the Dustbin: Before storing your vacuum cleaner, ensure that the dustbin is empty. Leaving debris in the dustbin can cause odor and might damage the dustbin over time.
Clean the Vacuum Cleaner: Thoroughly clean the vacuum cleaner to ensure that no dust or debris remains on the machine’s surface. Wipe down the exterior of the vacuum cleaner with a damp cloth and let it dry completely before storing it.
Disconnect the Battery: If your vacuum cleaner has a removable battery, disconnect it from the machine before storing it. This can prevent battery degradation and also save energy.
Store in a Dry Place: It’s crucial to store your vacuum cleaner in a dry and cool place. Keep it away from moisture or any direct source of heat or sunlight.
Store in an Upright Position: When not in use, store your smart vacuum cleaner upright to prevent any damage or deformation to the wheels, brushes, and sensors. This can also save storage space and prevent any accidents.
Protect the Vacuum Cleaner: Use a storage bag or cover to protect your vacuum cleaner against dust, dirt, and any potential scratches or damages.
By following these simple tips, you can ensure that your smart vacuum cleaner remains in excellent condition during its off-time and prolongs its efficiency for years to come.
Troubleshooting Tips
Sometimes, even with the best maintenance practices, unexpected issues can arise with your smart vacuum cleaner. If you’re experiencing problems with your device, don’t panic just yet. With a few troubleshooting tricks up your sleeve, you can quickly diagnose and fix the issue. In this section, we’ve compiled some helpful tips for resolving common issues that smart vacuum cleaners can encounter. From connectivity problems to system malfunctions, we’ll guide you through the steps to get your vacuum cleaner back up and running smoothly.
Check the Wi-Fi Connection
Checking the Wi-Fi connection is crucial in ensuring optimal performance of your smart vacuum cleaner. Without a stable connection, the vacuum may not work properly or at all. To check the Wi-Fi connection, follow these steps:
Step
Action
Step 1:
Make sure your phone or tablet is connected to the same Wi-Fi network as your smart vacuum cleaner.
Step 2:
Open the app that controls your smart vacuum cleaner.
Step 3:
Check the connection status in the app. If it says “disconnected,” try resetting your Wi-Fi router and/or your smart vacuum cleaner.
Step 4:
If resetting doesn’t work, try moving your Wi-Fi router closer to your smart vacuum cleaner or vice versa. You can also try using a Wi-Fi extender to boost the signal in the area.
Step 5:
If none of these solutions work, contact your Wi-Fi provider or the customer support for your smart vacuum cleaner.
Always make sure that your Wi-Fi connection is stable before using your smart vacuum cleaner. This will ensure that it can perform its functions optimally and without any interruptions.
Reset the Vacuum Cleaner
If you’re experiencing problems with your smart vacuum cleaner, resetting it may help resolve the issue. Resetting the vacuum cleaner to its factory settings can erase any persistent software or connectivity issues that may be causing problems. Here’s how to reset your smart vacuum cleaner:
Step 1:
Locate the reset button on your vacuum cleaner. The location of the reset button may vary depending on the model of your vacuum cleaner. Consult your user manual to find the reset button.
Step 2:
Press and hold the reset button for about 10 seconds. You may hear a beep or see lights flashing on your vacuum cleaner, indicating that the reset process has started.
Step 3:
Release the reset button once the reset process is complete. The vacuum cleaner will restart and return to its default factory settings.
It’s important to note that resetting your vacuum cleaner will erase any customized settings you may have created, such as schedules or cleaning maps. Before resetting, make sure to back up any important settings or data. If your vacuum cleaner still isn’t functioning properly after resetting, it may be time to contact customer support for further assistance.
Repair or Replace Damaged Parts
As much as we want our smart vacuum cleaner to operate flawlessly over time, there may come a point where it encounters a problem, such as a damaged part. It’s important to handle these situations appropriately to avoid further damage and ensure optimal performance. Here are some steps to take when faced with a damaged vacuum part:
First, determine the severity of the damage. If it is minor, such as a scratch on the case or a loose screw, it may be easily fixable. However, if the damage is significant, it may require a replacement part. Check the warranty or user manual to see if the damaged part is covered, and if so, follow the proper protocol for getting a replacement from the manufacturer.
If the part is not covered, you may need to purchase it separately or take the vacuum to a repair technician. It’s important to use only genuine parts provided by the manufacturer to ensure compatibility and avoid further damage.
Benefits of Repair and Replacement
Properly repairing or replacing damaged parts can greatly benefit the overall performance of the smart vacuum cleaner. When a part is damaged, it can cause the vacuum to work harder and less efficiently, leading to a shorter lifespan. By replacing the necessary parts, you can restore the vacuum’s optimal performance and extend its life.
Here is a table of some common damaged parts and their recommended solutions:
Part
Recommended Solution
Brush roll
Replace
Motor
Replace or repair by technician
Battery
Replace
Sensors
Replace or clean
Wheels
Replace or clean
Remember, regular maintenance can help prevent damage to vacuum parts in the first place. However, if damage does occur, don’t hesitate to take the necessary steps for repair or replacement. This will not only ensure optimal performance but also extend the life of your smart vacuum cleaner.
Contact Customer Support
If you have tried all the troubleshooting tips and your smart vacuum cleaner is still not working properly, it may be time to contact customer support. Customer support can provide you with expert guidance and help you resolve any issues you may be experiencing with your vacuum cleaner.
It’s important to have all relevant information about your vacuum cleaner available when you contact customer support. This information may include the model and serial number of your vacuum cleaner, any error messages you may be seeing on the display, and a detailed description of the issues you are experiencing.
An easy way to keep track of all this information is to create a table with the following columns:
Information to Provide to Customer Support
Description
Model Number
The model number of your smart vacuum cleaner
Serial Number
The serial number of your smart vacuum cleaner
Error Messages
Any error messages you may be seeing on the display screen
Description of Issues
A detailed description of the issues you are experiencing
Once you have all the necessary information, you can contact customer support either through the manufacturer’s website or by phone. Many manufacturers have a dedicated customer support team that can help you troubleshoot and fix any issues you may be experiencing with your smart vacuum cleaner.
By following these maintenance tips and troubleshooting steps, you can ensure that your smart vacuum cleaner is running at optimal performance for years to come. However, if you ever encounter any issues that you cannot resolve on your own, don’t hesitate to reach out to customer support for assistance.
Benefits of Smart Vacuum Cleaner Maintenance
Keeping your smart vacuum cleaner well-maintained offers a plethora of benefits that make the investment well worth it. First and foremost, it ensures the optimal functioning of your vacuum cleaner, which in turn means that it will perform better, last longer, and need fewer repairs. By following the maintenance tips mentioned above regularly, you can improve the suction power of the vacuum, which will lead to a cleaner and healthier indoor environment.
Maintaining your smart vacuum cleaner is an essential aspect of hygiene. It eliminates the potential for mold, dirt, or dust accumulation in the vacuum cleaner, which can potentially cause infections or allergies. Dust and debris accumulation within your vacuum cleaner can clog the system, which, over time, can cause wear and tear or even result in system breakdowns.
Proper maintenance of your vacuum cleaner can also help you save money in the long run. A well-maintained vacuum requires less energy to operate, which can reduce your electricity bills. By keeping your vacuum in good condition, you will decrease the need for expensive repairs and replacements, saving you money in the long run.
Lastly, a well-maintained vacuum cleaner contributes to a cleaner indoor environment. It is especially important for people with pets, as pet hair and dander can cause allergies or respiratory problems. By regularly cleaning your vacuum cleaner, you can ensure that it is functioning optimally and effectively capturing all the pet hair and dander, leaving your indoor air cleaner.
Investing time and effort into the maintenance of your smart vacuum cleaner will provide you with a variety of benefits that positively impact your health, finances, and the cleanliness of your home. So, make sure to give your smart vacuum cleaner the attention it deserves and enjoy all its benefits.
Conclusion
In conclusion, taking care of your smart vacuum cleaner through proper maintenance and cleaning techniques can greatly improve its performance and extend its lifespan. This not only saves you money in the long run but also ensures that your home is always clean and healthy.
Regularly cleaning the dustbin, brush roll, and wheels of your vacuum cleaner will prevent clogs and keep it running smoothly. Changing the filter and cleaning the sensors and camera will ensure that it is picking up dirt and debris effectively. Tightening screws and updating software will optimize performance, and charging and storing it properly will ensure the battery lasts longer.
In the event of any issues, troubleshooting tips such as checking the Wi-Fi connection, resetting the vacuum cleaner, repairing or replacing damaged parts, or contacting customer support may be necessary.
Overall, the benefits of smart vacuum cleaner maintenance are clear. Keeping your vacuum cleaner in optimal condition not only ensures that it cleans effectively but also saves you money and helps to extend its lifespan. So be sure to follow these cleaning and maintenance tips to make the most out of your investment and keep your home spick and span.
Frequently Asked Questions
1. How often should I clean the dustbin of my smart vacuum cleaner?
It’s recommend to clean the dustbin after every use to prevent dust buildup and ensure optimal performance.
2. Can I wash the dustbin of my smart vacuum cleaner with water?
Yes, you can wash the dustbin with water as long as it’s completely dry before reinserting it into the vacuum cleaner.
3. Why is it important to remove hair and debris from the brush roll and wheels of my smart vacuum cleaner?
Removing hair and debris from the brush roll and wheels ensures that they rotate smoothly and effectively pick up dirt and debris from your floors.
4. How often should I change the filter of my smart vacuum cleaner?
You should change the filter every three to six months depending on usage and manufacturer recommendations.
5. How do I clean the sensors and camera of my smart vacuum cleaner?
You can clean the sensors and camera with a soft, dry cloth. Avoid using water or cleaning solutions.
6. Why is it important to check and tighten the vacuum screws?
Loose screws can cause the smart vacuum cleaner to malfunction or damage its internal components. Checking and tightening screws prevents these issues.
7. How do I update the software of my smart vacuum cleaner?
Check the manufacturer’s website or user manual for instructions on how to update the software of your smart vacuum cleaner.
8. Can I leave my smart vacuum cleaner charging overnight?
It’s best to avoid leaving your vacuum cleaner charging overnight and instead to unplug it once it’s fully charged to avoid battery damage.
9. How should I store my smart vacuum cleaner when not in use?
Store your smart vacuum cleaner in a cool, dry place away from direct sunlight and in a place where it’s less likely to fall or be bumped into.
10. What should I do if my smart vacuum cleaner stops working?
Try troubleshooting tips such as checking the Wi-Fi connection or resetting the vacuum cleaner. If these don’t work, contact customer support for further assistance.