Create Custom IFTTT Applets for Your Smart Vacuum Cleaner
Warning: A non-numeric value encountered in /var/www/html/wp-content/themes/generatepress/inc/structure/post-meta.php on line 165
by Dwight Gibson
Picture this: you’ve just had a long day at work, and all you want to do is relax at home. But as you make your way back, it dawns on you that your place is in serious need of a vacuum cleaning. The thought of manually cleaning your floors seems unbearable, and you wish there was a way to make the process more convenient. Luckily, with the help of IFTTT, you can now control your smart vacuum cleaner with ease. In this article, we’ll discuss how you can create custom applets for your smart vacuum cleaner that’ll make your life easier, so you can spend your time doing the things you love. From turning on your vacuum when your smart lights turn off to scheduling a clean while you’re away, we’ll cover everything you need to know to create the perfect applet for your needs. No more tedious cleaning, it’s time to make your home smarter.
Table of Contents
What is IFTTT?
Are you looking to streamline the cleaning process for your smart vacuum cleaner? One solution is by utilizing the power of IFTTT. If you are not familiar with IFTTT, it is a free online tool that enables you to automate various tasks by creating applets with “if this, then that” logic. By integrating your smart vacuum cleaner with IFTTT, you can create custom applets that can automate your cleaning schedule and heighten your smart home experience. Stay tuned to learn more. For detailed information on how to integrate IFTTT with your smart vacuum cleaner, check out our article on integrate-ifttt-smart-vacuum. If you are already familiar with IFTTT, and looking for ideas on useful applets, check out our article on 5-useful-ifttt-applets-vacuum.
IFTTT and Smart Vacuum Cleaners
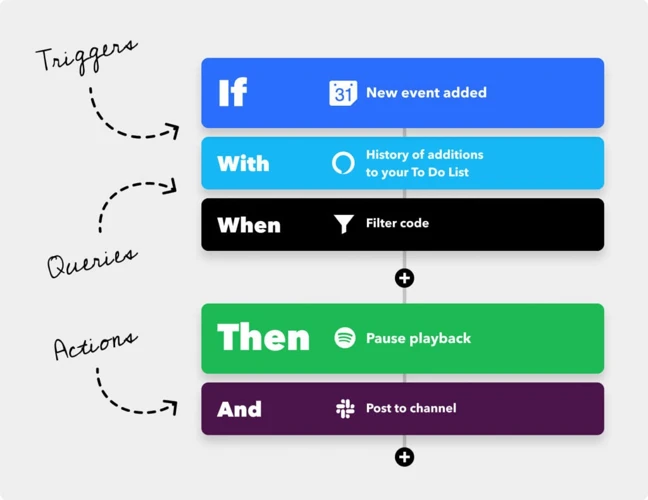
IFTTT (If This Then That) is a free web-based service that allows users to create applets that are triggered by changes that occur within other web services such as Gmail, Instagram, and Amazon Alexa. These applets can then perform specific actions, such as sending notifications, turning appliances on or off, or adjusting the temperature in your home. One popular product that IFTTT is compatible with is smart vacuum cleaners.
Smart vacuum cleaners are robotic devices that can autonomously clean floors and carpets in your home. They are extremely popular among homeowners as they allow people to keep their homes clean without having to do all of the cleaning manually. By integrating these devices with IFTTT, you can create custom applets that will allow you to automate even more tasks around your home.
For example, you can create an applet that will turn on your smart vacuum cleaner when your smart lights turn off. You can also create an applet that will send you a text message when your vacuum finishes cleaning, or you can set your vacuum to start cleaning when you leave home.
The integration of IFTTT with smart vacuum cleaners allows you to make the most out of your device by creating custom applets that suit your needs. However, there are both pros and cons to using IFTTT with smart home devices. Additionally, there are other smart home integrations that you can use to enhance the functionality of your device.
How to Connect Your Smart Vacuum Cleaner with IFTTT
Connecting your smart devices to IFTTT can seem daunting if you’re not particularly tech-savvy, but it’s actually quite simple with the intuitive IFTTT app. IFTTT, which stands for “If This, Then That,” is a platform that allows you to connect your smart devices and create custom applets to automate actions. In this section, we’ll guide you through the process of connecting your smart vacuum cleaner to IFTTT in a few easy steps. So let’s get started!
Step 1: Create an IFTTT account
Creating an IFTTT account is the first step in connecting your smart vacuum cleaner to IFTTT. Follow these steps to create your account:
Click on the Sign Up button located in the top right corner of the page.
3.
You can sign up for IFTTT using your Google, Facebook, or Apple ID. Alternatively, you can sign up using your email and a password. Choose the option that is most convenient for you and follow the prompts to create your account.
4.
Once you have created your account, log in to IFTTT using your new username and password.
Creating an IFTTT account is quick and easy, and it is necessary if you want to connect your smart vacuum cleaner to the IFTTT platform. Once you have your IFTTT account set up, you can move on to the next step of connecting your smart vacuum cleaner to IFTTT.
Step 2: Connect Your Smart Vacuum Cleaner to IFTTT
Connecting your Smart Vacuum Cleaner to IFTTT is an easy process that requires just a few simple steps:
Check if your Vacuum Cleaner is IFTTT-compatible. Some models will require you to install an additional device to enable IFTTT functionality.
Download and open the IFTTT app on your smartphone or tablet, or visit the IFTTT website.
Click on the “Search” icon and type in the name of your Smart Vacuum Cleaner. If it is IFTTT-compatible, it should appear on the list.
Select your Vacuum Cleaner from the search results and click on it to proceed with the connection process.
Follow the instructions provided by IFTTT to connect your Vacuum Cleaner to the platform. You may be prompted to enter your Vacuum Cleaner account details or link it to your IFTTT account.
Once the connection is established, you can start creating custom Applets to automate your Vacuum Cleaner and other devices!
Make sure to check your Vacuum Cleaner’s manual or contact the manufacturer’s customer support for detailed instructions on how to connect it to IFTTT. If you encounter any issues during the process, you can also seek help from the IFTTT community or support team.
Step 3: Create a New Applet
To create a new applet for your smart vacuum cleaner, follow these simple steps:
Step 1
Log in to your IFTTT account.
Step 2
Click on your username and select “Create” from the dropdown menu.
Step 3
Click on “This” and search for the trigger for your applet. For example, if you want your vacuum cleaner to start cleaning when you leave your home, you can choose “Location” as your trigger.
Step 4
Set up the trigger according to your requirements. For example, if you want your vacuum cleaner to start cleaning when you leave your home, set up the location trigger to detect when you leave your home.
Step 5
Click on “That” and search for the action that you want your vacuum cleaner to perform. For example, if you want your vacuum cleaner to start cleaning, you can choose “Start Vacuum” as your action.
Step 6
Set up the action according to your requirements. For example, set up the “Start Vacuum” action by selecting the smart vacuum cleaner that you want to use.
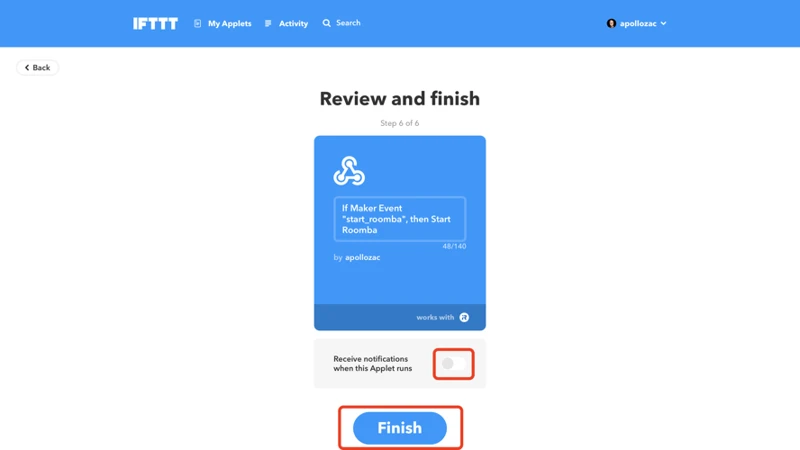
Step 7
Click “Create Action” to finalize and save your applet.
By following these easy-to-follow steps, you can create custom applets for your smart vacuum cleaner and automate your cleaning process. With the help of IFTTT, you can create a variety of applets that can help you make the most of your smart vacuum cleaner and enjoy a cleaner home with minimal effort.
Creating Custom Applets for Your Smart Vacuum Cleaner
Now that you’ve successfully connected your smart vacuum cleaner to IFTTT, you can take advantage of the platform’s endless possibilities by creating custom applets to automate your cleaning routine even further. With just a few simple steps, you can program your smart vacuum to perform specific tasks when certain conditions are met in your home. Let’s explore some creative applet ideas to get the most out of your smart vacuum cleaner.
Applet Ideas:
IFTTT provides endless possibilities for creating custom applets for your smart vacuum cleaner. Here are some applet ideas to inspire you:
Applet Idea
Description
Turn on your vacuum when your smart lights turn off
Program your vacuum cleaner to start cleaning automatically when the smart lights turn off. This is a great way to ensure that your floors are always clean, without you even lifting a finger!
Receive a text message when your vacuum finishes cleaning
If you want to know when your vacuum has finished cleaning, this applet idea is perfect for you. Set up a notification that will send a text message to your phone as soon as the cleaning is complete. That way, you can come home to clean floors without having to check on the vacuum.
Set your vacuum to start cleaning when you leave home
With this applet idea, you can program your vacuum cleaner to start cleaning automatically when you leave home. This way, cleaning can be done while you’re away, and you can come back to a clean home!
Have your vacuum clean on specific days or times
If you want to set specific cleaning schedules for your vacuum, this applet idea will be perfect for you. Program your vacuum cleaner to clean at specific times or on specific days, so that your cleaning routine becomes automated and you don’t forget to clean!
Set your vacuum to stop cleaning when your pet enters the room
If you have pets at home, this applet idea is perfect for you. Set up a motion sensor that detects when your pet enters the room, and have the vacuum cleaner stop cleaning at that point. That way, your pet can move around without causing any interference in the cleaning process!
These are just a few examples of the many applets that you can create for your smart vacuum cleaner using IFTTT. Get creative and try out different combinations to find the ones that work best for you and your cleaning routine. With these custom applets, you can enjoy more efficient, effective cleaning without putting in the extra manual effort!
Turn on your vacuum when your smart lights turn off
Creating an applet to turn on your vacuum when your smart lights turn off is a great way to ensure your floors are always clean. Imagine coming home to a dark house and the knowledge that your floors are taken care of. Here’s how to create this custom applet:
Step 1: Open IFTTT and create a new applet.
Step 2: Choose your trigger. In this case, select your smart lights turning off as the trigger.
Step 3: Select your action. Choose your smart vacuum cleaner as the action and select the “Turn On” option.
Step 4: Test your applet to make sure it works properly.
Now, whenever your smart lights turn off, your vacuum will turn on and start cleaning. This is a great way to ensure your floors are clean without having to remember to turn on your vacuum manually. Plus, with IFTTT and smart home technology, setting up this applet is easy and convenient.
Receive a text message when your vacuum finishes cleaning
Receiving a text message when your vacuum finishes cleaning is a convenient feature that can save you time and let you know when your home is clean. To create this applet, follow these steps:
Step
Action
1
Open your IFTTT app or website and select “My Applets”.
2
Select the “New Applet” button to create a new applet.
3
Click on “this” to create a trigger. In the search box, type “vacuum” and select your smart vacuum cleaner from the list of compatible devices.
4
Select “cleaning finished” as the trigger to activate the applet.
5
Click on “that” to create the action. In the search box, type “text” and select “Send me an SMS”.
6
Enter the phone number where you want to receive the text message and customize the message to indicate that your vacuum cleaning has finished.
7
Click on “Create Action” to finish the applet.
Now, every time your vacuum finishes cleaning, you will receive a text message alerting you to the completion. This applet saves you time and energy since you don’t have to check on your vacuum constantly to see if it’s finished cleaning.
Set your vacuum to start cleaning when you leave home
Another interesting applet idea for your smart vacuum cleaner is setting it to start cleaning when you leave home. This can be a great way to ensure that your floors are clean when you come back from a long day at work or other activities.
To create this applet, you will need to start by opening your IFTTT app and heading to the “Create” button to begin the process of creating a new applet. From there, you will need to select the “IF” section and choose the appropriate trigger. In this case, you will select the location trigger that will activate the applet when you leave home.
Next, you will need to link your location to IFTTT so that the app can track when you leave your home. You may need to grant permission for IFTTT to access your location data.
Once you have set up the trigger, you will need to move on to the “THEN” section and choose the action that you want your smart vacuum cleaner to perform. In this case, you will choose the action to start cleaning. You will need to link your smart vacuum cleaner to IFTTT so that the app can communicate with the device.
One thing to keep in mind when creating this applet is that it may be more suitable for a robot vacuum. Traditional vacuum cleaners may be too heavy and difficult to move around on their own, making it impractical to start cleaning when you leave home. However, there are many robot vacuum cleaners on the market that are specifically designed for this type of automation.
By creating an applet for your robot vacuum cleaner to start cleaning when you leave home, you can ensure that your floors are always clean without having to lift a finger. This can be especially useful if you have pets or children that create a lot of mess during the day.
Have your vacuum clean on specific days or times
Are you tired of manually turning on your smart vacuum cleaner every time your house needs cleaning? Well, you’re in luck because with IFTTT, you can have your vacuum clean on specific days or times without even lifting a finger.
Scheduling Your Vacuum Cleaning
Setting up a custom applet to schedule your vacuum cleaning is easy. In fact, it only takes a couple of minutes!
Step
Action
Description
1
Select “This”
In the “This” section, choose a trigger that will initiate the vacuum cleaning. You can select “Date & Time”, “Location”, “Google Assistant”, or even “Weather”. For scheduling specific days or times, choose “Date & Time”.
2
Specify the Time and Day
Set the day and time when you want the cleaning to begin. You can select specific days of the week, a specific time of the day, or both. For instance, you can schedule the cleaning for every Monday at 10 AM, or every day at 3 PM.
3
Select “That”
In the “That” section, choose the action you want to occur after the trigger. For scheduling your vacuum cleaning, select your vacuum cleaner as the device and set the action to “Start Cleaning”.
4
Create and Activate the Applet
Review your applet and then click on “Create” to save it. Once the applet is created, activate it by switching the toggle on. Now your vacuum will automatically start cleaning on the specified days and times!
Benefits of Scheduling Your Vacuum Cleaning
Scheduling your vacuum cleaning has many benefits. First, you don’t have to worry about when your house needs cleaning. You can simply set a schedule and forget about it. Second, scheduling helps you save time and energy. You don’t have to remember to turn on the vacuum every time you want to clean, and you can use that time to do other things. Finally, scheduling helps you maintain a consistent cleaning routine. By giving your vacuum specific times to clean, you can ensure that your home is always clean and tidy.
Scheduling your vacuum cleaning is a smart and efficient way to keep your home clean without any hassle. With IFTTT, you can easily create custom applets that will take care of the cleaning for you. So why wait? Try setting up a vacuum cleaning schedule today and enjoy a cleaner and more organized home!
Set your vacuum to stop cleaning when your pet enters the room
Are you tired of worrying about whether your smart vacuum cleaner will bump into your pets while cleaning? With IFTTT, you can create a custom applet that will automatically stop your vacuum’s cleaning cycle when your pet enters the room.
The logic behind this applet is simple: you’ll use a smart pet sensor that connects to IFTTT. When the sensor detects that your pet is in the same room as the vacuum, it will send a signal to the applet to halt the cleaning cycle.
To set up this applet, you’ll need a compatible smart pet sensor like the “SmartThings Arrival Sensor”. You’ll also need to ensure that your smart vacuum cleaner is connected to IFTTT.
Once you have everything set up, follow these steps to create your custom applet:
Step
<
Action
1
Open the IFTTT app
2
Create a new applet
3
Search for your pet sensor in the “If This” section
4
Select “Arrives in a room” as the trigger
5
Select your smart vacuum cleaner in the “Then That” section
6
Choose “Stop cleaning” as the action
7
Add any additional conditions or restrictions, such as restricting this applet to specific times of day
8
Activate the applet and start cleaning with peace of mind!
By creating this applet, you won’t have to worry about your pet’s safety while your vacuum is cleaning. You’ll have the freedom to let your vacuum clean autonomously without any concerns.
Conclusion
In conclusion, creating custom applets for your smart vacuum cleaner with IFTTT is a great way to enhance your cleaning experience and save time. With the ability to automate certain aspects of the cleaning process, you can focus on other important things while your vacuum does the work.
By connecting your smart vacuum cleaner to IFTTT and creating custom applets, you can turn on your vacuum when your smart lights turn off, receive a text message when your vacuum finishes cleaning, set your vacuum to start cleaning when you leave home, have your vacuum clean on specific days or times, and even set it to stop cleaning when your pet enters the room.
The possibilities for creating custom applets with IFTTT are endless, and with a little creativity, you can customize your smart vacuum cleaner to fit your specific needs and preferences. Plus, with IFTTT’s user-friendly interface, creating custom applets is easy and accessible for everyone.
So, if you want to take your smart vacuum cleaning experience to the next level, be sure to connect your device with IFTTT and start creating custom applets today. Your time and energy are valuable, and with IFTTT, you can make the most of both while keeping your home clean and tidy.
Frequently Asked Questions
1. Can I connect any smart vacuum cleaner to IFTTT?
It depends on whether your vacuum cleaner is compatible with IFTTT or not. Check with your vacuum cleaner’s manufacturer for compatibility.
2. Is IFTTT free to use?
Yes, IFTTT is free to use for personal accounts, but there is a paid version for businesses.
3. Can I use IFTTT applets with multiple smart devices?
Yes, you can use IFTTT applets with multiple smart devices as long as they are compatible with IFTTT.
4. How many applets can I create on IFTTT?
You can create as many applets as you want on IFTTT, there is no limit.
5. Can I share my applets on IFTTT with others?
Yes, you can share your applets on IFTTT with others by making them public.
6. Can I edit or delete my applets on IFTTT?
Yes, you can edit or delete your applets on IFTTT at any time.
7. Are there any security concerns when using IFTTT with smart home devices?
There have been some security concerns with using IFTTT with smart home devices, as it involves sharing personal information with a third-party app. Make sure to read the privacy policy and terms of service before connecting your devices.
8. What kind of smart home devices can I connect with my smart vacuum cleaner on IFTTT?
You can connect a variety of smart home devices with your smart vacuum cleaner on IFTTT, such as smart lights, smart locks, and smart thermostats.
9. Can I create custom voice commands for my vacuum cleaner using IFTTT?
Yes, you can create custom voice commands for your vacuum cleaner using voice assistants like Alexa or Google Assistant, which are integrated with IFTTT.
10. How often do I need to update my IFTTT applets?
You may need to update your IFTTT applets if there are changes to your smart home devices or if there are updates to the IFTTT service. It’s a good idea to check your applets periodically to make sure they are still working as intended.