Ways to avoid your smart vacuum cleaner getting stuck under furniture
Warning: A non-numeric value encountered in /var/www/html/wp-content/themes/generatepress/inc/structure/post-meta.php on line 165
by Dwight Gibson
Have you ever found yourself frustrated as you watch your vacuum cleaner get stuck under the furniture? It’s a common problem that can make cleaning more of a hassle than it needs to be. But fear not! There are several tips and tricks you can use to ensure that your vacuum cleaner navigates around your home with ease. From decluttering your floors to investing in accessories, there are plenty of ways to make your vacuum cleaner work smarter, not harder. Let’s explore these tips step-by-step and get your floors looking spick and span!
Table of Contents
Clean the path
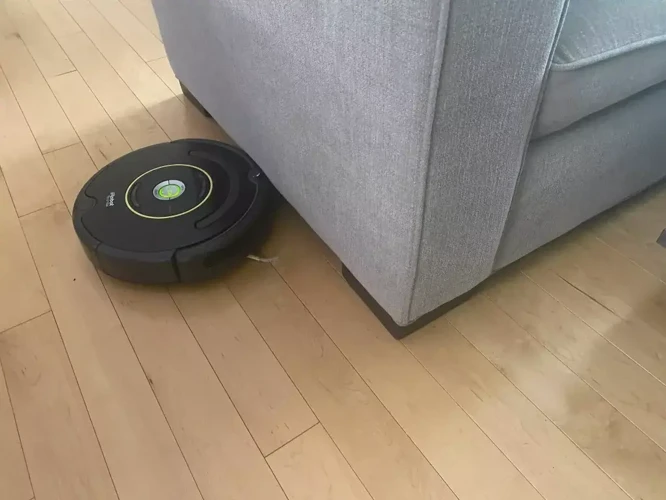
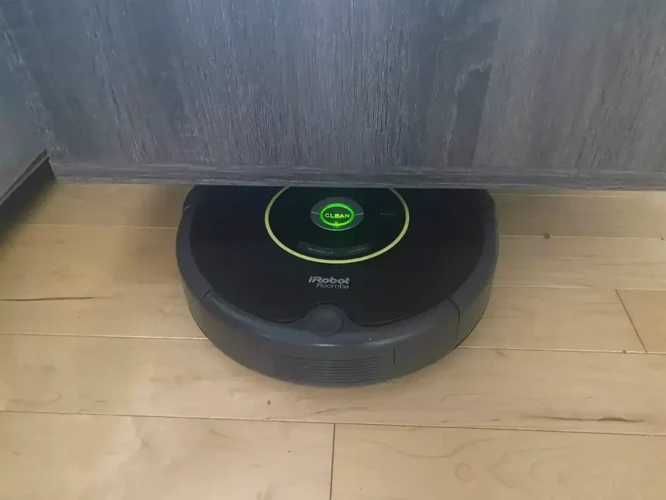
Keeping your home clean and dust-free can be a laborious task, especially if you have to maneuver around furniture and other obstacles. In the past, vacuuming was even more challenging since you had to do it manually. Nowadays, smart vacuum cleaners have simplified the process and made cleaning less time-consuming. However, even with the latest technology, your vacuum cleaner can still get stuck or tangled under furniture. To prevent this from happening, we’ve compiled a list of tips and tricks to help you clean your home efficiently and effectively. Let’s dive in! If you’re interested in preventing your smart vacuum cleaner from getting stuck, check out our article on how to prevent your smart vacuum cleaner from getting stuck.
1. Declutter the floor
To ensure that your smart vacuum cleaner can easily navigate around your home and clean every possible area, decluttering the floor is essential. This means removing any items that could hinder your device’s progress.
Here are some tips for decluttering your floors:
Tip
Description
1
Remove any large or bulky items such as furniture and toys
2
Pick up any small objects such as socks, shoes, and phone chargers
3
Clear cords and cables that can easily get tangled around your device and cause it to get stuck
4
Pick up clutter such as papers, magazines, and books that may be lying around on the floor
5
Remove any pet toys or pet bowls to prevent the vacuum from knocking them over and creating a mess
Remember that even the tiniest objects can cause your smart vacuum cleaner to get stuck. By decluttering your floors prior to cleaning, you can ensure that your device can move freely around and under furniture, making the cleaning process much more efficient.
For more information on why smart vacuums may get stuck and how to prevent it, you can check out our article on the top 5 reasons smart vacuums get stuck.
2. Secure loose rugs and carpets
Keeping your rugs and carpets in place is essential to prevent your smart vacuum cleaner from getting stuck. Loose rugs and carpets can be a nightmare for smart vacuums, causing them to get tangled or even damaged. So, ensure your carpets are secure and in place before you hit the start button. Here are some ways to do that:
Method
Description
Using a rug gripper pad
A rug gripper pad is an excellent way to keep your rugs and carpets secure. These pads feature a non-slip surface on the bottom that sticks to the floor and a non-slip surface on the top to keep your rugs in place. Simply place the pad under your rug or carpet, and it will prevent sliding.
Add some double-sided tape
You can use double-sided tape to secure your rugs and carpets in place. Simply apply some tape to the bottom of the rug and the floor, and press it down firmly. This not only helps to keep the rug in place but also stops the corners from curling up.
Opt for carpet tape
Another reliable method to keep your carpets in place is to use carpet tape. Carpet tape is a double-sided adhesive tape that can be used to stick all kinds of carpets and mats on the floor. It’s also ideal for high-traffic areas, where your smart vacuum cleaner is more likely to get stuck.
By following these methods, you can secure your rugs and carpets and prevent unexpected blockages in the cleaning process. It’s essential to keep your smart vacuum cleaner running smoothly to save time, energy, and reduce the risk of damage.
If you want to know more about how to prevent your smart vacuum cleaner from getting stuck, check out our article on smart vacuum cleaner stuck. And if you want to learn about how smart mapping can prevent your vacuum from getting stuck, read our article on smart mapping prevents vacuum stuck.
3. Check the cords and cables of devices under furniture
Electronics and gadgets can easily become snarled in the cords and cables that are frequently found under furniture. These snags not only impede the movement of your vacuum cleaner but can also result in expensive accidents that cause damage to your devices. So before you begin cleaning, take a moment to assess the situation and safeguard against the potential danger.
Here are some tips to help you check the cords and cables of devices under furniture:
Use a flashlight: Before you start moving any furniture around, use a flashlight to get a clear view of the cords and cables that are hidden beneath them. This will allow you to identify any problems beforehand.
Untangle the cords: Once you’ve identified any problems, take the time to straighten out and untangle the cords. This will not only prevent your vacuum cleaner from getting stuck but will also protect your devices from being yanked or pulled by tangled cords.
Secure the cords: Once you have untangled the cords, secure them in place so that they are out of the way. Use clips or fasteners to keep them together and attached to the wall or floor. This will help to prevent them from becoming tangled again and causing a hazard.
Remove cords where possible: If there are any cords that are no longer being used, or that don’t serve a vital purpose, remove them. This will reduce the number of cords that you need to worry about when vacuuming your floors.
Label cords: Another way to avoid confusion is to label your cords. Use tags or markers to identify which cord corresponds to each device. This will prevent you from unplugging the wrong device when you need to move something around.
By taking the time to check and organize the cords and cables under your furniture, you will be able to prevent accidents and ensure that your vacuum cleaner can move around with ease. These simple steps can end up saving you time, money, and hassle in the long run.
4. Close the doors of rooms you don’t want your vacuum to enter
Closing the doors of certain rooms you don’t want your vacuum to enter might seem like a no-brainer, but it’s a step that is often overlooked. Here’s why it’s important and how to do it right:
Why it matters:
Closing doors to certain rooms helps your vacuum concentrate on the areas you do want it to clean. This is especially important in cases where you don’t want the vacuum to vacuum up cords or small items that are not meant to be cleaned up. Additionally, it helps prevent the vacuum from accidentally getting stuck or trapped in small spaces, reducing wear and tear on the device.
How to do it:
1. Identify the rooms you don’t want the vacuum to enter.
2. Make sure the doors are closed securely so the vacuum won’t be able to enter.
3. If there are any doors that don’t close completely or stay open on their own, consider using a doorstop or another blocking device to keep them closed.
Remember, the point of using a vacuum cleaner is to make cleaning easier, not harder. By taking simple steps like closing doors to unwanted areas, you can make the whole process faster and more effective.
5. Get rid of obstacles and clutter around the furniture
When it comes to ensuring a smooth and efficient vacuuming process, getting rid of any obstacles and clutter around the furniture is extremely important. It not only helps in preventing any damage to the vacuum cleaner and the furniture, but also helps in ensuring thorough cleaning. Below are some tips to help you get rid of the clutter effectively:
Clear the floor: Before running the vacuum cleaner, take some time to clear the floor of any small objects like toys, shoes, or stray pieces of paper that could get sucked up in the vacuum or clog it.
Put away loose items: Remove any loose items like magazines, books, or cushions and keep them in a safe place. These items may get sucked up or cause the vacuum cleaner to get stuck underneath the furniture.
Remove small rugs: If possible, remove any small rugs that are not secured to the floor. This will prevent the vacuum cleaner from getting stuck on the edges or corners of the rug. If the rug cannot be removed, be sure to secure it firmly in place.
Arrange furniture: Rearrange light furniture like chairs, small tables, or ottomans to create easy pathways for the vacuum cleaner. This will help the cleaner reach tight spaces around or under the furniture.
Eliminate cords: Remove or organize any cords or cables that may be found around the furniture. These can cause the vacuum cleaner to get tangled or stuck, and also pose a tripping hazard to you or your family members.
By taking these simple tips into account, you can ensure that your vacuum cleaner runs smoothly and that it thoroughly cleans the space without any damage or hiccups.
6. Move light furniture to clean hard to reach places
When it comes to cleaning hard-to-reach places, sometimes we need to take extra measures to ensure that every inch of our floor is free from dirt and dust. By moving some light furniture, we can make the job a lot easier for our smart vacuum cleaner. Here are some tips on how to do it effectively:
Tip
Description
1. Decide which furniture to move
Before moving anything, think about which pieces of furniture are light enough to be moved without risking damage to them or the floor. Avoid moving heavy or fragile pieces that may be difficult to move or cause scratches on the floor. Also, keep in mind the size and weight of your smart vacuum cleaner, and make sure the furniture is not blocking its way.
2. Lift the furniture with care
When lifting the furniture, make sure to use proper lifting techniques to avoid hurting yourself. Bend your knees, keep your back straight, and use your legs to lift the furniture, not your back. Also, avoid dragging the furniture as it can cause scratches on the floor. Instead, lift the furniture and carry it to the desired location.
3. Clean under the furniture
Once the furniture is in its new location, use your smart vacuum cleaner to clean the hard-to-reach places that were previously hidden. Make sure to move the cleaner in different directions to cover the entire surface area. You may also want to use the crevice tool to reach tight spots, and the brush tool to clean upholstery and fabric.
4. Put the furniture back in place
After cleaning under the furniture, put the piece back in its original position. Make sure to lift the furniture with care, and avoid dragging it. Also, check that the piece is level and stable before putting anything back on top of it. This will prevent damage to the furniture and items on top of it.
Moving light furniture is a smart way to ensure that your smart vacuum cleaner can clean hard-to-reach places effectively. By following these tips, you can make sure that the process is safe, efficient, and hassle-free. Remember to always take care when moving furniture to avoid damage to your floor and belongings.
Invest in accessories
Are you tired of constantly getting stuck under furniture? Do you want to make your cleaning routine more efficient and effortless? Perhaps it’s time to consider investing in some accessories for your vacuum cleaner. These affordable and handy gadgets can help you clean smarter and avoid frustration caused by obstacles and narrow spaces. Let’s explore some of the most useful accessories that can transform your cleaning experience.
1. Magnetic strips to create boundaries
If you have areas in your home that you don’t want your vacuum cleaner to enter, magnetic strips can be a lifesaver. These strips are thin, flexible and equipped with strong magnets that create a virtual boundary the vacuum won’t cross. Using these strips is an excellent way to protect valuable items such as expensive vases, antique statues, or fragile electronics. Below are some pros and cons of using magnetic strips for creating boundaries.
Pros
Cons
Quick and easy installation: Magnetic strips are simple to install and can be cut to fit any shape or size, making them a convenient solution for a wide range of spaces.
May require some experimentation: You may need to move the strips around a bit to find the perfect placement, so be prepared to experiment a little before finding the right spot.
No need for additional hardware: Since the magnets on the strips are strong, there’s no need for additional hardware, like anchors or screws. This keeps the installation process quick and uncomplicated.
Not suitable for all surfaces: Magnetic strips do not work well on carpets or uneven surfaces, which can limit where you can use them in your home.
Reusable: The strips can be removed and reused multiple times, which makes them a cost-effective solution in the long run.
May not be aesthetically pleasing: Some homeowners may find the strips to be unattractive or may not want them to be visible in their homes.
Magnetic strips are a great accessory for creating boundaries and keeping your vacuum cleaner operating smartly. While they may not be perfect for every situation, they can still be an immensely valuable tool in your cleaning arsenal.
2. Wheel attachments to raise height
Are you tired of your vacuum cleaner getting stuck under low-lying furniture? Then investing in wheel attachments that raise the height of your vacuum might be the solution you need. These attachments are essential for households with furniture that has low undercarriages or thick carpeting that are difficult for the vacuum to navigate underneath.
Here are some features of wheel attachments that raise the height of your vacuum:
Improved suction power: The raised height of the vacuum allows for improved suction power, ensuring that the vacuum cleans more effectively.
Height adjustment: Some wheel attachments come with adjustable heights to ensure that you can fit your vacuum under furniture of different heights.
Easy installation: They are easy to install and can be attached to the vacuum without the need for any special tools or technical expertise.
Compatibility: They are compatible with many vacuum models, though it is always advisable to check beforehand whether an attachment is compatible with your vacuum model.
Durability: The attachments are made of durable materials and are built to withstand the weight of the vacuum.
With wheel attachments that raise the height, vacuuming becomes a breeze as you no longer have to worry about the vacuum getting stuck or damaging your furniture. It is important to note that while these attachments can significantly improve the performance of your vacuum, they should be used in conjunction with other tips for smart vacuum cleaning and not relied upon solely. By combining the use of wheel attachments with other techniques such as virtual mapping and decluttering the floor, you can keep your home neat and tidy hassle-free.
3. Lighthouse to navigate smartly
When it comes to vacuuming under furniture, one of the biggest challenges is navigating in tight spaces where the vacuum may easily get stuck. This is where a lighthouse accessory for your smart vacuum cleaner can come in handy.
What is a lighthouse?
A lighthouse is a small device that you can use with some smart vacuum cleaners to help guide the vacuum in areas that may be more difficult to navigate. It emits a signal that allows the vacuum to detect its position and use it as a point of reference while cleaning.
How does it work?
A lighthouse consists of an infrared beam that is transmitted to the vacuum cleaner. The vacuum cleaner uses this beam as a guide to move around in the room. When the vacuum cleaner comes close to the lighthouse, it sends a signal to the vacuum cleaner to slow down or stop, depending on the setting you choose.
What are the benefits of using a lighthouse?
Using a lighthouse can have several benefits when vacuuming under furniture. Firstly, it allows the vacuum cleaner to clean more efficiently since it can navigate more easily around furniture, avoiding getting stuck or knocking over objects in its path. Additionally, it can reduce the amount of time and effort it takes to clean since the vacuum can complete the task without requiring as much manual intervention.
Are there any downsides?
While a lighthouse can be a valuable addition to your smart vacuum cleaner, it’s important to recognize that it may not be suitable for all homes. If you have a lot of furniture or obstacles in your home, you may find that the lighthouse doesn’t work as well as you had hoped, and it may not be worth the investment.
If you’re looking for a way to make cleaning under furniture easier, a lighthouse may be a worthwhile investment. Just remember to consider your home’s layout and furniture placement before making a decision.
4. Protective bumper to avoid damage to furniture
When it comes to vacuum cleaning, sometimes accidents happen and your vacuum cleaner can hit your furniture, leaving unsightly marks and scratches. But you can avoid this inconvenience by investing in a protective bumper. This accessory is a simple but effective solution that creates a cushion between your vacuum cleaner and furniture, protecting them from damage. Let’s take a closer look at some benefits of using a protective bumper:
Benefit
Description
Prevents damage
A protective bumper creates a barrier between your vacuum and your furniture, preventing scratches, dents, and other damage.
Reduces noise
Most bumpers are made of soft and noise-absorbing materials which help reduce the noise of the vacuum cleaner when it hits objects.
Easy to install
Most protective bumpers are easy to install and will fit on most vacuum cleaners without requiring any tools. They just clip onto the plastic housing of your cleaner.
Affordable
Protective bumpers often come at an affordable price, which means you can save money on furniture repairs or replacements.
Variety of options
Protective bumpers come in various sizes and shapes to fit different vacuum cleaner models and types. You can find them in different materials, like rubber or foam, and in different colors to match your vacuum and your decor.
Investing in a protective bumper will not only help you avoid damaging your furniture, but it will also reduce noise, save you money in the long run and give you peace of mind while vacuuming. So, if you’re worried about accidentally hitting or scratching your favorite furniture piece, consider purchasing a protective bumper to keep them safe.
Virtual map
Are you tired of your vacuum cleaner getting stuck under furniture and wasting precious time? Fortunately, with modern technology, you can say goodbye to this frustrating experience once and for all. One of the most useful features available in high-quality vacuums is the ability to create a virtual map of the room. By utilizing this technology, you can save a considerable amount of time and optimize your cleaning process. But how does it work, and what are some tips for using it efficiently? Let’s dive into the world of virtual mapping and explore how it can revolutionize your cleaning routine.
1. Create a virtual map of the space
Creating a virtual map of the space is an important step to ensure that your smart vacuum cleaner can clean the entire area efficiently. This feature is available in most modern vacuum cleaners and is designed to help the vacuum cleaner navigate around the space it is cleaning. To create a virtual map of the space, follow the steps below:
Turn on the vacuum cleaner and activate the mapping feature: Most vacuum cleaners that have mapping features require you to activate the feature manually. Check the user manual to find out how to activate the mapping feature on your vacuum cleaner.
Let the vacuum cleaner roam around the space: Once you have activated the mapping feature, let the vacuum cleaner move around the space freely. The vacuum cleaner will use its sensors and cameras to create a map of the space.
Check the virtual map: Once the vacuum cleaner has completed mapping the space, you can check the virtual map on your device. The virtual map will show you the areas that the vacuum cleaner has cleaned as well as the areas that it has not cleaned. You can use this map to send the vacuum cleaner back to areas that it missed.
Having a virtual map of the space will help the smart vacuum cleaner navigate around the areas that need cleaning and avoid areas that have already been cleaned. This will save you time and effort in the long run as the vacuum cleaner will only clean the areas that need cleaning. Make sure that you update the virtual map regularly as the layout of your space may change over time. Keep your virtual map up to date, and your smart vacuum cleaner will continue to work efficiently for years to come.
2. Check if the software is up to date
When it comes to ensuring your smart vacuum cleaner is performing at peak efficiency, it’s important to regularly check if the software is up to date.
Why is this important?
Software updates often contain bug fixes and performance enhancements that can improve the overall functionality and cleaning performance of your vacuum.
How to check for software updates?
This process can vary depending on the brand and model of your vacuum cleaner. However, most smart vacuums can be connected to a mobile app that allows you to check for and install software updates.
To check for updates, open the accompanying app on your smartphone or tablet and navigate to the settings menu. From there, you should be able to see if any updates are available and follow the prompts to download and install them.
What if there are no updates available?
If you find that there are no available updates for your smart vacuum cleaner, it’s still a good idea to periodically check for any new developments. Manufacturers will often release updates in response to customer feedback or to address new technological advancements.
By ensuring that your vacuum’s software is up to date, you’ll be able to optimize your cleaning efforts to reach every corner and crevice of your home.
3. Monitor the cleaning process from your device
One of the most convenient features of modern smart vacuum cleaners is the ability to monitor their cleaning process from your device. This means that you can easily keep an eye on the progress without having to physically be in the same room as the vacuum.
Why Monitor the Cleaning Process?
There are several reasons why monitoring the cleaning process is beneficial. Firstly, it allows you to ensure that your vacuum is cleaning your home thoroughly and efficiently. You can easily check if there are any areas that have been missed or if the vacuum has encountered any issues or errors during its cleaning cycle.
How to Monitor the Cleaning Process
To monitor the cleaning process of your smart vacuum cleaner, you will typically need to use a companion app or website provided by the manufacturer. This app will allow you to view real-time updates and metrics, such as the current cleaning status, cleaning time, and battery life.
Benefits of Monitoring the Cleaning Process
One of the main benefits of monitoring the cleaning process is that it allows you to manage your time effectively. You can check the progress of the cleaning cycle and estimate how much time is remaining, making it easier to plan your day.
Monitoring the cleaning process can also help you detect any potential issues or errors. For example, if you notice that the vacuum is spending a lot of time cleaning one small area, it could be a sign that there is an obstacle blocking its path. You can address this issue quickly and easily, ensuring that your vacuum is operating at peak efficiency.
Monitoring the cleaning process of your smart vacuum cleaner is an excellent way to ensure that your home is always clean and tidy. With just a few taps on your device, you can track the progress of the cleaning cycle and address any issues that arise, helping you save time and keep your home looking its best.
Benefits of Monitoring
How to Monitor
Why Monitor
Manage your time effectively
Use companion app or website
Ensure thorough and efficient cleaning
Detect potential issues or errors
View real-time updates and metrics
Check progress and estimate remaining time
4. Schedule the cleaning for convenient time
Schedule the cleaning for convenient time
One of the most convenient features of a smart vacuum cleaner is the ability to schedule cleaning sessions. This means that you don’t have to manually start the vacuum every time you want to clean. Instead, you can set a schedule for the vacuum to automatically start cleaning at specific times of the day or week. This is a great option if you have a busy schedule and want to ensure that your floors are always clean.
To schedule your cleaning session, you’ll need to use the companion app that comes with your vacuum cleaner. The app will allow you to set the date and time for your cleaning session, as well as choose the cleaning mode and intensity.
Here is a table highlighting the steps for scheduling a cleaning session:
Step 1:
Open the companion app on your device
Step 2:
Select the “Schedule” option
Step 3:
Set the date and time for your cleaning session
Step 4:
Choose the cleaning mode and intensity
Step 5:
Save your settings
By following these simple steps, you can easily schedule your cleaning sessions and ensure that your floors are always clean. This is a great way to save time and ensure that your home is always looking its best. Plus, with the ability to customize the cleaning mode and intensity, you can be sure that your vacuum is cleaning your floors exactly the way you want it to.
Conclusion
In conclusion, keeping your floors clean and free of dirt and debris is crucial to maintaining a healthy and comfortable home. Investing in a smart vacuum cleaner can make your life easier and save you time, allowing you to focus on other important tasks.
By following these tips for using a smart vacuum cleaner, you can ensure that you get the most out of your investment. Decluttering the floor, securing loose rugs and carpets, checking cords and cables, closing off rooms, and getting rid of obstacles and clutter around furniture are all important steps to take before starting the cleaning process.
Accessories like magnetic strips, wheel attachments, lighthouses, and protective bumpers can help you navigate obstacles and clean hard-to-reach places easily. Virtual maps also provide an efficient way to monitor the cleaning process, schedule cleanings at a convenient time, and update software when necessary.
Overall, taking these steps to clean your floors will not only improve the air quality in your home but also extend the life of your flooring. With the right tools and techniques, you can keep your floors clean without getting stuck under furniture, which ultimately means less time spent cleaning and more time enjoying your space. So invest in a smart vacuum cleaner and enjoy a cleaner home today!
Frequently Asked Questions
1. Can I use a vacuum cleaner on all types of floors?
Yes, but make sure to adjust the height settings for different floor types to avoid damaging them.
2. How often should I clean my vacuum cleaner?
It’s recommended to clean your vacuum’s filter and brush roll after every use and give it a thorough clean once a month.
3. Is it safe to leave my vacuum cleaner unattended while it’s cleaning?
No, it’s not recommended to leave your vacuum cleaner unattended while it’s cleaning as it could potentially pose a safety hazard.
4. Can I use a vacuum cleaner to remove pet hair?
Yes, many vacuum cleaners come with specialized attachments for removing pet hair from carpets and upholstery.
5. How do I know when my vacuum cleaner’s bag or bin needs to be emptied?
You’ll know it’s time to empty the bag or bin when suction power decreases or when the bag or bin is full.
6. Can I use a vacuum cleaner to clean my curtains?
Yes, vacuum cleaners can be used to clean curtains using the upholstery attachment. Make sure to adjust the suction setting for delicate fabrics.
7. How do I maintain my vacuum cleaner’s suction power?
To maintain your vacuum cleaner’s suction power, clean the filter and brush roll regularly, and check for obstructions in the hose or nozzle.
8. Can I use my vacuum cleaner to clean my car interior?
Yes, vacuum cleaners can be used to clean the interior of your car using the crevice tool and upholstery attachment.
9. How do I store my vacuum cleaner?
When not in use, store your vacuum cleaner in a dry, clean place, and wrap the cord around the hooks provided.
10. Can a vacuum cleaner handle large debris like cereal or rice?
Some vacuum cleaners come with larger debris pickup capabilities, but generally, it’s recommended to sweep up large debris before vacuuming to avoid clogs and damage to the vacuum.