Introduction
As we embrace the age of the smart home, our cleaning routine has also undergone a revolution with the invention of smart vacuum cleaners. These cleaners rely on advanced technology, including anti-collision sensors, to keep our homes spick and span without exhausting ourselves. However, with constant use, these sensors can become dirty or damaged, leading to performance issues. In this guide, we’ll explore the importance of cleaning and maintaining anti-collision sensors in your smart vacuum cleaner to keep it functioning at its best. From preparations to step-by-step instructions, we’ve got you covered. So, let’s dive in!
What are Anti-Collision Sensors?
Anti-collision sensors are a crucial component of smart vacuum cleaners that help them navigate around obstacles and clean efficiently. These sensors work by detecting objects in the robot’s path and adjusting its trajectory, thus preventing the robot from crashing into obstacles and causing damage.
Here are some common types of anti-collision sensors:
- Bumper sensors – these are physical sensors that detect an impact when the robot makes contact with an obstacle.
- Active infrared sensors – these sensors emit infrared beams that are reflected back into the sensor by obstacles in the robot’s path. The sensor can then calculate the distance and location of the object based on the reflection time and intensity of the beam.
- Passive infrared sensors – these sensors detect the temperature of objects in the robot’s path and can detect the presence of an obstacle based on differences in temperature.
- Ultrasonic sensors – these sensors emit high-frequency sound waves that bounce back to the sensor when they encounter an obstacle. The sensor can determine the distance and location of the object based on the time it takes for the sound wave to return.
These sensors are a vital component of any robotic vacuum cleaner and are essential for ensuring the robot operates safely and efficiently. If the sensors are not working correctly, it can lead to crashes, drops, and other issues. It’s important to regularly clean and maintain these sensors to ensure that they continue working correctly.
link: /tech-anti-collision-sensors/
Why Clean and Maintain Anti-Collision Sensors?
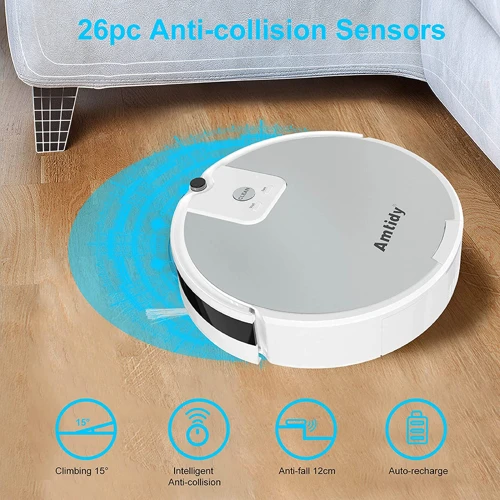
Maintaining and cleaning the anti-collision sensors in your smart vacuum cleaner is crucial to ensure a thorough and effortless cleaning experience. These sensors can detect obstacles in the way, such as furniture and walls, and direct the vacuum cleaner to navigate around them without causing any damage. However, without proper maintenance and cleaning, your smart vacuum may not clean as efficiently and may cause damage to your furniture or flooring. Regular cleaning and maintenance minimizes the risk of faulty operation and increases the longevity of the sensors. In the next sections, we will discuss the importance of maintaining and cleaning your anti-collision sensors, the advantages of regular maintenance, and the best practices to clean and maintain them. If you want to learn more about other types of sensors in smart vacuums, check out our article on drop sensors.
Reasons Behind Cleaning
Regular cleaning of the anti-collision sensors is essential to keep them in good working condition. Dirt, dust, and debris can accumulate on the sensors, which can affect their ability to detect obstacles while cleaning. Below are some reasons why cleaning the anti-collision sensors is important:
| Reasons Behind Cleaning Anti-Collision Sensors | Explanation |
| Improved Performance | If the sensors are not cleaned regularly, they will become ineffective at detecting obstacles which can lead to poor performance of the smart vacuum cleaner. |
| Increased Lifespan | Dirt and debris can cause damage and wear to the sensors. Regular cleaning can help in maintaining the sensors and increasing their lifespan. |
| Reduced Malfunction | Without proper cleaning, the sensors can malfunction and stop working entirely, which may lead to costly repairs or replacement of the sensors. |
| Improved Efficiency | Clean sensors can detect obstacles more accurately, allowing the vacuum cleaner to navigate around furniture and other obstacles more efficiently. |
| Protects Flooring | Dirty sensors can also cause damage to the flooring by rubbing against it, and properly maintained sensors will avoid any scuffs or scratches. |
Cleaning the anti-collision sensors in your smart vacuum cleaner is essential for improving its performance, increasing its lifespan, and avoiding costly repairs or replacements. By regularly maintaining the sensors, you can also improve the efficiency of the vacuum cleaner and protect your flooring from damage caused by dirty sensors.
Advantages of Regular Maintenance
Regular maintenance of anti-collision sensors in your smart vacuum cleaner can bring several advantages. It can not only extend the lifespan of the device but also provide effective cleaning of the house. In addition to this, here are a few more benefits of keeping your sensors well-maintained:
| Advantages | Explanation |
|---|---|
| Better Performance: | Regular cleaning of sensors ensures they are free from debris, dust, and dirt. This eliminates the chances of misreading obstacles which will enable the vacuum cleaner to move freely and complete its cleaning task efficiently. |
| Improved Accuracy: | Maintaining the anti-collision sensors of your smart vacuum cleaner helps to keep the sensors in perfect working condition. This ensures accurate reading of the obstacle, minimizing the chances of collision, which ultimately reduces the damage of both the device and furniture/objects you have in your house. |
| Longer Lifespan: | Regular care and attention of the sensors can prevent damage to the device, maximizing its lifespan. Keeping the sensors clean and well-maintained reduces the risk of malfunction and saves money on repairs or replacement. |
| Efficient Cleaning: | When the sensors of your smart vacuum cleaner are well-maintained, they can accurately read the surroundings and clean your house more efficiently. This ensures that your smart vacuum cleaner cleans up every nook and cranny that needs cleaning. |
Having said that, sensor issues can still arise even with regular maintenance, and it’s best to know how to troubleshoot such issues.
Preparations Before Cleaning
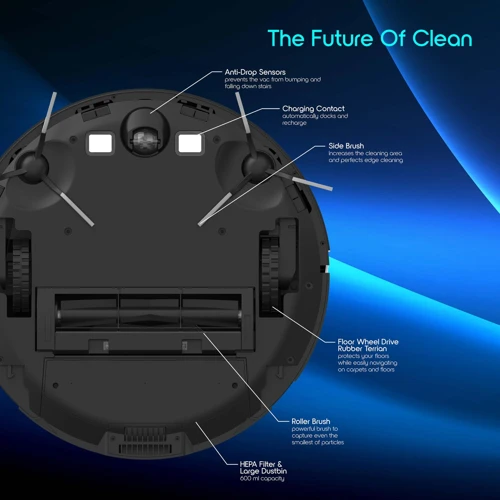
Before diving into how to clean and maintain anti-collision sensors in your smart vacuum cleaner, it is important to take some necessary precautions. Proper preparations are essential to avoid any damage to the sensors and make sure they work efficiently. These steps will ensure that the cleaning process is safe and effective. So, what are the preparations you need to take before cleaning? Let’s take a look.
Firstly, gather all the necessary cleaning tools and solutions that won’t cause any damage to the sensors. Secondly, go through the manufacturer’s guidelines on how to clean the sensors. These guidelines will give you insight into any specific cleaning procedures that need to be followed. It’s important to follow these guidelines to avoid damage and voiding the warranty.
Lastly, it’s important to understand the importance of anti-collision sensors in your smart vacuum and how innovations in anti-collision sensors are improving the capabilities of smart vacuums. By utilizing these sensors, smart vacuums can detect obstacles in your home and clean around them, making cleaning more efficient and effective. To learn more about the latest innovations in anti-collision sensors in the smart vacuum market, check out our article /innovations-anti-collision-sensors-smart-vacuum-market/.
Things You Will Need
Before cleaning and maintaining anti-collision sensors in your smart vacuum cleaner, you need to gather a few essential things, which include:
- Clean cloth: To wipe the sensors clean without leaving lint or scratches on them, a soft, clean, and dry cloth is a must-have. It is better to use microfiber or lint-free cloth to avoid any residual filaments on the sensors.
- Isopropyl alcohol: This is a great cleaning agent that evaporates quickly and doesn’t leave behind any residue.
- Cotton swabs: You will need cotton swabs to clean the corners and hard-to-reach areas of the sensors.
- Compressed air can: Compressed air can help blow away any dust, hair, or debris that may have accumulated on the sensors or inside the unit.
Make sure to gather all these items before you initiate the cleaning process for optimal results. Using the wrong cleaning agents or tools can damage the anti-collision sensors, and you don’t want that to happen. Additionally, always follow the manufacturer’s instructions and safety guidelines while cleaning the sensors as a precautionary measure.
Tips for Safe Cleaning
When cleaning anti-collision sensors in your smart vacuum cleaner, it is important to take certain precautions to ensure that you do not damage the delicate components. Here are some tips for safe cleaning:
| Tips for Safe Cleaning |
|---|
| 1. Turn off the vacuum cleaner – Before performing any cleaning, make sure that the vacuum cleaner is turned off and unplugged to prevent any accidents or damage to the device. |
| 2. Use a soft cloth or brush – When cleaning the sensors, use a soft cloth or brush to avoid scratching or damaging the surface. Avoid using any abrasive or sharp objects that could scratch or damage the sensors. |
| 3. Avoid using water or cleaning agents – Anti-collision sensors are sensitive to water and certain cleaning agents. Avoid using water or any cleaning agents that could damage the sensors. Instead, use a dry cloth or brush to gently remove any dirt or debris. |
| 4. Clean in a well-lit area – Cleaning the sensors requires precision and attention to detail. To ensure that you do not miss any spots or damage any components, clean in a well-lit area where you can easily see what you are doing. |
| 5. Be gentle and patient – Cleaning anti-collision sensors requires a gentle touch and patience. Do not rush the process or use excessive force, as this could damage the sensors or other components of the vacuum cleaner. |
By following these tips for safe cleaning, you can ensure that your smart vacuum cleaner’s anti-collision sensors remain in good condition, allowing your device to navigate efficiently and effectively around your home.
How to Clean Anti-Collision Sensors?
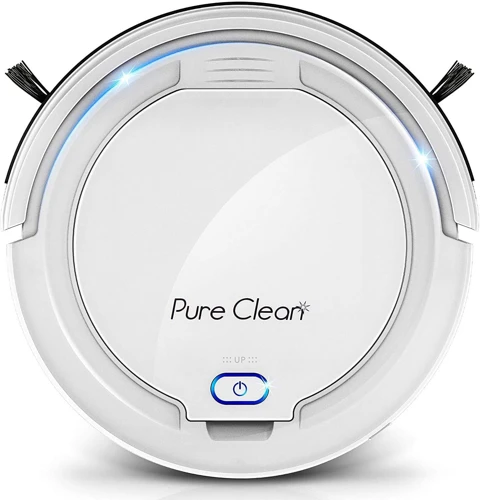
As the saying goes, “prevention is better than cure,” this is very applicable when it comes to the maintenance of your smart vacuum cleaner’s anti-collision sensors. Regular cleaning and maintenance of these sensors can guarantee their efficient performance and prolonged lifespan. If you want to know how to keep your sensors in top shape, then keep on reading. In this section, we will provide you with a step-by-step guide on how to clean and maintain anti-collision sensors of your smart vacuum cleaner. So, roll up your sleeves and get ready to make your vacuum cleaner sensors sparkle again!
Step-by-step Guide on Cleaning Sensors
To ensure the proper functioning of your smart vacuum cleaner’s anti-collision sensors, regular cleaning is necessary. Follow these step-by-step instructions to keep them in great condition:
- Step 1: Turn off your smart vacuum cleaner – Before starting the cleaning process, make sure to turn off your device to avoid any accidental damage.
- Step 2: Locate the sensors – Anti-collision sensors are typically located on the bumper of your smart vacuum cleaner. Look closely at the bumpers to identify the sensors’ location.
- Step 3: Clean the sensors with a soft cloth – Using a soft, lint-free cloth or microfiber towel, gently wipe the sensors on the bumper. Make sure not to press too hard or scratch the sensor’s surface.
- Step 4: Use a cleaning solution – If your sensor surface is dirty or has stubborn stains, slightly dampen your cleaning cloth with a mild cleaning solution. Avoid using harsh chemicals or abrasive cleaning pads as it may damage the sensor’s surface.
- Step 5: Dry the sensors – Once the sensors are cleaned, use a dry cloth to carefully wipe the sensor’s surface to remove any excess moisture. Do not use a hairdryer or any heat source to dry it quickly.
- Step 6: Turn on the smart vacuum cleaner – Once the sensors are clean and dry, turn on your device to ensure that the sensors are functioning correctly.
Remember that the sensors are delicate and require gentle handling, or they might get damaged. Be sure to follow these steps to avoid accidents and prolong the lifespan of your smart vacuum cleaner’s anti-collision sensors.
Things to Avoid While Cleaning
When it comes to cleaning anti-collision sensors, there are a few things you should avoid doing to prevent damaging the delicate components. Here are some important things to keep in mind:
- Avoid using harsh chemicals: Cleaning agents that contain harsh chemicals like bleach or ammonia can damage the sensors. Stick to mild cleaning solutions like soapy water or alcohol-based cleaners.
- Do not spray cleaning solution directly on the sensors: Spraying the solution directly on the sensors can cause moisture to seep inside and damage the inner workings. Instead, dampen a soft cloth or q-tip with the solution and gently wipe down the sensors.
- Do not submerge the vacuum cleaner: Submerging the vacuum cleaner, even briefly, can cause serious damage not only to the sensors but also to other parts of the machine. Stick to cleaning the sensors with a damp cloth or q-tip.
- Avoid using rough or abrasive materials: Rough materials like wire brushes or scouring pads can scratch the sensors’ surface and cause permanent damage. Instead, use a soft and lint-free cloth to clean the sensors.
- Do not overload the sensors with pressure: Applying too much pressure when cleaning can damage the sensors. Apply gentle pressure and use a light touch when wiping down the sensors with a cloth or q-tip.
By avoiding these common cleaning mistakes, you can ensure that your vacuum cleaner’s anti-collision sensors stay in good working condition for years to come. Remember to approach the cleaning process with care and take your time to avoid any potential damage to these essential components.
How to Maintain Anti-Collision Sensors?
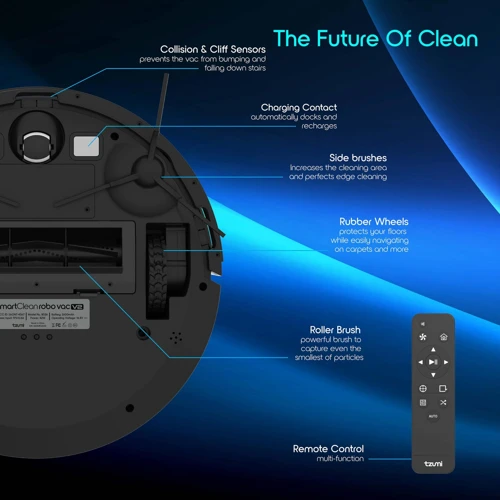
Once you have cleaned your anti-collision sensors, the next crucial step is to maintain them. Regular maintenance not only extends the lifespan of your smart vacuum cleaner, but it also ensures that the sensors continue to function optimally. In this section, we will walk you through the best ways to maintain your anti-collision sensors and provide you with some quick tips that will help you prevent any future issues that may arise. So, grab a cup of coffee, sit back, and let’s delve into maintaining your smart vacuum cleaner’s anti-collision sensors.
Schedule Regular Maintenance
Maintaining anti-collision sensors is not a one-time task, it is an ongoing process that requires regular attention. To ensure that your smart vacuum cleaner’s anti-collision sensors work efficiently, you need to schedule regular maintenance checks.
Here are some tips for scheduling regular maintenance checks:
- Set a reminder on your phone or calendar to check the sensors once a month.
- Check the sensors after every use to ensure that they are functioning properly.
- Create a schedule that works for you, and stick to it. Consistency is key when it comes to regular maintenance.
The benefits of scheduling regular maintenance checks include:
- Early detection of any issues or malfunctions in the sensors.
- Improving the longevity of your smart vacuum cleaner.
- Maintaining the efficiency of the sensors, ensuring that they work as intended.
Regular maintenance is essential for the durability of your vacuum cleaner’s anti-collision sensors. By keeping up with the maintenance schedule, you can make sure that the sensors remain in tip-top condition and continue to work effectively for years to come.
Quick Tips on Sensor Maintenance
Maintaining the anti-collision sensors in your smart vacuum cleaner on a regular basis can help to extend their lifespan and prevent any unexpected malfunctions. Here are some quick tips that can come in handy when it comes to sensor maintenance:
- Keep the sensors clean: One of the easiest ways to ensure that the sensors continue to function accurately is by regularly wiping them down with a dry and soft cloth. Make sure to remove any dust, dirt, or debris that may have accumulated on the sensors over time.
- Avoid harsh cleaning agents: Using abrasive cleaning agents such as ammonia or bleach can damage the sensors and reduce their effectiveness. It is recommended to use mild cleaning agents or simply water when cleaning the sensors.
- Check the sensors regularly: Conduct a visual inspection of the sensors from time to time to ensure that they are in good working condition. Look out for any signs of damage, cracks, or scratches on the sensors, and replace them immediately if you notice any issues.
- Handle the sensors carefully: The anti-collision sensors are delicate components of the vacuum cleaner and should be handled with care. Avoid exerting excess pressure on them while cleaning or moving the vacuum cleaner around.
- Store the vacuum cleaner properly: When not in use, it is important to store the vacuum cleaner in a dry and secure place to prevent any damage to the sensors from exposure to moisture or dust.
By following these quick tips, you can ensure that the anti-collision sensors in your smart vacuum cleaner continue to function optimally and serve their purpose effectively. Remember, regular sensor maintenance is the key to keeping your vacuum cleaner running smoothly and efficiently.
Troubleshooting Common Issues
Even with regular cleaning and maintenance, anti-collision sensors on smart vacuum cleaners can sometimes encounter issues. If you’re experiencing problems with your vacuum’s sensors, don’t worry – many common problems can be fixed easily at home. In this section, we’ll go over the top 5 issues that can affect your anti-collision sensors and give you some tips on how to troubleshoot and fix them. Be prepared to put on your detective hat and get to the bottom of any sensor-related problems!
Top 5 Issues That Affect Anti-Collision Sensors
After prolonged usage, Anti-Collision Sensors in your smart vacuum cleaners may face several issues that could cause them to malfunction. Here are the top 5 issues that can affect Anti-Collision Sensors:
| Issue | Description |
| 1. Obstruction | Obstructions on the Anti-Collision Sensors can trigger a false signal. |
| 2. Dirt and Dust Accumulation | Over time, Dirt and dust can accumulate on the Anti-Collision sensors, causing them to misinterpret signals. |
| 3. Malfunctioning Sensor Components | If the sensor’s components start to malfunction, it may not be able to function correctly. |
| 4. Wrong Placement | If the sensors are not placed correctly, they may not be able to detect walls and obstacles, and eventually, cause damage to the vacuum. |
| 5. Battery Issue | If the battery power is low or exhausted, the Anti-Collision Sensors would not be able to provide correct signals. |
It is essential to troubleshoot when these issues arise and rectify them as soon as possible to avoid any further damage to your smart vacuum cleaner.
How to Fix Them?
If you encounter any issues with your anti-collision sensors, don’t worry as most of them can be easily fixed. Here are the top 5 issues you may face and how to fix them:
1. Sensors Not Detecting Obstacles
- Check if there is any obstruction or dirt on the sensor surface. Clean it gently following the instructions mentioned earlier.
- Make sure that the sensor is not covered with any plastic or adhesive residue. In some cases, the protective covering is not removed by the manufacturer, so you need to peel it off before using the vacuum cleaner.
- Confirm that the sensor is not malfunctioning. Contact the manufacturer or a professional repair center for further assistance.
2. Sensors Detecting Nonexistent Obstacles
- Inspect the sensor surface for any dirt or debris that might trick the sensor into detecting obstacles that don’t exist. Remove any residue from the surface.
- Check whether the lighting conditions in the room are adequate for the sensor to function correctly. Bright light or dark environments can sometimes cause false positives on the sensors.
- If the issue persists, reprogram the vacuum cleaner according to the instructions in the user manual.
3. Sensors Not Turning On or Off Automatically
- Check if the sensors have the toggle switch ON/OFF properly positioned. Sometimes, the switch can be turned off accidentally.
- Confirm that the vacuum cleaner is equipped with the necessary sensors and that they are functioning correctly. Some models don’t have sensors that turn on or off automatically.
- Reboot the vacuum cleaner by pressing the reset button or unplugging it for a minute before connecting it back.
4. Sensors Producing Error or Warning Messages
- Read the messages displayed on the vacuum cleaner’s LCD display and check the manual that came with the device for a possible solution.
- Make sure that the sensors are not covered with adhesive residue or dirt, which might cause the error message to appear.
- Consult with the manufacturer’s customer support or a professional technician to fix the error message.
5. Sensors Malfunctioning or Damaged
- If the issue persists or the sensors are visibly damaged, replace them with new ones. Contact the manufacturer or an authorized repair center for assistance.
- It is not recommended to try fixing damaged sensors on your own as this may cause further issues or damage to the vacuum cleaner.
By following these steps, you can easily troubleshoot and fix any issues with your anti-collision sensors, ensuring that your smart vacuum cleaner functions optimally.
Conclusion
As we come to the end of our guide on cleaning and maintaining anti-collision sensors in your smart vacuum cleaner, it’s vital to stress the importance of regular upkeep for optimal performance. By following the steps we’ve outlined and implementing the tips we’ve given, you can extend the lifespan of your sensors and help your vacuum cleaner function flawlessly for years to come. Remember, prevention is always easier than fixing issues that arise due to negligence. Keep your smart vacuum cleaner in tip-top condition and enjoy the benefits of a hassle-free cleaning experience.
Final Thoughts on Maintaining Anti-Collision Sensors
Maintaining anti-collision sensors in your smart vacuum cleaner is an essential task that ensures the longevity and reliability of your device. Regular cleaning and maintenance of these sensors prevent issues such as crashing, poor navigation, and even robot breakdowns. Here are some final thoughts on maintaining anti-collision sensors effectively:
- Be consistent: Set a regular cleaning and maintenance schedule for your vacuum cleaner’s anti-collision sensors. This will ensure that they are always performing at their best.
- Pay attention to the environment: Observe your environment and adjust your sensors accordingly. If you have a cluttered space, your sensors may require more frequent cleaning and maintenance.
- Use the right tools: Ensure you use the right cleaning tools to avoid damaging or scratching the sensors. Avoid using sharp tools or abrasive cleaning agents that can harm the device.
- Be patient: Cleaning and maintaining anti-collision sensors takes time and patience. Rushing the process can lead to incomplete cleaning, which can affect the efficiency of the sensors.
- Replace damaged sensors: If a sensor is damaged or not working as it should, don’t hesitate to replace it. Contact the manufacturer or seek professional assistance to replace the faulty sensor.
By following these tips, you can keep your anti-collision sensors in top condition and eliminate the need for costly repairs or replacements. Remember to always prioritize your vacuum cleaner’s maintenance, so it can consistently deliver the best performance and keep your home clean and tidy.
Frequently Asked Questions
What are the symptoms of dirty anti-collision sensors?
Dirty anti-collision sensors can cause your smart vacuum cleaner to bump into furniture, walls, and other obstacles. You may also notice that the cleaning time is taking longer than usual.
Do I need to clean the anti-collision sensors on my smart vacuum cleaner?
Yes, it is important to regularly clean and maintain the anti-collision sensors on your smart vacuum cleaner to ensure proper functionality and longevity.
How often should I clean my smart vacuum cleaner’s anti-collision sensors?
It is recommended to clean the anti-collision sensors every two weeks, or more often if you notice any issues with the sensors.
What should I use to clean the anti-collision sensors?
You can use a soft, dry cloth or a cotton swab to clean the anti-collision sensors. If necessary, you can also use a small amount of isopropyl alcohol on the cloth or cotton swab.
Can I use water to clean the anti-collision sensors?
No, you should not use water to clean the anti-collision sensors as it can damage the sensitive components.
What are some tips for safe cleaning of anti-collision sensors?
Make sure the smart vacuum cleaner is turned off and unplugged before cleaning. Use gentle pressure and avoid getting any liquids or cleaning solutions on the sensors.
What are some common issues with anti-collision sensors?
Common issues include dirty sensors, sensors blocked by furniture, sensors not properly calibrated, and sensor malfunction or damage.
How do I troubleshoot issues with my smart vacuum cleaner’s anti-collision sensors?
You can troubleshoot issues by checking for blockages or obstructions, cleaning the sensors, and ensuring the sensors are properly calibrated. If issues persist, refer to the manufacturer’s manual or contact customer support.
What are the benefits of regularly maintaining my smart vacuum cleaner’s anti-collision sensors?
Regular maintenance can help prolong the life of your smart vacuum cleaner and improve its overall performance by ensuring the sensors are functioning properly.
What happens if I don’t clean or maintain my smart vacuum cleaner’s anti-collision sensors?
If you don’t clean or maintain the anti-collision sensors, it can lead to poor performance and potentially damage the sensors, resulting in costly repairs or replacement.
