How to Clean Your Smart Vacuum Cleaner’s HEPA Filter
Warning: A non-numeric value encountered in /var/www/html/wp-content/themes/generatepress/inc/structure/post-meta.php on line 165
by Dwight Gibson
Have you ever noticed that your smart vacuum cleaner’s performance isn’t what it used to be? Does it leave behind dust and dirt or make more noise than usual? Chances are, your HEPA filter needs a good cleaning. But how do you do that? Don’t worry, we’ve got you covered with the ultimate guide to clean your smart vacuum cleaner’s HEPA filter. Keep reading to learn why cleaning your HEPA filter is important, how often to do it, and step-by-step instructions on how to clean it properly. Say goodbye to subpar suction and say hello to a freshly cleaned home!
Table of Contents
Why is Cleaning Your HEPA Filter Important?
The HEPA filter is an essential component of a smart vacuum cleaner. It traps microparticles and contaminants that would otherwise be released into the air during vacuuming. However, over time, the filter gets clogged with dirt, dust, and other debris, reducing its efficiency. This is why cleaning your HEPA filter is of utmost importance.
What is a HEPA Filter?
HEPA stands for High-Efficiency Particulate Air, and HEPA filters can capture microscopic particles with an efficiency rating of 99.97%. The filter contains a fine mesh of glass fibers that create a barrier to trap dust, pollen, pet dander, and other allergens.
Why Does it Need Cleaning?
When the filter gets clogged with dirt, dust, and debris, the vacuum cleaner’s suction power is reduced, making it difficult to clean carpets and floors effectively. A clogged filter can also cause the vacuum cleaner’s motor to overheat, which can damage the unit and lead to costly repairs. Cleaning the HEPA filter regularly is essential to keep the vacuum cleaner functioning efficiently.
Keeping the HEPA filter clean is also critical for people with asthma, allergies, and other respiratory conditions. HEPA filtration has been proven to reduce indoor air pollution, making it easier for people with asthma and allergies to breathe comfortably. A dirty HEPA filter can negate the benefits of using a smart vacuum cleaner with HEPA filtration.
It is important to clean the HEPA filter regularly to minimize the risk of indoor air pollution and keep the vacuum cleaner functioning efficiently. But how often should you clean the filter? The next section of the article will address this.
When you hear the term HEPA filter, it’s easy to assume it’s just a regular air filter. However, HEPA filters are not just any kind of filter. HEPA stands for High-Efficiency Particulate Air and these filters are designed to trap the smallest particles that otherwise escape other filters. In fact, HEPA filters can capture up to 99.97% of particles at 0.3 microns, which is why they’re becoming more and more prevalent when it comes to air filtration. HEPA filters are not just for air purification. They’re also used in various appliances including vacuum cleaners. In this article, we’ll explore why HEPA filters need cleaning, how to clean them, when to replace them, and more, specifically focusing on HEPA filters in smart vacuums.
Why Does it Need Cleaning?
As mentioned earlier, the HEPA filter in your smart vacuum cleaner plays a crucial role in maintaining good indoor air quality. However, if the filter is not clean, it can lead to a host of problems. Here are some reasons why it is essential to clean your HEPA filter regularly:
1. Maintains Performance: The filter captures dust, dirt, and allergens, which can accumulate quickly, causing the vacuum cleaner’s performance to drop. This can make cleaning less efficient, and you may notice your vacuum cleaner is struggling to pick up debris.
2. Extends the Lifespan: By cleaning the HEPA filter regularly, you are extending the lifespan of the filter itself, as well as the vacuum cleaner. By not cleaning the filter, the motor of the vacuum cleaner is forced to work harder, potentially causing damage.
3. Improves Indoor Air Quality: A dirty HEPA filter is not able to trap pollutants efficiently. This means all of the dust and allergens that the filter should be capturing ends up back in the air you breathe, reducing indoor air quality. This can worsen allergies or asthma symptoms for people who suffer from these conditions.
4. Reduces Indoor Pollution: HEPA filters are known for their ability to reduce indoor air pollution. However, if the filter is dirty, it can’t do its job well, and the air quality in your home can be compromised. A dirty filter can also release trapped pollutants back into your house, which can be harmful to your health.
It is crucial to clean the HEPA filter in your smart vacuum cleaner regularly to achieve optimal performance, extend its lifespan, improve indoor air quality, and reduce indoor pollution.
Knowing how often to clean your HEPA filter is essential to maintain the efficiency and longevity of your smart vacuum cleaner. The frequency of cleaning your HEPA filter primarily relies on the frequency of use and the environment where you use the vacuum cleaner.
If you use the vacuum cleaner daily, it is advisable to clean the HEPA filter once every two weeks. But, if you use it only a few times a week, then cleaning the filter once every three months should suffice. However, if you have pets, allergies, or asthma, it is recommended to clean the filter once a week. This is because pets shed hair and dander, which can clog the filter, while allergies and asthma can worsen if the filter is not appropriately cleaned.
Another way to know if your HEPA filter needs cleaning is to follow the manufacturer’s guidelines. Most smart vacuum cleaners come with instructions on when to clean and replace the HEPA filter. The manual will also have information on how frequently you should clean the filter based on your specific model.
It is crucial to understand that failing to clean the HEPA filter as often as necessary can cause clogging, which can lead to decreased performance, higher energy consumption, and eventual malfunction. Clogging can also lead to the development of mold, bacteria, and unpleasant odors, which can be harmful to your health. Hence, it is essential to make sure you clean your HEPA filter as per the recommended frequency.
If you fail to clean your HEPA filter regularly, it can cause it to wear and tear faster, which can result in replacement costs. Ultimately, cleaning the HEPA filter is a maintenance task that ensures your smart vacuum cleaner serves you for a more extended period while improving air quality in your home.
Now that you know how often to clean your HEPA filter, let’s dive into the detailed cleaning process in the next section.
How to Clean Your HEPA Filter?
Cleaning the HEPA filter on your smart vacuum cleaner is a straightforward process that involves a few simple steps. Here is an ultimate guide for cleaning your smart vacuum cleaner’s HEPA filter step-by-step.
Gather the Supplies
Before you begin the cleaning process, gather all the necessary supplies. You will need a soft bristle brush or a clean, dry microfiber cloth, a pair of scissors, and a vacuum cleaner.
Unplug and Disassemble the Vacuum Cleaner
Before you start the cleaning process, unplug the vacuum cleaner from the power source. Then, disassemble the vacuum cleaner to access the HEPA filter.
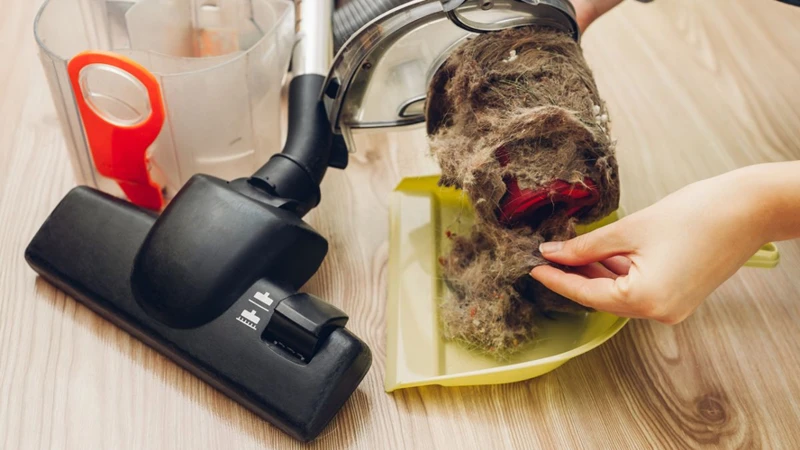
Locate the HEPA Filter
Locate the HEPA filter inside your smart vacuum cleaner. You can use the user manual that came with the cleaner to help you locate the filter. In most cases, the filter is located near the bottom of the vacuum cleaner or underneath the dirt container.
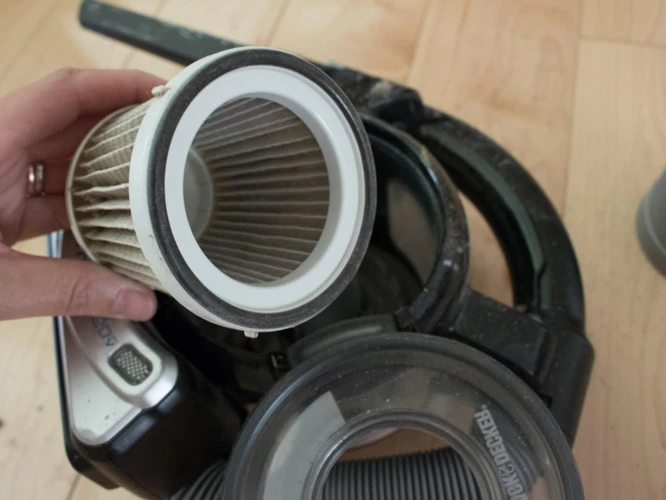
Clean the Filter
Once you have located the filter, you can start cleaning it. First, remove the filter from the vacuum cleaner. Use a soft bristle brush or a clean, dry microfiber cloth to gently brush away any dust, dirt, or debris from the filter. If you notice stubborn dirt, you can use a pair of scissors to carefully cut away the dirt or debris.
Reassemble the Vacuum Cleaner
After you have cleaned the HEPA filter, reinsert it back into the vacuum cleaner using the user manual’s instructions. Then, reassemble the vacuum cleaner.
What to Avoid When Cleaning Your HEPA Filter?
While cleaning HEPA filter on a smart vacuum cleaner, there are some things that you should avoid. Do not use water or any liquid cleaners as it can damage the filter. Avoid brushing the HEPA filter too hard as it can damage the filter’s thin and delicate membranes.
How to Know If Your HEPA Filter Needs Replacement?
Knowing when to change the HEPA filter is essential since it becomes less effective over time. The recommended timeframe for changing the HEPA filter is usually after six months. To know if the filter needs to be replaced, you can check the user manual to know the recommended replacement time.
Cleaning the HEPA filter of your smart vacuum cleaner is crucial in keeping your home free from harmful allergens. By following these simple steps mentioned above, you can easily clean your HEPA filter without damaging it. Regular cleaning of the HEPA filter will prolong its lifespan, and when it’s time to replace it, use only genuine HEPA filters that meet your vacuum cleaner’s specifications.
Gather the Supplies
Before you start cleaning your smart vacuum cleaner’s HEPA filter, you need to gather all the essential supplies that will make the task a lot easier. You don’t want to run around looking for the things you need in the middle of cleaning the filter. Make sure you have a soft-bristled brush for removing debris, a microfiber cloth for wiping the filter, and a replacement HEPA filter, in case the current one needs replacement. These essential supplies will allow you to thoroughly clean your HEPA filter, ensuring that your vacuum cleaner runs efficiently.
Before you begin cleaning your HEPA filter, it’s important to unplug and disassemble your vacuum cleaner to ensure your safety. Never attempt to clean your HEPA filter while your vacuum cleaner is still plugged in. Follow these steps to safely disassemble your vacuum cleaner:
Step 1: Remove any attachments or accessories that may be attached to the vacuum cleaner.
Step 2: Remove the canister or dustbin from the vacuum cleaner. This will reveal the filter compartment.
Step 3: Depending on the make and model of your vacuum cleaner, you may need to remove additional parts such as the brush roll, belt or nozzle. Refer to the manufacturer’s instructions to determine what parts need to be removed.
Step 4: Set aside the removed parts in a safe place to avoid misplacing them or damaging them during the cleaning process.
Once you have disassembled your vacuum cleaner, you can proceed to cleaning the HEPA filter. Remember to take note of the order of the removed parts, so it will be easier for you to re-assemble the vacuum cleaner later.
Locate the HEPA Filter
When it comes to cleaning your smart vacuum cleaner’s HEPA filter, the first important step is to locate it. The location of the HEPA filter can vary depending on the brand and model of your smart vacuum cleaner. However, it is typically located in or near the dustbin or canister.
To locate the HEPA filter, follow these general steps:
Step 1:
Refer to your vacuum cleaner’s manual for specific instructions on locating the HEPA filter. If you don’t have the manual, don’t worry! Most manufacturers have their manuals available online for download.
Step 2:
Unplug your vacuum cleaner and place it on a flat surface.
Step 3:
Open the dustbin or canister of your vacuum cleaner. This is where you usually find the HEPA filter.
Step 4:
Check for a small compartment or a latch that holds the filter in place.
Step 5:
Once you locate the HEPA filter, remove it carefully. Take note of its position to ensure proper reassembly later.
It’s important to handle the HEPA filter carefully while removing it as it can be fragile and easily damaged. Some vacuum cleaners have multiple filters, so be sure to carefully inspect each one and note their locations.
Once you have located the HEPA filter, you’re ready to move on to the cleaning process. But first, gather all necessary cleaning supplies to ensure a thorough cleaning.
Clean the Filter
To clean your HEPA filter, follow these simple steps:
Step 1: Hold your filter over a trash can and gently tap it to remove as much debris as possible.
Step 2: Use a soft-bristled brush to gently remove any remaining dirt and dust. It’s important to be gentle to avoid damaging the filter.
Step 3: If the filter is still dirty, use a vacuum cleaner with a brush attachment to gently remove any remaining debris. Again, be gentle to avoid damaging the filter.
Step 4: If your vacuum cleaner’s filter is washable, rinse it under running water. Be sure to use cold water to avoid damaging the filter’s fibers.
Step 5: Once the filter is clean, set it aside to air dry completely before putting it back in the vacuum cleaner. It’s important to wait until the filter is completely dry to avoid mold or bacteria growth.
Remember to clean your HEPA filter regularly to ensure the best performance from your vacuum cleaner. Ignoring regular cleaning can lead to clogged filters, which reduce suction power and may even damage your vacuum cleaner in the long run.
Reassemble the Vacuum Cleaner
Now that you have successfully cleaned your HEPA filter, it’s time to put everything back in place and reassemble your vacuum cleaner. This process is rather simple and can be done within a few minutes if you follow the below steps carefully.
Step 1: Start by inserting the HEPA filter back into its compartment. Make sure that it’s properly aligned and secured in its place.
Step 2: Next, replace or clean any other filters that you removed earlier from the vacuum cleaner. Check the manufacturer’s instructions to see whether or not they need to be replaced or simply cleaned.
Step 3: Reattach the dustbin or bag back to the vacuum cleaner. Make sure that it’s firmly in place before moving to the next step.
Step 4: Reattach the hoses and nozzles that you removed earlier. Ensure that they are properly connected and tightened so that there are no loose connections.
Step 5: Finally, plug the vacuum cleaner back in and turn it on to test its functionality. If everything is working properly, you’re good to go.
Reassembling your vacuum cleaner correctly is crucial. Otherwise, the vacuum may not work as it should, or the filter may not function effectively. So, make sure to follow the steps properly and check twice to ensure everything is correctly assembled.
Step 1:
Insert the HEPA filter back into its compartment
Step 2:
Replace or clean any other filters
Step 3:
Reattach the dustbin or bag back to the vacuum cleaner
Step 4:
Reattach the hoses and nozzles
Step 5:
Plug the vacuum cleaner and turn it on to test
What to Avoid When Cleaning Your HEPA Filter?
When cleaning your HEPA filter, there are some things that you need to avoid to ensure that the filter remains in good condition and continue functioning efficiently. Using water or liquid cleaners is one of the things that you need to avoid. HEPA filters are designed to trap and filter small particles, including liquid droplets. Using water or liquid cleaners can damage the filter by making it wet or causing the trapped particles to clump together, making it difficult to remove them.
Another thing to avoid is brushing the filter too hard. HEPA filters are delicate and can easily get damaged if not handled with care. Brushing the filter too hard can cause tears, rips, or distortions that can reduce its filtration efficiency. Instead of brushing the filter, you can opt to use a soft-bristled brush to gently remove the dirt and debris trapped in the filter.
Also, avoid using compressed air to clean your HEPA filter. Although compressed air can quickly dislodge dirt and debris from the filter, it can also push the particles deeper into the fibers, making it difficult to remove them. Using compressed air can cause the filter fibers to fray or tear, which can affect its performance.
Lastly, you should avoid exposing your HEPA filter to extreme temperatures, direct sunlight, or fire. The filter is made of materials that can easily melt, shrink, or deform under extreme conditions. Ensure that you store your HEPA filter in a cool, dry place, away from direct sunlight or sources of heat.
By avoiding these mistakes, you can be sure that your HEPA filter will last longer and continue to provide efficient filtration of particles in your home.
Don’t Use Water or Liquid Cleaners
Keeping your smart vacuum cleaner in top-notch shape is essential to keep your living space clean and healthy. As you work to clean the HEPA filter, it is important to note that not all cleaning methods are suitable. To avoid damaging your filter, it is crucial to understand what not to do. So, let’s take a closer look at why you shouldn’t use water or liquid cleaners on your smart vacuum’s HEPA filter, and what the right method is.
Don’t Brush the Filter Too Hard
When it comes to cleaning a HEPA filter, it might be tempting to use a brush to remove any stubborn dust and debris. However, it’s important to be gentle when cleaning a HEPA filter, as harsh brushing can damage the delicate fibers in the filter and compromise its efficacy. Here are some tips to keep in mind when cleaning your HEPA filter:
Avoid using stiff-bristled brushes: While it might be tempting to reach for a stiff-bristled brush, doing so can damage the filter’s delicate fibers. Instead, use a soft-bristled brush or a microfiber cloth to gently remove dust and debris from the surface of the filter.
Don’t scrub the filter: Scrubbing the filter vigorously can cause the fibers to fray and break. Instead, use a gentle tapping or patting motion to remove any loose dirt or debris.
Be gentle: When handling the filter, be gentle and avoid bending or folding it, as this can also damage the fibers.
Supervise children and pets: If you’re cleaning your HEPA filter in a household with children or pets, make sure to keep a close eye on them to prevent them from accidentally damaging the filter or coming into contact with any harmful dust or debris.
By being gentle and following these tips, you can keep your HEPA filter in top condition and ensure that it continues to effectively remove allergens and other airborne particles from your home.
How to Know If Your HEPA Filter Needs Replacement?
Over time, even with regular cleaning, your HEPA filter will start to show signs of wear and tear. It may get clogged up with debris and particles, and that can lead to a loss in suction power. When this happens, it may be time to replace the filter.
One way to know if your HEPA filter needs replacement is to check its color. Most HEPA filters are white or off-white when they are new. Over time, with regular use and cleaning, they become gray or black. If the filter has turned gray or black, it’s an indication that it’s not working effectively anymore.
You can also check the suction power of your vacuum cleaner to determine if the HEPA filter needs replacement. If you notice that your vacuum cleaner is not picking up dirt and dust as well as it used to, it may be due to a clogged HEPA filter. A clogged filter reduces the suction power of the vacuum cleaner, as it is unable to pull in air as effectively.
Another sign that your HEPA filter needs replacement is if you notice a musty smell coming from your vacuum cleaner. This is an indication that the filter has become saturated with dirt, dust, and other particles, which can also lead to the growth of mold and bacteria. This can be harmful to your health, especially if you have allergies or respiratory issues.
Ultimately, the lifespan of your HEPA filter depends on a variety of factors, including the frequency of use, the type of debris that it collects, and the quality of the filter itself. However, a good rule of thumb is to replace the filter every 6-12 months, to ensure that it’s working effectively and keeping your home clean and healthy.
Conclusion
After following the steps outlined in this ultimate guide, you should now have a clean and efficient HEPA filter for your smart vacuum cleaner. Remember that cleaning your HEPA filter is an essential maintenance task that should be performed regularly.
By cleaning your HEPA filter: you’ll ensure that your vacuum cleaner continues to perform at its best, and it’ll help improve the air quality in your home. When your filter is clean, it can trap allergens and pollutants more effectively, reducing the risk of allergies and other respiratory issues.
Remember that: a dirty HEPA filter not only reduces the effectiveness of your vacuum cleaner, but it can also cause overheating and unnecessary wear and tear on the device, leading to costly repairs or replacements.
Take the time to perform regular maintenance: on your smart vacuum cleaner, including cleaning the HEPA filter, to extend its lifespan and ensure it’s working at its peak performance level. And always remember to follow the manufacturer’s instructions and recommendations for cleaning and replacing your HEPA filter.
So, start now! Gather the supplies, unplug and disassemble the vacuum cleaner, locate the HEPA filter, clean it, and reassemble the vacuum cleaner. With a little effort and attention to detail, you can easily keep your smart vacuum cleaner running at its best for years to come.
Frequently Asked Questions
1. How often should I clean my HEPA filter?
You should clean your HEPA filter every three to six months or as needed depending on usage.
2. What happens if I don’t clean my HEPA filter?
If you don’t clean your HEPA filter, it can become clogged and lose its effectiveness. This will result in decreased suction and air flow, reducing the efficiency of your vacuum cleaner.
3. Do I need any special supplies to clean my HEPA filter?
No, you do not need any special supplies. You can clean your filter using a soft-bristled brush and a vacuum cleaner.
4. Can I wash my HEPA filter?
No, you should never wash your HEPA filter with water or liquid cleaners. This can damage the filter and reduce its effectiveness.
5. How do I disassemble my vacuum cleaner?
To disassemble your vacuum cleaner, refer to the manufacturer’s instructions or user manual. Alternatively, you can search for online tutorials or videos that demonstrate how to disassemble your specific model.
6. How do I know if my HEPA filter needs to be replaced?
You may notice a decrease in suction and air flow, or a musty odor emanating from your vacuum cleaner. If this is the case, it may be time to replace your HEPA filter.
7. Can I clean my HEPA filter with a liquid cleaner?
No, you should never clean your HEPA filter with a liquid cleaner. This can damage the filter and reduce its effectiveness.
8. Why is it important to clean my HEPA filter?
Cleaning your HEPA filter improves the suction and air flow of your vacuum cleaner, which increases its effectiveness. It also reduces the buildup of dust, allergens, and other particles, improving the indoor air quality of your home.
9. What if I don’t have a soft-bristled brush?
If you don’t have a soft-bristled brush, you can use a clean, dry paintbrush or toothbrush to gently remove debris from your filter.
10. How do I reassemble my vacuum cleaner?
To reassemble your vacuum cleaner, simply follow the manufacturer’s instructions or user manual in reverse order. Make sure all the pieces are properly aligned and securely fastened before turning your vacuum cleaner back on.